

Canvas implements magnifying glass effect
Picture magnifying glass
Effect
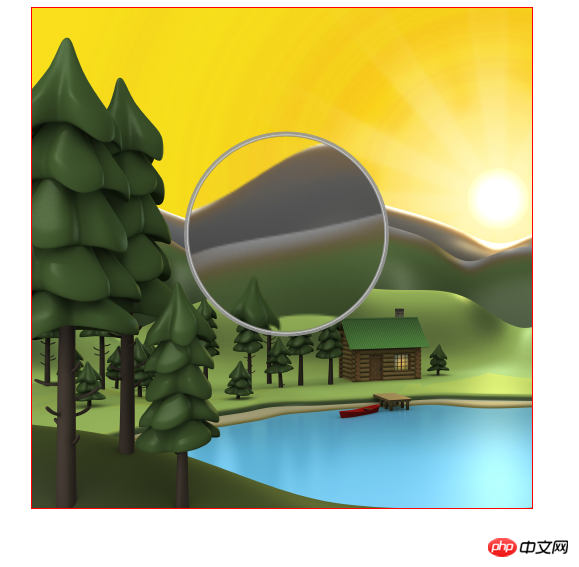
Online demonstration source code
Principle
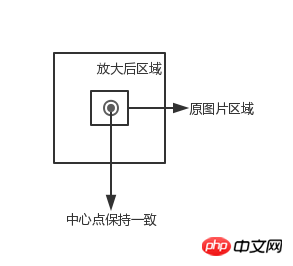
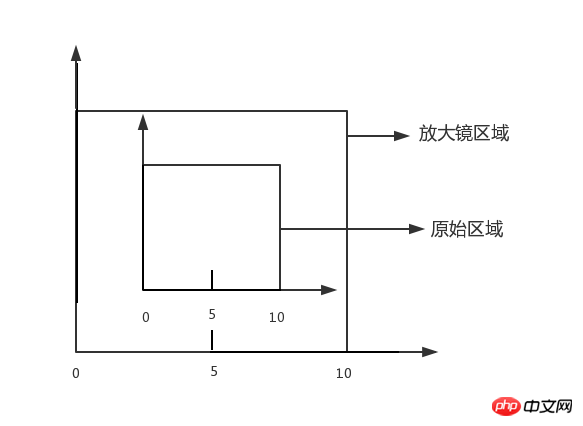
## First select an area of the picture , then enlarge this area, and then draw it on the original picture, ensuring that the center points of the two areas are consistent, as shown in the following figure:
Initialization<canvas id="canvas" width="500" height="500">
</canvas>
<img src="image.png" style="display: none" id="img">
tag to preload the image, About image preloading, you can see here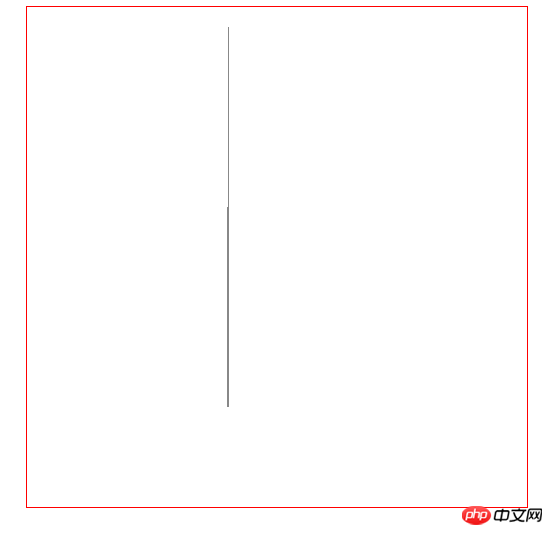
var canvas = document.getElementById("canvas");
var context = canvas.getContext("2d");
var img = document.getElementById("img");
// 图片被放大区域的中心点,也是放大镜的中心点
var centerPoint = {};
// 图片被放大区域的半径
var originalRadius = 100;
// 图片被放大区域
var originalRectangle = {};
// 放大倍数
var scale = 2;
// 放大后区域
var scaleGlassRectangle
function drawBackGround() {
    context.drawImage(img, 0, 0);
}
Here we use the position of the mouse as the center point of the magnified area (the magnifying glass moves as the mouse moves), because the canvas When drawing a picture, you need to know the coordinates of the upper left corner and the width and height of the area, so here we calculate the range of the area
function calOriginalRectangle(point) {
    originalRectangle.x = point.x - originalRadius;
    originalRectangle.y = point.y - originalRadius;
    originalRectangle.width = originalRadius * 2;
    originalRectangle.height = originalRadius * 2;
}
Drawing the magnifying glass area
Cropping area
A magnifying glass is generally circular. Here we use the clip function to cut out a circular area, and then draw the magnified image in this area. Once a certain area is clipped, all future drawings will be limited to this area. Here we use the save and restore methods to clear the impact of the clipped area. save saves the current state of the canvas, including the context attributes of the canvas, such as style, lineWidth, etc., and then pushes this state into a stack. restore is used to restore the state of the last save and pop the top-most state from the stack.context.save();
context.beginPath();
context.arc(centerPoint.x, centerPoint.y, originalRadius, 0, Math.PI * 2, false);
context.clip();
......
context.restore();
Calculate the magnifying glass area
Obtain the area through the center point, the width and height of the magnified area and the magnification factor The coordinates of the upper left corner and the width and height of the area.scaleGlassRectangle = {
x: centerPoint.x - originalRectangle.width * scale / 2,
y: centerPoint.y - originalRectangle.height * scale / 2,
width: originalRectangle.width * scale,
height: originalRectangle.height * scale
}
Drawing pictures## Here we use context.drawImage(img,sx,sy,swidth,sheight ,x,y,width,height); method, will The canvas itself acts as a picture, then takes the image of the magnified area and draws it into the magnifying glass area.
context.drawImage(canvas,
    originalRectangle.x, originalRectangle.y,
    originalRectangle.width, originalRectangle.height,
    scaleGlassRectangle.x, scaleGlassRectangle.y,
    scaleGlassRectangle.width, scaleGlassRectangle.height
);## CreateRadialGradient is used to draw gradient images
context.beginPath();
var gradient = context.createRadialGradient(
    centerPoint.x, centerPoint.y, originalRadius - 5,
    centerPoint.x, centerPoint.y, originalRadius);
gradient.addColorStop(0, 'rgba(0,0,0,0.2)');
gradient.addColorStop(0.80, 'silver');
gradient.addColorStop(0.90, 'silver');
gradient.addColorStop(1.0, 'rgba(150,150,150,0.9)');

context.strokeStyle = gradient;
context.lineWidth = 5;
context.arc(centerPoint.x, centerPoint.y, originalRadius, 0, Math.PI * 2, false);
context.stroke();Add mouse event
## Add mouse movement event for canvas
canvas.onmousemove = function (e) {
    ......
}Convert coordinates
The coordinates obtained by mouse events are generally screen or window coordinates, and we need to convert them to canvas coordinates. getBoundingClientRect Used to obtain the left, top, right and bottom positions of an element on the page relative to the browser window.
function windowToCanvas(x, y) {
    var bbox = canvas.getBoundingClientRect();
    return {x: x - bbox.left, y: y - bbox.top}
}Modify the mouse style
We can modify the mouse style through css
#canvas {
    display: block;
    border: 1px solid red;
    margin: 0 auto;
    cursor: crosshair;
}Chart magnifying glass
We may be based on canvas When drawing some charts or images, if the coordinates of two elements are relatively close, it will have some impact on the selection of elements. For example, if we draw two lines, the coordinates of one line are (200.5, 400) -> (200.5, 200), and the coordinates of the other line are (201.5, 400) -> (201.5, 20), then the two lines will almost overlap, as shown in the following figure:
The effect of using the chart magnifying glass

Principle
类似于地图中的图例,放大镜使用较为精确的图例,如下图所示: 在放大镜坐标系统中,原始的区域会变大,如下图所示 绘制原始线段 首先创建一个线段对象 初始化线段 绘制线段 计算原始区域和放大镜区域 计算线段在新坐标系统的位置 由原理图我们知道,放大镜中使用坐标系的图例要比原始坐标系更加精确,比如原始坐标系使用 1:100,那么放大镜坐标系使用
1:10,因此我们需要重新计算线段在放大镜坐标系中的位置。同时为了简便,我们将线段的原始坐标进行了转化,减去原始区域起始的x值和y值,即将原始区域左上角的点看做为(0,0)。 绘制放大镜中心点 绘制放大镜中心的瞄准器 绘制放大镜 添加事件 鼠标拖动 鼠标移动到放大镜上,然后按下鼠标左键,可以拖动放大镜,不按鼠标左键或者不在放大镜区域都不可以拖动放大镜。 为了实现上面的效果,我们要实现3种事件 mousedown, mousemove, 'mouseup',
当鼠标按下时,检测是否在放大镜区域,如果在,设置放大镜可以移动。鼠标移动时更新放大镜中兴点的坐标。鼠标松开时,设置放大镜不可以被移动。 鼠标双击 当移动到对应的线段上时,鼠标双击可以选择该线段,将该线段的颜色变为红色。 键盘事件 因为线段离得比较近,所以使用鼠标移动很难精确的选中线段,这里使用键盘的w, a, s, d 来进行精确移动 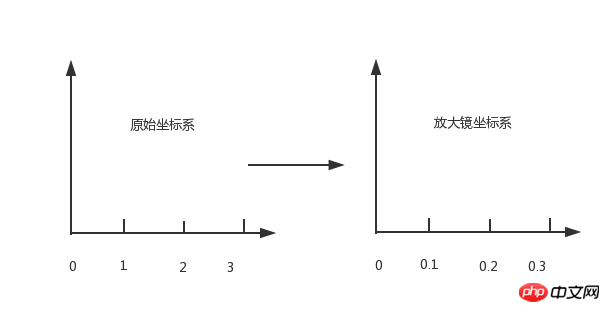
function Line(xStart, yStart, xEnd, yEnd, index, color) {
    // 起点x坐标
    this.xStart = xStart;
    // 起点y坐标
    this.yStart = yStart;
    // 终点x坐标
    this.xEnd = xEnd;
    // 终点y坐标
    this.yEnd = yEnd;
    // 用来标记是哪条线段
    this.index = index;
    // 线段颜色
    this.color = color;
}// 原始线段
var chartLines = new Array();
// 处于放大镜中的原始线段
var glassLines;
// 放大后的线段
var scaleGlassLines;
// 位于放大镜中的线段数量
var glassLineSize;
function initLines() {
var line;
line = new Line(200.5, 400, 200.5, 200, 0, "#888");
chartLines.push(line);
line = new Line(201.5, 400, 201.5, 20, 1, "#888");
chartLines.push(line);
glassLineSize = chartLines.length;
glassLines = new Array(glassLineSize);
for (var i = 0; i < glassLineSize; i++) {
line = new Line(0, 0, 0, 0, i);
glassLines[i] = line;
}
scaleGlassLines = new Array(glassLineSize);
for (var i = 0; i < glassLineSize; i++) {
line = new Line(0, 0, 0, 0, i);
scaleGlassLines[i] = line;
}
}function drawLines() {
var line;
context.lineWidth = 1;
for (var i = 0; i < chartLines.length; i++) {
line = chartLines[i];
context.beginPath();
context.strokeStyle = line.color;
context.moveTo(line.xStart, line.yStart);
context.lineTo(line.xEnd, line.yEnd);
context.stroke();
}
}function calGlassRectangle(point) {
originalRectangle.x = point.x - originalRadius;
originalRectangle.y = point.y - originalRadius;
originalRectangle.width = originalRadius * 2;
originalRectangle.height = originalRadius * 2;
scaleGlassRectangle.width = originalRectangle.width * scale;
scaleGlassRectangle.height = originalRectangle.height * scale;
scaleGlassRectangle.x = originalRectangle.x + originalRectangle.width / 2 - scaleGlassRectangle.width / 2;
scaleGlassRectangle.y = originalRectangle.y + originalRectangle.height / 2 - scaleGlassRectangle.height / 2;
// 将值装换为整数
scaleGlassRectangle.width = parseInt(scaleGlassRectangle.width);
scaleGlassRectangle.height = parseInt(scaleGlassRectangle.height);
scaleGlassRectangle.x = parseInt(scaleGlassRectangle.x);
scaleGlassRectangle.y = parseInt(scaleGlassRectangle.y);
}function calScaleLines() {
var xStart = originalRectangle.x;
var xEnd = originalRectangle.x + originalRectangle.width;
var yStart = originalRectangle.y;
var yEnd = originalRectangle.y + originalRectangle.height;
var line, gLine, sgLine;
var glassLineIndex = 0;
for (var i = 0; i < chartLines.length; i++) {
line = chartLines[i];
// 判断线段是否在放大镜中
if (line.xStart < xStart || line.xEnd > xEnd) {
continue;
}
if (line.yEnd > yEnd || line.yStart < yStart) {
continue;
}
gLine = glassLines[glassLineIndex];
sgLine = scaleGlassLines[glassLineIndex];
if (line.yEnd > yEnd) {
gLine.yEnd = yEnd;
}
if (line.yStart < yStart) {
gLine.yStart = yStart;
}
gLine.xStart = line.xStart - xStart;
gLine.yStart = line.yStart - yStart;
gLine.xEnd = line.xEnd - xStart;
gLine.yEnd = line.yEnd - yStart;
sgLine.xStart = parseInt(gLine.xStart * scale);
sgLine.yStart = parseInt(gLine.yStart * scale);
sgLine.xEnd = parseInt(gLine.xEnd * scale);
sgLine.yEnd = parseInt(gLine.yEnd * scale);
sgLine.color = line.color;
glassLineIndex++;
}
glassLineSize = glassLineIndex;
}function drawAnchor() {
context.beginPath();
context.lineWidth = 2;
context.fillStyle = "#fff";
context.strokeStyle = "#000";
context.arc(parseInt(centerPoint.x), parseInt(centerPoint.y), 10, 0, Math.PI * 2, false);
var radius = 15;
context.moveTo(parseInt(centerPoint.x - radius), parseInt(centerPoint.y));
context.lineTo(parseInt(centerPoint.x + radius), parseInt(centerPoint.y));
context.moveTo(parseInt(centerPoint.x), parseInt(centerPoint.y - radius));
context.lineTo(parseInt(centerPoint.x), parseInt(centerPoint.y + radius));
//context.fill();
context.stroke();
}function drawMagnifyingGlass() {
calScaleLines();
context.save();
context.beginPath();
context.arc(centerPoint.x, centerPoint.y, originalRadius, 0, Math.PI * 2, false);
context.clip();
context.beginPath();
context.fillStyle = "#fff";
context.arc(centerPoint.x, centerPoint.y, originalRadius, 0, Math.PI * 2, false);
context.fill();
context.lineWidth = 4;
for (var i = 0; i < glassLineSize; i++) {
context.beginPath();
context.strokeStyle = scaleGlassLines[i].color;
context.moveTo(scaleGlassRectangle.x + scaleGlassLines[i].xStart, scaleGlassRectangle.y + scaleGlassLines[i].yStart);
context.lineTo(scaleGlassRectangle.x + scaleGlassLines[i].xEnd, scaleGlassRectangle.y + scaleGlassLines[i].yEnd);
context.stroke();
}
context.restore();
context.beginPath();
var gradient = context.createRadialGradient(
parseInt(centerPoint.x), parseInt(centerPoint.y), originalRadius - 5,
parseInt(centerPoint.x), parseInt(centerPoint.y), originalRadius);
gradient.addColorStop(0.50, 'silver');
gradient.addColorStop(0.90, 'silver');
gradient.addColorStop(1, 'black');
context.strokeStyle = gradient;
context.lineWidth = 5;
context.arc(parseInt(centerPoint.x), parseInt(centerPoint.y), originalRadius, 0, Math.PI * 2, false);
context.stroke();
drawAnchor();
}canvas.onmousedown = function (e) {
var point = windowToCanvas(e.clientX, e.clientY);
var x1, x2, y1, y2, dis;
x1 = point.x;
y1 = point.y;
x2 = centerPoint.x;
y2 = centerPoint.y;
dis = Math.pow(x2 - x1, 2) + Math.pow(y2 - y1, 2);
if (dis < Math.pow(originalRadius, 2)) {
lastPoint.x = point.x;
lastPoint.y = point.y;
moveGlass = true;
}
}
canvas.onmousemove = function (e) {
if (moveGlass) {
var xDis, yDis;
var point = windowToCanvas(e.clientX, e.clientY);
xDis = point.x - lastPoint.x;
yDis = point.y - lastPoint.y;
centerPoint.x += xDis;
centerPoint.y += yDis;
lastPoint.x = point.x;
lastPoint.y = point.y;
draw();
}
}
canvas.onmouseup = function (e) {
moveGlass = false;
}canvas.ondblclick = function (e) {
var xStart, xEnd, yStart, yEnd;
var clickPoint = {};
clickPoint.x = scaleGlassRectangle.x + scaleGlassRectangle.width / 2;
clickPoint.y = scaleGlassRectangle.y + scaleGlassRectangle.height / 2;
var index = -1;
for (var i = 0; i < scaleGlassLines.length; i++) {
var scaleLine = scaleGlassLines[i];
xStart = scaleGlassRectangle.x + scaleLine.xStart - 3;
xEnd = scaleGlassRectangle.x + scaleLine.xStart + 3;
yStart = scaleGlassRectangle.y + scaleLine.yStart;
yEnd = scaleGlassRectangle.y + scaleLine.yEnd;
if (clickPoint.x > xStart && clickPoint.x < xEnd && clickPoint.y < yStart && clickPoint.y > yEnd) {
scaleLine.color = "#f00";
index = scaleLine.index;
break;
}
}
for (var i = 0; i < chartLines.length; i++) {
var line = chartLines[i];
if (line.index == index) {
line.color = "#f00";
} else {
line.color = "#888";
}
}
draw();
}document.onkeyup = function (e) {
if (e.key == 'w') {
centerPoint.y = intAdd(centerPoint.y, -0.2);
}
if (e.key == 'a') {
centerPoint.x = intAdd(centerPoint.x, -0.2);
}
if (e.key == 's') {
centerPoint.y = intAdd(centerPoint.y, 0.2);
}
if (e.key == 'd') {
centerPoint.x = intAdd(centerPoint.x, 0.2);
}
draw();
}
The above is the detailed content of Canvas implements magnifying glass effect. For more information, please follow other related articles on the PHP Chinese website!

Hot AI Tools

Undresser.AI Undress
AI-powered app for creating realistic nude photos

AI Clothes Remover
Online AI tool for removing clothes from photos.

Undress AI Tool
Undress images for free

Clothoff.io
AI clothes remover

Video Face Swap
Swap faces in any video effortlessly with our completely free AI face swap tool!

Hot Article
Hot Tools

Notepad++7.3.1
Easy-to-use and free code editor

SublimeText3 Chinese version
Chinese version, very easy to use

Zend Studio 13.0.1
Powerful PHP integrated development environment

Dreamweaver CS6
Visual web development tools

SublimeText3 Mac version
God-level code editing software (SublimeText3)
Hot Topics
 1386
1386
 52
52

 What are the canvas arrow plug-ins?
Aug 21, 2023 pm 02:14 PM
What are the canvas arrow plug-ins?
Aug 21, 2023 pm 02:14 PM
The canvas arrow plug-ins include: 1. Fabric.js, which has a simple and easy-to-use API and can create custom arrow effects; 2. Konva.js, which provides the function of drawing arrows and can create various arrow styles; 3. Pixi.js , which provides rich graphics processing functions and can achieve various arrow effects; 4. Two.js, which can easily create and control arrow styles and animations; 5. Arrow.js, which can create various arrow effects; 6. Rough .js, you can create hand-drawn arrows, etc.
 How to implement image magnifying glass effect with JavaScript?
Oct 18, 2023 am 08:45 AM
How to implement image magnifying glass effect with JavaScript?
Oct 18, 2023 am 08:45 AM
How to achieve image magnifying glass effect with JavaScript? In web design, the image magnifying glass effect is often used to display detailed product images. When the mouse is hovering over the image, a magnifying lens can be displayed at the mouse position to enlarge part of the image, thereby providing a clearer display of details. This article will introduce how to use JavaScript to achieve the image magnifying glass effect and provide code examples. 1. HTML structure First, you need to create a page layout with a magnifying glass. In HTML text
 What are the details of the canvas clock?
Aug 21, 2023 pm 05:07 PM
What are the details of the canvas clock?
Aug 21, 2023 pm 05:07 PM
The details of the canvas clock include clock appearance, tick marks, digital clock, hour, minute and second hands, center point, animation effects, other styles, etc. Detailed introduction: 1. Clock appearance, you can use Canvas to draw a circular dial as the appearance of the clock, and you can set the size, color, border and other styles of the dial; 2. Scale lines, draw scale lines on the dial to represent hours or minutes. Position; 3. Digital clock, you can draw a digital clock on the dial to indicate the current hour and minute; 4. Hour hand, minute hand, second hand, etc.
 What versions of html2canvas are there?
Aug 22, 2023 pm 05:58 PM
What versions of html2canvas are there?
Aug 22, 2023 pm 05:58 PM
The versions of html2canvas include html2canvas v0.x, html2canvas v1.x, etc. Detailed introduction: 1. html2canvas v0.x, which is an early version of html2canvas. The latest stable version is v0.5.0-alpha1. It is a mature version that has been widely used and verified in many projects; 2. html2canvas v1.x, this is a new version of html2canvas.
 Learn the canvas framework and explain the commonly used canvas framework in detail
Jan 17, 2024 am 11:03 AM
Learn the canvas framework and explain the commonly used canvas framework in detail
Jan 17, 2024 am 11:03 AM
Explore the Canvas framework: To understand what are the commonly used Canvas frameworks, specific code examples are required. Introduction: Canvas is a drawing API provided in HTML5, through which we can achieve rich graphics and animation effects. In order to improve the efficiency and convenience of drawing, many developers have developed different Canvas frameworks. This article will introduce some commonly used Canvas frameworks and provide specific code examples to help readers gain a deeper understanding of how to use these frameworks. 1. EaselJS framework Ea
 uniapp implements how to use canvas to draw charts and animation effects
Oct 18, 2023 am 10:42 AM
uniapp implements how to use canvas to draw charts and animation effects
Oct 18, 2023 am 10:42 AM
How to use canvas to draw charts and animation effects in uniapp requires specific code examples 1. Introduction With the popularity of mobile devices, more and more applications need to display various charts and animation effects on the mobile terminal. As a cross-platform development framework based on Vue.js, uniapp provides the ability to use canvas to draw charts and animation effects. This article will introduce how uniapp uses canvas to achieve chart and animation effects, and give specific code examples. 2. canvas
 What properties does tkinter canvas have?
Aug 21, 2023 pm 05:46 PM
What properties does tkinter canvas have?
Aug 21, 2023 pm 05:46 PM
The tkinter canvas attributes include bg, bd, relief, width, height, cursor, highlightbackground, highlightcolor, highlightthickness, insertbackground, insertwidth, selectbackground, selectforeground, xscrollcommand attributes, etc. Detailed introduction
 Explore the powerful role and application of canvas in game development
Jan 17, 2024 am 11:00 AM
Explore the powerful role and application of canvas in game development
Jan 17, 2024 am 11:00 AM
Understand the power and application of canvas in game development Overview: With the rapid development of Internet technology, web games are becoming more and more popular among players. As an important part of web game development, canvas technology has gradually emerged in game development, showing its powerful power and application. This article will introduce the potential of canvas in game development and demonstrate its application through specific code examples. 1. Introduction to canvas technology Canvas is a new element in HTML5, which allows us to use
