
 Backend Development
C#.Net Tutorial
Detailed explanation on running ASP.NET Core website in Docker
Backend Development
C#.Net Tutorial
Detailed explanation on running ASP.NET Core website in Docker
Detailed explanation on running ASP.NET Core website in Docker

This article mainly introduces the detailed explanationASP.NET Core website runs in Docker, which is of great practical value. Friends in need can refer to it
Docker, as a new generation of virtualization method, will definitely be widely used in the future. The deployment method of traditional virtual machines must ensure the dependency consistency of development environment, test environment, UAT environment and production environment, which requires a lot of operations. Dimensional human resources, using Docker we can deploy once and run everywhere.
This article introduces how to deploy the ASP.NET Core website to run in Docker.
Software environment list
CentOS 7.3.1611
- ## Docker 1.12.6
- .NET Core 1.1
InstallationDocker
$ #安装Docker
$ yum install docker
$ #启动docker服务
$ systemctl start docker.service
$ #配置开机启动
$ systemctl enable docker.service
Configuration Docker accelerator
Due to well-known reasons, if you want to use Docker smoothly, you need to configure a Docker accelerator, otherwise you will feel like you have returned to the era of dial-up Internet access. I use DaoCloud, which is said to be permanently free. The registration address is:
https://account.daocloud.io/signin.

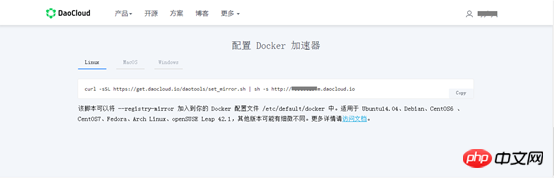
$ #配置docker加速器
$ curl -sSL https://get.daocloud.io/daotools/set_mirror.sh | sh -s http://xxxxxx.m.daocloud.io
$ #重启生效
$ systemctl restart docker
Pull ASP .NET Core image
$ docker pull microsoft/aspnetcore
$ #检查是否成功
$ docker images
Prepare ASP.NET Core website release files
You can refer to my previous article: ASP.NET Core website release toLinuxServer
and place it in the root directory of the website. The file content is as follows:FROM docker.io/microsoft/aspnetcore COPY ./publish WORKDIR /publish EXPOSE 8080 CMD ["dotnet", "TestAspNetCoreWeb.dll"]
Packaging image
$ #注意最后有个点。
$ docker build -t test-netcore:1.0 .
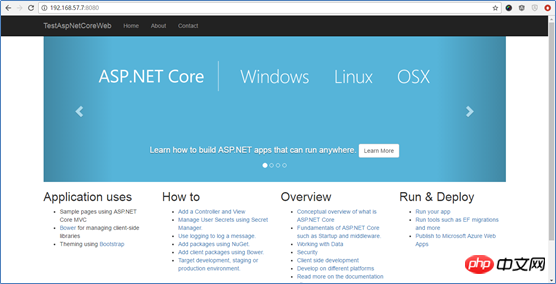
Start container
$ docker run --name test-netcore -p 8080:8080 -d test-netcore:1.0
$ #检查容器是否启动成功,如果启动后没效果,试试docker run 不加-d,如果有报错有提示信息。
$ docker ps

reset by peer”
Delete the container or change its name.
The above is the detailed content of Detailed explanation on running ASP.NET Core website in Docker. For more information, please follow other related articles on the PHP Chinese website!

Hot AI Tools

Undresser.AI Undress
AI-powered app for creating realistic nude photos

AI Clothes Remover
Online AI tool for removing clothes from photos.

Undress AI Tool
Undress images for free

Clothoff.io
AI clothes remover

AI Hentai Generator
Generate AI Hentai for free.

Hot Article
Hot Tools

Notepad++7.3.1
Easy-to-use and free code editor

SublimeText3 Chinese version
Chinese version, very easy to use

Zend Studio 13.0.1
Powerful PHP integrated development environment

Dreamweaver CS6
Visual web development tools

SublimeText3 Mac version
God-level code editing software (SublimeText3)
Hot Topics
 1378
1378
 52
52

 How to change the docker image source in China
Apr 15, 2025 am 11:30 AM
How to change the docker image source in China
Apr 15, 2025 am 11:30 AM
You can switch to the domestic mirror source. The steps are as follows: 1. Edit the configuration file /etc/docker/daemon.json and add the mirror source address; 2. After saving and exiting, restart the Docker service sudo systemctl restart docker to improve the image download speed and stability.
 How to use docker desktop
Apr 15, 2025 am 11:45 AM
How to use docker desktop
Apr 15, 2025 am 11:45 AM
How to use Docker Desktop? Docker Desktop is a tool for running Docker containers on local machines. The steps to use include: 1. Install Docker Desktop; 2. Start Docker Desktop; 3. Create Docker image (using Dockerfile); 4. Build Docker image (using docker build); 5. Run Docker container (using docker run).
 How to create a mirror in docker
Apr 15, 2025 am 11:27 AM
How to create a mirror in docker
Apr 15, 2025 am 11:27 AM
Steps to create a Docker image: Write a Dockerfile that contains the build instructions. Build the image in the terminal, using the docker build command. Tag the image and assign names and tags using the docker tag command.
 How to read the docker version
Apr 15, 2025 am 11:51 AM
How to read the docker version
Apr 15, 2025 am 11:51 AM
To get the Docker version, you can perform the following steps: Run the Docker command "docker --version" to view the client and server versions. For Mac or Windows, you can also view version information through the Version tab of the Docker Desktop GUI or the About Docker Desktop menu.
 How to build a private repository by docker
Apr 15, 2025 am 11:06 AM
How to build a private repository by docker
Apr 15, 2025 am 11:06 AM
You can build Docker private repositories to securely store and manage container images, providing strict control and security. The steps include: creating a repository, granting access, deploying a repository, pushing an image, and pulling an image. Advantages include security, version control, reduced network traffic and customization.
 How to call docker lnmp
Apr 15, 2025 am 11:15 AM
How to call docker lnmp
Apr 15, 2025 am 11:15 AM
Docker LNMP container call steps: Run the container: docker run -d --name lnmp-container -p 80:80 -p 443:443 lnmp-stack to get the container IP: docker inspect lnmp-container | grep IPAddress access website: http://<Container IP>/index.phpSSH access: docker exec -it lnmp-container bash access MySQL: mysql -u roo
 How to run the docker command
Apr 15, 2025 am 11:24 AM
How to run the docker command
Apr 15, 2025 am 11:24 AM
How to run Docker commands? Install Docker and start the daemon. Common Docker commands: docker images: display image docker ps: display container docker run: run container docker stop: stop container docker rm: delete container interact with container using Docker command: docker exec: execute command docker attach: attach console docker logs: display log docker commit: commit change to mirror stop Docker daemon: sudo systemctl stop doc
 How to save docker image
Apr 15, 2025 am 11:54 AM
How to save docker image
Apr 15, 2025 am 11:54 AM
To save the image in Docker, you can use the docker commit command to create a new image, containing the current state of the specified container, syntax: docker commit [Options] Container ID Image name. To save the image to the repository, you can use the docker push command, syntax: docker push image name [: tag]. To import saved images, you can use the docker pull command, syntax: docker pull image name [: tag].
