

canvas dynamic chart

Preface
canvas The powerful functions make it a very important part of HTML5. As for what it is, I don’t need to introduce it here. . Visual charts are one of the manifestations of the powerful functions of canvas.
Now there are many mature chart plug-ins that are implemented using canvas. Chart.js, ECharts, etc. can create beautiful and cool charts, and cover almost all charts. accomplish.
Sometimes I just want to draw a histogram, but it's troublesome to write it myself, and it's cumbersome to use other people's plug-ins. Finally, I open Baidu, copy a piece of code, and paste it in to modify it. You might as well pick one up yourself.
Effect
AnimationEffectPicture cannot be displayed, you can go to the bottom to find the demo address
Analysis
This chart consists of xy axis, data bar and title.
Axis: You can use moveTo() & lineTo() to achieve
Text: You can use fillText() to achieve
Rectangle: You can use fillRect() to achieve
It seems that it is not that difficult.
Implementation
Definition of canvas
<canvas id="canvas" width="600" height="500"></canvas>
The canvas tag is just a container, which truly realizes drawing. Or JavaScript.
Drawing the coordinate axis
The coordinate axis is two horizontal lines, which is the most basic knowledge in canvas.
Start a new path by ctx.beginPath()
ctx.lineWidth=1 Set line Width
ctx.strokeStyle='#000000' Set the line color
- ##ctx.moveTo(x,y) Define the starting point of the line
- ctx.lineTo(x1,y1) defines the end point of the line
- Finally ctx.stroke() connects the starting point and the end point into a line
var canvas = document.getElementById('canvas');var ctx = canvas.getContext('2d');var width = canvas.width;var height = canvas.height;var padding = 50; // 坐标轴到canvas边框的边距,留边距写文字ctx.beginPath();ctx.lineWidth = 1;// y轴线ctx.moveTo(padding + 0.5, height - padding + 0.5);ctx.lineTo(padding + 0.5, padding + 0.5);ctx.stroke();// x轴线ctx.moveTo(padding + 0.5, height - padding + 0.5);ctx.lineTo(width - padding + 0.5, height - padding + 0.5);ctx.stroke();
property of the incoming data.
- The coordinate value is the text, which is filled with text by ctx.fillText(value, x, y), value is the text value, x y is the coordinate of the value
- ctx.textAlign='center' Set the text center alignment
- ctx.fillStyle='#000000' Set the text fill color
var yNumber = 5; // y轴的段数var yLength = Math.floor((height - padding * 2) / yNumber); // y轴每段的真实长度var xLength = Math.floor((width - padding * 2) / data.length); // x轴每段的真实长度ctx.beginPath();ctx.textAlign = 'center';ctx.fillStyle = '#000000';ctx.strokeStyle = '#000000';// x轴刻度和值for (var i = 0; i < data.length; i++) {
var xAxis = data[i].xAxis;
var xlen = xLength * (i + 1);
ctx.moveTo(padding + xlen, height - padding);
ctx.lineTo(padding + xlen, height - padding + 5);
ctx.stroke(); // 画轴线上的刻度
ctx.fillText(xAxis, padding + xlen - xLength / 2, height - padding + 15); // 填充文字}// y轴刻度和值for (var i = 0; i < yNumber; i++) {
var y = yFictitious * (i + 1);
var ylen = yLength * (i + 1);
ctx.moveTo(padding, height - padding - ylen);
ctx.lineTo(padding - 5, height - padding - ylen);
ctx.stroke();
ctx.fillText(y, padding - 10, height - padding - ylen + 5);}setInterval, setTimeout and requestAnimationFrame.
requestAnimationFrame does not need to set the timing time yourself, but follows the drawing of the browser. This way there will be no frame drops and it will be smooth naturally.requestAnimationFrame originally only supported IE10 and above, but it can be compatible with IE6 through compatible writing methods.
function looping() {
    looped = requestAnimationFrame(looping);
    if(current < 100){
    // current 用来计算当前柱状的高度占最终高度的百分之几,通过不断循环实现柱状上升的动画
        current = (current + 3) > 100 ? 100 : (current + 3);
        drawAnimation();
    }else{
        window.cancelAnimationFrame(looped);
        looped = null;
    }}function drawAnimation() {
    for(var i = 0; i < data.length; i++) {
        var x = Math.ceil(data[i].value * current / 100 * yRatio);
        var y = height - padding - x;
        ctx.fillRect(padding + xLength * (i + 0.25), y, xLength/2, x);
        // 保存每个柱状的信息
        data[i].left = padding + xLength / 4 + xLength * i;
        data[i].top = y;
        data[i].right = padding + 3 * xLength / 4 + xLength * i;
        data[i].bottom = height - padding;
}}looping();- Column is to draw a rectangle, by ctx.fillRect(x, y, width, height) Implementation, x y is the coordinate of the upper left corner of the rectangle, width height is the width and height of the rectangle, the unit is pixels
- ctx.fillStyle='#1E9FFF' Set the fill color
Padding we defined early in the morning is really useful. You can’t cover the title on the histogram. . But some titles are at the top and some are at the bottom, so they cannot be written to death. Set a variable position to determine the position and draw it. This one is simple.
// 标题if(title){                      // 也不一定有标题
    ctx.textAlign = 'center';
    ctx.fillStyle = '#000000';  // 颜色,也可以不用写死,个性化嘛
    ctx.font = '16px Microsoft YaHei'
    if(titlePosition === 'bottom' && padding >= 40){
        ctx.fillText(title,width/2,height-5)    }else{
ctx.fillText(title,width/2,padding/2) }}Event
We see that in some charts, move the mouse When you move it up, the current column changes color, and when you move it it changes back to its original color. Here you need to listen to the mouseover event. When the mouse position is within the columnar area, the event is triggered.那我怎么知道在柱状里啊,发现在 drawAnimation() 里会有每个柱状的坐标,那我干脆把坐标给保存到 data 里。那么鼠标在柱状里的条件应该是:
ev.offsetX > data[i].left
ev.offsetX < data[i].right
ev.offsetY > data[i].top
ev.offsetY < data[i].bottom
canvas.addEventListener('mousemove',function(ev){
var ev = ev||window.event;
for (var i=0;i<data.length;i++){
for (var i=0;i<data.length;i++){
if(ev.offsetX > data[i].left &&
ev.offsetX < data[i].right &&
ev.offsetY > data[i].top &&
ev.offsetY < data[i].bottom){
console.log('我在第'+i+'个柱状里。');
}
}})总结
为了更方便的使用,封装成构造函数。通过
var chart = new sBarChart('canvas',data,{
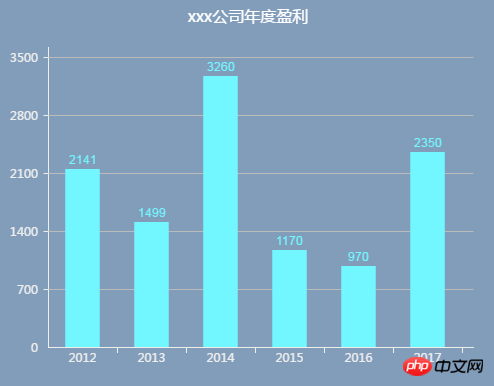
title: 'xxx公司年度盈利', // 标题
titleColor: '#000000', // 标题颜色
titlePosition: 'top', // 标题位置
bgColor: '#ffffff', // 背景色
fillColor: '#1E9FFF', // 柱状填充色
axisColor: '#666666', // 坐标轴颜色
contentColor: '#a5f0f6' // 内容横线颜色
});参数可配置,很简单就生成一个个性化的柱状图。代码地址:canvas-demo
最后加上折线图、饼图、环形图,完整封装成sChart.js插件,插件地址:sChart.js
The above is the detailed content of canvas dynamic chart. For more information, please follow other related articles on the PHP Chinese website!

Hot AI Tools

Undresser.AI Undress
AI-powered app for creating realistic nude photos

AI Clothes Remover
Online AI tool for removing clothes from photos.

Undress AI Tool
Undress images for free

Clothoff.io
AI clothes remover

Video Face Swap
Swap faces in any video effortlessly with our completely free AI face swap tool!

Hot Article
Hot Tools

Notepad++7.3.1
Easy-to-use and free code editor

SublimeText3 Chinese version
Chinese version, very easy to use

Zend Studio 13.0.1
Powerful PHP integrated development environment

Dreamweaver CS6
Visual web development tools

SublimeText3 Mac version
God-level code editing software (SublimeText3)
Hot Topics
 1386
1386
 52
52

 Which schools use canvas?
Aug 18, 2023 pm 05:59 PM
Which schools use canvas?
Aug 18, 2023 pm 05:59 PM
Schools using canvas include Stanford University, MIT, Columbia University, University of California, Berkeley, etc. Detailed introduction: 1. Stanford University uses Canvas as its main online learning platform. Teachers and students at Stanford University use Canvas to manage and communicate course content, and learn through functions such as online discussions, assignment submissions, and exams; 2. Ma Provincial Polytechnic Institute and MIT also use Canvas as their online learning management system and conduct course management through the Canvas platform; 3. Columbia University, etc.
 What are the canvas arrow plug-ins?
Aug 21, 2023 pm 02:14 PM
What are the canvas arrow plug-ins?
Aug 21, 2023 pm 02:14 PM
The canvas arrow plug-ins include: 1. Fabric.js, which has a simple and easy-to-use API and can create custom arrow effects; 2. Konva.js, which provides the function of drawing arrows and can create various arrow styles; 3. Pixi.js , which provides rich graphics processing functions and can achieve various arrow effects; 4. Two.js, which can easily create and control arrow styles and animations; 5. Arrow.js, which can create various arrow effects; 6. Rough .js, you can create hand-drawn arrows, etc.
 What are the details of the canvas clock?
Aug 21, 2023 pm 05:07 PM
What are the details of the canvas clock?
Aug 21, 2023 pm 05:07 PM
The details of the canvas clock include clock appearance, tick marks, digital clock, hour, minute and second hands, center point, animation effects, other styles, etc. Detailed introduction: 1. Clock appearance, you can use Canvas to draw a circular dial as the appearance of the clock, and you can set the size, color, border and other styles of the dial; 2. Scale lines, draw scale lines on the dial to represent hours or minutes. Position; 3. Digital clock, you can draw a digital clock on the dial to indicate the current hour and minute; 4. Hour hand, minute hand, second hand, etc.
 What versions of html2canvas are there?
Aug 22, 2023 pm 05:58 PM
What versions of html2canvas are there?
Aug 22, 2023 pm 05:58 PM
The versions of html2canvas include html2canvas v0.x, html2canvas v1.x, etc. Detailed introduction: 1. html2canvas v0.x, which is an early version of html2canvas. The latest stable version is v0.5.0-alpha1. It is a mature version that has been widely used and verified in many projects; 2. html2canvas v1.x, this is a new version of html2canvas.
 Learn the canvas framework and explain the commonly used canvas framework in detail
Jan 17, 2024 am 11:03 AM
Learn the canvas framework and explain the commonly used canvas framework in detail
Jan 17, 2024 am 11:03 AM
Explore the Canvas framework: To understand what are the commonly used Canvas frameworks, specific code examples are required. Introduction: Canvas is a drawing API provided in HTML5, through which we can achieve rich graphics and animation effects. In order to improve the efficiency and convenience of drawing, many developers have developed different Canvas frameworks. This article will introduce some commonly used Canvas frameworks and provide specific code examples to help readers gain a deeper understanding of how to use these frameworks. 1. EaselJS framework Ea
 uniapp implements how to use canvas to draw charts and animation effects
Oct 18, 2023 am 10:42 AM
uniapp implements how to use canvas to draw charts and animation effects
Oct 18, 2023 am 10:42 AM
How to use canvas to draw charts and animation effects in uniapp requires specific code examples 1. Introduction With the popularity of mobile devices, more and more applications need to display various charts and animation effects on the mobile terminal. As a cross-platform development framework based on Vue.js, uniapp provides the ability to use canvas to draw charts and animation effects. This article will introduce how uniapp uses canvas to achieve chart and animation effects, and give specific code examples. 2. canvas
 What properties does tkinter canvas have?
Aug 21, 2023 pm 05:46 PM
What properties does tkinter canvas have?
Aug 21, 2023 pm 05:46 PM
The tkinter canvas attributes include bg, bd, relief, width, height, cursor, highlightbackground, highlightcolor, highlightthickness, insertbackground, insertwidth, selectbackground, selectforeground, xscrollcommand attributes, etc. Detailed introduction
 Explore the powerful role and application of canvas in game development
Jan 17, 2024 am 11:00 AM
Explore the powerful role and application of canvas in game development
Jan 17, 2024 am 11:00 AM
Understand the power and application of canvas in game development Overview: With the rapid development of Internet technology, web games are becoming more and more popular among players. As an important part of web game development, canvas technology has gradually emerged in game development, showing its powerful power and application. This article will introduce the potential of canvas in game development and demonstrate its application through specific code examples. 1. Introduction to canvas technology Canvas is a new element in HTML5, which allows us to use
