

Sample code analysis of multi-page crawler in nodejs

This article mainly introduces the multi-page crawler based on nodejs. The editor thinks it is quite good. Now I will share it with you and give it as a reference. Let’s follow the editor to take a look.
Preface
I reviewed the front-end time againnode.js, so I took advantage of the situation and made a crawler. Deepen your understanding of node.
The three modules mainly used are request, cheerio, and async
request
is used to request addresses and fast DownloadPictureStream.
cheerio
A fast, flexible and implemented core implementation of jQuery specially customized for the server.
Easy to parse html code.
async
Asynchronous call to prevent blocking.
Core idea
Use request to send a request. Get the html code and get the img tag and a tag.
Make a recursive call through the obtained a expression. Continuously obtain the img address and a address, and continue to recurse
Get the img address through request(photo).pipe(fs.createWriteStream(dir + “/” + filename)); for fast downloading .
function requestall(url) {

 request({

  uri: url,

  headers: setting.header

 }, function (error, response, body) {

  if (error) {

   console.log(error);

  } else {

   console.log(response.statusCode);

   if (!error && response.statusCode == 200) {

    var $ = cheerio.load(body);

    var photos = [];

    $('img').each(function () {

     // 判断地址是否存在

     if ($(this).attr('src')) {

      var src = $(this).attr('src');

      var end = src.substr(-4, 4).toLowerCase();

      if (end == '.jpg' || end == '.png' || end == '.jpeg') {

       if (IsURL(src)) {

        photos.push(src);

       }

      }

     }

    });

    downloadImg(photos, dir, setting.download_v);

    // 递归爬虫

    $('a').each(function () {

     var murl = $(this).attr('href');

     if (IsURL(murl)) {

      setTimeout(function () {

       fetchre(murl);

      }, timeout);

      timeout += setting.ajax_timeout;

     } else {

      setTimeout(function () {

       fetchre("http://www.ivsky.com/" + murl);

      }, timeout);

      timeout += setting.ajax_timeout;

     }

    })

   }

  }

 });

}Anti-pit
1. When the request is downloaded through the image address, bind the error event to prevent crawler exceptions of interruption.
2. Limit concurrency through async’s mapLimit.
3. Add request header to prevent IP from being blocked.
4. Obtain some pictures and hyperlink addresses, which may be relative paths (to be considered whether there is a solution).
function downloadImg(photos, dir, asyncNum) {

 console.log("即将异步并发下载图片,当前并发数为:" + asyncNum);

 async.mapLimit(photos, asyncNum, function (photo, callback) {

  var filename = (new Date().getTime()) + photo.substr(-4, 4);

  if (filename) {

   console.log('正在下载' + photo);

   // 默认

   // fs.createWriteStream(dir + "/" + filename)

   // 防止pipe错误

   request(photo)

    .on('error', function (err) {

     console.log(err);

    })

    .pipe(fs.createWriteStream(dir + "/" + filename));

   console.log('下载完成');

   callback(null, filename);

  }

 }, function (err, result) {

  if (err) {

   console.log(err);

  } else {

   console.log(" all right ! ");

   console.log(result);

  }

 })

}Test:
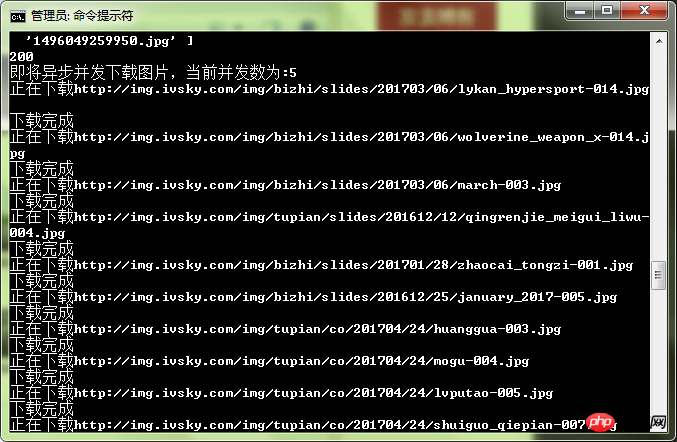
You can feel that the speed is relatively fast.

The above is the detailed content of Sample code analysis of multi-page crawler in nodejs. For more information, please follow other related articles on the PHP Chinese website!

Hot AI Tools

Undresser.AI Undress
AI-powered app for creating realistic nude photos

AI Clothes Remover
Online AI tool for removing clothes from photos.

Undress AI Tool
Undress images for free

Clothoff.io
AI clothes remover

AI Hentai Generator
Generate AI Hentai for free.

Hot Article
Hot Tools

Notepad++7.3.1
Easy-to-use and free code editor

SublimeText3 Chinese version
Chinese version, very easy to use

Zend Studio 13.0.1
Powerful PHP integrated development environment

Dreamweaver CS6
Visual web development tools

SublimeText3 Mac version
God-level code editing software (SublimeText3)
Hot Topics
 1382
1382
 52
52

 The difference between nodejs and vuejs
Apr 21, 2024 am 04:17 AM
The difference between nodejs and vuejs
Apr 21, 2024 am 04:17 AM
Node.js is a server-side JavaScript runtime, while Vue.js is a client-side JavaScript framework for creating interactive user interfaces. Node.js is used for server-side development, such as back-end service API development and data processing, while Vue.js is used for client-side development, such as single-page applications and responsive user interfaces.
 Is nodejs a backend framework?
Apr 21, 2024 am 05:09 AM
Is nodejs a backend framework?
Apr 21, 2024 am 05:09 AM
Node.js can be used as a backend framework as it offers features such as high performance, scalability, cross-platform support, rich ecosystem, and ease of development.
 How to connect nodejs to mysql database
Apr 21, 2024 am 06:13 AM
How to connect nodejs to mysql database
Apr 21, 2024 am 06:13 AM
To connect to a MySQL database, you need to follow these steps: Install the mysql2 driver. Use mysql2.createConnection() to create a connection object that contains the host address, port, username, password, and database name. Use connection.query() to perform queries. Finally use connection.end() to end the connection.
 What is the difference between npm and npm.cmd files in the nodejs installation directory?
Apr 21, 2024 am 05:18 AM
What is the difference between npm and npm.cmd files in the nodejs installation directory?
Apr 21, 2024 am 05:18 AM
There are two npm-related files in the Node.js installation directory: npm and npm.cmd. The differences are as follows: different extensions: npm is an executable file, and npm.cmd is a command window shortcut. Windows users: npm.cmd can be used from the command prompt, npm can only be run from the command line. Compatibility: npm.cmd is specific to Windows systems, npm is available cross-platform. Usage recommendations: Windows users use npm.cmd, other operating systems use npm.
 What are the global variables in nodejs
Apr 21, 2024 am 04:54 AM
What are the global variables in nodejs
Apr 21, 2024 am 04:54 AM
The following global variables exist in Node.js: Global object: global Core module: process, console, require Runtime environment variables: __dirname, __filename, __line, __column Constants: undefined, null, NaN, Infinity, -Infinity
 Is there a big difference between nodejs and java?
Apr 21, 2024 am 06:12 AM
Is there a big difference between nodejs and java?
Apr 21, 2024 am 06:12 AM
The main differences between Node.js and Java are design and features: Event-driven vs. thread-driven: Node.js is event-driven and Java is thread-driven. Single-threaded vs. multi-threaded: Node.js uses a single-threaded event loop, and Java uses a multi-threaded architecture. Runtime environment: Node.js runs on the V8 JavaScript engine, while Java runs on the JVM. Syntax: Node.js uses JavaScript syntax, while Java uses Java syntax. Purpose: Node.js is suitable for I/O-intensive tasks, while Java is suitable for large enterprise applications.
 Is nodejs a back-end development language?
Apr 21, 2024 am 05:09 AM
Is nodejs a back-end development language?
Apr 21, 2024 am 05:09 AM
Yes, Node.js is a backend development language. It is used for back-end development, including handling server-side business logic, managing database connections, and providing APIs.
 How to deploy nodejs project to server
Apr 21, 2024 am 04:40 AM
How to deploy nodejs project to server
Apr 21, 2024 am 04:40 AM
Server deployment steps for a Node.js project: Prepare the deployment environment: obtain server access, install Node.js, set up a Git repository. Build the application: Use npm run build to generate deployable code and dependencies. Upload code to the server: via Git or File Transfer Protocol. Install dependencies: SSH into the server and use npm install to install application dependencies. Start the application: Use a command such as node index.js to start the application, or use a process manager such as pm2. Configure a reverse proxy (optional): Use a reverse proxy such as Nginx or Apache to route traffic to your application
