
 Backend Development
C#.Net Tutorial
Share WebApi2 file and image upload and download function examples
Backend Development
C#.Net Tutorial
Share WebApi2 file and image upload and download function examples
Share WebApi2 file and image upload and download function examples

This article mainly introduces the WebApi2 file and image upload and download functions. Friends in need can refer to
Asp.Net Framework webapi2 File upload and download The front-end interface is executed using Ajax
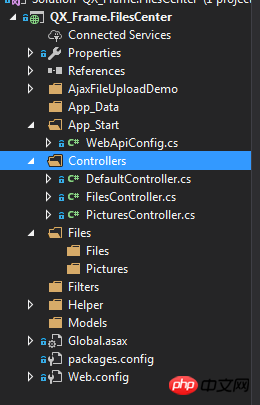
1. Project structure
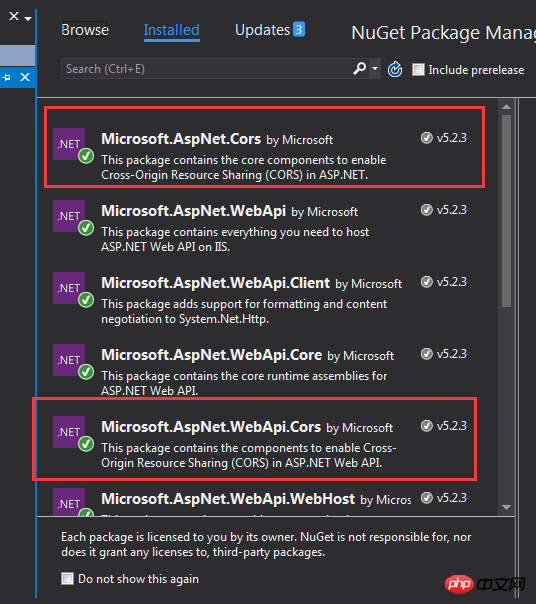
1.App_Start is configured with cross- Domain access to avoid requests that cannot be submitted due to cross-domain issues. The specific cross-domain configuration method is as follows, if you know it, please skip it by yourself.
Cross-domain configuration: NewGet installs dll Microsofg.AspNet.Cors
Then write the cross-domain configuration code in WebApiConfig.cs under the App_Start folder .
public static class WebApiConfig
  {
    public static void Register(HttpConfiguration config)
    {
      // Web API configuration and services
      // Web API routes
      config.MapHttpAttributeRoutes();
      // Web API configuration and services
      //跨域配置 //need reference from nuget
      config.EnableCors(new EnableCorsAttribute("*", "*", "*"));
      config.Routes.MapHttpRoute(
        name: "DefaultApi",
        routeTemplate: "api/{controller}/{id}",
        defaults: new { id = RouteParameter.Optional }
      );
      //if config the global filter input there need not write the attributes
      //config.Filters.Add(new App.WebApi.Filters.ExceptionAttribute_DG());
    }
}Even if the cross-domain is completed, please test it yourself.
2. Create two new controllers, one PicturesController.cs and one FilesController.cs. Of course, pictures are also files. Here pictures and files are processed in different ways. Because the file upload of the picture method was not successful, the other Find another way. If anyone here has a better way, please feel free to enlighten me!
2. Project code
1. Let’s first talk about the image upload and download controller interface. There is actually nothing to say here, just Get Get the file, the parameter is the full name of the file; Post upload the file; directly upload the code.
using QX_Frame.App.WebApi;
using QX_Frame.FilesCenter.Helper;
using QX_Frame.Helper_DG;
using QX_Frame.Helper_DG.Extends;
using System;
using System.Collections.Generic;
using System.Diagnostics;
using System.IO;
using System.Linq;
using System.Net;
using System.Net.Http;
using System.Net.Http.Headers;
using System.Text;
using System.Threading.Tasks;
using System.Web.Http;
/**
* author:qixiao
* create:2017-5-26 16:54:46
* */
namespace QX_Frame.FilesCenter.Controllers
{
public class PicturesController : WebApiControllerBase
{
//Get : api/Pictures
public HttpResponseMessage Get(string fileName)
{
HttpResponseMessage result = null;
DirectoryInfo directoryInfo = new DirectoryInfo(IO_Helper_DG.RootPath_MVC + @"Files/Pictures");
FileInfo foundFileInfo = directoryInfo.GetFiles().Where(x => x.Name == fileName).FirstOrDefault();
if (foundFileInfo != null)
{
FileStream fs = new FileStream(foundFileInfo.FullName, FileMode.Open);
result = new HttpResponseMessage(HttpStatusCode.OK);
result.Content = new StreamContent(fs);
result.Content.Headers.ContentType = new System.Net.Http.Headers.MediaTypeHeaderValue("application/octet-stream");
result.Content.Headers.ContentDisposition = new ContentDispositionHeaderValue("attachment");
result.Content.Headers.ContentDisposition.FileName = foundFileInfo.Name;
}
else
{
result = new HttpResponseMessage(HttpStatusCode.NotFound);
}
return result;
}
//POST : api/Pictures
public async Task<IHttpActionResult> Post()
{
if (!Request.Content.IsMimeMultipartContent())
{
throw new Exception_DG("unsupported media type", 2005);
}
string root = IO_Helper_DG.RootPath_MVC;
IO_Helper_DG.CreateDirectoryIfNotExist(root + "/temp");
var provider = new MultipartFormDataStreamProvider(root + "/temp");
// Read the form data.
await Request.Content.ReadAsMultipartAsync(provider);
List<string> fileNameList = new List<string>();
StringBuilder sb = new StringBuilder();
long fileTotalSize = 0;
int fileIndex = 1;
// This illustrates how to get the file names.
foreach (MultipartFileData file in provider.FileData)
{
//new folder
string newRoot = root + @"Files/Pictures";
IO_Helper_DG.CreateDirectoryIfNotExist(newRoot);
if (File.Exists(file.LocalFileName))
{
//new fileName
string fileName = file.Headers.ContentDisposition.FileName.Substring(1, file.Headers.ContentDisposition.FileName.Length - 2);
string newFileName = Guid.NewGuid() + "." + fileName.Split('.')[1];
string newFullFileName = newRoot + "/" + newFileName;
fileNameList.Add($"Files/Pictures/{newFileName}");
FileInfo fileInfo = new FileInfo(file.LocalFileName);
fileTotalSize += fileInfo.Length;
sb.Append($" #{fileIndex} Uploaded file: {newFileName} ({ fileInfo.Length} bytes)");
fileIndex++;
File.Move(file.LocalFileName, newFullFileName);
Trace.WriteLine("1 file copied , filePath=" + newFullFileName);
}
}
return Json(Return_Helper.Success_Msg_Data_DCount_HttpCode($"{fileNameList.Count} file(s) /{fileTotalSize} bytes uploaded successfully! Details -> {sb.ToString()}", fileNameList, fileNameList.Count));
}
}
}There may be some code written in the Help class. In fact, it is just to obtain the server root path and create the directory if it is judged that the folder does not exist. The implementation of the code is as follows:
 public static string RootPath_MVC
     {
       get { return System.Web.HttpContext.Current.Server.MapPath("~"); }
     }
//create Directory
    public static bool CreateDirectoryIfNotExist(string filePath)
    {
      if (!Directory.Exists(filePath))
      {
        Directory.CreateDirectory(filePath);
      }
      return true;
}2. The file upload and download interface is similar to that of pictures.
using QX_Frame.App.WebApi;
using QX_Frame.FilesCenter.Helper;
using QX_Frame.Helper_DG;
using System.Collections.Generic;
using System.Diagnostics;
using System.IO;
using System.Linq;
using System.Net;
using System.Net.Http;
using System.Net.Http.Headers;
using System.Text;
using System.Threading.Tasks;
using System.Web;
using System.Web.Http;
/**
 * author:qixiao
 * create:2017-5-26 16:54:46
 * */
namespace QX_Frame.FilesCenter.Controllers
{
  public class FilesController : WebApiControllerBase
  {
    //Get : api/Files
    public HttpResponseMessage Get(string fileName)
    {
      HttpResponseMessage result = null;
      DirectoryInfo directoryInfo = new DirectoryInfo(IO_Helper_DG.RootPath_MVC + @"Files/Files");
      FileInfo foundFileInfo = directoryInfo.GetFiles().Where(x => x.Name == fileName).FirstOrDefault();
      if (foundFileInfo != null)
      {
        FileStream fs = new FileStream(foundFileInfo.FullName, FileMode.Open);
        result = new HttpResponseMessage(HttpStatusCode.OK);
        result.Content = new StreamContent(fs);
        result.Content.Headers.ContentType = new System.Net.Http.Headers.MediaTypeHeaderValue("application/octet-stream");
        result.Content.Headers.ContentDisposition = new ContentDispositionHeaderValue("attachment");
        result.Content.Headers.ContentDisposition.FileName = foundFileInfo.Name;
      }
      else
      {
        result = new HttpResponseMessage(HttpStatusCode.NotFound);
      }
      return result;
    }
    //POST : api/Files
    public async Task<IHttpActionResult> Post()
    {
      //get server root physical path
      string root = IO_Helper_DG.RootPath_MVC;
      //new folder
      string newRoot = root + @"Files/Files/";
      //check path is exist if not create it
      IO_Helper_DG.CreateDirectoryIfNotExist(newRoot);
      List<string> fileNameList = new List<string>();
      StringBuilder sb = new StringBuilder();
      long fileTotalSize = 0;
      int fileIndex = 1;
      //get files from request
      HttpFileCollection files = HttpContext.Current.Request.Files;
      await Task.Run(() =>
      {
        foreach (var f in files.AllKeys)
        {
          HttpPostedFile file = files[f];
          if (!string.IsNullOrEmpty(file.FileName))
          {
            string fileLocalFullName = newRoot + file.FileName;
            file.SaveAs(fileLocalFullName);
            fileNameList.Add($"Files/Files/{file.FileName}");
            FileInfo fileInfo = new FileInfo(fileLocalFullName);
            fileTotalSize += fileInfo.Length;
            sb.Append($" #{fileIndex} Uploaded file: {file.FileName} ({ fileInfo.Length} bytes)");
            fileIndex++;
            Trace.WriteLine("1 file copied , filePath=" + fileLocalFullName);
          }
        }
      });
      return Json(Return_Helper.Success_Msg_Data_DCount_HttpCode($"{fileNameList.Count} file(s) /{fileTotalSize} bytes uploaded successfully!   Details -> {sb.ToString()}", fileNameList, fileNameList.Count));
    }
  }
}After implementing the above two controller codes, we need front-end code to debug the docking, the code is as follows.
<!doctype>
<head>
<script src="jquery-3.2.0.min.js"></script>
<!--<script src="jquery-1.11.1.js"></script>-->
<!--<script src="ajaxfileupload.js"></script>-->
<script>
$(document).ready(function () {
var appDomain = "http://localhost:3997/";
$("#btn_fileUpload").click(function () {
/**
* 用ajax方式上传文件 -----------
* */
//-------asp.net webapi fileUpload
//
var formData = new FormData($("#uploadForm")[0]);
$.ajax({
url: appDomain + 'api/Files',
type: 'POST',
data: formData,
async: false,
cache: false,
contentType: false,
processData: false,
success: function (data) {
console.log(JSON.stringify(data));
},
error: function (data) {
console.log(JSON.stringify(data));
}
});
//----end asp.net webapi fileUpload
//----.net core webapi fileUpload
// var fileUpload = $("#files").get(0);
// var files = fileUpload.files;
// var data = new FormData();
// for (var i = 0; i < files.length; i++) {
// data.append(files[i].name, files[i]);
// }
// $.ajax({
// type: "POST",
// url: appDomain+'api/Files',
// contentType: false,
// processData: false,
// data: data,
// success: function (data) {
// console.log(JSON.stringify(data));
// },
// error: function () {
// console.log(JSON.stringify(data));
// }
// });
//--------end net core webapi fileUpload
/**
* ajaxfileupload.js 方式上传文件
* */
// $.ajaxFileUpload({
// type: 'post',
// url: appDomain + 'api/Files',
// secureuri: false,
// fileElementId: 'files',
// success: function (data) {
// console.log(JSON.stringify(data));
// },
// error: function () {
// console.log(JSON.stringify(data));
// }
// });
});
//end click
})
</script>
</head>
<title></title>
<body>
<article>
<header>
<h2>article-form</h2>
</header>
<p>
<form action="/" method="post" id="uploadForm" enctype="multipart/form-data">
<input type="file" id="files" name="files" placeholder="file" multiple>file-multiple属性可以选择多项<br><br>
<input type="button" id="btn_fileUpload" value="fileUpload">
</form>
</p>
</article>
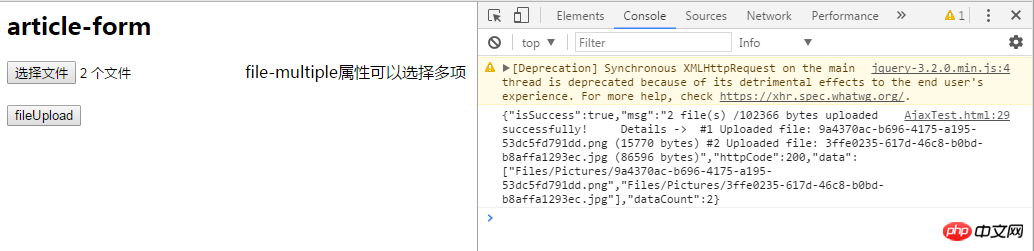
</body>At this point, all our functions have been implemented, let’s test it:

Visible, file upload Success, returned in the expected format!
Next we test single image upload ->

Then we press the returned address to access the image address.

I found that there is no pressure at all!
Test multi-image upload below ->
Perfect~
At this point, we have implemented WebApi2 file and image upload and download all functions.
Here you need to pay attention to the total size supported by the Web.config configuration upload file. What I configured here is that the maximum supported file size is 1MB
<requestFiltering>
  <requestLimits maxAllowedContentLength="1048576" />
</requestFiltering>
  <system.webServer>
   <handlers>
    <remove name="ExtensionlessUrlHandler-Integrated-4.0" />
    <remove name="OPTIONSVerbHandler" />
    <remove name="TRACEVerbHandler" />
    <add name="ExtensionlessUrlHandler-Integrated-4.0" path="*." verb="*" type="System.Web.Handlers.TransferRequestHandler" preCondition="integratedMode,runtimeVersionv4.0" />
   </handlers>
   <security>
   <requestFiltering>
    <requestLimits maxAllowedContentLength="1048576" /><!--1MB-->
    </requestFiltering>
  </security>
</system.webServer>[Related recommendations]
1. ASP.NET Free Video Tutorial
2. Detailed introduction to ASP.NET MVC--routing
3. Detailed Introducing ASP.NET MVC--controller
4. Introducing ASP.NET MVC--View in detail
The above is the detailed content of Share WebApi2 file and image upload and download function examples. For more information, please follow other related articles on the PHP Chinese website!

Hot AI Tools

Undresser.AI Undress
AI-powered app for creating realistic nude photos

AI Clothes Remover
Online AI tool for removing clothes from photos.

Undress AI Tool
Undress images for free

Clothoff.io
AI clothes remover

AI Hentai Generator
Generate AI Hentai for free.

Hot Article
Hot Tools

Notepad++7.3.1
Easy-to-use and free code editor

SublimeText3 Chinese version
Chinese version, very easy to use

Zend Studio 13.0.1
Powerful PHP integrated development environment

Dreamweaver CS6
Visual web development tools

SublimeText3 Mac version
God-level code editing software (SublimeText3)
Hot Topics
 1378
1378
 52
52

 How to download episodes of Hongguo short drama
Mar 11, 2024 pm 09:16 PM
How to download episodes of Hongguo short drama
Mar 11, 2024 pm 09:16 PM
Hongguo Short Play is not only a platform for watching short plays, but also a treasure trove of rich content, including novels and other exciting content. This is undoubtedly a huge surprise for many users who love reading. However, many users still don’t know how to download and watch these novels in Hongguo Short Play. In the following, the editor of this website will provide you with detailed downloading steps. I hope it can help everyone in need. Partners. How to download and watch the Hongguo short play? The answer: [Hongguo short play] - [Audio book] - [Article] - [Download]. Specific steps: 1. First open the Hongguo Short Drama software, enter the homepage and click the [Listen to Books] button at the top of the page; 2. Then on the novel page we can see a lot of article content, here
 What should I do if I download other people's wallpapers after logging into another account on wallpaperengine?
Mar 19, 2024 pm 02:00 PM
What should I do if I download other people's wallpapers after logging into another account on wallpaperengine?
Mar 19, 2024 pm 02:00 PM
When you log in to someone else's steam account on your computer, and that other person's account happens to have wallpaper software, steam will automatically download the wallpapers subscribed to the other person's account after switching back to your own account. Users can solve this problem by turning off steam cloud synchronization. What to do if wallpaperengine downloads other people's wallpapers after logging into another account 1. Log in to your own steam account, find cloud synchronization in settings, and turn off steam cloud synchronization. 2. Log in to someone else's Steam account you logged in before, open the Wallpaper Creative Workshop, find the subscription content, and then cancel all subscriptions. (In case you cannot find the wallpaper in the future, you can collect it first and then cancel the subscription) 3. Switch back to your own steam
 How to download links starting with 115://? Download method introduction
Mar 14, 2024 am 11:58 AM
How to download links starting with 115://? Download method introduction
Mar 14, 2024 am 11:58 AM
Recently, many users have been asking the editor, how to download links starting with 115://? If you want to download links starting with 115://, you need to use the 115 browser. After you download the 115 browser, let's take a look at the download tutorial compiled by the editor below. Introduction to how to download links starting with 115:// 1. Log in to 115.com, download and install the 115 browser. 2. Enter: chrome://extensions/ in the 115 browser address bar, enter the extension center, search for Tampermonkey, and install the corresponding plug-in. 3. Enter in the address bar of 115 browser: Grease Monkey Script: https://greasyfork.org/en/
 Introduction to how to download and install the superpeople game
Mar 30, 2024 pm 04:01 PM
Introduction to how to download and install the superpeople game
Mar 30, 2024 pm 04:01 PM
The superpeople game can be downloaded through the steam client. The size of this game is about 28G. It usually takes one and a half hours to download and install. Here is a specific download and installation tutorial for you! New method to apply for global closed testing 1) Search for "SUPERPEOPLE" in the Steam store (steam client download) 2) Click "Request access to SUPERPEOPLE closed testing" at the bottom of the "SUPERPEOPLE" store page 3) After clicking the request access button, The "SUPERPEOPLECBT" game can be confirmed in the Steam library 4) Click the install button in "SUPERPEOPLECBT" and download
 How to download Quark network disk to local? How to save files downloaded from Quark Network Disk back to the local computer
Mar 13, 2024 pm 08:31 PM
How to download Quark network disk to local? How to save files downloaded from Quark Network Disk back to the local computer
Mar 13, 2024 pm 08:31 PM
Many users need to download files when using Quark Network Disk, but we want to save them locally, so how to set this up? Let this site introduce to users in detail how to save files downloaded from Quark Network Disk back to the local computer. How to save files downloaded from Quark network disk back to your local computer 1. Open Quark, log in to your account, and click the list icon. 2. After clicking the icon, select the network disk. 3. After entering Quark Network Disk, click My Files. 4. After entering My Files, select the file you want to download and click the three-dot icon. 5. Check the file you want to download and click Download.
 How to download foobar2000? -How to use foobar2000
Mar 18, 2024 am 10:58 AM
How to download foobar2000? -How to use foobar2000
Mar 18, 2024 am 10:58 AM
foobar2000 is a software that can listen to music resources at any time. It brings you all kinds of music with lossless sound quality. The enhanced version of the music player allows you to get a more comprehensive and comfortable music experience. Its design concept is to play the advanced audio on the computer The device is transplanted to mobile phones to provide a more convenient and efficient music playback experience. The interface design is simple, clear and easy to use. It adopts a minimalist design style without too many decorations and cumbersome operations to get started quickly. It also supports a variety of skins and Theme, personalize settings according to your own preferences, and create an exclusive music player that supports the playback of multiple audio formats. It also supports the audio gain function to adjust the volume according to your own hearing conditions to avoid hearing damage caused by excessive volume. Next, let me help you
 Where to download files from Quark Network Disk_How to download Quark Network Disk to local area and share
Mar 21, 2024 pm 03:57 PM
Where to download files from Quark Network Disk_How to download Quark Network Disk to local area and share
Mar 21, 2024 pm 03:57 PM
As a convenient and practical network disk tool, Quark can help users easily obtain their favorite resources. What if you want to download a file locally? Let the editor tell you now, let’s learn it together! How to download Quark Network Disk to local sharing method 1. First open the Quark software, enter the homepage, and click the [Cloud Icon] on the lower right; 2. Then on the Quark Network Disk page, we click the [Document] function; 3. Then go to the document page, select the file you want to download, and click the [three-dot icon]; 4. After the final click, we click [Download] in the pop-up dialog box;
 How to download Beilehu children's songs
Mar 28, 2024 am 11:10 AM
How to download Beilehu children's songs
Mar 28, 2024 am 11:10 AM
As an indispensable accompaniment to children's growth, Beilehu's children's songs have won the love of countless parents and children with their cheerful melody, vivid pictures and entertaining and educational content. In order to allow babies to enjoy the joy brought by children's songs anytime and anywhere, many parents hope to download Beilehu's children's songs to their mobile phones or tablets so that they can listen to their children at any time, but how to save Beilehu's children's songs? On your mobile phone, this tutorial will bring you a detailed introduction. Users who don’t understand it yet can come and read along with this article to learn more. Beilehu Nursery Rhymes Download Children's Songs Multi-Picture Tutorial: Open the software and select a children's song you want to download. The editor takes "Classic Children's Songs" as an example. 2. Click the "Download" button below the children's song star.
