 Operation and Maintenance
 Linux Operation and Maintenance
 A graphic tutorial detailing the installation and configuration of VMWare linux mysql 5.7.13
A graphic tutorial detailing the installation and configuration of VMWare linux mysql 5.7.13
This article mainly introduces the VMWare linux mysql 5.7.13 installation and configuration tutorial in detail. It has certain reference value. Interested friends can refer to it.
This article shares VMWare linux with everyone. Tutorial on installing mysql 5.7.13 for your reference. The specific content is as follows
1. Basic environment description
Virtual machine: VMWare
Operating system :linux
Database version: mysql 5.7.13 community version (don’t ask why you don’t install the enterprise version, because the enterprise version costs money)
Background: The virtual machine can be connected to the external network
2. Check to see if mysql has been installed on Linux
① Start the service mysqld start##
②Check whether the service exists on Linux chkconfig --list mysqld

3. Create the /tools directory (download the file into this directory) and enter the /tools directory
# mkdir /tools
# cd /tools

4. Download mysql 5.7.13
#wget http://cdn.mysql.com/archives/mysql-5.7/mysql-5.7.13-linux-glibc2.5-x86_64.tar.gz

# tar -xzf mysql-5.7.13-linux-glibc2.5-x86_64.tar.gz

# cd /
# mkdir data
# cd /data
# mkdir mysql
7. Create new mysql user, group and directory
# groupadd mysql
# useradd -r -s /sbin/nologin -g mysql mysql -d /tools/mysql-5.7.13-linux-glibc2.5-x86_64

##
#cd/tools/mysql-5.7.13-linux-glibc2.5-x86_64
#pwd
#chown –R mysql .
#chgrp –R mysql .

#chown -R mysql /data/mysql
If steps 6-8 are not done, an error will be reported :bin/mysqld: no such file or directory
9. Set parameters
# bin/mysqld --initialize --user=mysql --basedir=/tools/mysql-5.7.13-linux-glibc2.5-x86_64 --datadir=/data/mysql
Note, remember the temporary password in the red box, you will use it later
#bin/mysql_ssl_rsa_setup --datadir=/data/mysql
 10. Modify the configuration file
# cd support-files

# cp my-default.cnf /etc/my.cnf
# cp mysql.server /etc/init.d/mysql

# vim /etc/init.d/mysql
Modify the following content:
 ##
##
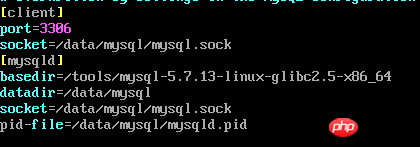
# vim /etc/my.cnf


Note, check whether the path used in the my.cnf configuration file exists. If it does not exist, please create it yourself
# bin/mysqld_safe --user=mysql &

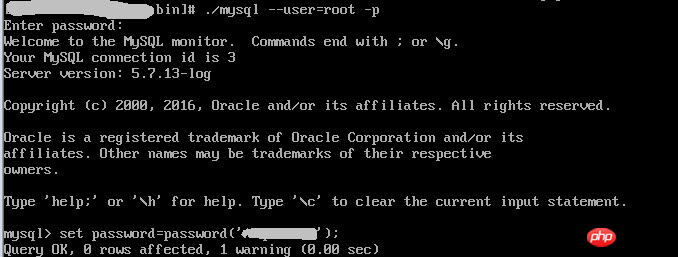
bin/mysql --user=root –p
12. Modify the root password 
mysql> set password=password('123456'); --输入新密码
13. Grant permissions
mysql> grant all privileges on *.* to 'root'@'%' identified by '123456';
mysql> flush privileges;
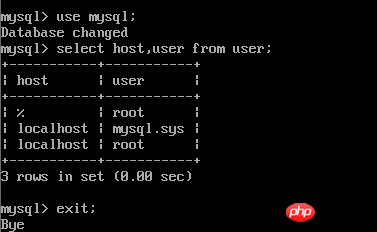
14. Check results
mysql> use mysql;
mysql> select host,user from user;
mysql> exit;
15. Add system path
# vim /etc/profile
export PATH=/usr/local/ mysql/bin:$PATH
##
# source /etc/profile
 16. Configure mysql auto-start
# chmod 755 /etc/init.d/mysql
# chkconfig --add mysql
# chkconfig --level 345 mysql on

以上配置大部分参考:mysql 5.7.13 安装配置方法图文教程
The above is the detailed content of A graphic tutorial detailing the installation and configuration of VMWare linux mysql 5.7.13. For more information, please follow other related articles on the PHP Chinese website!

Hot AI Tools

Undresser.AI Undress
AI-powered app for creating realistic nude photos

AI Clothes Remover
Online AI tool for removing clothes from photos.

Undress AI Tool
Undress images for free

Clothoff.io
AI clothes remover

AI Hentai Generator
Generate AI Hentai for free.

Hot Article

Hot Tools

Notepad++7.3.1
Easy-to-use and free code editor

SublimeText3 Chinese version
Chinese version, very easy to use

Zend Studio 13.0.1
Powerful PHP integrated development environment

Dreamweaver CS6
Visual web development tools

SublimeText3 Mac version
God-level code editing software (SublimeText3)

Hot Topics
 1378
1378
 52
52
 How to start apache
Apr 13, 2025 pm 01:06 PM
The steps to start Apache are as follows: Install Apache (command: sudo apt-get install apache2 or download it from the official website) Start Apache (Linux: sudo systemctl start apache2; Windows: Right-click the "Apache2.4" service and select "Start") Check whether it has been started (Linux: sudo systemctl status apache2; Windows: Check the status of the "Apache2.4" service in the service manager) Enable boot automatically (optional, Linux: sudo systemctl
 What to do if the apache80 port is occupied
Apr 13, 2025 pm 01:24 PM
When the Apache 80 port is occupied, the solution is as follows: find out the process that occupies the port and close it. Check the firewall settings to make sure Apache is not blocked. If the above method does not work, please reconfigure Apache to use a different port. Restart the Apache service.
 How to restart the apache server
Apr 13, 2025 pm 01:12 PM
To restart the Apache server, follow these steps: Linux/macOS: Run sudo systemctl restart apache2. Windows: Run net stop Apache2.4 and then net start Apache2.4. Run netstat -a | findstr 80 to check the server status.
 How to solve the problem that apache cannot be started
Apr 13, 2025 pm 01:21 PM
Apache cannot start because the following reasons may be: Configuration file syntax error. Conflict with other application ports. Permissions issue. Out of memory. Process deadlock. Daemon failure. SELinux permissions issues. Firewall problem. Software conflict.
 How to learn Debian syslog
Apr 13, 2025 am 11:51 AM
This guide will guide you to learn how to use Syslog in Debian systems. Syslog is a key service in Linux systems for logging system and application log messages. It helps administrators monitor and analyze system activity to quickly identify and resolve problems. 1. Basic knowledge of Syslog The core functions of Syslog include: centrally collecting and managing log messages; supporting multiple log output formats and target locations (such as files or networks); providing real-time log viewing and filtering functions. 2. Install and configure Syslog (using Rsyslog) The Debian system uses Rsyslog by default. You can install it with the following command: sudoaptupdatesud
 Does the internet run on Linux?
Apr 14, 2025 am 12:03 AM
The Internet does not rely on a single operating system, but Linux plays an important role in it. Linux is widely used in servers and network devices and is popular for its stability, security and scalability.
 How to fix apache vulnerability
Apr 13, 2025 pm 12:54 PM
Steps to fix the Apache vulnerability include: 1. Determine the affected version; 2. Apply security updates; 3. Restart Apache; 4. Verify the fix; 5. Enable security features.
 How to start nginx in Linux
Apr 14, 2025 pm 12:51 PM
Steps to start Nginx in Linux: Check whether Nginx is installed. Use systemctl start nginx to start the Nginx service. Use systemctl enable nginx to enable automatic startup of Nginx at system startup. Use systemctl status nginx to verify that the startup is successful. Visit http://localhost in a web browser to view the default welcome page.


