This article mainly introduces the processing of several common messages in Windows. In "Win32 SDK Basics (8) - Windows Message Mechanism", we introduced the processing of WM_CREATE messages. In the window creation Previously, we used the message processing function to pop up a MessageBox. Based on this, this article introduces WM_DESTROY, WM_SYSCOMMAND, WM_QUIT, WM_SIZE and other other common Windows messages. First, we introduce the SDK Basics (8) - Windows Message Mechanism" is the code in the article, and subsequent experiments are based on this code.
#include "stdafx.h"
#include "MessageTs.h"

HINSTANCE g_hInstance = 0;
//窗口处理函数
LRESULT CALLBACK WndProc(HWND hWnd, UINT uMsg, WPARAM wParam, LPARAM lParam)
{
	switch (uMsg)
	{
	case WM_DESTROY:
		PostQuitMessage(0);//可以使GetMessage返回0
		break;
	case  WM_CREATE:
		MessageBox(NULL,"WM_CREATE消息被处理了","消息处理",MB_OK);
	default:
		break;
	}
	return DefWindowProc(hWnd, uMsg, wParam, lParam);
}
//注册窗口类
BOOL Register(LPSTR lpClassName, WNDPROC wndProc)
{
	WNDCLASSEX wce = { 0 };
	wce.cbSize = sizeof(wce);
	wce.cbClsExtra = 0;
	wce.cbWndExtra = 0;
	wce.hbrBackground = (HBRUSH)(COLOR_WINDOW + 1);
	wce.hCursor = NULL;
	wce.hIcon = NULL;
	wce.hIconSm = NULL;
	wce.hInstance = g_hInstance;
	wce.lpfnWndProc = wndProc;
	wce.lpszClassName = lpClassName;
	wce.lpszMenuName = NULL;
	wce.style = CS_HREDRAW | CS_VREDRAW;
	ATOM nAtom = RegisterClassEx(&wce);
	if (nAtom == 0)
		return FALSE;
	return true;

}
//创建主窗口
HWND CreateMain(LPSTR lpClassName, LPSTR lpWndName)
{
	HWND hWnd = CreateWindowEx(0, lpClassName, lpWndName,
		WS_OVERLAPPEDWINDOW, CW_USEDEFAULT, CW_USEDEFAULT, CW_USEDEFAULT, CW_USEDEFAULT, NULL, NULL, g_hInstance, NULL);
	return hWnd;
}
//显示窗口
void Display(HWND hWnd)
{
	ShowWindow(hWnd, SW_SHOW);
	UpdateWindow(hWnd);
}
//消息循环
void Message()
{
	MSG nMsg = { 0 };
	while (GetMessage(&nMsg, NULL, 0, 0))
	{
		TranslateMessage(&nMsg);
		DispatchMessage(&nMsg);
	}
}
int APIENTRY wWinMain(_In_ HINSTANCE hInstance,
	_In_opt_ HINSTANCE hPrevInstance,
	_In_ LPWSTR    lpCmdLine,
	_In_ int       nCmdShow)
{
	// TODO: Place code here.

	g_hInstance = hInstance;
	BOOL nRet = Register("Main", WndProc);
	if (!nRet)
	{
		MessageBox(NULL, "注册失败", "Infor", MB_OK);
		return 0;
	}
	HWND hWnd = CreateMain("Main", "window");
	Display(hWnd);
	Message();
	return 0;
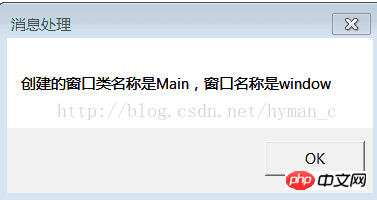
}We still want to introduce the WM_CREATE message. Because in the previous article we only verified the timing of the WM_CREATE message by popping up the MessageBox, but did not introduce its other very important component-WPARAM and LPARAM parameters. When we send a message, we can often carry some information through these two parameters. The WM_CREATE message is a message automatically sent by the system when we create a window, and these two parameters are also used to carry information. LPARAM carries the 12 parameter information of CreateWindowEx in which we created the window. WPARAM is not used. Next, when we process the WM_CREATE message, we will display the window class and window name on the pop-up dialog box.
//窗口处理函数
LRESULT CALLBACK WndProc(HWND hWnd, UINT uMsg, WPARAM wParam, LPARAM lParam)
{
	switch (uMsg)
	{
	case WM_DESTROY:
		PostQuitMessage(0);//可以使GetMessage返回0
		break;
	case  WM_CREATE:
		{
			CREATESTRUCT crt = *((CREATESTRUCT*)lParam);
			char buf[256] = {0};
			sprintf(buf,"创建的窗口类名称是%s,窗口名称是%s",crt.lpszClass,crt.lpszName);
			MessageBox(NULL, buf, "消息处理", MB_OK);
		}

	default:
		break;
	}
	return DefWindowProc(hWnd, uMsg, wParam, lParam);
}Running the program, we found that we successfully captured the registered window class name and window name of the window before the window was created, and displayed it on the dialog box:

We have already solved this message in the previous article. It is a message sent when the Windows window is closed. To put it simply, when you click the close button of the Windows window, this message will be sent. In our previous code, the operation to process this message was PostQuitMessage(0). This actually means that we sent a WM_QUIT message to be introduced next to end the program process. Neither LPARAM nor WPARAM of the WM_DESTORY message is used. It is generally used to do some resource recycling and memory release before the window is closed. The PostQuitMessage(0) we call is a very common usage.
As we have already introduced before, this is a message we send using PostQuitMessage(0) to end the program process. Its WMPARAM is the parameter passed in PostQuitMessage , the LPARAM parameter is not used. Normally, after we send WM_QUIT, it will cause the GetMessage function in the message loop to return, causing the process to exit . The WM_QUIT message cannot be passed to our own window processing function. But we can verify that there is such a message from the side: We first add processing of the WM_QUIT message in the code.
LRESULT CALLBACK WndProc(HWND hWnd, UINT uMsg, WPARAM wParam, LPARAM lParam)
{
	switch (uMsg)
	{
	case WM_DESTROY:
		PostQuitMessage(0);//可以使GetMessage返回0
		break;
	case  WM_CREATE:
	{
		CREATESTRUCT crt = *((CREATESTRUCT*)lParam);
		char buf[256] = {0};
		sprintf(buf,"创建的窗口类名称是%s,窗口名称是%s",crt.lpszClass,crt.lpszName);
		MessageBox(NULL, buf, "消息处理", MB_OK);
	}
	case WM_QUIT:
	{
		int param = (int)wParam;
		char buf[256];
		sprintf(buf, "进程退出,退出码:%d", param);
		MessageBox(NULL, buf, "消息处理", MB_OK);
	}
	default:
		break;
	}
	return DefWindowProc(hWnd, uMsg, wParam, lParam);
}Running the program, after closing the dialog box for processing the WM_CREATE message, we found that the dialog box for us to verify the WM_QUIT message popped up.

This is because the pop -up processing wm_create message MESSAGEBOX is also a window, but it belongs to our process. Each window has a message loop, but there is only one message queue per process. When the MessageBox window is closed, its window processing function also calls PostQuitMessage(0) to send a WM_QUIT message. In its message loop, GetMessage returns and exits after receiving the WM_QUIT message. This message will be captured by our message loop, but since it is not a message sent by our window, it will not cause our GetMessage to return to end the loop. Instead, it will be passed to our window processing function for summary processing, so it appears. The dialog box shown in the screenshot above appears.
System command message, this message will be triggered when we click the maximize, minimize and close commands (so when we click the close button, WM_DESTROY and WM_SYSCOMMAND will be triggered at the same time) Two pieces of news). Its wParam parameter carries the specific window operation:
Close: SC_CLOSE
Maximize: SC_MAXIMIZE
Minimize: SC_MINIMIZE
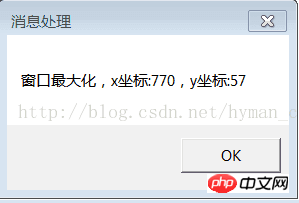
这里只列举了三种常见的WM_SYSCOMMAND携带的参数宏,其它的可以参照MSDN。WM_SYSCOMMAND的lParam携带的是产生该消息的鼠标的位置,位置的X和Y坐标分别被存放在lParam的低位和高位字中,我们用下面的代码来验证在窗口最大化时,我们鼠标的位置:
case WM_SYSCOMMAND:
	{
		if (wParam == SC_MAXIMIZE)
		{
			short x = LOWORD(lParam);
			short y = HIWORD(lParam);
			char buf[256];
			sprintf(buf, "窗口最大化,x坐标:%d,y坐标:%d", x,y);
			MessageBox(NULL, buf, "消息处理", MB_OK);
		}
	}
当我们点击窗口的最大化按钮时,出现下面的提示:

每当我们调整窗口的大小时,都会触发WM_SIZE消息。它的wParam参数携带的是该消息产生的原因:
SIZE_RESTORED —— 重新调整窗口大小
SIZE_MAXIMIZED —— 最大化显示
SIZE_ MINIMIZED —— 最小化显示
其他参数宏详见MSDN
它的lParam参数携带的是重新调整大小后的窗口的高和宽,其中低字节代表宽,高字节代表高,这里我们通过代码验证,当窗口最大化后窗口的高和宽:
case WM_SIZE:
	{
		if (wParam == SIZE_MAXIMIZED)
		{
			short width = LOWORD(lParam);
			short hight = HIWORD(lParam);
			char buf[256];
			sprintf(buf, "窗口最大化,高度:%d,宽度:%d", hight, width);
			MessageBox(NULL, buf, "消息处理", MB_OK);
		}
}运行程序,最大化时可以显示最大化后的窗口高度和宽度:

The above is the detailed content of Win32 SDK Basics (10) Detailed explanation of several common Windows message processing sample codes. For more information, please follow other related articles on the PHP Chinese website!


