How to set up middleware in asp.net core example tutorial
Asp.Net Core-Middleware
In this chapter, we will learn how to set up middleware. Middleware technology in ASP.NET Core controls how our applications respond to HTTP requests. It can also control application exception errors, which is a key in how users are authenticated and authorized to perform specific actions.
Middleware is a software component assembled into an application's pipeline to handle requests and responses.
Each component can choose whether to pass the request to the next component in the pipeline, and can perform certain actions before and after tasks in the pipeline.
The Request delegate is used to build the request pipeline. The Request delegate is used to handle each HTTP request.
Every piece of middleware in ASP.NET Core is an object, and each piece has a very specific, focused and limited role.
Ultimately, we need a lot of middleware to provide appropriate behavior for the application.
Now let’s assume we want to log every request to our application.
In this case, the first piece of middleware we install into the application is a logging component.
This logger can see all incoming requests, and then the middleware just logs some information, and then passes the request to the next block of middleware.

Middleware appears in this processing pipeline as a series of components.
The next middleware we install into our application is an authorization component.
A component might be looking for a specific cookie or accessing a token in the HTTP header.
If the authorization component finds a token, it allows the request to continue.
If not, the authorization component itself may respond to the request with an HTTP error code or redirect the user to the login page.
Otherwise, the authorization component passes the request to the next router's middleware.
A router looks at the URL and determines the next action.
The router is making some responses. If the router does not find any response, the router itself may return a 404 Not Found error.
Case
Now let us understand more about middleware through a simple example. We configure the middleware component by using the Configure method of our startup class.
using Microsoft.AspNet.Builder;
using Microsoft.AspNet.Hosting;
using Microsoft.AspNet.Http;
using Microsoft.Extensions.DependencyInjection;
using Microsoft.Extensions.Configuration;
namespace FirstAppDemo {
   public class Startup {
      public Startup() {
         var builder = new ConfigurationBuilder()
            .AddJsonFile("AppSettings.json");
         Configuration = builder.Build();
      }
      public IConfiguration Configuration { get; set; }

      // This method gets called by the runtime.
      // Use this method to add services to the container.
      // For more information on how to configure your application,
      // visit http://go.microsoft.com/fwlink/?LinkID=398940
      public void ConfigureServices(IServiceCollection services) {
      }

      // This method gets called by the runtime.
      // Use this method to configure the HTTP request pipeline.
      public void Configure(IApplicationBuilder app) {
         app.UseIISPlatformHandler();

         app.Run(async (context) => {
            var msg = Configuration["message"];
            await context.Response.WriteAsync(msg);
         });
      }
      // Entry point for the application.
      public static void Main(string[] args) => WebApplication.Run<Startup>(args);
   }
}
Configure()方法内,我们将调用IApplicationBuilder接口的扩展方法来添加中间件。By default in a new empty project there are two pieces of middleware -
IISPlatformHandler
Middleware registered with app.Run
IISPlatformHandler
IISPlatformHandler allows us to use Windows Authentication. It will look at each incoming request to see if there are any Windows identity related requests and then call the next block middleware.
Middleware registered with app.Run
In this case a middleware is registered with app.Run. The Run method allows us to pass in another method that we can use to handle each response. The Run method is not something you often see, we can call it a middleware terminal.
The middleware you register to run will never have the opportunity to call another middleware. The only thing it can do is receive the request and produce some kind of response.
You also have access to a response object, and you can add some strings to the response object.
If you want to register another middleware after app.Run, this middleware will never be called, because the Run method is the terminal of a middleware. It doesn't call the next block middleware.
How to add a middleware
Let us proceed with the following steps to add another middleware −
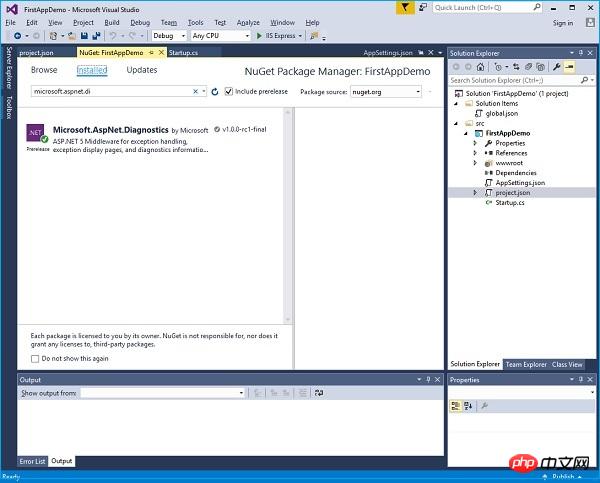
Step 1−Right click on the project and select Manage NuGet Packages.
Step 2− Search for Microsoft.aspnet.diagnostics, this particular package contains many different kinds of middleware that we can use.

Step 3−If the package is not installed in your project, then choose to install the package.
Step 4−Now let us call the app.UseWelcomePage middleware in the Configure() method.
// This method gets called by the runtime.
// Use this method to configure the HTTP request pipeline. public void Configure(IApplicationBuilder app) {
   app.UseIISPlatformHandler();
   app.UseWelcomePage();

   app.Run(async (context) => {
      var msg = Configuration["message"];
      await context.Response.WriteAsync(msg);
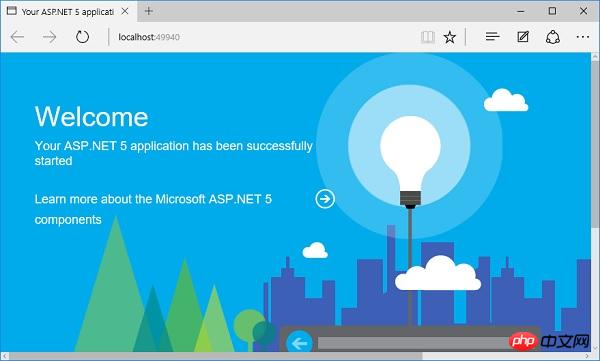
});Step 5 − Run your application and you will see the following welcome screen.

This welcome screen may not be that useful.
Step 6− Let’s try something else that might be more useful, instead of using the welcome page, we will use the RuntimeInfoPage.
 1 // This method gets called by the runtime.
 2 // Use this method to configure the HTTP request pipeline.  3 public void Configure(IApplicationBuilder app) {
 4    app.UseIISPlatformHandler();
 5    app.UseRuntimeInfoPage();
 6      7    app.Run(async (context) => {
 8       var msg = Configuration["message"];
 9       await context.Response.WriteAsync(msg);
10    });
11 }Step 7 − Save your Startup.cs page and refresh your browser, you will see the page below.

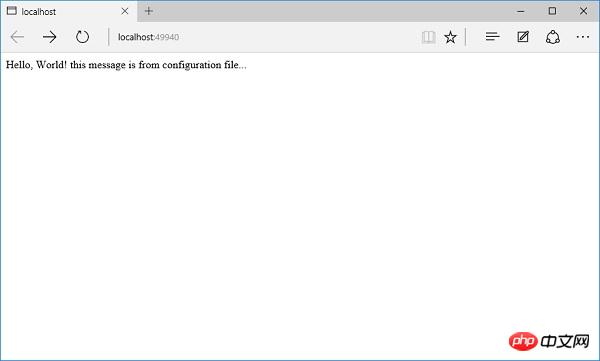
This RuntimeInfoPage is middleware that will only respond to requests for a specific URL. If the incoming request does not match the URL, this middleware simply passes the request on to the next piece of middleware. The request will go through the IISPlatformHandler middleware and then go to the UseRuntimeInfoPage middleware. It doesn't create a response, so it goes to our application. Run and display the string.
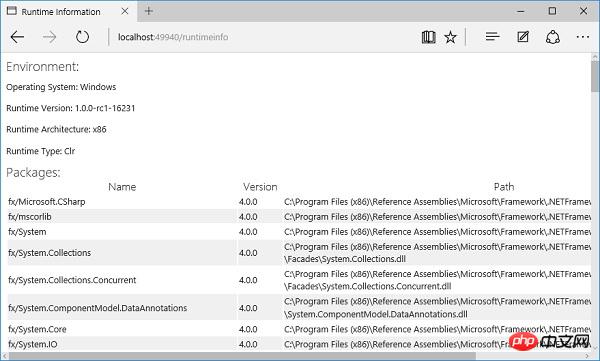
Step 8−We add “runtimeinfo” at the end of the URL. You will now see a page that is runtime information page by the middleware.

You will see a return page, which shows you some information about your runtime environment, such as operating system, runtime version, structure, type and the type you are running. Information about all packages used.
The above is the detailed content of How to set up middleware in asp.net core example tutorial. For more information, please follow other related articles on the PHP Chinese website!

Hot AI Tools

Undresser.AI Undress
AI-powered app for creating realistic nude photos

AI Clothes Remover
Online AI tool for removing clothes from photos.

Undress AI Tool
Undress images for free

Clothoff.io
AI clothes remover

Video Face Swap
Swap faces in any video effortlessly with our completely free AI face swap tool!

Hot Article

Hot Tools

Notepad++7.3.1
Easy-to-use and free code editor

SublimeText3 Chinese version
Chinese version, very easy to use

Zend Studio 13.0.1
Powerful PHP integrated development environment

Dreamweaver CS6
Visual web development tools

SublimeText3 Mac version
God-level code editing software (SublimeText3)

Hot Topics
 1389
1389
 52
52
 What is the principle of tomcat middleware
Dec 27, 2023 pm 04:40 PM
The principle of tomcat middleware is implemented based on Java Servlet and Java EE specifications. As a Servlet container, Tomcat is responsible for processing HTTP requests and responses and providing the running environment for Web applications. The principles of Tomcat middleware mainly involve: 1. Container model; 2. Component architecture; 3. Servlet processing mechanism; 4. Event listening and filters; 5. Configuration management; 6. Security; 7. Clustering and load balancing; 8. Connector technology; 9. Embedded mode, etc.
 How to handle form validation using middleware in Laravel
Nov 02, 2023 pm 03:57 PM
How to use middleware to handle form validation in Laravel, specific code examples are required Introduction: Form validation is a very common task in Laravel. In order to ensure the validity and security of the data entered by users, we usually verify the data submitted in the form. Laravel provides a convenient form validation function and also supports the use of middleware to handle form validation. This article will introduce in detail how to use middleware to handle form validation in Laravel and provide specific code examples.
 How to use middleware for data acceleration in Laravel
Nov 02, 2023 am 09:40 AM
How to use middleware for data acceleration in Laravel Introduction: When developing web applications using the Laravel framework, data acceleration is the key to improving application performance. Middleware is an important feature provided by Laravel that handles requests before they reach the controller or before the response is returned. This article will focus on how to use middleware to achieve data acceleration in Laravel and provide specific code examples. 1. What is middleware? Middleware is a mechanism in the Laravel framework. It is used
 How to use middleware for response transformation in Laravel
Nov 03, 2023 am 09:57 AM
How to use middleware for response conversion in Laravel Middleware is one of the very powerful and practical features in the Laravel framework. It allows us to process requests and responses before the request enters the controller or before the response is sent to the client. In this article, I will demonstrate how to use middleware for response transformation in Laravel. Before starting, make sure you have Laravel installed and a new project created. Now we will follow these steps: Create a new middleware Open
 How to use middleware for data recovery in Laravel
Nov 02, 2023 pm 02:12 PM
Laravel is a popular PHP web application framework that provides many fast and easy ways to build efficient, secure and scalable web applications. When developing Laravel applications, we often need to consider the issue of data recovery, that is, how to recover data and ensure the normal operation of the application in the event of data loss or damage. In this article, we will introduce how to use Laravel middleware to implement data recovery functions and provide specific code examples. 1. What is Lara?
 How to use middleware to set up cross-domain resource sharing (CORS) in the Slim framework
Jul 30, 2023 pm 08:34 PM
How to set up Cross-Origin Resource Sharing (CORS) using middleware in the Slim framework Cross-Origin Resource Sharing (CORS) is a mechanism that allows the server to set some additional information in the HTTP response header to tell the browser whether Allow cross-domain requests. In some projects with front-end and back-end separation, the CORS mechanism can be used to realize the front-end's cross-domain request for the back-end interface. When using the Slim framework to develop REST API, we can use middleware (Middleware)
 How to use middleware for scheduled task scheduling in Laravel
Nov 02, 2023 pm 02:26 PM
How to use middleware for scheduled task scheduling in Laravel Introduction: Laravel is a popular PHP open source framework that provides convenient and powerful tools to develop web applications. One of the important features is scheduled tasks, which allows developers to run specific tasks at specified intervals. In this article, we will introduce how to use middleware to implement Laravel's scheduled task scheduling, and provide specific code examples. Environment Preparation Before starting, we need to make sure
 CodeIgniter middleware: Provides secure file upload and download functions
Aug 01, 2023 pm 03:01 PM
CodeIgniter middleware: Provides secure file upload and download functions Introduction: In the process of web application development, file upload and download are very common functions. However, for security reasons, handling file uploads and downloads often requires additional security measures. CodeIgniter is a popular PHP framework that provides a wealth of tools and libraries to support developers in building secure and reliable web applications. This article will introduce how to use CodeIgniter middleware to implement secure files


