

Detailed explanation of examples of animation using Shape

The previous article was almost all about the application of DoubleAnimation, and this article is about PointAnimation.
1. Use PointAnimation
Using PointAnimation can deform Shape, but in fact I don’t see many people using it this way. After all, most software made in WPF does not need to be so fancy.
1.1 Using PointAnimation on XAML
<Storyboard x:Name="Storyboard2" RepeatBehavior="Forever" AutoReverse="True" Duration="0:0:4"><PointAnimation Storyboard.TargetProperty="(Path.Data).(PathGeometry.Figures)[0].(PathFigure.StartPoint)" Storyboard.TargetName="Path2" To="0,0" EnableDependentAnimation="True" /><PointAnimation Storyboard.TargetProperty="(Path.Data).(PathGeometry.Figures)[0].(PathFigure.Segments)[0].(LineSegment.Point)" Storyboard.TargetName="Path2" To="100,0" EnableDependentAnimation="True" /><ColorAnimation To="#FF85C82E" Storyboard.TargetProperty="(Shape.Fill).(SolidColorBrush.Color)" Storyboard.TargetName="Path2" /></Storyboard>…<Path Margin="0,20,0,0" x:Name="Path2" Fill="GreenYellow"><Path.Data><PathGeometry><PathFigure StartPoint="50,0"><LineSegment Point="50,0" /><LineSegment Point="0,100" /><LineSegment Point="0,100" /><LineSegment Point="100,100" /><LineSegment Point="100,100" /></PathFigure></PathGeometry></Path.Data></Path>

The biggest headache in this example is the Property-path syntax. If you can't If you memorize it, it is best to rely on Blend generation.
1.2 Using PointAnimation in code
If there are a lot of Points, such as charts, PointAnimation is usually used in C# code:
_storyboard = new Storyboard();
Random random = new Random();for (int i = 0; i < _pathFigure.Segments.Count; i++)
{var animation = new PointAnimation { Duration = TimeSpan.FromSeconds(3) };
    Storyboard.SetTarget(animation, _pathFigure.Segments[i]);
    Storyboard.SetTargetProperty(animation, "(LineSegment.Point)");
    animation.EnableDependentAnimation = true;
    animation.EasingFunction = new QuarticEase { EasingMode = EasingMode.EaseOut };
    animation.To = new Point((_pathFigure.Segments[i] as LineSegment).Point.X, (i % 2 == 0 ? 1 : -1) * i * 1.2 + 60);
    _storyboard.Children.Add(animation);
}
_storyboard.Begin();
Because you can SetTarget directly, the Property-path syntax can be very simple.
2. Extend PointAnimation
The animations in the above two examples are relatively simple. If they are more complicated, XAML or C# code needs to be written very complicated. I referred to this webpage and wanted to make a similar animation, but found that I needed to write a lot of XAML so I gave up using PointAnimation to implement it. The core animation of this page is this HTML:
<polygon fill="#FFD41D" points="97.3,0 127.4,60.9 194.6,70.7 145.9,118.1 157.4,185.1 97.3,153.5 37.2,185.1 48.6,118.1 0,70.7     67.2,60.9">
      <animate id="animation-to-check" begin="indefinite" fill="freeze" attributeName="points" dur="500ms" to="110,58.2 147.3,0 192.1,29 141.7,105.1 118.7,139.8 88.8,185.1 46.1,156.5 0,125 23.5,86.6     71.1,116.7"/>
<animate id="animation-to-star" begin="indefinite" fill="freeze" attributeName="points" dur="500ms" to="97.3,0 127.4,60.9 194.6,70.7 145.9,118.1 157.4,185.1 97.3,153.5 37.2,185.1 48.6,118.1 0,70.7 67.2,60.9"/> </polygon>You only need a set of Points to control the animation of all Points, which is indeed much more efficient than PointAnimation. In WPF, you can implement a PointCollectionAnimamtion by inheriting Timeline. For details, please refer to this project. Unfortunately, although UWP's Timeline class is not closed, I don't know how to inherit and derive a custom Animation.
At this time, you need to change your thinking a little bit. DoubleAnimation can be understood like this: Storyboard passes TimeSpan to DoubleAnimation, and DoubleAnimation uses this TimeSpan (sometimes combined with EasingFunction) to calculate the current value of the target attribute and finally passes it to the target attribute, as shown in the following figure:

In this case, you can also receive the calculated Double and then calculate the target PointCollection value through the Converter:
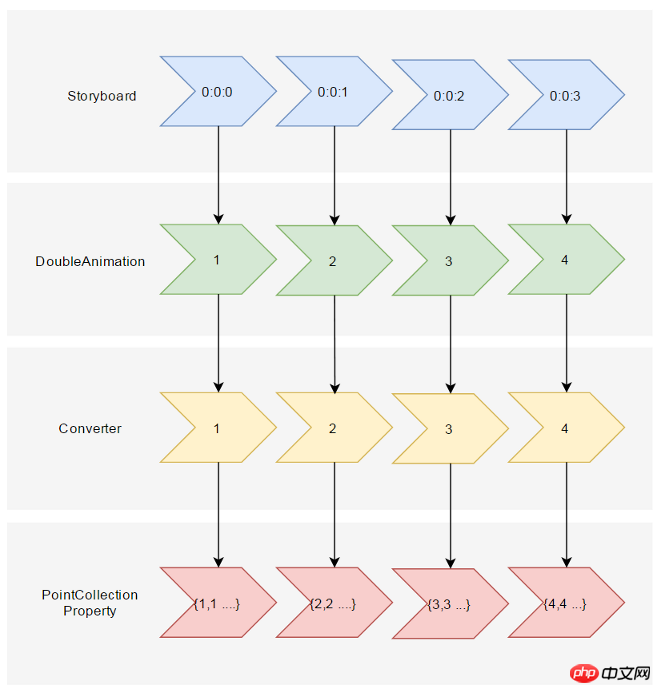
Suppose you tell this Converter When the incoming Double value (named Progress) is 0, PointCollection is {0,0 1,1...}, when Progress is 100, PointCollection is {1,1 2,2...}, when Progress is at any of these values The calculation method of time is:
private PointCollection GetCurrentPoints(PointCollection fromPoints, PointCollection toPoints, double percentage)
{var result = new PointCollection();for (var i = 0;
        i < Math.Min(fromPoints.Count, toPoints.Count);
        i++)
    {
        var x = (1 - percentage / 100d) * fromPoints[i].X + percentage / 100d * toPoints[i].X;
        var y = (1 - percentage / 100d) * fromPoints[i].Y + percentage / 100d * toPoints[i].Y;

        result.Add(new Point(x, y));
    }return result;
}This completes the conversion process from TimeSpan to PointCollection. Then there is the way to use it in XAML. Referring to the PointCollectionAnimation above, although there is an extra Converter, the XAML should be concise enough:
<local:ProgressToPointCollectionBridge x:Name="ProgressToPointCollectionBridge"><PointCollection>97.3,0 127.4,60.9 194.6,70.7 145.9,118.1 157.4,185.1 97.3,153.5 37.2,185.1 48.6,118.1 0,70.7 67.2,60.9</PointCollection><PointCollection>110,58.2 147.3,0 192.1,29 141.7,105.1 118.7,139.8 88.8,185.1 46.1,156.5 0,125 23.5,86.6 71.1,116.7</PointCollection></local:ProgressToPointCollectionBridge><Storyboard x:Name="Storyboard1" FillBehavior="HoldEnd"><DoubleAnimation Duration="0:0:2" To="100" FillBehavior="HoldEnd" Storyboard.TargetProperty="(local:ProgressToPointCollectionBridge.Progress)" Storyboard.TargetName="ProgressToPointCollectionBridge" EnableDependentAnimation="True"/></Storyboard>…<Polygon x:Name="polygon" Points="{Binding Source={StaticResource ProgressToPointCollectionBridge},Path=Points}" Stroke="DarkOliveGreen" StrokeThickness="2" Height="250" Width="250" Stretch="Fill" />In the end, I chose to name this Converter ProgressToPointCollectionBridge. It can be seen that Polygon binds Points to ProgressToPointCollectionBridge, and DoubleAnimation changes ProgressToPointCollectionBridge.Progress, thus changing Points. The simplicity of XAML is quite satisfactory. If you need to operate multiple points, it has great advantages over PointAnimation.
The running results are as follows:

Complete XAML:
<UserControl.Resources><local:ProgressToPointCollectionBridge x:Name="ProgressToPointCollectionBridge"><PointCollection>97.3,0 127.4,60.9 194.6,70.7 145.9,118.1 157.4,185.1 97.3,153.5 37.2,185.1 48.6,118.1 0,70.7 67.2,60.9</PointCollection><PointCollection>110,58.2 147.3,0 192.1,29 141.7,105.1 118.7,139.8 88.8,185.1 46.1,156.5 0,125 23.5,86.6 71.1,116.7</PointCollection></local:ProgressToPointCollectionBridge><Storyboard x:Name="Storyboard1" FillBehavior="HoldEnd"><DoubleAnimation Duration="0:0:2" To="100" FillBehavior="HoldEnd" Storyboard.TargetProperty="(local:ProgressToPointCollectionBridge.Progress)" Storyboard.TargetName="ProgressToPointCollectionBridge" EnableDependentAnimation="True"><DoubleAnimation.EasingFunction><ElasticEase EasingMode="EaseInOut" /></DoubleAnimation.EasingFunction></DoubleAnimation><ColorAnimation Duration="0:0:2" To="#FF48F412" Storyboard.TargetProperty="(Shape.Fill).(SolidColorBrush.Color)" Storyboard.TargetName="polygon" d:IsOptimized="True"><ColorAnimation.EasingFunction><ElasticEase EasingMode="EaseInOut" /></ColorAnimation.EasingFunction></ColorAnimation></Storyboard></UserControl.Resources><Grid x:Name="LayoutRoot" Background="White"><Polygon x:Name="polygon" Points="{Binding Source={StaticResource ProgressToPointCollectionBridge},Path=Points}" Stroke="DarkOliveGreen" StrokeThickness="2" Height="250" Width="250" Stretch="Fill" Fill="#FFEBF412" /></Grid>ProgressToPointCollectionBridge:
[ContentProperty(Name = nameof(Children))]public class ProgressToPointCollectionBridge : DependencyObject
{public ProgressToPointCollectionBridge()
    {
        Children = new ObservableCollection<PointCollection>();
    }/// <summary>///     获取或设置Points的值/// </summary>public PointCollection Points
    {get { return (PointCollection) GetValue(PointsProperty); }set { SetValue(PointsProperty, value); }
    }/// <summary>///     获取或设置Progress的值/// </summary>public double Progress
    {get { return (double) GetValue(ProgressProperty); }set { SetValue(ProgressProperty, value); }
    }/// <summary>///     获取或设置Children的值/// </summary>public Collection<PointCollection> Children
    {get { return (Collection<PointCollection>) GetValue(ChildrenProperty); }set { SetValue(ChildrenProperty, value); }
    }protected virtual void OnProgressChanged(double oldValue, double newValue)
    {UpdatePoints();
    }protected virtual void OnChildrenChanged(Collection<PointCollection> oldValue, Collection<PointCollection> newValue)
    {var oldCollection = oldValue as INotifyCollectionChanged;if (oldCollection != null)
            oldCollection.CollectionChanged -= OnChildrenCollectionChanged;var newCollection = newValue as INotifyCollectionChanged;if (newCollection != null)
            newCollection.CollectionChanged += OnChildrenCollectionChanged;UpdatePoints();
    }private void OnChildrenCollectionChanged(object sender, NotifyCollectionChangedEventArgs e)
    {UpdatePoints();
    }private void UpdatePoints()
    {if (Children == null || Children.Any() == false)
        {
            Points = null;
        }else if (Children.Count == 1)
        {var fromPoints = new PointCollection();for (var i = 0; i < Children[0].Count; i++)
                fromPoints.Add(new Point(0, 0));var toPoints = Children[0];
            Points = GetCurrentPoints(fromPoints, toPoints, Progress);
        }else{var rangePerSection = 100d / (Children.Count - 1);var fromIndex = Math.Min(Children.Count - 2, Convert.ToInt32(Math.Floor(Progress / rangePerSection)));
            fromIndex = Math.Max(fromIndex, 0);var toIndex = fromIndex + 1;
            PointCollection fromPoints;if (fromIndex == toIndex)
            {
                fromPoints = new PointCollection();for (var i = 0; i < Children[0].Count; i++)
                    fromPoints.Add(new Point(0, 0));
            }else{
                fromPoints = Children.ElementAt(fromIndex);
            }var toPoints = Children.ElementAt(toIndex);
            var percentage = (Progress / rangePerSection - fromIndex) * 100;

            Points = GetCurrentPoints(fromPoints, toPoints, percentage);
        }
    }private PointCollection GetCurrentPoints(PointCollection fromPoints, PointCollection toPoints, double percentage)
    {var result = new PointCollection();for (var i = 0;
            i < Math.Min(fromPoints.Count, toPoints.Count);
            i++)
        {
            var x = (1 - percentage / 100d) * fromPoints[i].X + percentage / 100d * toPoints[i].X;
            var y = (1 - percentage / 100d) * fromPoints[i].Y + percentage / 100d * toPoints[i].Y;

            result.Add(new Point(x, y));
        }return result;
}#region DependencyProperties#endregion}3. Conclusion
If DoubleAnimation is said to be "animating the Double property of the target", then PointAnimation can be said to be "animating the two Double properties of Point.X and Point.Y of the target." Properties are animated at the same time", while ColorAnimation is "animating the four Int properties of the target's Color.A, R, G, and B at the same time." Understood in this way, PointAnimation and ColorAnimation are just extensions of DoubleAnimation. Furthermore, DoubleAnimation should be able to extend the animation of all types of attributes. However, I don’t know how to customize animations on UWP. I can only expand it through the compromise method in this article. Although XAML needs to be written more complicated, it also has its advantages:
You don’t need to know too much about Animation-related classes, you only need to have basic knowledge such as dependency properties, binding, etc. .
will not change due to changes in the animation API, and is compatible with WPF, Silverlight and UWP (probably, I didn't really test these codes on WPF).
The code is simple enough, eliminating the steps of calculating TimeSpan and EasingFunction. With slight modifications, it can also be made into a generic
AnimationBridge < T >, providing support for data types other than PointCollection.
Based on the previous article, I always feel that any functions not provided by UWP can be implemented through alternative methods in the future. Binding and DependencyProperty are really the best for UWP developers. friend.
4. Reference
How SVG Shape Morphing Works
Gadal MetaSyllabus
The above is the detailed content of Detailed explanation of examples of animation using Shape. For more information, please follow other related articles on the PHP Chinese website!

Hot AI Tools

Undresser.AI Undress
AI-powered app for creating realistic nude photos

AI Clothes Remover
Online AI tool for removing clothes from photos.

Undress AI Tool
Undress images for free

Clothoff.io
AI clothes remover

Video Face Swap
Swap faces in any video effortlessly with our completely free AI face swap tool!

Hot Article
Hot Tools

Notepad++7.3.1
Easy-to-use and free code editor

SublimeText3 Chinese version
Chinese version, very easy to use

Zend Studio 13.0.1
Powerful PHP integrated development environment

Dreamweaver CS6
Visual web development tools

SublimeText3 Mac version
God-level code editing software (SublimeText3)
Hot Topics
 1386
1386
 52
52

 What software is crystaldiskmark? -How to use crystaldiskmark?
Mar 18, 2024 pm 02:58 PM
What software is crystaldiskmark? -How to use crystaldiskmark?
Mar 18, 2024 pm 02:58 PM
CrystalDiskMark is a small HDD benchmark tool for hard drives that quickly measures sequential and random read/write speeds. Next, let the editor introduce CrystalDiskMark to you and how to use crystaldiskmark~ 1. Introduction to CrystalDiskMark CrystalDiskMark is a widely used disk performance testing tool used to evaluate the read and write speed and performance of mechanical hard drives and solid-state drives (SSD). Random I/O performance. It is a free Windows application and provides a user-friendly interface and various test modes to evaluate different aspects of hard drive performance and is widely used in hardware reviews
 How to download foobar2000? -How to use foobar2000
Mar 18, 2024 am 10:58 AM
How to download foobar2000? -How to use foobar2000
Mar 18, 2024 am 10:58 AM
foobar2000 is a software that can listen to music resources at any time. It brings you all kinds of music with lossless sound quality. The enhanced version of the music player allows you to get a more comprehensive and comfortable music experience. Its design concept is to play the advanced audio on the computer The device is transplanted to mobile phones to provide a more convenient and efficient music playback experience. The interface design is simple, clear and easy to use. It adopts a minimalist design style without too many decorations and cumbersome operations to get started quickly. It also supports a variety of skins and Theme, personalize settings according to your own preferences, and create an exclusive music player that supports the playback of multiple audio formats. It also supports the audio gain function to adjust the volume according to your own hearing conditions to avoid hearing damage caused by excessive volume. Next, let me help you
 How to use NetEase Mailbox Master
Mar 27, 2024 pm 05:32 PM
How to use NetEase Mailbox Master
Mar 27, 2024 pm 05:32 PM
NetEase Mailbox, as an email address widely used by Chinese netizens, has always won the trust of users with its stable and efficient services. NetEase Mailbox Master is an email software specially created for mobile phone users. It greatly simplifies the process of sending and receiving emails and makes our email processing more convenient. So how to use NetEase Mailbox Master, and what specific functions it has. Below, the editor of this site will give you a detailed introduction, hoping to help you! First, you can search and download the NetEase Mailbox Master app in the mobile app store. Search for "NetEase Mailbox Master" in App Store or Baidu Mobile Assistant, and then follow the prompts to install it. After the download and installation is completed, we open the NetEase email account and log in. The login interface is as shown below
 How to use Baidu Netdisk app
Mar 27, 2024 pm 06:46 PM
How to use Baidu Netdisk app
Mar 27, 2024 pm 06:46 PM
Cloud storage has become an indispensable part of our daily life and work nowadays. As one of the leading cloud storage services in China, Baidu Netdisk has won the favor of a large number of users with its powerful storage functions, efficient transmission speed and convenient operation experience. And whether you want to back up important files, share information, watch videos online, or listen to music, Baidu Cloud Disk can meet your needs. However, many users may not understand the specific use method of Baidu Netdisk app, so this tutorial will introduce in detail how to use Baidu Netdisk app. Users who are still confused can follow this article to learn more. ! How to use Baidu Cloud Network Disk: 1. Installation First, when downloading and installing Baidu Cloud software, please select the custom installation option.
 BTCC tutorial: How to bind and use MetaMask wallet on BTCC exchange?
Apr 26, 2024 am 09:40 AM
BTCC tutorial: How to bind and use MetaMask wallet on BTCC exchange?
Apr 26, 2024 am 09:40 AM
MetaMask (also called Little Fox Wallet in Chinese) is a free and well-received encryption wallet software. Currently, BTCC supports binding to the MetaMask wallet. After binding, you can use the MetaMask wallet to quickly log in, store value, buy coins, etc., and you can also get 20 USDT trial bonus for the first time binding. In the BTCCMetaMask wallet tutorial, we will introduce in detail how to register and use MetaMask, and how to bind and use the Little Fox wallet in BTCC. What is MetaMask wallet? With over 30 million users, MetaMask Little Fox Wallet is one of the most popular cryptocurrency wallets today. It is free to use and can be installed on the network as an extension
 Extensions and third-party modules for PHP functions
Apr 13, 2024 pm 02:12 PM
Extensions and third-party modules for PHP functions
Apr 13, 2024 pm 02:12 PM
To extend PHP function functionality, you can use extensions and third-party modules. Extensions provide additional functions and classes that can be installed and enabled through the pecl package manager. Third-party modules provide specific functionality and can be installed through the Composer package manager. Practical examples include using extensions to parse complex JSON data and using modules to validate data.
 How to use Xiaoai Speaker How to connect Xiaoai Speaker to mobile phone
Feb 22, 2024 pm 05:19 PM
How to use Xiaoai Speaker How to connect Xiaoai Speaker to mobile phone
Feb 22, 2024 pm 05:19 PM
After long pressing the play button of the speaker, connect to wifi in the software and you can use it. Tutorial Applicable Model: Xiaomi 12 System: EMUI11.0 Version: Xiaoai Classmate 2.4.21 Analysis 1 First find the play button of the speaker, and press and hold to enter the network distribution mode. 2 Log in to your Xiaomi account in the Xiaoai Speaker software on your phone and click to add a new Xiaoai Speaker. 3. After entering the name and password of the wifi, you can call Xiao Ai to use it. Supplement: What functions does Xiaoai Speaker have? 1 Xiaoai Speaker has system functions, social functions, entertainment functions, knowledge functions, life functions, smart home, and training plans. Summary/Notes: The Xiao Ai App must be installed on your mobile phone in advance for easy connection and use.
 How to set up ppt animation to enter first and then exit
Mar 20, 2024 am 09:30 AM
How to set up ppt animation to enter first and then exit
Mar 20, 2024 am 09:30 AM
We often use ppt in our daily work, so are you familiar with every operating function in ppt? For example: How to set animation effects in ppt, how to set switching effects, and what is the effect duration of each animation? Can each slide play automatically, enter and then exit the ppt animation, etc. In this issue, I will first share with you the specific steps of entering and then exiting the ppt animation. It is below. Friends, come and take a look. Look! 1. First, we open ppt on the computer, click outside the text box to select the text box (as shown in the red circle in the figure below). 2. Then, click [Animation] in the menu bar and select the [Erase] effect (as shown in the red circle in the figure). 3. Next, click [
