
 Backend Development
C#.Net Tutorial
IdentityServer4 authorization configuration AllowedScopes instance
Backend Development
C#.Net Tutorial
IdentityServer4 authorization configuration AllowedScopes instance
IdentityServer4 authorization configuration AllowedScopes instance

1. Business scenario
AllowedScopes in the IdentityServer4 authorization configurationClient sets the specific API site name, which is the ## set by the user. #ApiName, sample code:
//授权中心配置new Client
{
    ClientId = "client_id_1",
    AllowedGrantTypes = GrantTypes.ResourceOwnerPassword,
    AllowOfflineAccess = true,
    AccessTokenLifetime = 3600 * 6, //6小时SlidingRefreshTokenLifetime = 1296000, //15天ClientSecrets =
    {new Secret("secret".Sha256())
    },
    AllowedScopes =
    {"api_name1"},
}//API 服务配置app.UseIdentityServerAuthentication(new IdentityServerAuthenticationOptions
{
    Authority = $"http://localhost:5000",
    ApiName = "api_name1",
RequireHttpsMetadata = false});api_name1 configurations must be consistent. The problem arises because the scope## of the authorization center #The configuration is the entire API service. If we have multiple Client configurations, such as a frontend and a backend, and then both need to access api_name1, some problems will occur. For example, an interface service configuration code in the
service:
[Authorize()]
[Route("api/values")]
[HttpGet]public IActionResult Get()
{return Ok();
} configuration, description api/valuesThe interface needs to be accessed after authorization. If the authorization center is configured with two Client (frontend and backend), and scope both contain api_name1 , now there will be two situations:
- front desk
- Client
and backend
Client, both require authorization to accessapi/valuesInterface: No problem. Front desk - Client
does not require authorization for access, background
Clientrequires authorization for access: There is a problem, front deskClientThere is no way to access it because theapi/valuesinterface is set withAuthorize(). Actually, to explain more clearly, how to let the API service specify
to authorize access? For example: [Authorize(ClientId = 'client_id_1')]. 2. Solution
There is no
[Authorize(ClientId = 'client_id_1')]this solution, but you can use [Authorize(Roles = ' admin')]. The
code of the authorization center is modified as follows:
public class ResourceOwnerPasswordValidator : IResourceOwnerPasswordValidator
{private readonly IUserService _userService;public ResourceOwnerPasswordValidator(IUserService userService)
    {
        _userService = userService;
    }public async Task ValidateAsync(ResourceOwnerPasswordValidationContext context)
    {var user = await _userService.Login(context.UserName, context.Password);if (user != null)
        {var claims = new List<Claim>() { new Claim("role", "admin") }; //根据 user 对象,设置不同的 rolecontext.Result = new GrantValidationResult(user.UserId.ToString(), OidcConstants.AuthenticationMethods.Password, claims);
        }
    }
} configuration of the authorization center is modified as follows
var builder = services.AddIdentityServer();
builder.AddTemporarySigningCredential()//.AddInMemoryIdentityResources(Config.GetIdentityResources()).AddInMemoryApiResources(new List<ApiResource>
        {new ApiResource("api_name1", "api1"){ UserClaims = new List<string> {"role"}}, //增加 role claimnew ApiResource("api_name2", "api2"){ UserClaims = new List<string> {"role"}}
        })
.AddInMemoryClients(Config.GetClients());[Authorize()]
[Route("api/values")]
[HttpGet]public IActionResult Get()
{return Ok();
}
[Authorize(Roles = "admin")]
[Route("api/values2")]
[HttpGet]public IActionResult Get2()
{return Ok();
}
[Authorize(Roles = "admin,normal")]
[Route("api/values3")]
[HttpGet]public IActionResult Get3()
{return Ok();
} interface does not Set specific Roles, but each Role is accessible.
The above is the detailed content of IdentityServer4 authorization configuration AllowedScopes instance. For more information, please follow other related articles on the PHP Chinese website!

Hot AI Tools

Undresser.AI Undress
AI-powered app for creating realistic nude photos

AI Clothes Remover
Online AI tool for removing clothes from photos.

Undress AI Tool
Undress images for free

Clothoff.io
AI clothes remover

Video Face Swap
Swap faces in any video effortlessly with our completely free AI face swap tool!

Hot Article
Hot Tools

Notepad++7.3.1
Easy-to-use and free code editor

SublimeText3 Chinese version
Chinese version, very easy to use

Zend Studio 13.0.1
Powerful PHP integrated development environment

Dreamweaver CS6
Visual web development tools

SublimeText3 Mac version
God-level code editing software (SublimeText3)
Hot Topics
 1387
1387
 52
52

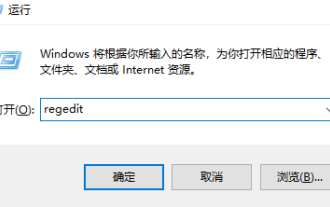 How to upgrade win10 enterprise version 2016 long-term service version to professional version
Jan 03, 2024 pm 11:26 PM
How to upgrade win10 enterprise version 2016 long-term service version to professional version
Jan 03, 2024 pm 11:26 PM
When we no longer want to continue using the current Win10 Enterprise Edition 2016 Long-Term Service Edition, we can choose to switch to the Professional Edition. The method is also very simple. We only need to change some contents and install the system image. How to change win10 enterprise version 2016 long-term service version to professional version 1. Press win+R, and then enter "regedit" 2. Paste the following path directly in the address bar above: Computer\HKEY_LOCAL_MACHINE\SOFTWARE\Microsoft\WindowsNT\CurrentVersion3 , then find the EditionID and replace the content with "professional" to confirm
 How to use Flask-Security to implement user authentication and authorization
Aug 04, 2023 pm 02:40 PM
How to use Flask-Security to implement user authentication and authorization
Aug 04, 2023 pm 02:40 PM
How to use Flask-Security to implement user authentication and authorization Introduction: In modern web applications, user authentication and authorization are essential functions. To simplify this process, Flask-Security is a very useful extension that provides a series of tools and functions to make user authentication and authorization simple and convenient. This article will introduce how to use Flask-Security to implement user authentication and authorization. 1. Install the Flask-Security extension: at the beginning
 UniApp implements detailed analysis of user login and authorization
Jul 05, 2023 pm 11:54 PM
UniApp implements detailed analysis of user login and authorization
Jul 05, 2023 pm 11:54 PM
UniApp implements detailed analysis of user login and authorization. In modern mobile application development, user login and authorization are essential functions. As a cross-platform development framework, UniApp provides a convenient way to implement user login and authorization. This article will explore the details of user login and authorization in UniApp, and attach corresponding code examples. 1. Implementation of user login function Create login page User login function usually requires a login page, which contains a form for users to enter their account number and password and a login button
 How to get authorization for Douyin slices and goods? Is Douyin slicing easy to make?
Mar 07, 2024 pm 10:52 PM
How to get authorization for Douyin slices and goods? Is Douyin slicing easy to make?
Mar 07, 2024 pm 10:52 PM
Douyin, as a popular social media platform at the moment, not only provides people with a wealth of entertainment content, but has also become an important channel for many brands and merchants to promote products and achieve sales. Among them, Douyin’s slicing and selling products has become a novel and efficient marketing method. So, how do you get authorization for Douyin's sliced products? 1. How do you get authorization for Douyin's sliced products? Douyin's sliced products decompose long videos into short video clips and embed product promotion information in them to attract viewers to buy. . When slicing and selling goods on Douyin, the first step is to obtain authorization from the original video. When looking for a suitable licensor, you can consider using various channels such as Douyin platform, social media and industry forums. Find creators or copyright holders with popular video content and actively connect with them,
 How to implement authentication and authorization in PHP applications using JWT
Aug 03, 2023 pm 10:17 PM
How to implement authentication and authorization in PHP applications using JWT
Aug 03, 2023 pm 10:17 PM
How to use JWT to implement authentication and authorization in PHP applications Introduction: With the rapid development of the Internet, authentication and authorization are becoming increasingly important in web applications. JSONWebToken (JWT) is a popular authentication and authorization mechanism that is widely used in PHP applications. This article will introduce how to use JWT to implement authentication and authorization in PHP applications, and provide code examples to help readers better understand the use of JWT. 1. Introduction to JWT JSONWebTo
 User authentication and authorization in Flask
Jun 17, 2023 pm 06:02 PM
User authentication and authorization in Flask
Jun 17, 2023 pm 06:02 PM
With the widespread use of web applications, security and data protection have become an important issue in web application development. To ensure the security of web applications, user authentication and authorization are required. As a popular web development framework, Flask provides many mechanisms for implementing user authentication and authorization. User Authentication User authentication refers to using a certain authentication method to determine whether the user's identity is legitimate when the user accesses the Web application. Flask offers a lot
 What to do if wps authorization has expired and text cannot be entered?
Mar 20, 2024 am 09:00 AM
What to do if wps authorization has expired and text cannot be entered?
Mar 20, 2024 am 09:00 AM
There are many genuine softwares in order to protect their own intellectual property rights. Before using the software, users must obtain some authorizations and obtain permission from the developer before they can use it. Some software has a trial period. After this period, you need to obtain re-authorization before you can use it normally. If wps prompts that the authorization has expired, we cannot perform any operations. How to solve this problem, let’s take a look at the explanation below. 1. I opened the WPS text program and clicked on the red box in the picture above, as shown in the picture below. 2. Click Configuration and Repair Tools. 3. Select "Advanced", as shown in the figure below. 4. Click the product management center and delete the "Expired" prompt content, as shown in the figure below. 5. After clicking "Add", enter the serial number, as shown in the figure below. 6. Then first
 How to implement user authentication and authorization functions through the Webman framework?
Jul 07, 2023 am 09:21 AM
How to implement user authentication and authorization functions through the Webman framework?
Jul 07, 2023 am 09:21 AM
How to implement user authentication and authorization functions through the Webman framework? Webman is a lightweight web framework based on Python, which provides rich functions and flexible scalability. In development, user authentication and authorization are very important functions. This article will introduce how to use the Webman framework to implement these functions. Install Webman First, we need to install Webman. You can use the pip command to install: pipinstallwebman
