

Share a practical experience in mini program development

The production of the bottom navigation bar of e-commerce
I think everyone is familiar with e-commerce. Generally, the bottom navigation bar of e-commerce has the following homepage, category, shopping cart, and personal center.
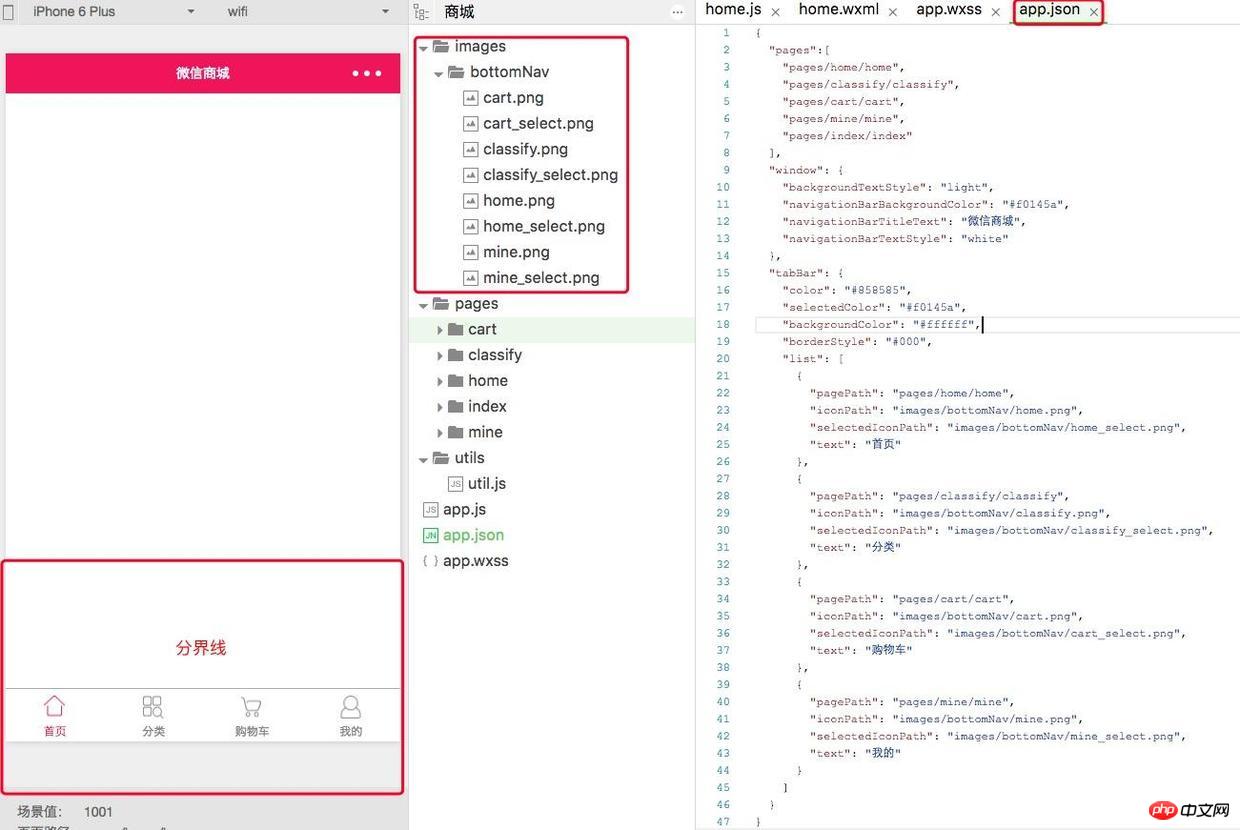
app.json is used to configure the page path and navigation bar attributes. If we want to make the homepage, category, shopping cart, and personal center interfaces, we must also add these interfaces to the page, so in app. Add the following code to the json page and write the page path. The system will automatically help you create the interface.
  "pages":["pages/home/home","pages/classify/classify",  "pages/cart/cart","pages/mine/mine","pages/index/index"
  ],
Okay, now that four interfaces have been added, how do we make the bottom navigation bar? Let’s give the app today .json adds another attribute, that is, you can configure the navigation bar in app.json. Add the following code to app.json
 "tabBar": {"color": "#858585","selectedColor": "#f0145a","backgroundColor": "#ffffff","borderStyle": "#000","list": [
      {"pagePath": "pages/home/home","iconPath": "images/bottomNav/home.png","selectedIconPath": "images/bottomNav/home_select.png","text": "首页"
      },
      {"pagePath": "pages/classify/classify","iconPath": "images/bottomNav/classify.png","selectedIconPath": "images/bottomNav/classify_select.png","text": "分类"
      },
      {"pagePath": "pages/cart/cart","iconPath": "images/bottomNav/cart.png","selectedIconPath": "images/bottomNav/cart_select.png","text": "购物车"
      },
      {"pagePath": "pages/mine/mine","iconPath": "images/bottomNav/mine.png","selectedIconPath": "images/bottomNav/mine_select.png","text": "我的"
      }
    ]
}tabBar The system has its own field and cannot be changed. Adding this field tells the system that you To add a navigation bar, color, selectedColor, and backgroundColor are literally fields, and the corresponding attributes are the default font color, checked font color, and background color. Let’s focus on borderStyle, which defines the boundary line between the bottom navigation bar and the interface. The property is a bit special. What’s special is that if you don’t want this boundary line, you can set the property to white. The rest does not matter what you write, the system Everyone understands that this dividing line needs to be added. If you don’t believe me, you can try it. The list attribute is naturally used to set the interface corresponding to the navigation bar.
pagePath: The page path is the path you write in the page
iconPath : Default navigation bar image path
selectedIconPath: Checked image path
text: Navigation bar name
What I want to say here is that the picture path must be written correctly, otherwise it will not be displayed if the picture cannot be found. Here I provide you with my navigation bar picture---extraction code: 8zwe You can follow my picture Create the corresponding folder in the path, as shown below
##1-1.png
- When adding tabBar, don’t forget to remember that there is a comma on it. This is used to distinguish each attribute, so every time you add an attribute, you must separate it with a comma. Pay attention to this, otherwise an error will be reported. , this is the error log where I removed the punctuation. Generally, the error log reported Expecting 'EOF' XXXXXXXXX and got STRING are grammatical errors, so you need to check carefully to see where there is something missing.

1-2.png - Also, it cannot be written in the .json file Comments, I originally wanted to add some comments to facilitate readers' reading, but the following error message will appear. The solution is very simple, just delete the comments ##1 -3.png
draw inferences - You may think it is very simple, just try adding two to the list. I did the same, but something went wrong. The system will report an error. You know this time, the maximum can only be five. There is no way. Who makes WeChat the boss? If they set a maximum of five, then there can only be a maximum of five! 1-3.png I don’t know if you have noticed that the navigation bar defaults to the home page. The check mark is red, then I want the default check mark to be red. What should I do?
- This is a bit difficult. What I first thought was that changing the first home attribute and classify attribute in the list in the tabBar attribute should solve the problem. However, this is not the case, because it has no effect, and it happened again later. I found it by accident. Let me give you a little tip. Have you noticed that the first path of pages is pages/home/home? Yes, that’s it. If you want to classify, classify will be the default check option. , you only need to change the home path and classify path in the pages attribute, save and recompile, and the effect you want will come out. One thing that can be summarized here is that tabBar is the first line path to the page as the default Check the option.

 ##1 -3.png
- We have created four navigation bars, so if I want to add two more navigation bars, is it okay?
 1-3.png
Now that we have talked about the navigation bar, let me explain a little more today, and then teach you how to make the top navigation bar. First Above rendering
 2-1.png
这个导航栏可不像底部导航栏啦,因为他的级别比较低,是页面级别的导航栏,所以要写在页面里,你想要在哪个页面加入顶部导航栏就在哪个页面里添加如下代码,这里以首页的界面为例:
home.wxss
/* pages/home/home.wxss */page{
  display: flex;
  flex-direction: column;
  height: 100%;
}
.navbar{
  flex: none;
  display: flex;
  background: #fff;
}
.navbar .item{
  position: relative;
  flex: auto;
  text-align: center;
  line-height: 80rpx;
  font-size:14px;
}
/* 顶部导航字体颜色 */.navbar .item.active{
  color: #f0145a;
}
/* 顶部指示条属性 */.navbar .item.active:after{
  content: "";
  display: block;
  position: absolute;
  bottom: 0;
  left: 0;
  right: 0;
  height: 6rpx;
  background: #f0145a;
}home.wxml
<!--导航条-->
<view class="navbar">
<text wx:for="{{navbar}}" data-idx="{{index}}" class="item {{currentTab==index ? 'active' : ''}}" wx:key="unique" bindtap="navbarTap">{{item}}</text>
</view>在home.wxml里面bindtap字段我们已经讲解过啦,是事件监听的标识符,事件名称叫“navbarTap”可以到home.js里查找到这个事件wx:for这个字段重点讲解,在组件上使用wx:for控制属性绑定一个数组,即可使用数组中各项的数据重复渲染该组件。默认数组的当前项的下标变量名默认为index,数组当前项的变量名默认为item,这是官方解释,说白了就是item默认叫做变量的值,index表示第几个变量的值,还不太明白请看这个 微信 wx:for 的讲解
wx:for="{{navbar}}" 意思是虚幻navbar的数组数据
{{item}} 这里面是navbar数组里面的值,如护肤、彩妆等值
wx:key="unique" 来指定列表中项目的唯一的标识符
data-idx="{{index}}" 存储一些数据供home.js里调用,这里data-xxx,xxx就是你给home.js里提供的数据关键词,home.js通过获取xxx关键词来获取xxx里面的数据
home.js
// pages/home/home.jsvar app = getApp()
Page({ data: {navbar: ['护肤', '彩妆', '香水','个人护理'],currentTab: 0,
}, // 导航切换监听
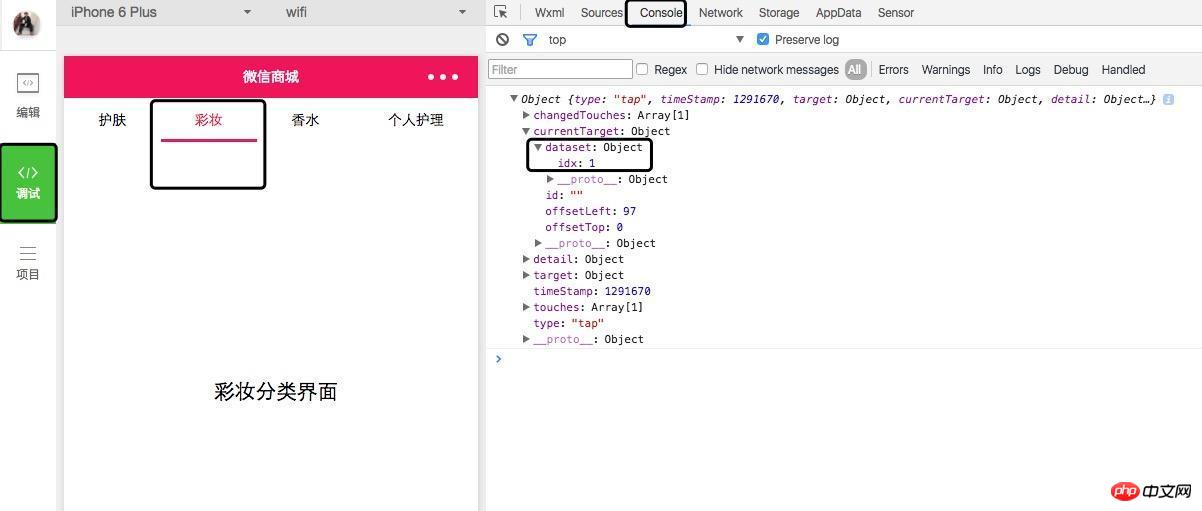
navbarTap: function (e) {console.debug(e);this.setData({ currentTab: e.currentTarget.dataset.idx
})
},
})home.js,这里读过微信小程序入门篇(二)都知道,page页面里.js一般是放data数据和事件监听的,这里data有一个navbar导航栏数据,还有一个记录当前位置的currentTab,字段可以自由命名,赋值的时候对应上就好,
navbarTap 记得在home.wxml里面data-idx属性吗,在这里用到,currentTab: e.currentTarget.dataset.idx 把当前用户选择的Tab传给currentTab里,为了验证一下结果,我在这里面加入了一个输出日志console.debug(e);,可以在控制台上看输出的日志,我选择点击彩妆,输出台的数据idx:1刚好是彩妆的位置。
总结
今天我们讲解的微信小程序的底部导航栏和顶部导航栏,导航栏应该说是必须的对于电商小程序来说,那么今天的导航栏教程你掌握了吗?
学习过程中遇到什么问题或者想获取学习资源的话,欢迎加入学习交流群
The above is the detailed content of Share a practical experience in mini program development. For more information, please follow other related articles on the PHP Chinese website!

Hot AI Tools

Undresser.AI Undress
AI-powered app for creating realistic nude photos

AI Clothes Remover
Online AI tool for removing clothes from photos.

Undress AI Tool
Undress images for free

Clothoff.io
AI clothes remover

Video Face Swap
Swap faces in any video effortlessly with our completely free AI face swap tool!

Hot Article
Hot Tools

Notepad++7.3.1
Easy-to-use and free code editor

SublimeText3 Chinese version
Chinese version, very easy to use

Zend Studio 13.0.1
Powerful PHP integrated development environment

Dreamweaver CS6
Visual web development tools

SublimeText3 Mac version
God-level code editing software (SublimeText3)
Hot Topics
 1386
1386
 52
52

 How to make Google Maps the default map in iPhone
Apr 17, 2024 pm 07:34 PM
How to make Google Maps the default map in iPhone
Apr 17, 2024 pm 07:34 PM
The default map on the iPhone is Maps, Apple's proprietary geolocation provider. Although the map is getting better, it doesn't work well outside the United States. It has nothing to offer compared to Google Maps. In this article, we discuss the feasible steps to use Google Maps to become the default map on your iPhone. How to Make Google Maps the Default Map in iPhone Setting Google Maps as the default map app on your phone is easier than you think. Follow the steps below – Prerequisite steps – You must have Gmail installed on your phone. Step 1 – Open the AppStore. Step 2 – Search for “Gmail”. Step 3 – Click next to Gmail app
 Clock app missing in iPhone: How to fix it
May 03, 2024 pm 09:19 PM
Clock app missing in iPhone: How to fix it
May 03, 2024 pm 09:19 PM
Is the clock app missing from your phone? The date and time will still appear on your iPhone's status bar. However, without the Clock app, you won’t be able to use world clock, stopwatch, alarm clock, and many other features. Therefore, fixing missing clock app should be at the top of your to-do list. These solutions can help you resolve this issue. Fix 1 – Place the Clock App If you mistakenly removed the Clock app from your home screen, you can put the Clock app back in its place. Step 1 – Unlock your iPhone and start swiping to the left until you reach the App Library page. Step 2 – Next, search for “clock” in the search box. Step 3 – When you see “Clock” below in the search results, press and hold it and
 Can't allow access to camera and microphone in iPhone
Apr 23, 2024 am 11:13 AM
Can't allow access to camera and microphone in iPhone
Apr 23, 2024 am 11:13 AM
Are you getting "Unable to allow access to camera and microphone" when trying to use the app? Typically, you grant camera and microphone permissions to specific people on a need-to-provide basis. However, if you deny permission, the camera and microphone will not work and will display this error message instead. Solving this problem is very basic and you can do it in a minute or two. Fix 1 – Provide Camera, Microphone Permissions You can provide the necessary camera and microphone permissions directly in settings. Step 1 – Go to the Settings tab. Step 2 – Open the Privacy & Security panel. Step 3 – Turn on the “Camera” permission there. Step 4 – Inside, you will find a list of apps that have requested permission for your phone’s camera. Step 5 – Open the “Camera” of the specified app
 PHP and Vue: a perfect pairing of front-end development tools
Mar 16, 2024 pm 12:09 PM
PHP and Vue: a perfect pairing of front-end development tools
Mar 16, 2024 pm 12:09 PM
PHP and Vue: a perfect pairing of front-end development tools. In today's era of rapid development of the Internet, front-end development has become increasingly important. As users have higher and higher requirements for the experience of websites and applications, front-end developers need to use more efficient and flexible tools to create responsive and interactive interfaces. As two important technologies in the field of front-end development, PHP and Vue.js can be regarded as perfect tools when paired together. This article will explore the combination of PHP and Vue, as well as detailed code examples to help readers better understand and apply these two
 PHP Practical: Code Example to Quickly Implement Fibonacci Sequence
Mar 20, 2024 pm 02:24 PM
PHP Practical: Code Example to Quickly Implement Fibonacci Sequence
Mar 20, 2024 pm 02:24 PM
PHP Practice: Code Example to Quickly Implement the Fibonacci Sequence The Fibonacci Sequence is a very interesting and common sequence in mathematics. It is defined as follows: the first and second numbers are 0 and 1, and from the third Starting with numbers, each number is the sum of the previous two numbers. The first few numbers in the Fibonacci sequence are 0,1,1.2,3,5,8,13,21,...and so on. In PHP, we can generate the Fibonacci sequence through recursion and iteration. Below we will show these two
 Questions frequently asked by front-end interviewers
Mar 19, 2024 pm 02:24 PM
Questions frequently asked by front-end interviewers
Mar 19, 2024 pm 02:24 PM
In front-end development interviews, common questions cover a wide range of topics, including HTML/CSS basics, JavaScript basics, frameworks and libraries, project experience, algorithms and data structures, performance optimization, cross-domain requests, front-end engineering, design patterns, and new technologies and trends. . Interviewer questions are designed to assess the candidate's technical skills, project experience, and understanding of industry trends. Therefore, candidates should be fully prepared in these areas to demonstrate their abilities and expertise.
 Is Django front-end or back-end? check it out!
Jan 19, 2024 am 08:37 AM
Is Django front-end or back-end? check it out!
Jan 19, 2024 am 08:37 AM
Django is a web application framework written in Python that emphasizes rapid development and clean methods. Although Django is a web framework, to answer the question whether Django is a front-end or a back-end, you need to have a deep understanding of the concepts of front-end and back-end. The front end refers to the interface that users directly interact with, and the back end refers to server-side programs. They interact with data through the HTTP protocol. When the front-end and back-end are separated, the front-end and back-end programs can be developed independently to implement business logic and interactive effects respectively, and data exchange.
 Exploring Go language front-end technology: a new vision for front-end development
Mar 28, 2024 pm 01:06 PM
Exploring Go language front-end technology: a new vision for front-end development
Mar 28, 2024 pm 01:06 PM
As a fast and efficient programming language, Go language is widely popular in the field of back-end development. However, few people associate Go language with front-end development. In fact, using Go language for front-end development can not only improve efficiency, but also bring new horizons to developers. This article will explore the possibility of using the Go language for front-end development and provide specific code examples to help readers better understand this area. In traditional front-end development, JavaScript, HTML, and CSS are often used to build user interfaces
