

Share an example code about JS

<script><br>window.onload=function(){<br> var td1=document.getElementById("td");<br> var dv0=document.getElementById("dva");<br> var dv1=document.getElementById("dvv");<br> var dv2=document.getElementById("dve");<br> var color1=document.getElementById("c1");<br> var color2=document.getElementById("c2");<br> var color3=document.getElementById("c3");<br> var width1=document.getElementById("w1");<br> var width2=document.getElementById("w2");<br> var width3=document.getElementById("w3");<br> var height1=document.getElementById("h1");<br> var height2=document.getElementById("h2");<br> var height3=document.getElementById("h3");<br> var re=document.getElementById("recover");<br> var su=document.getElementById("sure");<br><br> td1.onclick=function(){<br> dv2.style.display='block';<br> dv0.style.background='#999999';<br> }<br><br> color1.onclick=function(){<br> dv1.style.background='#F00';<br> }<br> color1.onmouseover=function(){<br> color1.style.background='#F00';<br> }<br> color1.onmouseout=function(){<br> color1.style.background='#99CC66';<br> }<br><br> color2.onclick=function(){<br> dv1.style.background='#FF0';<br> }<br> color2.onmouseover=function(){<br> color2.style.background='#FF0';<br> }<br> color2.onmouseout=function(){<br> color2.style.background='#CCCC00';<br> }<br><br> color3.onclick=function(){<br> dv1.style.background='#00F';<br> }<br> color3.onmouseover=function(){<br> color3.style.background='#00F';<br> }<br> color3.onmouseout=function(){<br> color3.style.background='#3399CC';<br> }<br><br> width1.onclick=function(){<br> dv1.style.width='200px';<br> }<br> width1.onmouseover=function(){<br> width1.style.background='#F90';<br> }<br> width1.onmouseout=function(){<br> width1.style.background='#CCC';<br> }<br><br> width2.onclick=function(){<br> dv1.style.width='300px';<br> }<br> width2.onmouseover=function(){<br> width2.style.background='#F90';<br> }<br> width2.onmouseout=function(){<br> width2.style.background='#CCC';<br> }<br><br> width3.onclick=function(){<br> dv1.style.width='400px';<br> }<br> width3.onmouseover=function(){<br> width3.style.background='#F90';<br> }<br> width3.onmouseout=function(){<br> width3.style.background='#CCC';<br> }<br><br> height1.onclick=function(){<br> dv1.style.height='200px';<br> }<br> height1.onmouseover=function(){<br> height1.style.background='#F90';<br> }<br> height1.onmouseout=function(){<br> height1.style.background='#CCC';<br> }<br><br> height2.onclick=function(){<br> dv1.style.height='300px';<br> }<br> height2.onmouseover=function(){<br> height2.style.background='#F90';<br> }<br> height2.onmouseout=function(){<br> height2.style.background='#CCC';<br> }<br><br> height3.onclick=function(){<br> dv1.style.height='400px';<br> }<br> height3.onmouseover=function(){<br> height3.style.background='#F90';<br> }<br> height3.onmouseout=function(){<br> height3.style.background='#CCC';<br> }<br><br> re.onclick=function(){<br> dv1.style.width='150px';<br> dv1.style.height='150px';<br> dv1.style.background='none';<br> }<br><br> su.onclick=function(){<br> dv2.style.display='none';<br> dv0.style.background='none';<br> }<br> }<br></script>
请为下面的DIV设置样式: | 点击设置 |
| 请选择背景颜色: | 红 | 黄 | 蓝 |
| 请选择宽(px): | 200 | 300 | 400 |
| 请选择高(px): | 200 | 300 | 400 |
| 恢复 | 确定 |
The above is the detailed content of Share an example code about JS. For more information, please follow other related articles on the PHP Chinese website!

Hot AI Tools

Undresser.AI Undress
AI-powered app for creating realistic nude photos

AI Clothes Remover
Online AI tool for removing clothes from photos.

Undress AI Tool
Undress images for free

Clothoff.io
AI clothes remover

Video Face Swap
Swap faces in any video effortlessly with our completely free AI face swap tool!

Hot Article
Hot Tools

Notepad++7.3.1
Easy-to-use and free code editor

SublimeText3 Chinese version
Chinese version, very easy to use

Zend Studio 13.0.1
Powerful PHP integrated development environment

Dreamweaver CS6
Visual web development tools

SublimeText3 Mac version
God-level code editing software (SublimeText3)
Hot Topics
 1386
1386
 52
52

 What to do if the blue screen code 0x0000001 occurs
Feb 23, 2024 am 08:09 AM
What to do if the blue screen code 0x0000001 occurs
Feb 23, 2024 am 08:09 AM
What to do with blue screen code 0x0000001? The blue screen error is a warning mechanism when there is a problem with the computer system or hardware. Code 0x0000001 usually indicates a hardware or driver failure. When users suddenly encounter a blue screen error while using their computer, they may feel panicked and at a loss. Fortunately, most blue screen errors can be troubleshooted and dealt with with a few simple steps. This article will introduce readers to some methods to solve the blue screen error code 0x0000001. First, when encountering a blue screen error, we can try to restart
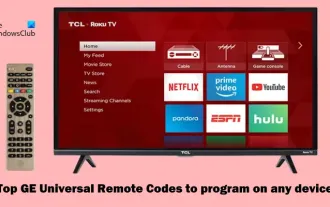 GE universal remote codes program on any device
Mar 02, 2024 pm 01:58 PM
GE universal remote codes program on any device
Mar 02, 2024 pm 01:58 PM
If you need to program any device remotely, this article will help you. We will share the top GE universal remote codes for programming any device. What is a GE remote control? GEUniversalRemote is a remote control that can be used to control multiple devices such as smart TVs, LG, Vizio, Sony, Blu-ray, DVD, DVR, Roku, AppleTV, streaming media players and more. GEUniversal remote controls come in various models with different features and functions. GEUniversalRemote can control up to four devices. Top Universal Remote Codes to Program on Any Device GE remotes come with a set of codes that allow them to work with different devices. you may
 How to use Copilot to generate code
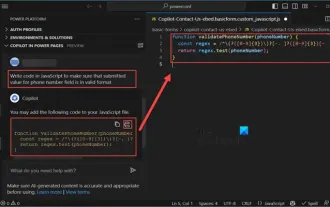
Mar 23, 2024 am 10:41 AM
How to use Copilot to generate code
Mar 23, 2024 am 10:41 AM
As a programmer, I get excited about tools that simplify the coding experience. With the help of artificial intelligence tools, we can generate demo code and make necessary modifications as per the requirement. The newly introduced Copilot tool in Visual Studio Code allows us to create AI-generated code with natural language chat interactions. By explaining functionality, we can better understand the meaning of existing code. How to use Copilot to generate code? To get started, we first need to get the latest PowerPlatformTools extension. To achieve this, you need to go to the extension page, search for "PowerPlatformTool" and click the Install button
 Getting Started with Pygame: Comprehensive Installation and Configuration Tutorial
Feb 19, 2024 pm 10:10 PM
Getting Started with Pygame: Comprehensive Installation and Configuration Tutorial
Feb 19, 2024 pm 10:10 PM
Learn Pygame from scratch: complete installation and configuration tutorial, specific code examples required Introduction: Pygame is an open source game development library developed using the Python programming language. It provides a wealth of functions and tools, allowing developers to easily create a variety of type of game. This article will help you learn Pygame from scratch, and provide a complete installation and configuration tutorial, as well as specific code examples to get you started quickly. Part One: Installing Python and Pygame First, make sure you have
 Revealing the appeal of C language: Uncovering the potential of programmers
Feb 24, 2024 pm 11:21 PM
Revealing the appeal of C language: Uncovering the potential of programmers
Feb 24, 2024 pm 11:21 PM
The Charm of Learning C Language: Unlocking the Potential of Programmers With the continuous development of technology, computer programming has become a field that has attracted much attention. Among many programming languages, C language has always been loved by programmers. Its simplicity, efficiency and wide application make learning C language the first step for many people to enter the field of programming. This article will discuss the charm of learning C language and how to unlock the potential of programmers by learning C language. First of all, the charm of learning C language lies in its simplicity. Compared with other programming languages, C language
 Let's learn how to input the root number in Word together
Mar 19, 2024 pm 08:52 PM
Let's learn how to input the root number in Word together
Mar 19, 2024 pm 08:52 PM
When editing text content in Word, you sometimes need to enter formula symbols. Some guys don’t know how to input the root number in Word, so Xiaomian asked me to share with my friends a tutorial on how to input the root number in Word. Hope it helps my friends. First, open the Word software on your computer, then open the file you want to edit, and move the cursor to the location where you need to insert the root sign, refer to the picture example below. 2. Select [Insert], and then select [Formula] in the symbol. As shown in the red circle in the picture below: 3. Then select [Insert New Formula] below. As shown in the red circle in the picture below: 4. Select [Radical Formula], and then select the appropriate root sign. As shown in the red circle in the picture below:
 Create and run Linux ".a" files
Mar 20, 2024 pm 04:46 PM
Create and run Linux ".a" files
Mar 20, 2024 pm 04:46 PM
Working with files in the Linux operating system requires the use of various commands and techniques that enable developers to efficiently create and execute files, code, programs, scripts, and other things. In the Linux environment, files with the extension ".a" have great importance as static libraries. These libraries play an important role in software development, allowing developers to efficiently manage and share common functionality across multiple programs. For effective software development in a Linux environment, it is crucial to understand how to create and run ".a" files. This article will introduce how to comprehensively install and configure the Linux ".a" file. Let's explore the definition, purpose, structure, and methods of creating and executing the Linux ".a" file. What is L
 Tsinghua University and Zhipu AI open source GLM-4: launching a new revolution in natural language processing
Jun 12, 2024 pm 08:38 PM
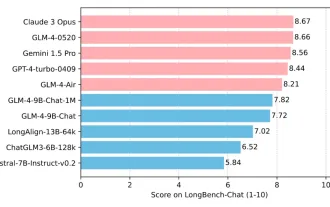
Tsinghua University and Zhipu AI open source GLM-4: launching a new revolution in natural language processing
Jun 12, 2024 pm 08:38 PM
Since the launch of ChatGLM-6B on March 14, 2023, the GLM series models have received widespread attention and recognition. Especially after ChatGLM3-6B was open sourced, developers are full of expectations for the fourth-generation model launched by Zhipu AI. This expectation has finally been fully satisfied with the release of GLM-4-9B. The birth of GLM-4-9B In order to give small models (10B and below) more powerful capabilities, the GLM technical team launched this new fourth-generation GLM series open source model: GLM-4-9B after nearly half a year of exploration. This model greatly compresses the model size while ensuring accuracy, and has faster inference speed and higher efficiency. The GLM technical team’s exploration has not
