

JAVA: OGNL expression practice

1. OGNL expression
1. Introduction
OGNL: Object view navigation language. ${user.addr.name} This way of writing is called an object View navigation.
OGNL can not only view navigation, but also supports richer functions than EL expressions.
2. Use OGNL to prepare work
2.1 Import package
The struts2 package is already included, so there is no need to import additional jar packages
2.2 Code preparation


 ##
## @Test//准备工作public void fun1() throws Exception{//准备OGNLContext//准备RootUser rootUser = new User("tom",18);//准备ContextMap<String,User> context = new HashMap<String,User>();
context.put("user1", new User("jack",18));
context.put("user2", new User("rose",22));
OgnlContext oc = new OgnlContext();//将rootUser作为root部分 oc.setRoot(rootUser);//将context这个Map作为Context部分 oc.setValues(context);//书写OGNLOgnl.getValue("", oc, oc.getRoot());
}

        //取出root中user对象的name属性String name = (String) Ognl.getValue("name", oc, oc.getRoot());
        Integer age = (Integer) Ognl.getValue("age", oc, oc.getRoot());
        System.out.println(name);
        System.out.println(age);

        //取出context中键为user1对象的name属性String name = (String) Ognl.getValue("#user1.name", oc, oc.getRoot());
        String name2 = (String) Ognl.getValue("#user2.name", oc, oc.getRoot());
        Integer age = (Integer) Ognl.getValue("#user2.age", oc, oc.getRoot());
        System.out.println(name);
        System.out.println(name2);
        System.out.println(age);

        //将root中的user对象的name属性赋值Ognl.getValue("name='jerry'", oc, oc.getRoot());
        String name = (String) Ognl.getValue("name", oc, oc.getRoot());

        String name2 = (String) Ognl.getValue("#user1.name='郝强勇',#user1.name", oc, oc.getRoot());
        System.out.println(name);
        System.out.println(name2);

        //调用root中user对象的setName方法Ognl.getValue("setName('lilei')", oc, oc.getRoot());
        String name = (String) Ognl.getValue("getName()", oc, oc.getRoot());
        String name2 = (String) Ognl.getValue("#user1.setName('lucy'),#user1.getName()", oc, oc.getRoot());

        System.out.println(name);
        System.out.println(name2);

        String name = (String) Ognl.getValue("@cn.itheima.a_ognl.HahaUtils@echo('hello 强勇!')", oc, oc.getRoot());//Double pi = (Double) Ognl.getValue("@java.lang.Math@PI", oc, oc.getRoot());Double pi = (Double) Ognl.getValue("@@PI", oc, oc.getRoot());
        System.out.println(name);
        System.out.println(pi);

        //创建list对象Integer size = (Integer) Ognl.getValue("{'tom','jerry','jack','rose'}.size()", oc, oc.getRoot());
        String name = (String) Ognl.getValue("{'tom','jerry','jack','rose'}[0]", oc, oc.getRoot());
        String name2 = (String) Ognl.getValue("{'tom','jerry','jack','rose'}.get(1)", oc, oc.getRoot());    /*System.out.println(size);
        System.out.println(name);
        System.out.println(name2);*///创建Map对象Integer size2 = (Integer) Ognl.getValue("#{'name':'tom','age':18}.size()", oc, oc.getRoot());
        String name3  = (String) Ognl.getValue("#{'name':'tom','age':18}['name']", oc, oc.getRoot());
        Integer age  = (Integer) Ognl.getValue("#{'name':'tom','age':18}.get('age')", oc, oc.getRoot());
        System.out.println(size2);
        System.out.println(name3);
        System.out.println(age);
二、OGNL与Struts2的结合
1.结合原理

ValueStack中的两部分

2.栈原理

栈是由ArrayList模拟的

栈中的两个方法的实现

访问栈中属性的特点.由上到下

3.查看值栈中两部分内容(使用DEBUG标签)
3.1Root
默认情况下,栈中放置当前访问的Action对象

3.2Context


Context部分就是ActionContext数据中心
4.struts2与ognl结合体现
4.1参数接收


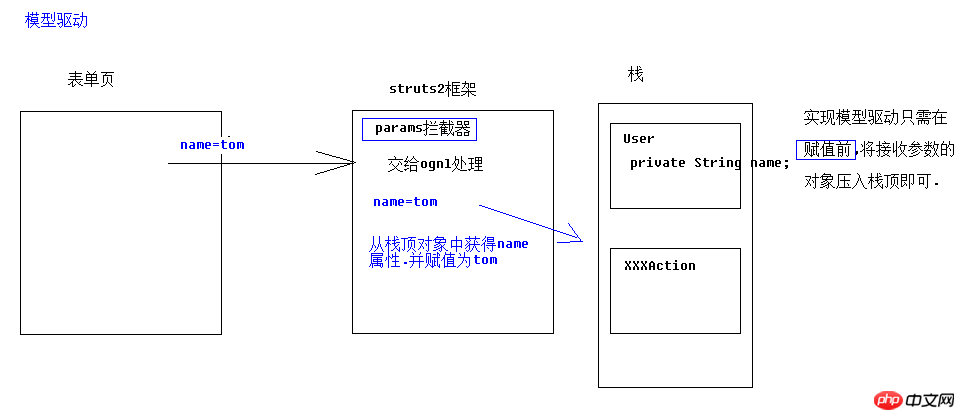
如何获得值栈对象,值栈对象与ActionContext对象是互相引用的
//压入栈顶//1获得值栈ValueStack vs = ActionContext.getContext().getValueStack();//2将u压入栈顶vs.push(u);
4.2配置文件中


<action name="Demo3Action" class="cn.itheima.d_config.Demo3Action" method="execute" ><result name="success" type="redirectAction" ><param name="actionName">Demo1Action</param><param name="namespace">/</param><!-- 如果添加的参数struts"看不懂".就会作为参数附加重定向的路径之后.
如果参数是动态的.可以使用${}包裹ognl表达式.动态取值 --><param name="name">${name}</param></result></action>5.扩展:request对象的getAttribute方法
查找顺序:

三、练习:客户列表


    public String list() throws Exception {//1 接受参数String cust_name = ServletActionContext.getRequest().getParameter("cust_name");//2 创建离线查询对象DetachedCriteria dc =DetachedCriteria.forClass(Customer.class);//3 判断参数拼装条件if(StringUtils.isNotBlank(cust_name)){
            dc.add(Restrictions.like("cust_name", "%"+cust_name+"%"));
        }//4 调用Service将离线对象传递List<Customer> list = cs.getAll(dc);//5 将返回的list放入request域.转发到list.jsp显示        //ServletActionContext.getRequest().setAttribute("list", list);// 放到ActionContextActionContext.getContext().put("list", list);        return "list";
    }

<s:iterator value="#list" var="cust" >
    <TR
        style="FONT-WEIGHT: normal; FONT-STYLE: normal; BACKGROUND-COLOR: white; TEXT-DECORATION: none">
        <TD>
            <s:property value="#cust.cust_name" />
        </TD>
        <TD>
        <s:property value="#cust.cust_level" />
        </TD>
        <TD>
        <s:property value="#cust.cust_source" />
        </TD>
        <TD>
        <s:property value="#cust.cust_linkman" />
        </TD>
        <TD>
        <s:property value="#cust.cust_phone" />
        </TD>
        <TD>
        <s:property value="#cust.cust_mobile" />
        </TD>
        <TD>
        <a href="${pageContext.request.contextPath }/customerServlet?method=edit&custId=${customer.cust_id}">修改</a>
          <a href="${pageContext.request.contextPath }/customerServlet?method=delete&custId=${customer.cust_id}">删除</a>
        </TD>
    </TR>
    </s:iterator>
    <%-- <s:iterator value="#list"  >
    <TR
        style="FONT-WEIGHT: normal; FONT-STYLE: normal; BACKGROUND-COLOR: white; TEXT-DECORATION: none">
        <TD>
            <s:property value="cust_name" />
        </TD>
        <TD>
        <s:property value="cust_level" />
        </TD>
        <TD>
        <s:property value="cust_source" />
        </TD>
        <TD>
        <s:property value="cust_linkman" />
        </TD>
        <TD>
        <s:property value="cust_phone" />
        </TD>
        <TD>
        <s:property value="cust_mobile" />
        </TD>
        <TD>
        <a href="${pageContext.request.contextPath }/customerServlet?method=edit&custId=${customer.cust_id}">修改</a>
          <a href="${pageContext.request.contextPath }/customerServlet?method=delete&custId=${customer.cust_id}">删除</a>
        </TD>
    </TR>
</s:iterator> --%> 注意:

The above is the detailed content of JAVA: OGNL expression practice. For more information, please follow other related articles on the PHP Chinese website!

Hot AI Tools

Undresser.AI Undress
AI-powered app for creating realistic nude photos

AI Clothes Remover
Online AI tool for removing clothes from photos.

Undress AI Tool
Undress images for free

Clothoff.io
AI clothes remover

Video Face Swap
Swap faces in any video effortlessly with our completely free AI face swap tool!

Hot Article
Hot Tools

Notepad++7.3.1
Easy-to-use and free code editor

SublimeText3 Chinese version
Chinese version, very easy to use

Zend Studio 13.0.1
Powerful PHP integrated development environment

Dreamweaver CS6
Visual web development tools

SublimeText3 Mac version
God-level code editing software (SublimeText3)
Hot Topics
 1386
1386
 52
52

 Learn to completely uninstall pip and use Python more efficiently
Jan 16, 2024 am 09:01 AM
Learn to completely uninstall pip and use Python more efficiently
Jan 16, 2024 am 09:01 AM
No more need for pip? Come and learn how to uninstall pip effectively! Introduction: pip is one of Python's package management tools, which can easily install, upgrade and uninstall Python packages. However, sometimes we may need to uninstall pip, perhaps because we wish to use another package management tool, or because we need to completely clear the Python environment. This article will explain how to uninstall pip efficiently and provide specific code examples. 1. How to uninstall pip The following will introduce two common methods of uninstalling pip.
 A deep dive into matplotlib's colormap
Jan 09, 2024 pm 03:51 PM
A deep dive into matplotlib's colormap
Jan 09, 2024 pm 03:51 PM
To learn more about the matplotlib color table, you need specific code examples 1. Introduction matplotlib is a powerful Python drawing library. It provides a rich set of drawing functions and tools that can be used to create various types of charts. The colormap (colormap) is an important concept in matplotlib, which determines the color scheme of the chart. In-depth study of the matplotlib color table will help us better master the drawing functions of matplotlib and make drawings more convenient.
 What is the principle of Struts2 framework
Jan 04, 2024 pm 01:55 PM
What is the principle of Struts2 framework
Jan 04, 2024 pm 01:55 PM
The principle of the Struts2 framework: 1. The interceptor parses the request path; 2. Finds the complete class name of the Action; 3. Creates the Action object; 4. Execute the Action method; 5. Returns the result; 6. View parsing. Its principle is based on the interceptor mechanism, which completely separates the business logic controller from the Servlet API, improving the reusability and maintainability of the code. By using the reflection mechanism, the Struts2 framework can flexibly create and manage Action objects to process requests and responses.
 Revealing the appeal of C language: Uncovering the potential of programmers
Feb 24, 2024 pm 11:21 PM
Revealing the appeal of C language: Uncovering the potential of programmers
Feb 24, 2024 pm 11:21 PM
The Charm of Learning C Language: Unlocking the Potential of Programmers With the continuous development of technology, computer programming has become a field that has attracted much attention. Among many programming languages, C language has always been loved by programmers. Its simplicity, efficiency and wide application make learning C language the first step for many people to enter the field of programming. This article will discuss the charm of learning C language and how to unlock the potential of programmers by learning C language. First of all, the charm of learning C language lies in its simplicity. Compared with other programming languages, C language
 Getting Started with Pygame: Comprehensive Installation and Configuration Tutorial
Feb 19, 2024 pm 10:10 PM
Getting Started with Pygame: Comprehensive Installation and Configuration Tutorial
Feb 19, 2024 pm 10:10 PM
Learn Pygame from scratch: complete installation and configuration tutorial, specific code examples required Introduction: Pygame is an open source game development library developed using the Python programming language. It provides a wealth of functions and tools, allowing developers to easily create a variety of type of game. This article will help you learn Pygame from scratch, and provide a complete installation and configuration tutorial, as well as specific code examples to get you started quickly. Part One: Installing Python and Pygame First, make sure you have
 Let's learn how to input the root number in Word together
Mar 19, 2024 pm 08:52 PM
Let's learn how to input the root number in Word together
Mar 19, 2024 pm 08:52 PM
When editing text content in Word, you sometimes need to enter formula symbols. Some guys don’t know how to input the root number in Word, so Xiaomian asked me to share with my friends a tutorial on how to input the root number in Word. Hope it helps my friends. First, open the Word software on your computer, then open the file you want to edit, and move the cursor to the location where you need to insert the root sign, refer to the picture example below. 2. Select [Insert], and then select [Formula] in the symbol. As shown in the red circle in the picture below: 3. Then select [Insert New Formula] below. As shown in the red circle in the picture below: 4. Select [Radical Formula], and then select the appropriate root sign. As shown in the red circle in the picture below:
 Learn the main function in Go language from scratch
Mar 27, 2024 pm 05:03 PM
Learn the main function in Go language from scratch
Mar 27, 2024 pm 05:03 PM
Title: Learn the main function in Go language from scratch. As a simple and efficient programming language, Go language is favored by developers. In the Go language, the main function is an entry function, and every Go program must contain the main function as the entry point of the program. This article will introduce how to learn the main function in Go language from scratch and provide specific code examples. 1. First, we need to install the Go language development environment. You can go to the official website (https://golang.org
 Quickly learn pip installation and master the skills from scratch
Jan 16, 2024 am 10:30 AM
Quickly learn pip installation and master the skills from scratch
Jan 16, 2024 am 10:30 AM
Learn pip installation from scratch and quickly master the skills. Specific code examples are required. Overview: pip is a Python package management tool that can easily install, upgrade and manage Python packages. For Python developers, it is very important to master the skills of using pip. This article will introduce the installation method of pip from scratch, and give some practical tips and specific code examples to help readers quickly master the use of pip. 1. Install pip Before using pip, you first need to install pip. pip
