
 Operation and Maintenance
Linux Operation and Maintenance
How to deploy php project under linux?
Operation and Maintenance
Linux Operation and Maintenance
How to deploy php project under linux?
How to deploy php project under linux?


The environment for deploying PHP projects under Linux can be divided into two types, one is installed using the compressed package of Apache, PHP, and MySQL, and the other is Use the yum command to install.
# Use the compressed packages of the three software to install, and you need to manually configure the relationship between the three. The configuration between apache and php is not difficult, but when configuring with mysql, you need to understand php.
The following is to use yum to configure the php environment in linux:
##MySql
1.It is best to install mysql and apache first, because when configuring php, you need to configure and test related mysql and apache
First download mysql-sever file, because the blogger’s Linux environment is the CentOS version, and there seems to be no mysql-sever file for normal installation of mysql in the yum source. You need to download it from the official website
1.下载mysql-service文件
[root@tele-1 ~]# wget
mysql-service
[root@tele-1 ~]# rpm -ivh mysql-community-release-el7-5.noarch.rpm
2. Install mysql
[root@tele-1 ~]# yum install mysql-community-server
3. After the installation is complete, start the mysql service
[root@tele-1 ~]# service mysqld restart
4. The initial installation of mysql does not have a password, and the default user name is root. So we need to change the password and use the mysql command line to change it
1. Enter the mysql command line
[root@tele-1 ~]# mysql -urootWelcome to the MySQL monitor.  Commands end with ; or \g.Your MySQL connection id is 474801Server version: 5.6.36 MySQL Community Server (GPL)

Copyright (c) 2000, 2017, Oracle and/or its affiliates. All rights reserved.Oracle is a registered trademark of Oracle Corporation and/or its
affiliates. Other names may be trademarks of their respective
owners.Type 'help;' or '\h' for help. Type '\c' to clear the current input statement.mysql>
2.使用命令进行密码修改
mysql> set password for 'root'@'localhost' = password('你要修改的密码');
Query OK, 0 rows affected (0.06 sec)
5. Because the blogger uses The local navicat software is used to connect to mysql under Linux, so if you want to access it locally, you need to change the user table in the mysql database
1.操作mysql数据库表
mysql> use mysql;
Reading table information for completion of table and column names
You can turn off this feature to get a quicker startup with -A

Database changedmysql>
2.查看user表中的数据(在mysql命令行中可以直接进行sql语句编写)
mysql> select * from user;+-----------+------+-----------------------------------+-------------+-------------+-------------+-------------+-------------+-----------+-------------+---------------+--------------+-----------+------------+-----------------+------------+------------+--------------+------------+-----------------------+------------------+--------------+-----------------+------------------+------------------+----------------+---------------------+--------------------+------------------+------------+--------------+------------------------+----------+------------+-------------+--------------+---------------+-------------+-----------------+----------------------+-----------------------+-----------------------+------------------+
| Host      | User | Password                                  | Select_priv | Insert_priv | Update_priv | Delete_priv | Create_priv | Drop_priv | Reload_priv | Shutdown_priv | Process_priv | File_priv | Grant_priv | References_priv | Index_priv | Alter_priv | Show_db_priv | Super_priv | Create_tmp_table_priv | Lock_tables_priv | Execute_priv | Repl_slave_priv | Repl_client_priv | Create_view_priv | Show_view_priv | Create_routine_priv | Alter_routine_priv | Create_user_priv | Event_priv | Trigger_priv | Create_tablespace_priv | ssl_type | ssl_cipher | x509_issuer | x509_subject | max_questions | max_updates | max_connections | max_user_connections | plugin                | authentication_string | password_expired |
+-----------+------+-----------------------------------+-------------+-------------+-------------+-------------+-------------+-----------+-------------+---------------+--------------+-----------+------------+-----------------+------------+------------+--------------+------------+-----------------------+------------------+--------------+-----------------+------------------+------------------+----------------+---------------------+--------------------+------------------+------------+--------------+------------------------+----------+------------+-------------+--------------+---------------+-------------+-----------------+----------------------+-----------------------+-----------------------+------------------+| %         | root | *3ce8dad2446975d8b0c771bd7e48d15b | Y           | Y           | Y           | Y           | Y           | Y         | Y           | Y             | Y            | Y         | Y          | Y               | Y          | Y          | Y            | Y          | Y                     | Y                | Y            | Y               | Y                | Y                | Y              | Y                   | Y                  | Y                | Y          | Y            | Y                      |          |            |             |              |             0 |           0 |               0 |                    0 | mysql_native_password |                       | N                || localhost | root | *3ce8dad2446975d8b0c771bd7e48d15b | Y           | Y           | Y           | Y           | Y           | Y         | Y           | Y             | Y            | Y         | Y          | Y               | Y          | Y          | Y            | Y          | Y                     | Y                | Y            | Y               | Y                | Y                | Y              | Y                   | Y                  | Y                | Y          | Y            | Y                      |          |            |             |              |             0 |           0 |               0 |                    0 | mysql_native_password |                       | N                |
| 127.0.0.1 | root | *3ce8dad2446975d8b0c771bd7e48d15b | Y           | Y           | Y           | Y           | Y           | Y         | Y           | Y             | Y            | Y         | Y          | Y               | Y          | Y          | Y            | Y          | Y                     | Y                | Y            | Y               | Y                | Y                | Y              | Y                   | Y                  | Y                | Y          | Y            | Y                      |          |            |             |              |             0 |           0 |               0 |                    0 | mysql_native_password |                       | N                |
| ::1       | root | *3ce8dad2446975d8b0c771bd7e48d15b | Y           | Y           | Y           | Y           | Y           | Y         | Y           | Y             | Y            | Y         | Y          | Y               | Y          | Y          | Y            | Y          | Y                     | Y                | Y            | Y               | Y                | Y                | Y              | Y                   | Y                  | Y                | Y          | Y            | Y                      |          |            |             |              |             0 |           0 |               0 |                    0 | mysql_native_password |                       | N                || tele-1    |      |                                           | N           | N           | N           | N           | N           | N         | N           | N             | N            | N         | N          | N               | N          | N          | N            | N          | N                     | N                | N            | N               | N                | N                | N              | N                   | N                  | N                | N          | N            | N                      |          |            |             |              |             0 |           0 |               0 |                    0 | mysql_native_password | NULL                  | N                |
+-----------+------+-----------------------------------+-------------+-------------+-------------+-------------+-------------+-----------+-------------+---------------+--------------+-----------+------------+-----------------+------------+------------+--------------+------------+-----------------------+------------------+--------------+-----------------+------------------+------------------+----------------+---------------------+--------------------+------------------+------------+--------------+------------------------+----------+------------+-------------+--------------+---------------+-------------+-----------------+----------------------+-----------------------+-----------------------+------------------+
5 rows in set (0.00 sec)mysql>
3 The blogger's table is the modified table. If you want to access remotely, you need the data marked in red above. Host refers to the IP address that can access this database, and % means that all requests can be connected. .
You can modify a piece of data or add a piece of data. But it is best not to modify the data marked in blue above. The modification statement is in the format below
mysql> update user set Host = '%' where ???
4. Finally, exit or \q are the methods to exit the mysql command line
mysql> \q
Bye
Install Apache
1. The apache installation method is relatively simple
[root@tele-2 ~]# yum install httpd
2. External network access virtual For the address in the machine, we need to modify the apache configuration file /etc/httpd/conf/httpd.conf
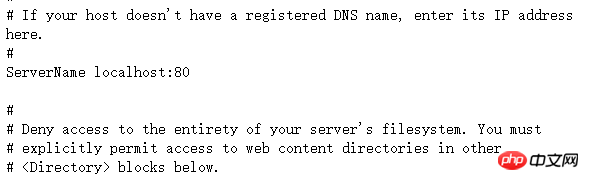
#ServerName www.example.com:80 Change to ServerName localhost:80
As shown on the right Shown: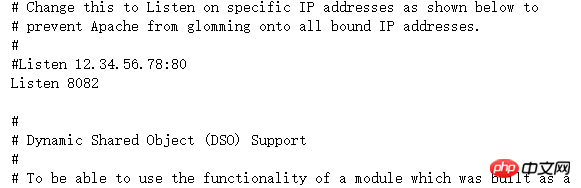 ## Find
#Listen is changed to Listen:8080 (Open port number 80XX in Linux)
As shown in the picture on the right: 3. After the modification is completed, we need to start the httpd service again and check the startup status
[root@tele-2 ~]# service httpd startRedirecting to /bin/systemctl start  httpd.service
[root@tele-2 ~]# service httpd statusRedirecting to /bin/systemctl status  httpd.service
● httpd.service - The Apache HTTP Server
   Loaded: loaded (/usr/lib/systemd/system/httpd.service; enabled; vendor preset: disabled)
   Active: active (running) since Mon 2017-06-05 15:57:34 CST; 5s ago
     Docs: man:httpd(8)
           man:apachectl(8)
  Process: 54532 ExecStop=/bin/kill -WINCH ${MAINPID} (code=exited, status=0/SUCCESS)
  Process: 39046 ExecReload=/usr/sbin/httpd $OPTIONS -k graceful (code=exited, status=0/SUCCESS)
 Main PID: 54573 (httpd)
   Status: "Processing requests..."
   Memory: 15.8M
   CGroup: /system.slice/httpd.service
           ├─54573 /usr/sbin/httpd -DFOREGROUND
           ├─54576 /usr/sbin/httpd -DFOREGROUND
           ├─54577 /usr/sbin/httpd -DFOREGROUND
           ├─54578 /usr/sbin/httpd -DFOREGROUND
           ├─54579 /usr/sbin/httpd -DFOREGROUND
           └─54580 /usr/sbin/httpd -DFOREGROUND

Jun 05 15:57:34 tele-2 systemd[1]: Starting The Apache HTTP Server...Jun 05 15:57:34 tele-2 systemd[1]: Started The Apache HTTP Server.
PHP
1.php安装命令
[root@tele-2 ~]# yum install php
2.直接一路安装,安装完成之后再次重启httpd服务
[root@tele-2 ~]# service httpd startRedirecting to /bin/systemctl start httpd.service
3.重启之后我们进行测试PHP相关信息,我们新建一个PHP界面进行测试
在apache默认页面路径/var/www/html下新建一个test.php页面,添加代码
<?php phpinfo();?>
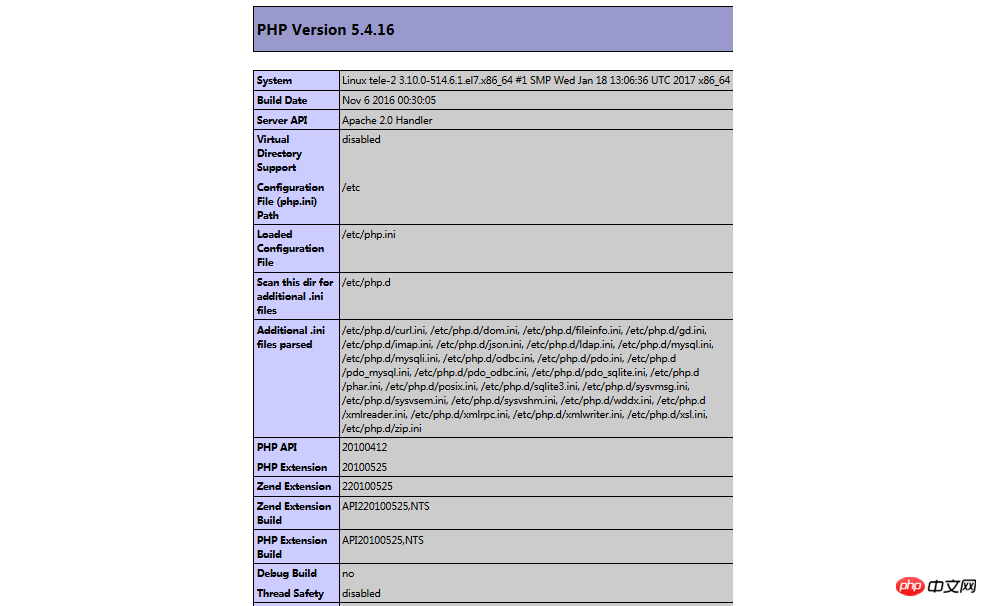
4.访问这个页面,输入localhost/test.php,或者
ip:端口号/test.php就可以看见php环境的配置信息了。如右图:
关联php和mysql
1.搜索模块
[root@tele-2 ~]# yum search php
2.安装相关模块
[root@tele-2 ~]# yum install php-mysql php-gd php-imap php-ldap php-odbc php-pear php-xml php-xmlrpc
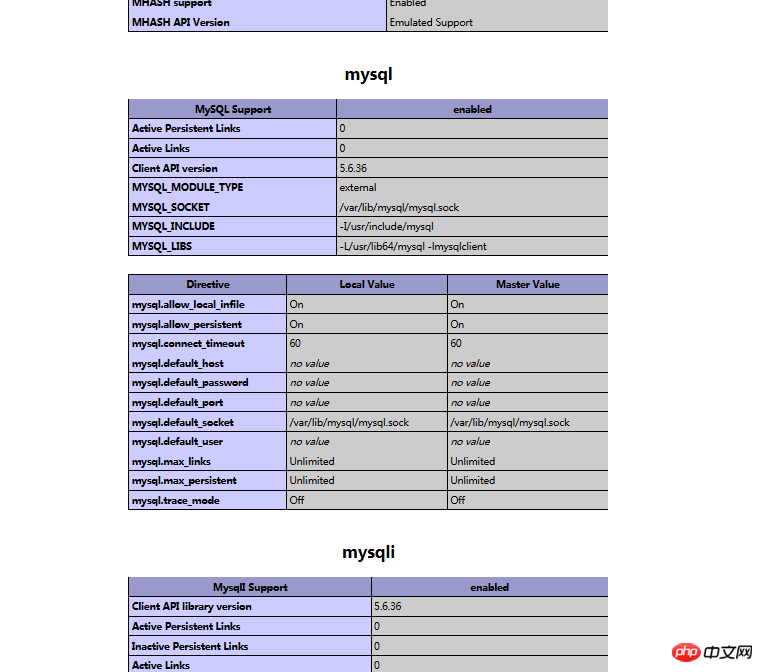
3.安装完成,重启mysqld,重启httpd
重新访问刚才的info.php,我们发现已经多了MySQL的相关信息。如右图:
至此,php在linux中的运行环境就已经成功配置完成了。
1.mysql yum安装默认文件夹及相关命令
/var/lib/mysql/

:/usr/share/mysql(mysql.server)

/usr/bin(mysqladmin mysqldump)

my.cnf: /etc/my.cnf

:/etc/rc.d/init.d/mysql
:service mysql start
停止命令:service mysql stop
运行状态:service mysql status
2.apache
配置文件路径:/etc/httpd/conf/httpd.conf
service httpd start
service httpd stop
运行状态:service httpd status
3.php
php默认页面路径:/var/www/html
The above is the detailed content of How to deploy php project under linux?. For more information, please follow other related articles on the PHP Chinese website!

Hot AI Tools

Undresser.AI Undress
AI-powered app for creating realistic nude photos

AI Clothes Remover
Online AI tool for removing clothes from photos.

Undress AI Tool
Undress images for free

Clothoff.io
AI clothes remover

Video Face Swap
Swap faces in any video effortlessly with our completely free AI face swap tool!

Hot Article
Hot Tools

Notepad++7.3.1
Easy-to-use and free code editor

SublimeText3 Chinese version
Chinese version, very easy to use

Zend Studio 13.0.1
Powerful PHP integrated development environment

Dreamweaver CS6
Visual web development tools

SublimeText3 Mac version
God-level code editing software (SublimeText3)
Hot Topics
 1387
1387
 52
52

 PHP vs. Python: Use Cases and Applications
Apr 17, 2025 am 12:23 AM
PHP vs. Python: Use Cases and Applications
Apr 17, 2025 am 12:23 AM
PHP is suitable for web development and content management systems, and Python is suitable for data science, machine learning and automation scripts. 1.PHP performs well in building fast and scalable websites and applications and is commonly used in CMS such as WordPress. 2. Python has performed outstandingly in the fields of data science and machine learning, with rich libraries such as NumPy and TensorFlow.
 Choosing Between PHP and Python: A Guide
Apr 18, 2025 am 12:24 AM
Choosing Between PHP and Python: A Guide
Apr 18, 2025 am 12:24 AM
PHP is suitable for web development and rapid prototyping, and Python is suitable for data science and machine learning. 1.PHP is used for dynamic web development, with simple syntax and suitable for rapid development. 2. Python has concise syntax, is suitable for multiple fields, and has a strong library ecosystem.
 MySQL's Role: Databases in Web Applications
Apr 17, 2025 am 12:23 AM
MySQL's Role: Databases in Web Applications
Apr 17, 2025 am 12:23 AM
The main role of MySQL in web applications is to store and manage data. 1.MySQL efficiently processes user information, product catalogs, transaction records and other data. 2. Through SQL query, developers can extract information from the database to generate dynamic content. 3.MySQL works based on the client-server model to ensure acceptable query speed.
 PHP and Python: Different Paradigms Explained
Apr 18, 2025 am 12:26 AM
PHP and Python: Different Paradigms Explained
Apr 18, 2025 am 12:26 AM
PHP is mainly procedural programming, but also supports object-oriented programming (OOP); Python supports a variety of paradigms, including OOP, functional and procedural programming. PHP is suitable for web development, and Python is suitable for a variety of applications such as data analysis and machine learning.
 How to run java code in notepad
Apr 16, 2025 pm 07:39 PM
How to run java code in notepad
Apr 16, 2025 pm 07:39 PM
Although Notepad cannot run Java code directly, it can be achieved by using other tools: using the command line compiler (javac) to generate a bytecode file (filename.class). Use the Java interpreter (java) to interpret bytecode, execute the code, and output the result.
 PHP's Impact: Web Development and Beyond
Apr 18, 2025 am 12:10 AM
PHP's Impact: Web Development and Beyond
Apr 18, 2025 am 12:10 AM
PHPhassignificantlyimpactedwebdevelopmentandextendsbeyondit.1)ItpowersmajorplatformslikeWordPressandexcelsindatabaseinteractions.2)PHP'sadaptabilityallowsittoscaleforlargeapplicationsusingframeworkslikeLaravel.3)Beyondweb,PHPisusedincommand-linescrip
 PHP and Python: A Deep Dive into Their History
Apr 18, 2025 am 12:25 AM
PHP and Python: A Deep Dive into Their History
Apr 18, 2025 am 12:25 AM
PHP originated in 1994 and was developed by RasmusLerdorf. It was originally used to track website visitors and gradually evolved into a server-side scripting language and was widely used in web development. Python was developed by Guidovan Rossum in the late 1980s and was first released in 1991. It emphasizes code readability and simplicity, and is suitable for scientific computing, data analysis and other fields.
 How to set important Git configuration global properties
Apr 17, 2025 pm 12:21 PM
How to set important Git configuration global properties
Apr 17, 2025 pm 12:21 PM
There are many ways to customize a development environment, but the global Git configuration file is one that is most likely to be used for custom settings such as usernames, emails, preferred text editors, and remote branches. Here are the key things you need to know about global Git configuration files.
