

Create a Jersey REST service based on Maven
REST service based on JavaSE
-
Create project
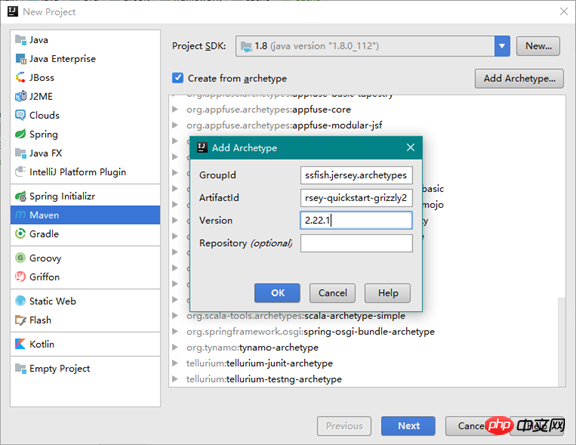
We prefer to use the prototype with archetypeGroupId as org.glassfish.jersey.archetypes and archetypeArtifactId as jersey-quickstart-grizzly2 to create a REST service Project, use IDEA to create the project as follows:

##After clicking OK, use the original model to create the project.
- Running Service
After the project is created, the original model has created a REST service by default. We can start the REST service directly, enter the root directory of the project, and execute the following command to build and start the service:
mvnpackage
##mvnexec:java
The REST service will be started, and you can stop the service at any time by pressing the Enter key. The output is as follows:
##June 19, 2017 11:12:23 PM org. glassfish.grizzly.http.server.NetworkListener startMessage: Started listener bound to [localhost:8080]
June 19, 2017 11:12:23 PM org.glassfish.grizzly.http.server.HttpServer start
Information: [HttpServer] Started.
Jersey app started with WADL available at http://localhost:8080/myapp/application.wadl
##Hit enter to stop it…
also provides
WADL. By accessing application.wadl, you can obtain the interface published by the current REST service:
path= "myresource">#
"getIt"name="GET"># ##
##
through # ;
##Access service
can be accessed directlyhttp://localhost:8080/myapp/myresource
You can access the REST service. If you directly access the REST service,Got it! will be output.
project instructionCommand to start the servicemvnexec: java, this command actually calls one defined by the exec-maven-plugin plug-in The goal whose value is java is used to trigger the main function in mainClass. The plug-in configuration is as follows:
org.codehaus.mojo #
exec-maven-plugin ##
1.2.1 ## #
#
#
## .rest.Main
#
REST service class is MyResource, the resource path is defined in @Path, and GET is defined in @GET Method getIt(), the response type defined in @Produces is an ordinary string, the sample code is as follows:
@Path("myresource")
##public classMyResource {
@GET##
@GET# public String getIt() {
return"Got it!";
}
}
##The unit test class MyResourceTest of the REST service, in the unit test class, is required before executing the unit test Start the service and use the method defined in JerseyClient to call the REST service. The sample code is as follows:
##public classMyResourceTest {##
privateHttpServer server; ;
##voidsetUp() throws Exception {
// Start the Server Server = Main.startserver ();
// create the client
Client c = ClientBuilder.newClient();
// uncomment the following line if you want to enable
// support for JSON in the client (you also have to uncomment
// dependency on jersey-media-json module in pom.xml and Main.startServer())
// --
// c.configuration().enable(new org.glassfish.jersey.media.json.JsonJaxbFeature());
target = c.target(Main.BASE_URI);
}
@After
publicvoidtearDown() throws Exception {
server.stop();
}
@Test
publicvoidtestGetIt() {
String responseMsg = target.path("myresource").request().get(String.class);
assertEquals("Got it!", responseMsg);
}
}
Based on Servlet container service
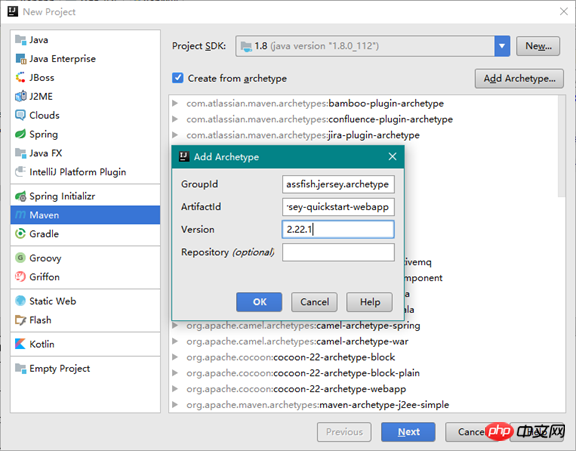
Create projectWe prefer to use the prototype with archetypeGroupId as org.glassfish.jersey.archetypes and archetypeArtifactId as jersey-quickstart-webapp prototype, create a REST service project, use IDEA to create the project as follows:
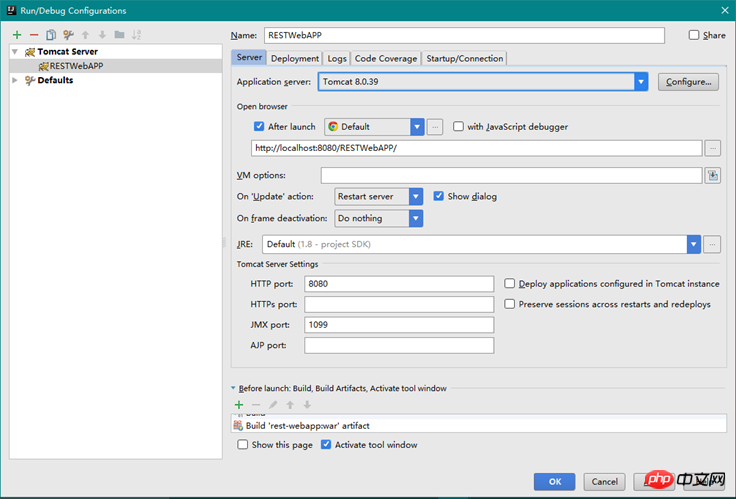
Running ServiceSince this is a Web project and does not have a main function, it must be deployed into a Servlet container before it can be run. , we need to configure Tomcat, the configuration of IDEA is as follows:
-
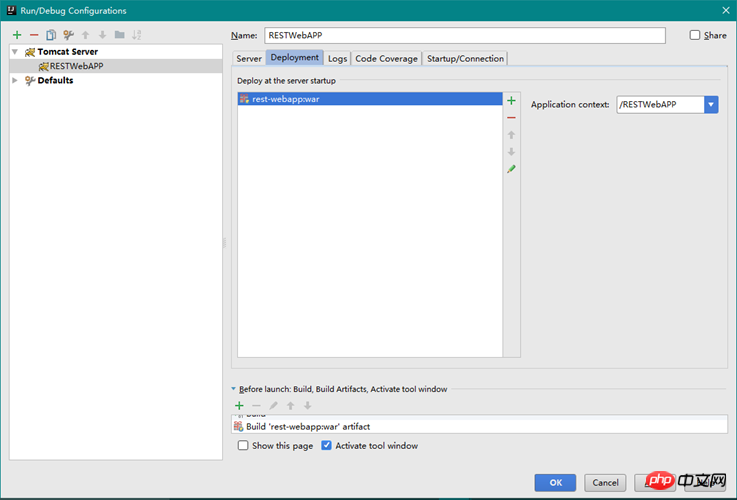
Click ## of the Run menu #EditConfiguration, add Tomcat service configuration in the opened form, specify the installation directory of Tomcat, and set the current site's The name of the deployed virtual directory is as follows:
After clicking OK, the Servlet container is configured and the service can be run
Access the serviceAfter the service is started, we can accesshttp://localhost:8080/RESTWebAPP/webapi /myresource to call the REST service will output Got it!
Project DescriptionThe name of the Web root directory is webapp, the default Servlet container version is 2.5, and the WEB-INF/web.xml file is configured to configure the REST service. The web.xml configuration is as follows:
version="1.0"encoding="UTF-8"? >
#
see implementation details -->
version="2.5"xmlns="http://java.sun.com/xml/ns/javaee" xmlns:xsi="http://www.w3.org/2001/XMLSchema-instance" xsi:schemaLocation=" http://java.sun.com/xml/ns/javaee "> ##
Jersey Web Application##
org.glassfish.jersey.servlet.ServletContainer ## & LT; Param-Name & GT; ## jersey.config. Orvider.packages & LT
org.drsoft.rest ##
1Jersey Web Application /webapi/*
The above is the detailed content of Create a Jersey REST service based on Maven. For more information, please follow other related articles on the PHP Chinese website!

Hot AI Tools

Undresser.AI Undress
AI-powered app for creating realistic nude photos

AI Clothes Remover
Online AI tool for removing clothes from photos.

Undress AI Tool
Undress images for free

Clothoff.io
AI clothes remover

Video Face Swap
Swap faces in any video effortlessly with our completely free AI face swap tool!

Hot Article
Hot Tools

Notepad++7.3.1
Easy-to-use and free code editor

SublimeText3 Chinese version
Chinese version, very easy to use

Zend Studio 13.0.1
Powerful PHP integrated development environment

Dreamweaver CS6
Visual web development tools

SublimeText3 Mac version
God-level code editing software (SublimeText3)
Hot Topics
 1386
1386
 52
52

 How to delete Xiaohongshu notes
Mar 21, 2024 pm 08:12 PM
How to delete Xiaohongshu notes
Mar 21, 2024 pm 08:12 PM
How to delete Xiaohongshu notes? Notes can be edited in the Xiaohongshu APP. Most users don’t know how to delete Xiaohongshu notes. Next, the editor brings users pictures and texts on how to delete Xiaohongshu notes. Tutorial, interested users come and take a look! Xiaohongshu usage tutorial How to delete Xiaohongshu notes 1. First open the Xiaohongshu APP and enter the main page, select [Me] in the lower right corner to enter the special area; 2. Then in the My area, click on the note page shown in the picture below , select the note you want to delete; 3. Enter the note page, click [three dots] in the upper right corner; 4. Finally, the function bar will expand at the bottom, click [Delete] to complete.
 What should I do if the notes I posted on Xiaohongshu are missing? What's the reason why the notes it just sent can't be found?
Mar 21, 2024 pm 09:30 PM
What should I do if the notes I posted on Xiaohongshu are missing? What's the reason why the notes it just sent can't be found?
Mar 21, 2024 pm 09:30 PM
As a Xiaohongshu user, we have all encountered the situation where published notes suddenly disappeared, which is undoubtedly confusing and worrying. In this case, what should we do? This article will focus on the topic of "What to do if the notes published by Xiaohongshu are missing" and give you a detailed answer. 1. What should I do if the notes published by Xiaohongshu are missing? First, don't panic. If you find that your notes are missing, staying calm is key and don't panic. This may be caused by platform system failure or operational errors. Checking release records is easy. Just open the Xiaohongshu App and click "Me" → "Publish" → "All Publications" to view your own publishing records. Here you can easily find previously published notes. 3.Repost. If found
 How to add product links in notes in Xiaohongshu Tutorial on adding product links in notes in Xiaohongshu
Mar 12, 2024 am 10:40 AM
How to add product links in notes in Xiaohongshu Tutorial on adding product links in notes in Xiaohongshu
Mar 12, 2024 am 10:40 AM
How to add product links in notes in Xiaohongshu? In the Xiaohongshu app, users can not only browse various contents but also shop, so there is a lot of content about shopping recommendations and good product sharing in this app. If If you are an expert on this app, you can also share some shopping experiences, find merchants for cooperation, add links in notes, etc. Many people are willing to use this app for shopping, because it is not only convenient, but also has many Experts will make some recommendations. You can browse interesting content and see if there are any clothing products that suit you. Let’s take a look at how to add product links to notes! How to add product links to Xiaohongshu Notes Open the app on the desktop of your mobile phone. Click on the app homepage
 How to create a folder on Realme Phone?
Mar 23, 2024 pm 02:30 PM
How to create a folder on Realme Phone?
Mar 23, 2024 pm 02:30 PM
Title: Realme Phone Beginner’s Guide: How to Create Folders on Realme Phone? In today's society, mobile phones have become an indispensable tool in people's lives. As a popular smartphone brand, Realme Phone is loved by users for its simple and practical operating system. In the process of using Realme phones, many people may encounter situations where they need to organize files and applications on their phones, and creating folders is an effective way. This article will introduce how to create folders on Realme phones to help users better manage their phone content. No.
 How to create pixel art in GIMP
Feb 19, 2024 pm 03:24 PM
How to create pixel art in GIMP
Feb 19, 2024 pm 03:24 PM
This article will interest you if you are interested in using GIMP for pixel art creation on Windows. GIMP is a well-known graphics editing software that is not only free and open source, but also helps users create beautiful images and designs easily. In addition to being suitable for beginners and professional designers alike, GIMP can also be used to create pixel art, a form of digital art that utilizes pixels as the only building blocks for drawing and creating. How to Create Pixel Art in GIMP Here are the main steps to create pixel pictures using GIMP on a Windows PC: Download and install GIMP, then launch the application. Create a new image. Resize width and height. Select the pencil tool. Set the brush type to pixels. set up
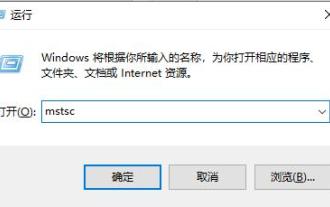 How to open Remote Desktop Connection Service using command
Dec 31, 2023 am 10:38 AM
How to open Remote Desktop Connection Service using command
Dec 31, 2023 am 10:38 AM
Remote desktop connection has brought convenience to many users' daily lives. Some people want to use commands to connect remotely, which is more convenient to operate. So how to connect? Remote Desktop Connection Service can help you solve this problem by using a command to open it. How to set up the remote desktop connection command: Method 1. Connect remotely by running the command 1. Press "Win+R" to open "Run" and enter mstsc2, then click "Show Options" 3. Enter the IP address and click "Connect". 4. It will show that it is connecting. Method 2: Connect remotely through the command prompt 1. Press "Win+R" to open "Run" and enter cmd2. In the "Command Prompt" enter mstsc/v:192.168.1.250/console
 How to create a family with Gree+
Mar 01, 2024 pm 12:40 PM
How to create a family with Gree+
Mar 01, 2024 pm 12:40 PM
Many friends expressed that they want to know how to create a family in Gree+ software. Here is the operation method for you. Friends who want to know more, come and take a look with me. First, open the Gree+ software on your mobile phone and log in. Then, in the options bar at the bottom of the page, click the "My" option on the far right to enter the personal account page. 2. After coming to my page, there is a "Create Family" option under "Family". After finding it, click on it to enter. 3. Next jump to the page to create a family, enter the family name to be set in the input box according to the prompts, and click the "Save" button in the upper right corner after entering it. 4. Finally, a "save successfully" prompt will pop up at the bottom of the page, indicating that the family has been successfully created.
 What is the correct way to restart a service in Linux?
Mar 15, 2024 am 09:09 AM
What is the correct way to restart a service in Linux?
Mar 15, 2024 am 09:09 AM
What is the correct way to restart a service in Linux? When using a Linux system, we often encounter situations where we need to restart a certain service, but sometimes we may encounter some problems when restarting the service, such as the service not actually stopping or starting. Therefore, it is very important to master the correct way to restart services. In Linux, you can usually use the systemctl command to manage system services. The systemctl command is part of the systemd system manager
