Preface
We know that the role of the volatile keyword is to ensure the visibility of variables between multiple threads, which is java.util. The core of the concurrent package, without volatile there would not be so many concurrent classes for us to use.
This article explains in detail how the volatile keyword ensures the visibility of variables between multiple threads. Before that, it is necessary to explain the relevant knowledge of CPU cache. Mastering this part of knowledge is necessary It will allow us to better understand the principle of volatile, so that we can use the volatile keyword better and more correctly.
##CPU cache
## The emergence of CPU cache is mainly to solve the contradiction between the CPU operation speed and the memory read and write speed , because the CPU operation speed is much faster than the memory read and write speed, for example:
Based on this, now the CPU does not directly access the memory for reading and writing in most cases (the CPU does not have pins connected to the memory), instead it is the CPU cache, and the CPU cache is A temporary memory located between the CPU and the memory. Its capacity is much smaller than the memory but the exchange speed is much faster than the memory. The data in the cache is a small part of the data in the memory, but this small part is about to be accessed by the CPU in a short period of time. When the CPU calls a large amount of data, it can be read from the cache first, thereby speeding up the reading speed.
According to how closely the reading sequence is combined with the CPU, the CPU cache can be divided into:
When the CPU wants to read a piece of data, it first searches it from the first-level cache. If it does not, it then searches it from the second-level cache. If it still does not, it then searches it from the third-level cache or memory. Find in . Generally speaking, the hit rate of each level of cache is about 80%, which means that 80% of the total data volume can be found in the first-level cache, and only 20% of the total data volume needs to be obtained from the second-level cache, L3 cache or in-memory read.
Problems caused by using CPU cache
Use a picture to represent the CPU -->CPU cache-->The relationship between main memory data reading:

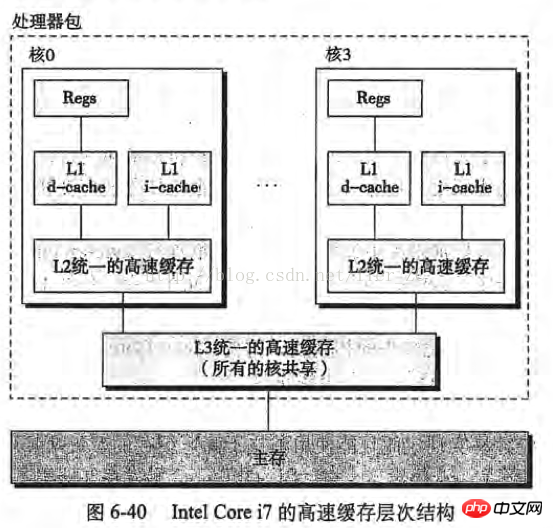
If the server is a single-core CPU, then these steps will not have any problems, but if the server is a multi-core CPU, then the problem arises, with the cache of the Intel Core i7 processor Take the conceptual model as an example (the picture is taken from "In-depth Understanding of Computer Systems"):

Imagine the following situation:
Core 0 reads a byte. According to the principle of locality, its adjacent bytes are also read into the cache of core 0
Core 3 did the same thing as above, so that the caches of core 0 and core 3 have the same data
Core 0 modified that byte. After the modification, that byte was written back to the cache of core 0, but the information was not written back to the main memory.
Core 3 accesses this byte. Since core 0 does not write the data back to the main memory, the data is out of sync.
In order to solve this problem, the CPU manufacturer A rule is formulated: When a CPU modifies bytes in the cache, other CPUs in the server will be notified and their caches will be considered invalid. Therefore, in the above situation, core 3 finds that the data in its cache is invalid, core 0 will immediately write its data back to the main memory, and then core 3 will re-read the data.
It can be seen that the cache will have some performance losses when using multi-core CPUs.
Disassemble the Java bytecode and see what is done to the volatile keyword at the assembly level
With the above theoretical basis, we can study how the volatile keyword is implemented. First write a simple code:
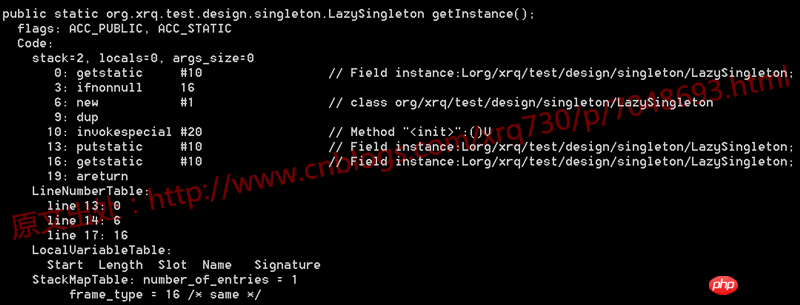
1 /** 2 * @author 五月的仓颉 3 */ 4 public class LazySingleton { 5 6 private static volatile LazySingleton instance = null; 7 8 public static LazySingleton getInstance() { 9 if (instance == null) {10 instance = new LazySingleton();11 }12 13 return instance;14 }15 16 public static void main(String[] args) {17 LazySingleton.getInstance();18 }19 20 }First decompile the .class file of this code and look at the generated bytecode:

Nothing special. We know that bytecode instructions, such as getstatic, ifnonnull, new, etc. in the picture above, ultimately correspond to the operating system level and are converted into instructions one by one for execution. The CPU architecture of the PCs and application servers we use usually It is an IA-32 architecture. The instruction set used in this architecture is CISC (Complex Instruction Set), and assembly language is the mnemonic of this instruction set.
So, since we can’t see any clues at the bytecode level, let’s see what clues can be seen by converting the code into assembly instructions. It is not difficult to see the assembly code corresponding to the above code on Windows (a rant, it is not difficult to say, I searched all kinds of information for this problem, and almost prepared to install a virtual machine on the Linux system), visit hsdis You can directly download the hsdis tool in the tool path. After downloading, unzip it and place the hsdis-amd64.dll and hsdis-amd64.lib files in the %JAVA_HOME%\jre\bin\server path, as shown below:

Then run the main function. Before running the main function, add the following virtual machine parameters:
-server -Xcomp -XX:+UnlockDiagnosticVMOptions -XX:+PrintAssembly -XX:CompileCommand=compileonly,*LazySingleton.getInstance
Just run the main function. The assembly instructions generated by the code are:
1 Java HotSpot(TM) 64-Bit Server VM warning: PrintAssembly is enabled; turning on DebugNonSafepoints to gain additional output 2 CompilerOracle: compileonly *LazySingleton.getInstance 3 Loaded disassembler from D:\JDK\jre\bin\server\hsdis-amd64.dll 4 Decoding compiled method 0x0000000002931150: 5 Code: 6 Argument 0 is unknown.RIP: 0x29312a0 Code size: 0x00000108 7 [Disassembling for mach='amd64'] 8 [Entry Point] 9 [Verified Entry Point]10 [Constants]11 # {method} 'getInstance' '()Lorg/xrq/test/design/singleton/LazySingleton;' in 'org/xrq/test/design/singleton/LazySingleton'12 # [sp+0x20] (sp of caller)13 0x00000000029312a0: mov dword ptr [rsp+0ffffffffffffa000h],eax14 0x00000000029312a7: push rbp15 0x00000000029312a8: sub rsp,10h ;*synchronization entry16 ; - org.xrq.test.design.singleton.LazySingleton::getInstance@-1 (line 13)17 0x00000000029312ac: mov r10,7ada9e428h ; {oop(a 'java/lang/Class' = 'org/xrq/test/design/singleton/LazySingleton')}18 0x00000000029312b6: mov r11d,dword ptr [r10+58h]19 ;*getstatic instance20 ; - org.xrq.test.design.singleton.LazySingleton::getInstance@0 (line 13)21 0x00000000029312ba: test r11d,r11d22 0x00000000029312bd: je 29312e0h23 0x00000000029312bf: mov r10,7ada9e428h ; {oop(a 'java/lang/Class' = 'org/xrq/test/design/singleton/LazySingleton')}24 0x00000000029312c9: mov r11d,dword ptr [r10+58h]25 0x00000000029312cd: mov rax,r1126 0x00000000029312d0: shl rax,3h ;*getstatic instance27 ; - org.xrq.test.design.singleton.LazySingleton::getInstance@16 (line 17)28 0x00000000029312d4: add rsp,10h29 0x00000000029312d8: pop rbp30 0x00000000029312d9: test dword ptr [330000h],eax ; {poll_return}31 0x00000000029312df: ret32 0x00000000029312e0: mov rax,qword ptr [r15+60h]33 0x00000000029312e4: mov r10,rax34 0x00000000029312e7: add r10,10h35 0x00000000029312eb: cmp r10,qword ptr [r15+70h]36 0x00000000029312ef: jnb 293135bh37 0x00000000029312f1: mov qword ptr [r15+60h],r1038 0x00000000029312f5: prefetchnta byte ptr [r10+0c0h]39 0x00000000029312fd: mov r11d,0e07d00b2h ; {oop('org/xrq/test/design/singleton/LazySingleton')}40 0x0000000002931303: mov r10,qword ptr [r12+r11*8+0b0h]41 0x000000000293130b: mov qword ptr [rax],r1042 0x000000000293130e: mov dword ptr [rax+8h],0e07d00b2h43 ; {oop('org/xrq/test/design/singleton/LazySingleton')}44 0x0000000002931315: mov dword ptr [rax+0ch],r12d45 0x0000000002931319: mov rbp,rax ;*new ; - org.xrq.test.design.singleton.LazySingleton::getInstance@6 (line 14)46 0x000000000293131c: mov rdx,rbp47 0x000000000293131f: call 2907c60h ; OopMap{rbp=Oop off=132}48 ;*invokespecial <init>49 ; - org.xrq.test.design.singleton.LazySingleton::getInstance@10 (line 14)50 ; {optimized virtual_call}51 0x0000000002931324: mov r10,rbp52 0x0000000002931327: shr r10,3h53 0x000000000293132b: mov r11,7ada9e428h ; {oop(a 'java/lang/Class' = 'org/xrq/test/design/singleton/LazySingleton')}54 0x0000000002931335: mov dword ptr [r11+58h],r10d55 0x0000000002931339: mov r10,7ada9e428h ; {oop(a 'java/lang/Class' = 'org/xrq/test/design/singleton/LazySingleton')}56 0x0000000002931343: shr r10,9h57 0x0000000002931347: mov r11d,20b2000h58 0x000000000293134d: mov byte ptr [r11+r10],r12l59 0x0000000002931351: lock add dword ptr [rsp],0h ;*putstatic instance60 ; - org.xrq.test.design.singleton.LazySingleton::getInstance@13 (line 14)61 0x0000000002931356: jmp 29312bfh62 0x000000000293135b: mov rdx,703e80590h ; {oop('org/xrq/test/design/singleton/LazySingleton')}63 0x0000000002931365: nop64 0x0000000002931367: call 292fbe0h ; OopMap{off=204}65 ;*new ; - org.xrq.test.design.singleton.LazySingleton::getInstance@6 (line 14)66 ; {runtime_call}67 0x000000000293136c: jmp 2931319h68 0x000000000293136e: mov rdx,rax69 0x0000000002931371: jmp 2931376h70 0x0000000002931373: mov rdx,rax ;*new ; - org.xrq.test.design.singleton.LazySingleton::getInstance@6 (line 14)71 0x0000000002931376: add rsp,10h72 0x000000000293137a: pop rbp73 0x000000000293137b: jmp 2932b20h ; {runtime_call}74 [Stub Code]75 0x0000000002931380: mov rbx,0h ; {no_reloc}76 0x000000000293138a: jmp 293138ah ; {runtime_call}77 [Exception Handler]78 0x000000000293138f: jmp 292fca0h ; {runtime_call}79 [Deopt Handler Code]80 0x0000000002931394: call 2931399h81 0x0000000002931399: sub qword ptr [rsp],5h82 0x000000000293139e: jmp 2909000h ; {runtime_call}83 0x00000000029313a3: hlt84 0x00000000029313a4: hlt85 0x00000000029313a5: hlt86 0x00000000029313a6: hlt87 0x00000000029313a7: hltSuch a long assembly code, maybe everyone I don’t know where the CPU has done something, but it’s not difficult. I located the lines 59 and 60:
0x0000000002931351: lock add dword ptr [rsp],0h ;*putstatic instance; - org.xrq.test.design.singleton.LazySingleton::getInstance@13 (line 14)
之所以定位到这两行是因为这里结尾写明了line 14,line 14即volatile变量instance赋值的地方。后面的add dword ptr [rsp],0h都是正常的汇编语句,意思是将双字节的栈指针寄存器+0,这里的关键就是add前面的lock指令,后面详细分析一下lock指令的作用和为什么加上lock指令后就能保证volatile关键字的内存可见性。
lock指令做了什么
之前有说过IA-32架构,关于CPU架构的问题大家有兴趣的可以自己查询一下,这里查询一下IA-32手册关于lock指令的描述,没有IA-32手册的可以去这个地址下载IA-32手册下载地址,是个中文版本的手册。
我摘抄一下IA-32手册中关于lock指令作用的一些描述(因为lock指令的作用在手册中散落在各处,并不是在某一章或者某一节专门讲):
在修改内存操作时,使用LOCK前缀去调用加锁的读-修改-写操作,这种机制用于多处理器系统中处理器之间进行可靠的通讯,具体描述如下:
(1)在Pentium和早期的IA-32处理器中,LOCK前缀会使处理器执行当前指令时产生一个LOCK#信号,这种总是引起显式总线锁定出现
(2)在Pentium4、Inter Xeon和P6系列处理器中,加锁操作是由高速缓存锁或总线锁来处理。如果内存访问有高速缓存且只影响一个单独的高速缓存行,那么操作中就会调用高速缓存锁,而系统总线和系统内存中的实际区域内不会被锁定。同时,这条总线上的其它Pentium4、Intel Xeon或者P6系列处理器就回写所有已修改的数据并使它们的高速缓存失效,以保证系统内存的一致性。如果内存访问没有高速缓存且/或它跨越了高速缓存行的边界,那么这个处理器就会产生LOCK#信号,并在锁定操作期间不会响应总线控制请求
32位IA-32处理器支持对系统内存中的某个区域进行加锁的原子操作。这些操作常用来管理共享的数据结构(如信号量、段描述符、系统段或页表),两个或多个处理器可能同时会修改这些数据结构中的同一数据域或标志。处理器使用三个相互依赖的机制来实现加锁的原子操作:1、保证原子操作2、总线加锁,使用LOCK#信号和LOCK指令前缀3、高速缓存相干性协议,确保对高速缓存中的数据结构执行原子操作(高速缓存锁)。这种机制存在于Pentium4、Intel Xeon和P6系列处理器中
IA-32处理器提供有一个LOCK#信号,会在某些关键内存操作期间被自动激活,去锁定系统总线。当这个输出信号发出的时候,来自其他处理器或总线代理的控制请求将被阻塞。软件能够通过预先在指令前添加LOCK前缀来指定需要LOCK语义的其它场合。
在Intel386、Intel486、Pentium处理器中,明确地对指令加锁会导致LOCK#信号的产生。由硬件设计人员来保证系统硬件中LOCK#信号的可用性,以控制处理器间的内存访问。
对于Pentinum4、Intel Xeon以及P6系列处理器,如果被访问的内存区域是在处理器内部进行高速缓存的,那么通常不发出LOCK#信号;相反,加锁只应用于处理器的高速缓存。
<span style="color: #000000">为显式地强制执行LOCK语义,软件可以在下列指令修改内存区域时使用LOCK前缀。当LOCK前缀被置于其它指令之前或者指令没有对内存进行写操作(也就是说目标操作数在寄存器中)时,会产生一个非法操作码异常(#UD)。
【</span><span style="color: #800080">1</span><span style="color: #000000">】位测试和修改指令(BTS、BTR、BTC)
【</span><span style="color: #800080">2</span><span style="color: #000000">】交换指令(XADD、CMPXCHG、CMPXCHG8B)
【</span><span style="color: #800080">3</span><span style="color: #000000">】自动假设有LOCK前缀的XCHG指令<br>【4】下列单操作数的算数和逻辑指令:INC、DEC、NOT、NEG<br>【5】下列双操作数的算数和逻辑指令:ADD、ADC、SUB、SBB、AND、OR、XOR<br>一个加锁的指令会保证对目标操作数所在的内存区域加锁,但是系统可能会将锁定区域解释得稍大一些。<br>软件应该使用相同的地址和操作数长度来访问信号量(用作处理器之间发送信号的共享内存)。例如,如果一个处理器使用一个字来访问信号量,其它处理器就不应该使用一个字节来访问这个信号量。<br>总线锁的完整性不收内存区域对齐的影响。加锁语义会一直持续,以满足更新整个操作数所需的总线周期个数。但是,建议加锁访问应该对齐在它们的自然边界上,以提升系统性能:<br>【1】任何8位访问的边界(加锁或不加锁)<br>【2】锁定的字访问的16位边界<br>【3】锁定的双字访问的32位边界<br>【4】锁定的四字访问的64位边界<br>对所有其它的内存操作和所有可见的外部事件来说,加锁的操作都是原子的。所有取指令和页表操作能够越过加锁的指令。加锁的指令可用于同步一个处理器写数据而另一个处理器读数据的操作。</span>
IA-32架构提供了几种机制用来强化或弱化内存排序模型,以处理特殊的编程情形。这些机制包括:
【1】I/O指令、加锁指令、LOCK前缀以及串行化指令等,强制在处理器上进行较强的排序
【2】SFENCE指令(在Pentium III中引入)和LFENCE指令、MFENCE指令(在Pentium4和Intel Xeon处理器中引入)提供了某些特殊类型内存操作的排序和串行化功能
...(这里还有两条就不写了)
这些机制可以通过下面的方式使用。
总线上的内存映射设备和其它I/O设备通常对向它们缓冲区写操作的顺序很敏感,I/O指令(IN指令和OUT指令)以下面的方式对这种访问执行强写操作的排序。在执行了一条I/O指令之前,处理器等待之前的所有指令执行完毕以及所有的缓冲区都被都被写入了内存。只有取指令和页表查询能够越过I/O指令,后续指令要等到I/O指令执行完毕才开始执行。
反复思考IA-32手册对lock指令作用的这几段描述,可以得出lock指令的几个作用:
锁总线,其它CPU对内存的读写请求都会被阻塞,直到锁释放,不过实际后来的处理器都采用锁缓存替代锁总线,因为锁总线的开销比较大,锁总线期间其他CPU没法访问内存
lock后的写操作会回写已修改的数据,同时让其它CPU相关缓存行失效,从而重新从主存中加载最新的数据
不是内存屏障却能完成类似内存屏障的功能,阻止屏障两遍的指令重排序
(1)中写了由于效率问题,实际后来的处理器都采用锁缓存来替代锁总线,这种场景下多缓存的数据一致是通过缓存一致性协议来保证的,我们来看一下什么是缓存一致性协议。
缓存一致性协议
讲缓存一致性之前,先说一下缓存行的概念:
缓存是分段(line)的,一个段对应一块存储空间,我们称之为缓存行,它是CPU缓存中可分配的最小存储单元,大小32字节、64字节、128字节不等,这与CPU架构有关。当CPU看到一条读取内存的指令时,它会把内存地址传递给一级数据缓存,一级数据缓存会检查它是否有这个内存地址对应的缓存段,如果没有就把整个缓存段从内存(或更高一级的缓存)中加载进来。注意,这里说的是一次加载整个缓存段,这就是上面提过的局部性原理
上面说了,LOCK#会锁总线,实际上这不现实,因为锁总线效率太低了。因此最好能做到:使用多组缓存,但是它们的行为看起来只有一组缓存那样。缓存一致性协议就是为了做到这一点而设计的,就像名称所暗示的那样,这类协议就是要使多组缓存的内容保持一致。
缓存一致性协议有多种,但是日常处理的大多数计算机设备都属于"嗅探(snooping)"协议,它的基本思想是:
<span style="color: #000000">所有内存的传输都发生在一条共享的总线上,而所有的处理器都能看到这条总线:缓存本身是独立的,但是内存是共享资源,所有的内存访问都要经过仲裁(同一个指令周期中,只有一个CPU缓存可以读写内存)。<br>CPU缓存不仅仅在做内存传输的时候才与总线打交道,而是不停在嗅探总线上发生的数据交换,跟踪其他缓存在做什么。所以当一个缓存代表它所属的处理器去读写内存时,其它处理器都会得到通知,它们以此来使自己的缓存保持同步。只要某个处理器一写内存,其它处理器马上知道这块内存在它们的缓存段中已失效。</span>
MESI protocol is currently the most mainstream cache consistency protocol. In the MESI protocol, each cache line has 4 states, which can be represented by 2 bits. They are:

The I, S and M states here already have corresponding concepts: invalid/unloaded, clean and dirty cache segments. So the new knowledge point here is only the E state, which represents exclusive access. This state solves the problem of "before we start modifying a certain piece of memory, we need to tell other processors": only when the cache line is in the E or M state , the processor can write it, that is to say, only in these two states, the processor exclusively occupies this cache line. When the processor wants to write to a certain cache line, if it does not have exclusive rights, it must first send an "I want exclusive rights" request to the bus. This will notify other processors to write the same cache line they own. The copy of the cache segment is invalid (if any). Only after gaining exclusive rights can the processor start modifying the data - and at this point the processor knows that there is only one copy of this cache line, in my own cache, so there will be no conflicts.
Conversely, if another processor wants to read this cache line (you will know it immediately because it has been sniffing the bus), the exclusive or modified cache line must first be returned to " Share" status. If it is a modified cache line, the content must be written back to memory first.
Look back at volatile variable reading and writing through the lock instruction
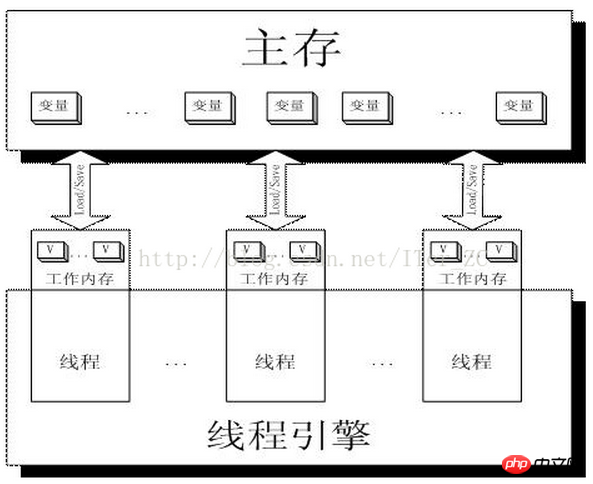
I believe that with the above The explanation of lock and the implementation principle of volatile keyword should be clear at a glance. First look at a picture:

Working memory Work Memory is actually an abstraction of CPU registers and caches, or in other words The working memory of each thread can also be simply understood as CPU registers and cache.
Then when two threads Thread-A and Threab-B are written to operate a volatile variable i in the main memory at the same time, Thread-A writes the variable i, then:
Thread-A issues the LOCK# instruction
issues the LOCK# instruction to lock the bus (or lock cache line), and at the same time invalidate the cache line content in Thread-B cache
Thread-A writes back the latest modified i to the main memory
Thread-B reads variable i, then:
Thread-B finds the corresponding address The cache line is locked and waiting for the lock to be released. The cache consistency protocol will ensure that it reads the latest value
It can be seen from this that volatile is the key There is basically no difference between reading words and reading ordinary variables. The main difference lies in the writing operation of variables.
Postscript
I personally have some knowledge about the role of volatile keywords before. Confusing misunderstandings. After deeply understanding the role of the volatile keyword, I feel that my understanding of volatile is much deeper. I believe that after reading this article, as long as you are willing to think and study, you will have the same sudden enlightenment and enlightenment as I did ^_^
Reference materials
"IA-32 Architecture Software Developer's Manual Volume 3: System Programming Guide"
"Java Concurrent Programming The Art of "
"In-depth Understanding of Java Virtual Machine: JVM Advanced Features and Best Practices"
PrintAssemblyView volatile assembly code notes
Introduction to Cache Coherency
Let’s talk about high concurrency (34) Java memory model (2) Understanding CPU cache working principle
The above is the detailed content of How to use volatile in Java?. For more information, please follow other related articles on the PHP Chinese website!


