

Example of implementation of Spring+quartz

There is a problem in my friend’s project. His side is based on Spring architecture and has a relatively simple task that requires scheduled execution. After understanding his needs, he proposed a relatively simple Spring+quartz implementation.
Note that this article only discusses how to complete the simplest scheduled tasks under the completed Spring project.
The first step is to know the Spring architecture, which is very interesting and interesting. The effect of freely plugging and unplugging functional modules can be achieved. The project is based on MAVEN package dependency management, so list the required dependency package references this time:
1 <!-- 定时器依赖 开始 --> 2 <dependency> 3 <groupId>org.springframework</groupId> 4 <artifactId>spring-context-support</artifactId> 5 <version>4.0.2.RELEASE</version> 6 </dependency> 7 8 9 10 <dependency>11 <groupId>org.quartz-scheduler</groupId>12 <artifactId>quartz</artifactId>13 <version>2.2.1</version>14 </dependency>15 <!-- 定时器依赖 结束 -->
Of course, this must match the corresponding Spring version. . Our project here is 4.0.2. The previous package spring-context-support is mainly used as a component for communication and management between Spring and quartz. If it is commented out, an error like this will be reported

Configure in MAVEN After completing the packages that need to be added (other packages will not be discussed here for the time being, this article only discusses the configuration under the complete Spring project), we can start to add functional modules for scheduled tasks to this project.
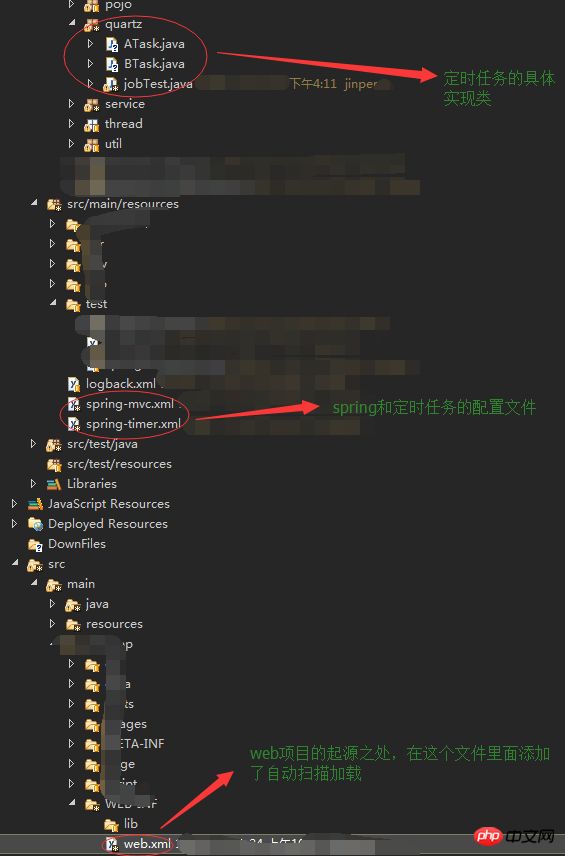
The second step is to start from the origin of the web project and make changes in web.xml. Since the Spring configuration file of the original project was Spring-mvc.xml, I changed the configuration file of the scheduled task to spring-time.xml. In this way, the same scan configuration can be read at startup. The specific code is as follows:
1 <context-param>2 <param-name>contextConfigLocation</param-name>3 <param-value>classpath:spring-*.xml</param-value>4 </context-param>
Then to show you my engineering structure:
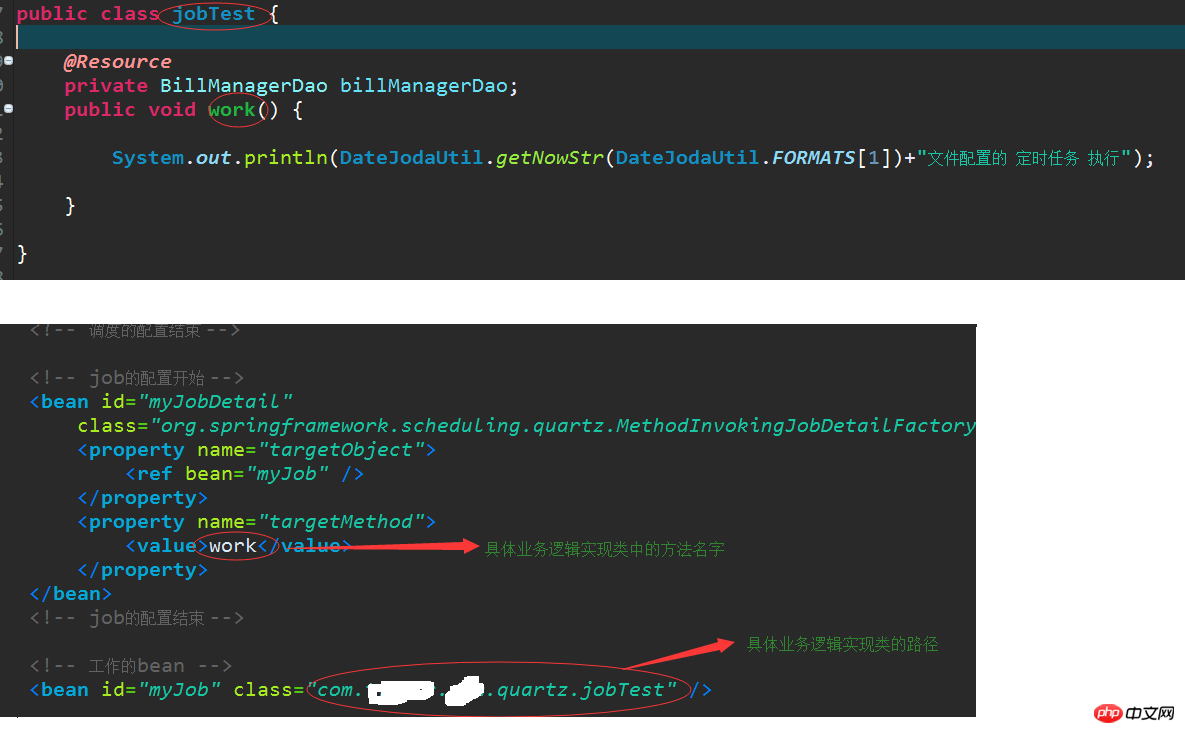
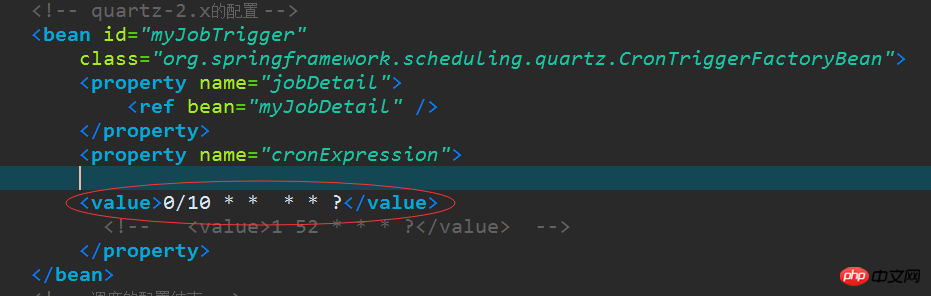
 1 <?xml version="1.0" encoding="UTF-8"?>   2 <beans xmlns="http://www.springframework.org/schema/beans"   3     xmlns:xsi="http://www.w3.org/2001/XMLSchema-instance"  4     xmlns:p="http://www.springframework.org/schema/p"   5     xsi:schemaLocation="http://www.springframework.org/schema/beans
 6      ">   7    8         <!-- 启动触发器的配置开始 -->   9     <bean name="startQuertz" lazy-init="false" autowire="no"  10         class="org.springframework.scheduling.quartz.SchedulerFactoryBean">  11         <property name="triggers">  12             <list>  13                 <ref bean="myJobTrigger" />  14             </list>  15         </property>  16     </bean>  17     <!-- 启动触发器的配置结束 -->  18   19     <!-- 调度的配置开始 -->  20     <!--  21         quartz-1.8以前的配置
22     <bean id="myJobTrigger"
23         class="org.springframework.scheduling.quartz.CronTriggerBean">
24         <property name="jobDetail">
25             <ref bean="myJobDetail" />
26         </property>
27         <property name="cronExpression">
28             <value>0/1 * * * * ?</value>
29         </property>
30     </bean>
31     -->  32     <!-- quartz-2.x的配置 -->  33     <bean id="myJobTrigger"  34         class="org.springframework.scheduling.quartz.CronTriggerFactoryBean">  35         <property name="jobDetail">  36             <ref bean="myJobDetail" />  37         </property>  38         <property name="cronExpression">  39         40         <value>0/10 * *  * * ?</value>41           <!--   <value>1 52 * * * ?</value>  --> 42         </property>  43     </bean>  44     <!-- 调度的配置结束 -->  45   46     <!-- job的配置开始 -->  47     <bean id="myJobDetail"  48         class="org.springframework.scheduling.quartz.MethodInvokingJobDetailFactoryBean">  49         <property name="targetObject">  50             <ref bean="myJob" />  51         </property>  52         <property name="targetMethod">  53             <value>work</value>  54         </property>  55     </bean>  56     <!-- job的配置结束 -->  57   58     <!-- 工作的bean -->  59     <bean id="myJob" class="com.tec.kevin.quartz.jobTest" />  60   61 </beans>
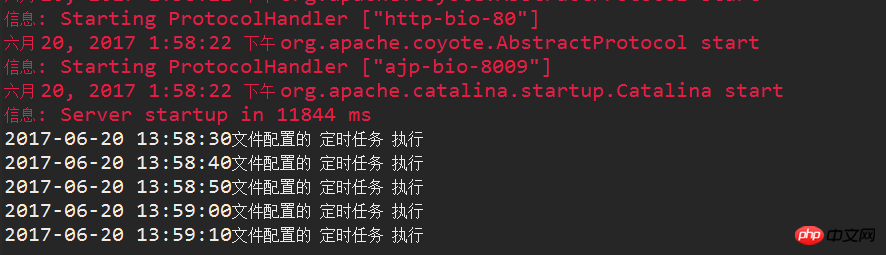 ##You can see here that the scheduled task is executed every 10 seconds according to the
There will be two articles next, one is a simpler implementation method of writing scheduled tasks, and the other explains cron expressions.
The above is the detailed content of Example of implementation of Spring+quartz. For more information, please follow other related articles on the PHP Chinese website!

Hot AI Tools

Undresser.AI Undress
AI-powered app for creating realistic nude photos

AI Clothes Remover
Online AI tool for removing clothes from photos.

Undress AI Tool
Undress images for free

Clothoff.io
AI clothes remover

AI Hentai Generator
Generate AI Hentai for free.

Hot Article
Hot Tools

Notepad++7.3.1
Easy-to-use and free code editor

SublimeText3 Chinese version
Chinese version, very easy to use

Zend Studio 13.0.1
Powerful PHP integrated development environment

Dreamweaver CS6
Visual web development tools

SublimeText3 Mac version
God-level code editing software (SublimeText3)
Hot Topics


 How to complete the horror corridor mission in Goat Simulator 3
Feb 25, 2024 pm 03:40 PM
How to complete the horror corridor mission in Goat Simulator 3
Feb 25, 2024 pm 03:40 PM
The Terror Corridor is a mission in Goat Simulator 3. How can you complete this mission? Master the detailed clearance methods and corresponding processes, and be able to complete the corresponding challenges of this mission. The following will bring you Goat Simulator. 3 Horror Corridor Guide to learn related information. Goat Simulator 3 Terror Corridor Guide 1. First, players need to go to Silent Hill in the upper left corner of the map. 2. Here you can see a house with RESTSTOP written on the roof. Players need to operate the goat to enter this house. 3. After entering the room, we first go straight forward, and then turn right. There is a door at the end here, and we go in directly from here. 4. After entering, we also need to walk forward first and then turn right. When we reach the door here, the door will be closed. We need to turn back and find it.
 How to pass the Imperial Tomb mission in Goat Simulator 3
Mar 11, 2024 pm 01:10 PM
How to pass the Imperial Tomb mission in Goat Simulator 3
Mar 11, 2024 pm 01:10 PM
Goat Simulator 3 is a game with classic simulation gameplay, allowing players to fully experience the fun of casual action simulation. The game also has many exciting special tasks. Among them, the Goat Simulator 3 Imperial Tomb task requires players to find the bell tower. Some players are not sure how to operate the three clocks at the same time. Here is the guide to the Tomb of the Tomb mission in Goat Simulator 3! The guide to the Tomb of the Tomb mission in Goat Simulator 3 is to ring the bells in order. Detailed step expansion 1. First, players need to open the map and go to Wuqiu Cemetery. 2. Then go up to the bell tower. There will be three bells inside. 3. Then, in order from largest to smallest, follow the familiarity of 222312312. 4. After completing the knocking, you can complete the mission and open the door to get the lightsaber.
 How to do the rescue Steve mission in Goat Simulator 3
Feb 25, 2024 pm 03:34 PM
How to do the rescue Steve mission in Goat Simulator 3
Feb 25, 2024 pm 03:34 PM
Rescue Steve is a unique task in Goat Simulator 3. What exactly needs to be done to complete it? This task is relatively simple, but we need to be careful not to misunderstand the meaning. Here we will bring you the rescue of Steve in Goat Simulator 3 Task strategies can help you better complete related tasks. Goat Simulator 3 Rescue Steve Mission Strategy 1. First come to the hot spring in the lower right corner of the map. 2. After arriving at the hot spring, you can trigger the task of rescuing Steve. 3. Note that there is a man in the hot spring. Although his name is Steve, he is not the target of this mission. 4. Find a fish named Steve in this hot spring and bring it ashore to complete this task.
 A new programming paradigm, when Spring Boot meets OpenAI
Feb 01, 2024 pm 09:18 PM
A new programming paradigm, when Spring Boot meets OpenAI
Feb 01, 2024 pm 09:18 PM
In 2023, AI technology has become a hot topic and has a huge impact on various industries, especially in the programming field. People are increasingly aware of the importance of AI technology, and the Spring community is no exception. With the continuous advancement of GenAI (General Artificial Intelligence) technology, it has become crucial and urgent to simplify the creation of applications with AI functions. Against this background, "SpringAI" emerged, aiming to simplify the process of developing AI functional applications, making it simple and intuitive and avoiding unnecessary complexity. Through "SpringAI", developers can more easily build applications with AI functions, making them easier to use and operate.
 What are the implementation methods of spring programmatic transactions?
Jan 08, 2024 am 10:23 AM
What are the implementation methods of spring programmatic transactions?
Jan 08, 2024 am 10:23 AM
How to implement spring programmatic transactions: 1. Use TransactionTemplate; 2. Use TransactionCallback and TransactionCallbackWithoutResult; 3. Use Transactional annotations; 4. Use TransactionTemplate in combination with @Transactional; 5. Customize the transaction manager.
 Use Spring Boot and Spring AI to build generative artificial intelligence applications
Apr 28, 2024 am 11:46 AM
Use Spring Boot and Spring AI to build generative artificial intelligence applications
Apr 28, 2024 am 11:46 AM
As an industry leader, Spring+AI provides leading solutions for various industries through its powerful, flexible API and advanced functions. In this topic, we will delve into the application examples of Spring+AI in various fields. Each case will show how Spring+AI meets specific needs, achieves goals, and extends these LESSONSLEARNED to a wider range of applications. I hope this topic can inspire you to understand and utilize the infinite possibilities of Spring+AI more deeply. The Spring framework has a history of more than 20 years in the field of software development, and it has been 10 years since the Spring Boot 1.0 version was released. Now, no one can dispute that Spring
 Where can I find Douyin fan group tasks? Will the Douyin fan club lose level?
Mar 07, 2024 pm 05:25 PM
Where can I find Douyin fan group tasks? Will the Douyin fan club lose level?
Mar 07, 2024 pm 05:25 PM
TikTok, as one of the most popular social media platforms at the moment, has attracted a large number of users to participate. On Douyin, there are many fan group tasks that users can complete to obtain certain rewards and benefits. So where can I find Douyin fan club tasks? 1. Where can I view Douyin fan club tasks? In order to find Douyin fan group tasks, you need to visit Douyin's personal homepage. On the homepage, you will see an option called "Fan Club." Click this option and you can browse the fan groups you have joined and related tasks. In the fan club task column, you will see various types of tasks, such as likes, comments, sharing, forwarding, etc. Each task has corresponding rewards and requirements. Generally speaking, after completing the task, you will receive a certain amount of gold coins or experience points.
 Teach you how to set up Win11 scheduled shutdown
Jan 06, 2024 pm 07:14 PM
Teach you how to set up Win11 scheduled shutdown
Jan 06, 2024 pm 07:14 PM
Sometimes, we need to leave the computer for a period of time to let it continue to download or allow certain programs, and want to shut down after the operation is completed. So how to set up a scheduled shutdown in win11? In fact, just use the shutdown command. How to set up a scheduled shutdown in win11: 1. First, right-click the start menu in the lower left corner and open "Run" 2. Then enter "shutdown-s-t7200" and press Enter to run. (7200 here is the scheduled shutdown time in seconds, 7200 is the shutdown after 2 hours) 3. In this way, we can complete the scheduled shutdown setting. 4. If you want to cancel the scheduled shutdown, just enter "shutdown-a" and press Enter. 5. After confirmation, you can cancel the scheduled shutdown.
