 Operation and Maintenance
 Linux Operation and Maintenance
 Static IP connects to the external network in NAT mode in centos
Static IP connects to the external network in NAT mode in centos
When using a Linux virtual machine, the yum command is usually used to install software. However, this command requires an external network connection to download the software, and using maven to download the jar package also requires an external network. The virtual machines can ping each other on the internal network, but cannot ping the external network, so through experiments, I finally found the solution:
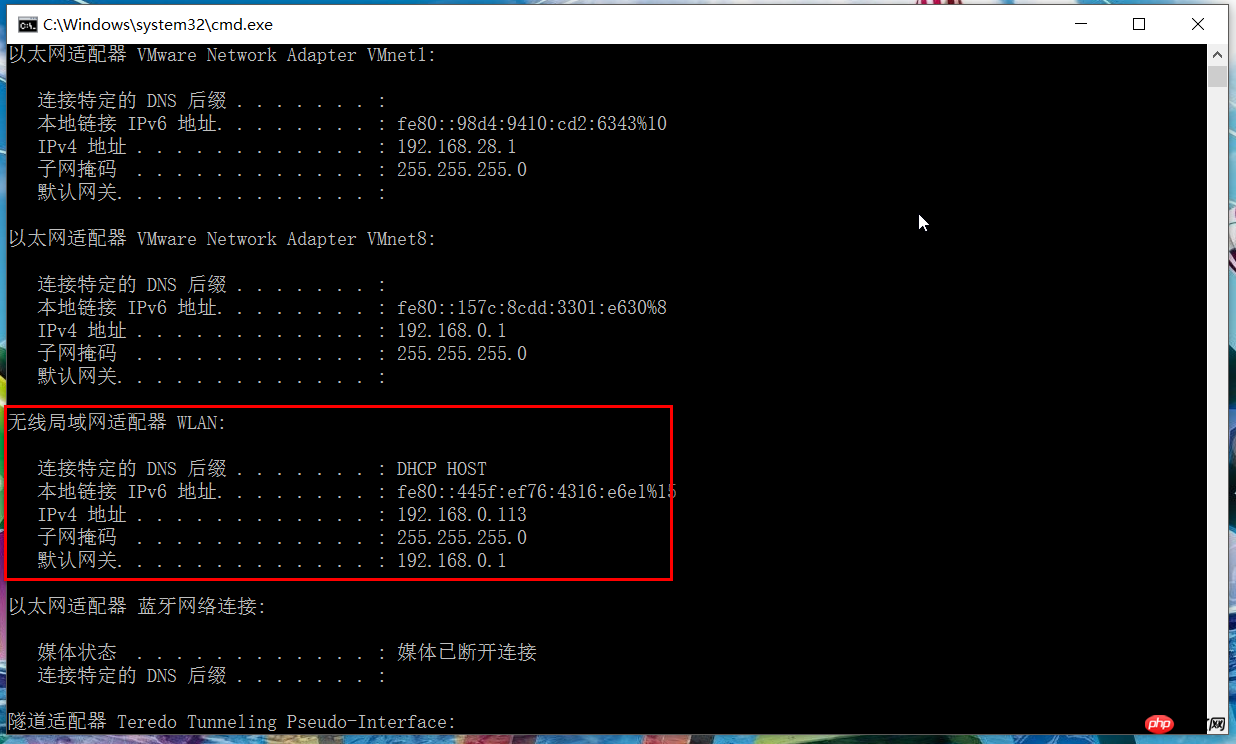
1. In the cmd command line of the physical machine, use the ipconfig command to view the IP configuration , as can be seen from the figure, the subnet IP of the physical machine is 192.168.0.0, the subnet mask is 255.255.255.0, and the gateway is 192.168.0.1
C:\Users\huanongying>ipconfig

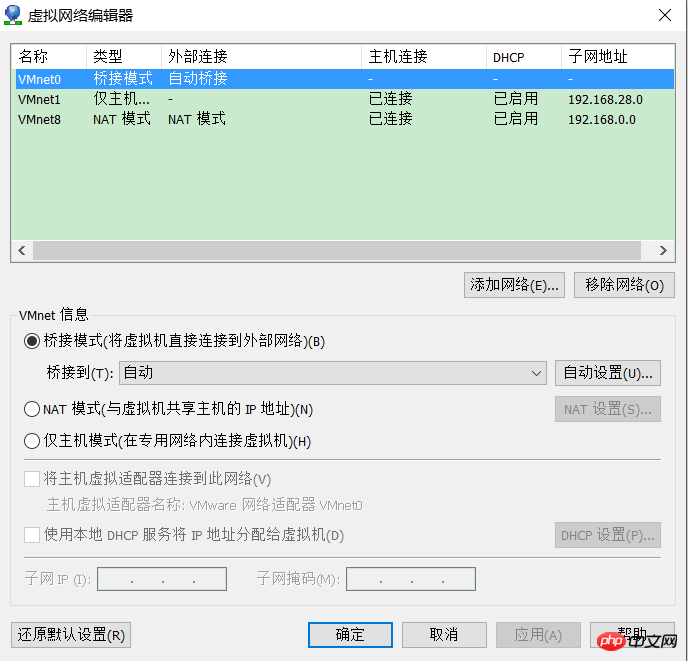
2. Close the virtual machine for which the IP is to be configured, and then click Edit -> Virtual Network Editor on the VMware main panel


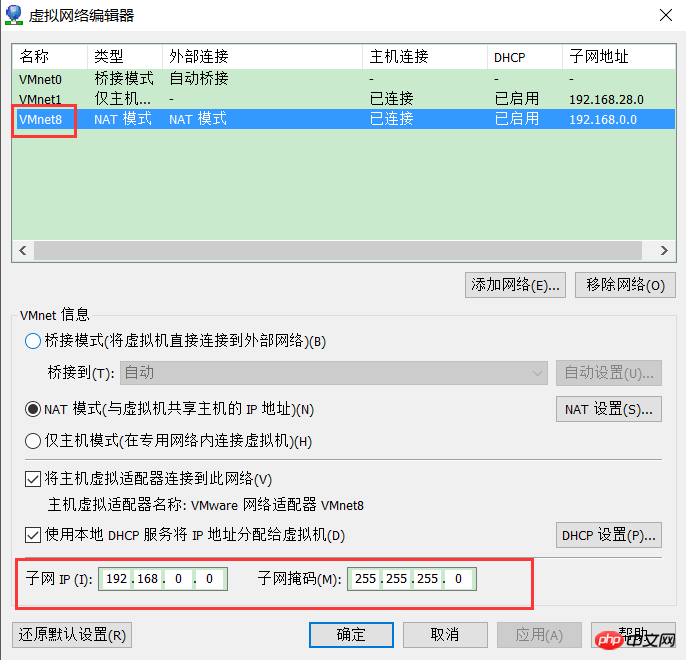
4. Click NAT Settings, set the gateway value to be consistent with the physical machine, click OK to save the configuration and return to the virtual network editor panel, click Apply to make steps 3 and 4 take effect (
It is best to click Apply , at first it was because I didn’t click on the application, so I couldn’t access the Internet), and finally click OK to exit the virtual network editor

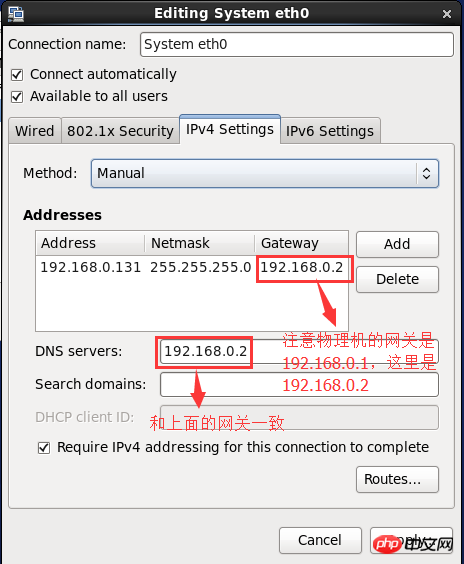
preferred DNS (you cannot connect to the external network without DNS) . The network segment of the IP is consistent with the physical host, which is 192.168.0, the host segment is 1, the subnet mask is consistent with the physical machine, and DNS
can be configured to be the same as the gateway of the physical machine


The above is the detailed content of Static IP connects to the external network in NAT mode in centos. For more information, please follow other related articles on the PHP Chinese website!

Hot AI Tools

Undresser.AI Undress
AI-powered app for creating realistic nude photos

AI Clothes Remover
Online AI tool for removing clothes from photos.

Undress AI Tool
Undress images for free

Clothoff.io
AI clothes remover

AI Hentai Generator
Generate AI Hentai for free.

Hot Article

Hot Tools

Notepad++7.3.1
Easy-to-use and free code editor

SublimeText3 Chinese version
Chinese version, very easy to use

Zend Studio 13.0.1
Powerful PHP integrated development environment

Dreamweaver CS6
Visual web development tools

SublimeText3 Mac version
God-level code editing software (SublimeText3)

Hot Topics
 How to input Chinese in centos
Apr 07, 2024 pm 08:21 PM
Methods for using Chinese input in CentOS include: using the fcitx input method: install and enable fcitx, set shortcut keys, press the shortcut keys to switch input methods, and input pinyin to generate candidate words. Use iBus input method: Install and enable iBus, set shortcut keys, press the shortcut keys to switch input methods, and input pinyin to generate candidate words.
 How to read USB disk files in centos7
Apr 07, 2024 pm 08:18 PM
To read U disk files in CentOS 7, you need to first connect the U disk and confirm its device name. Then, use the following steps to read the file: Mount the USB flash drive: mount /dev/sdb1 /media/sdb1 (replace "/dev/sdb1" with the actual device name) Browse the USB flash drive file: ls /media/sdb1; cd /media /sdb1/directory; cat file name
 How to enter root permissions in centos7
Apr 02, 2024 pm 08:57 PM
There are two ways to enter the root authority of CentOS 7: use the sudo command: enter sudo su - in the terminal and enter the current user password. Log in directly as the root user: Select "Other" on the login screen, enter "root" and the root password. Note: Operate carefully with root privileges, perform tasks with sudo privileges, and change the root password regularly.
 What to do if you forget your password to log in to centos
Apr 07, 2024 pm 07:33 PM
Solutions for forgotten CentOS passwords include: Single-user mode: Enter single-user mode and reset the password using passwd root. Rescue Mode: Boot from CentOS Live CD/USB, mount root partition and reset password. Remote access: Use SSH to connect remotely and reset the password with sudo passwd root.
 SCP usage tips-recursively exclude files
Apr 22, 2024 am 09:04 AM
One can use the scp command to securely copy files between network hosts. It uses ssh for data transfer and authentication. Typical syntax is: scpfile1user@host:/path/to/dest/scp -r/path/to/source/user@host:/path/to/dest/scp exclude files I don't think you can when using scp command Filter or exclude files. However, there is a good workaround to exclude the file and copy it securely using ssh. This page explains how to filter or exclude files when copying directories recursively using scp. How to use rsync command to exclude files The syntax is: rsyncav-essh-
 What should I do if I forget my centos username and password?
Apr 02, 2024 pm 08:54 PM
After forgetting your CentOS username and password, there are two ways to restore access: Reset the root password: Restart the server, edit the kernel command line in the GRUB menu, add "rw init=/sysroot/bin/sh" and press Ctrl+x ;Mount the root file system and reset the password in single-user mode. Use rescue mode: Start the server from the CentOS installation ISO image, select rescue mode; mount the root file system, copy the chroot environment from the ISO image, reset the password, exit the chroot environment and restart the server.
 Do Not Disturb Mode Not Working in iPhone: Fix
Apr 24, 2024 pm 04:50 PM
Even answering calls in Do Not Disturb mode can be a very annoying experience. As the name suggests, Do Not Disturb mode turns off all incoming call notifications and alerts from emails, messages, etc. You can follow these solution sets to fix it. Fix 1 – Enable Focus Mode Enable focus mode on your phone. Step 1 – Swipe down from the top to access Control Center. Step 2 – Next, enable “Focus Mode” on your phone. Focus Mode enables Do Not Disturb mode on your phone. It won't cause any incoming call alerts to appear on your phone. Fix 2 – Change Focus Mode Settings If there are some issues in the focus mode settings, you should fix them. Step 1 – Open your iPhone settings window. Step 2 – Next, turn on the Focus mode settings
 How to enable root permissions in centos7
Apr 07, 2024 pm 08:03 PM
CentOS 7 disables root permissions by default. You can enable it by following the following steps: Temporarily enable it: Enter "su root" on the terminal and enter the root password. Permanently enabled: Edit "/etc/ssh/sshd_config", change "PermitRootLogin no" to "yes", and restart the SSH service.


