About AbstractQueuedSynchronizer
The concurrency package java.util.concurrent was introduced after JDK1.5, which greatly improved the concurrency performance of Java programs. I summarize the java.util.concurrent package as follows:
AbstractQueuedSynchronizer is the core of concurrent classes such as ReentrantLock, CountDownLatch, and Semphore
CAS algorithm is the core of AbstractQueuedSynchronizer
It can be said that AbstractQueuedSynchronizer is the top priority of the concurrent class. In fact, in the article "In-depth Study of ReentrantLock Implementation Principles", AbstractQueuedSynchronizer has been explained in detail in combination with ReentrantLock. However, due to the level of the time, looking back at this article a year and a half ago, I feel that the interpretation and understanding of AbstractQueuedSynchronizer is not deep enough, so here is an update. This article once again explains the data structure of AbstractQueuedSynchronizer, that is, the relevant source code implementation. This article is based on JDK1.7 version.
The basic data structure of AbstractQueuedSynchronizer
##The basic data structure of AbstractQueuedSynchronizer is Node, about The author of Node and JDK wrote detailed comments. Here I will summarize a few points:
AbstractQueuedSynchronizer's waiting queue is a variant of CLH queue. CLH queue is usually used for Spin lock, AbstractQueuedSynchronizer's waiting queue is used to block the synchronizer
Each node holds a field named "status" for whether it is a thread Tracking that should be blocked, but the status field does not guarantee locking
If a thread is at the head of the queue, then it will try to acquire, but becomes the head Success is not guaranteed, it just has the right to compete
To enter the queue, you only need to automatically splice it at the end of the queue; to remove it from the queue To remove, you only need to set the header field
Below I use a table to summarize which variables are held in Node and the meaning of each variable:


AbstractQueuedSynchronizer methods for subclasses to implement
AbstractQueuedSynchzonizer is based on the implementation of template mode, but its template mode is a bit special. There is no abstract abstract method in the entire class. Instead, those methods that need to be implemented by subclasses throw UnsupportedOperationException through a method body. Exception to let subclasses know.
There are five methods in the AbstractQueuedSynchronizer class for subclasses to implement. Use a table to summarize:

Acquire a qualification to perform the current action based on the status field state.
For example, the lock() method of ReentrantLock will eventually call the acquire method, then:Exclusive mode acquire implementation process
With the above foundations, let's take a look at the implementation process of exclusive acquire, mainly how to build the data structure after the thread acquire fails. Let's look at the theory first, and then use an example to illustrate it.
Look at the acquisition method implementation process of AbstractQuueuedSynchronizer. The acquire method is used to operate in exclusive mode:
1 public final void acquire(int arg) { 2 if (!tryAcquire(arg) && 3 acquireQueued(addWaiter(Node.EXCLUSIVE), arg)) 4 selfInterrupt(); 5 }tryAcquire method, as mentioned before, is a method implemented by subclasses. If tryAcquire returns true (success), it means that the current thread has obtained the qualification to perform the current action, naturally there is no need to build a data structure for blocking waiting.
If the tryAcquire method returns false, then the current thread is not qualified to perform the current action, and then executes "acquireQueued(addWaiter(Node.EXCLUSIVE), arg))"This code, this sentence is very obvious, it consists of two steps:
##addWaiter, add a waiter
acquireQueued, try to get an acquire action from the waiting queue
Look at each step separately What.
addWaiter
## Let’s look at the first step. What does addWaiter do? Entering the parameter Node.EXCLUSIVE, we know that this is the exclusive mode:
1 private Node addWaiter(Node mode) { 2 Node node = new Node(Thread.currentThread(), mode); 3 // Try the fast path of enq; backup to full enq on failure 4 Node prev = tail; 5 if (prev != null) { 6 node.prev = prev; 7 if (compareAndSetTail(prev, node)) { 8 prev.next = node; 9 return node;10 }11 }12 enq(node);13 return node;14 }When there are nodes in the data structure, all new nodes are inserted into the data structure as tail nodes. From the comment point of view, the purpose of this logic is to quickly join the queue with the shortest path O(1) effect to minimize the overhead. If the current node is not set as the tail node, then execute the enq method:
1 private Node enq(final Node node) { 2 for (;;) { 3 Node t = tail; 4 if (t == null) { // Must initialize 5 if (compareAndSetHead(new Node())) 6 tail = head; 7 } else { 8 node.prev = t; 9 if (compareAndSetTail(t, node)) {10 t.next = node;11 return t;12 }13 }14 }15 }
new a Node without any status as the head node
All Nodes that are not successfully acquired will eventually be appended to the data structure

acquireQueued
The queue is built, the next step is to take it out of the queue when necessary A Node, this is the acquireQueued method, as the name suggests, acquire from the queue. Take a look at the implementation of acquireQueued method:
1 final boolean acquireQueued(final Node node, int arg) { 2 boolean failed = true; 3 try { 4 boolean interrupted = false; 5 for (;;) { 6 final Node p = node.prevecessor(); 7 if (p == head && tryAcquire(arg)) { 8 setHead(node); 9 p.next = null; // help GC10 failed = false;11 return interrupted;12 }13 if (shouldParkAfterFailedAcquire(p, node) &&14 parkAndCheckInterrupt())15 interrupted = true;16 }17 } finally {18 if (failed)19 cancelAcquire(node);20 }21 }这段代码描述了几件事:
从第6行的代码获取节点的前驱节点p,第7行的代码判断p是前驱节点并tryAcquire我们知道,只有当前第一个持有Thread的节点才会尝试acquire,如果节点acquire成功,那么setHead方法,将当前节点作为head、将当前节点中的thread设置为null、将当前节点的prev设置为null,这保证了数据结构中头结点永远是一个不带Thread的空节点
如果当前节点不是前驱节点或者tryAcquire失败,那么执行第13行~第15行的代码,做了两步操作,首先判断在acquie失败后是否应该park,其次park并检查中断状态
看一下第一步shouldParkAfterFailedAcquire代码做了什么:
1 private static boolean shouldParkAfterFailedAcquire(Node prev, Node node) { 2 int ws = prev.waitStatus; 3 if (ws == Node.SIGNAL) 4 /* 5 * This node has already set status asking a release 6 * to signal it, so it can safely park. 7 */ 8 return true; 9 if (ws > 0) {10 /*11 * prevecessor was cancelled. Skip over prevecessors and12 * indicate retry.13 */14 do {15 node.prev = prev = prev.prev;16 } while (prev.waitStatus > 0);17 prev.next = node;18 } else {19 /*20 * waitStatus must be 0 or PROPAGATE. Indicate that we21 * need a signal, but don't park yet. Caller will need to22 * retry to make sure it cannot acquire before parking.23 */24 compareAndSetWaitStatus(prev, ws, Node.SIGNAL);25 }26 return false;27 }这里每个节点判断它前驱节点的状态,如果:
它的前驱节点是SIGNAL状态的,返回true,表示当前节点应当park
它的前驱节点的waitStatus>0,相当于CANCELLED(因为状态值里面只有CANCELLED是大于0的),那么CANCELLED的节点作废,当前节点不断向前找并重新连接为双向队列,直到找到一个前驱节点waitStats不是CANCELLED的为止
它的前驱节点不是SIGNAL状态且waitStatus<=0,此时执行第24行代码,利用CAS机制,如果waitStatus的前驱节点是0那么更新为SIGNAL状态
如果判断判断应当park,那么parkAndCheckInterrupt方法:
LockSupport.park(
利用LockSupport的park方法让当前线程阻塞。
独占模式release流程
上面整理了独占模式的acquire流程,看到了等待的Node是如何构建成一个数据结构的,下面看一下释放的时候做了什么,release方法的实现为:
1 public final boolean release(int arg) {2 if (tryRelease(arg)) {3 Node h = head;4 if (h != null && h.waitStatus != 0)5 unparkSuccessor(h);6 return true;7 }8 return false;9 }tryRelease同样是子类去实现的,表示当前动作我执行完了,要释放我执行当前动作的资格,讲这个资格让给其它线程,然后tryRelease释放成功,获取到head节点,如果head节点的waitStatus不为0的话,执行unparkSuccessor方法,顾名思义unparkSuccessor意为unpark头结点的继承者,方法实现为:
1 private void unparkSuccessor(Node node) { 2 /* 3 * If status is negative (i.e., possibly needing signal) try 4 * to clear in anticipation of signalling. It is OK if this 5 * fails or if status is changed by waiting thread. 6 */ 7 int ws = node.waitStatus; 8 if (ws < 0) 9 compareAndSetWaitStatus(node, ws, 0);10 11 /*12 * Thread to unpark is held in successor, which is normally13 * just the next node. But if cancelled or apparently null,14 * traverse backwards from tail to find the actual15 * non-cancelled successor.16 */17 Node s = node.next;18 if (s == null || s.waitStatus > 0) {19 s = null;20 for (Node t = tail; t != null && t != node; t = t.prev)21 if (t.waitStatus <= 0)22 s = t;23 }24 if (s != null)25 LockSupport.unpark(s.thread);26 }这段代码比较好理解,整理一下流程:
头节点的waitStatus<0,将头节点的waitStatus设置为0
拿到头节点的下一个节点s,如果s==null或者s的waitStatus>0(被取消了),那么从队列尾巴开始向前寻找一个waitStatus<=0的节点作为后继要唤醒的节点
最后,如果拿到了一个不等于null的节点s,就利用LockSupport的unpark方法让它取消阻塞。
实战举例:数据结构构建
上面的例子讲解地过于理论,下面利用ReentrantLock举个例子,但是这里不讲ReentrantLock实现原理,只是利用ReentrantLock研究AbstractQueuedSynchronizer的acquire和release。示例代码为:
1 /** 2 * @author 五月的仓颉 3 */ 4 public class AbstractQueuedSynchronizerTest { 5 6 @Test 7 public void testAbstractQueuedSynchronizer() { 8 Lock lock = new ReentrantLock(); 9 10 Runnable runnable0 = new ReentrantLockThread(lock);11 Thread thread0 = new Thread(runnable0);12 thread0.setName("线程0");13 14 Runnable runnable1 = new ReentrantLockThread(lock);15 Thread thread1 = new Thread(runnable1);16 thread1.setName("线程1");17 18 Runnable runnable2 = new ReentrantLockThread(lock);19 Thread thread2 = new Thread(runnable2);20 thread2.setName("线程2");21 22 thread0.start();23 thread1.start();24 thread2.start();25 26 for (;;);27 }28 29 private class ReentrantLockThread implements Runnable {30 31 private Lock lock;32 33 public ReentrantLockThread(Lock lock) {34 this.lock = lock;35 }36 37 @Override38 public void run() {39 try {40 lock.lock();41 for (;;);42 } finally {43 lock.unlock();44 }45 }46 47 }48 49 }全部是死循环,相当于第一条线程(线程0)acquire成功之后,后两条线程(线程1、线程2)阻塞,下面的代码就不考虑后两条线程谁先谁后的问题,就一条线程(线程1)流程执行到底、另一条线程(线程2)流程执行到底这么分析了。
这里再把addWaiter和enq两个方法源码贴一下:
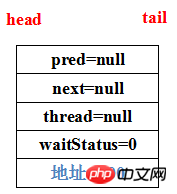
1 private Node addWaiter(Node mode) { 2 Node node = new Node(Thread.currentThread(), mode); 3 // Try the fast path of enq; backup to full enq on failure 4 Node prev = tail; 5 if (prev != null) { 6 node.prev = prev; 7 if (compareAndSetTail(prev, node)) { 8 prev.next = node; 9 return node;10 }11 }12 enq(node);13 return node;14 } 1 private Node enq(final Node node) { 2 for (;;) { 3 Node t = tail; 4 if (t == null) { // Must initialize 5 if (compareAndSetHead(new Node())) 6 tail = head; 7 } else { 8 node.prev = t; 9 if (compareAndSetTail(t, node)) {10 t.next = node;11 return t;12 }13 }14 }15 }首先第一个acquire失败的线程1,由于此时整个数据结构中么没有任何数据,因此addWaiter方法第4行中拿到的prev=tail为空,执行enq方法,首先第3行获取tail,第4行判断到tail是null,因此头结点new一个Node出来通过CAS算法设置为数据结构的head,tail同样也是这个Node,此时数据结构为:

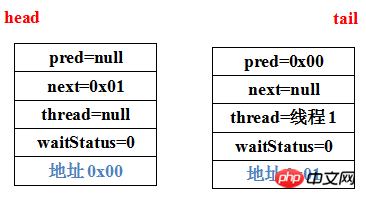
为了方便描述,prev和next,我给每个Node随便加了一个地址。接着继续enq,因为enq内是一个死循环,所以继续第3行获取tail,new了一个空的Node之后tail就有了,执行else判断,通过第8行~第10行代码将当前线程对应的Node追加到数据结构尾部,那么当前构建的数据结构为:

这样,线程1对应的Node被加入数据结构,成为数据结构的tail,而数据结构的head是一个什么都没有的空Node。
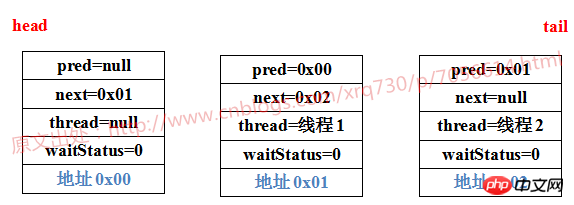
接着线程2也acquire失败了,线程2既然acquire失败,那也要准备被加入数据结构中,继续先执行addWaiter方法,由于此时已经有了tail,因此不需要执行enq方法,可以直接将当前Node添加到数据结构尾部,那么当前构建的数据结构为:

至此,两个阻塞的线程构建的三个Node已经全部归位。
实战举例:线程阻塞
上述流程只是描述了构建数据结构的过程,并没有描述线程1、线程2阻塞的流程,因此接着继续用实际例子看一下线程1、线程2如何阻塞。贴一下acquireQueued、shouldParkAfterFailedAcquire两个方法源码:
1 final boolean acquireQueued(final Node node, int arg) { 2 boolean failed = true; 3 try { 4 boolean interrupted = false; 5 for (;;) { 6 final Node p = node.prevecessor(); 7 if (p == head && tryAcquire(arg)) { 8 setHead(node); 9 p.next = null; // help GC10 failed = false;11 return interrupted;12 }13 if (shouldParkAfterFailedAcquire(p, node) &&14 parkAndCheckInterrupt())15 interrupted = true;16 }17 } finally {18 if (failed)19 cancelAcquire(node);20 }21 } 1 private static boolean shouldParkAfterFailedAcquire(Node prev, Node node) { 2 int ws = prev.waitStatus; 3 if (ws == Node.SIGNAL) 4 /* 5 * This node has already set status asking a release 6 * to signal it, so it can safely park. 7 */ 8 return true; 9 if (ws > 0) {10 /*11 * prevecessor was cancelled. Skip over prevecessors and12 * indicate retry.13 */14 do {15 node.prev = prev = prev.prev;16 } while (prev.waitStatus > 0);17 prev.next = node;18 } else {19 /*20 * waitStatus must be 0 or PROPAGATE. Indicate that we21 * need a signal, but don't park yet. Caller will need to22 * retry to make sure it cannot acquire before parking.23 */24 compareAndSetWaitStatus(prev, ws, Node.SIGNAL);25 }26 return false;27 }<p><span style="font-size: 13px; font-family: 宋体">首先是线程1,它的前驱节点是head节点,在它tryAcquire成功的情况下,执行第8行~第11行的代码。做几件事情:</span></p>
<ol class=" list-paddingleft-2">
<li><p><span style="font-size: 13px; font-family: 宋体">head为线程1对应的Node</span></p></li>
<li><p><span style="font-size: 13px; font-family: 宋体">线程1对应的Node的thread置空</span></p></li>
<li><p><span style="font-size: 13px; font-family: 宋体">线程1对应的Node的prev置空</span></p></li>
<li><p><span style="font-size: 13px; font-family: 宋体">原head的next置空,这样原head中的prev、next、thread都为空,对象内没有引用指向其他地方,GC可以认为这个Node是垃圾,对这个Node进行回收,注释"Help GC"就是这个意思</span></p></li>
<li><p><span style="font-size: 13px; font-family: 宋体">failed=false表示没有失败</span></p></li>
</ol>
<p><span style="font-size: 13px; font-family: 宋体">因此,如果线程1执行tryAcquire成功,那么数据结构将变为:</span></p>
<p><span style="font-size: 13px; font-family: 宋体"><img src="/static/imghw/default1.png" data-src="https://img.php.cn/upload/article/000/000/001/3d801230fc075de2d75122d27258c2ad-7.png" class="lazy" alt=""></span></p>
<p><span style="font-size: 13px; font-family: 宋体">从上述流程可以总结到:<span style="color: #ff0000"><strong>只有前驱节点为head的节点会尝试tryAcquire,其余都不会,结合后面的release选继承者的方式,保证了先acquire失败的线程会优先从阻塞状态中解除去重新acquire</strong></span>。这是一种公平的acquire方式,因为它遵循"先到先得"原则,但是我们可以动动手脚让这种公平变为非公平,比如ReentrantLock默认的费公平模式,这个留在后面说。</span></p>
<p><span style="font-size: 13px; font-family: 宋体">那如果线程1执行tryAcquire失败,那么要执行shouldParkAfterFailedAcquire方法了,shouldParkAfterFailedAcquire拿线程1的前驱节点也就是head节点的waitStatus做了一个判断,因为waitStatus=0,因此执行第18行~第20行的逻辑,将head的waitStatus设置为SIGNAL即-1,然后方法返回false,数据结构变为:</span></p>
<p><span style="font-size: 13px; font-family: 宋体"><img src="/static/imghw/default1.png" data-src="https://img.php.cn/upload/article/000/000/001/3d801230fc075de2d75122d27258c2ad-8.png" class="lazy" alt=""></span></p>
<p><span style="font-size: 13px; font-family: 宋体">看到这里就一个变化:head的waitStatus从0变成了-1。既然shouldParkAfterFailedAcquire返回false,acquireQueued的第13行~第14行的判断自然不通过,继续走for(;;)循环,如果tryAcquire失败显然又来到了shouldParkAfterFailedAcquire方法,此时线程1对应的Node的前驱节点head节点的waitStatus已经变为了SIGNAL即-1,因此执行第4行~第8行的代码,直接返回true出去。</span></p>
<p><span style="font-size: 13px; font-family: 宋体">shouldParkAfterFailedAcquire返回true,parkAndCheckInterrupt直接调用LockSupport的park方法:</span></p>
<div class="cnblogs_code"><pre class="brush:php;toolbar:false"> 1 private final boolean parkAndCheckInterrupt() { 2 LockSupport.park(this); 3 return Thread.interrupted(); 4 }至此线程1阻塞,线程2阻塞的流程与线程1阻塞的流程相同,可以自己分析一下。
另外再提一个问题,不知道大家会不会想:
为什么线程1对应的Node构建完毕不直接调用LockSupport的park方法进行阻塞?
为什么不直接把head的waitStatus直接设置为Signal而要从0设置为Signal?
我认为这是AbstractQueuedSynchronizer开发人员做了类似自旋的操作。因为很多时候获取acquire进行操作的时间很短,阻塞会引起上下文的切换,而很短时间就从阻塞状态解除,这样相对会比较耗费性能。
因此我们看到线程1自构建完毕Node加入数据结构到阻塞,一共尝试了两次tryAcquire,如果其中有一次成功,那么线程1就没有必要被阻塞,提升了性能。
The above is the detailed content of Analysis of AbstractQueuedSynchronizer: key and difficult points in exclusive mode. For more information, please follow other related articles on the PHP Chinese website!


