Detailed introduction to grub2

Translated most of the grub2official manual, and then sorted it out myself. Because the content is a bit complicated, the arrangement of chapters may not be very reasonable, so please understand.
Directory of this article:
##1.1 Basic content
1.2 Install grub2
##1.3 grub2 configuration file
1.4 Commands in the command line and menu items
1.5 Several common built-in variables
1.6 grub configuration and installation examples
1.7 Brief description of traditional grub
This article mainly introduces grub2. At the end of the article, traditional grub is briefly described, but the content of grub2 contains a lot of comparisons between grub2 and traditional grub.
If you just want to know the role of boot.img/core.img/diskboot.img/kernel.img in grub2 or the stage1/stage1_5/stage2 file in traditional grub, please directly Jump to related content to read.
1.1 Basic content
1.1.1 The difference between grub2 and grub
Official manual original text:
Only explain a few main ones:
1. The name of the configuration file has changed. In grub, the configuration file is grub.conf or menu.lst (a soft link to grub.conf), and is renamed grub.cfg in grub2.2.grub2 adds a lot of syntax, which is closer to a scripting language, such as supporting variables, conditional judgments, and loops.
3. In grub2, the device name starts from 1, but in grub it starts from 0.4.grub2 uses img files and no longer uses stage1, stage1.5 and stage2 in grub.
5. Supports the graphical interface to configure grub, but you need to install the grub-customizer package, which is provided by the epel source.
6. When the operating system environment has been entered, the grub command is no longer provided, that is, the grub interactive interface cannot be entered. It can only be entered when the computer is booted, which is a big shortcoming.
7. There is no useful find command in grub2, which is another major shortcoming.
1.1.2 Naming habits and file path representation
Official manual original text:
(fd0)           :表示第一块软盘
(hd0,msdos2)    :表示第一块硬盘的第二个mbr分区。grub2中分区从1开始编号,传统的grub是从0开始编号的
(hd0,msdos5)    :表示第一块硬盘的第一个逻辑分区
(hd0,gpt1)      :表示第一块硬盘的第一个gpt分区/boot/vmlinuz   :相对路径,基于根目录,表示根目录下的boot目录下的vmlinuz,
                :如果设置了根目录变量root为(hd0,msdos1),则表示(hd0,msdos1)/boot/vmlinuz
(hd0,msdos1)/boot/vmlinuz:绝对路径,表示第一硬盘第一分区的boot目录下的vmlinuz文件
Official manual original text:
grub2 supports two ways to boot the operating system:
- Direct boot: (direct-load) Directly boot the operating system written in the default configuration file through the default grub2 boot loader
- Chain boot (chain-load) Use the default grub2 boot loader to chain boot another boot loader, which will boot the corresponding operating system
- Generally only use the first method, only if you want to The second method is used when booting an operating system that grub does not support by default.
1.1.4 File distribution after installation of grub2 program and traditional grub program
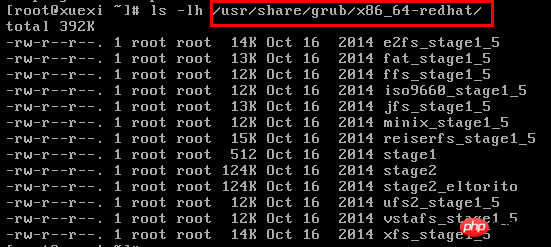
After the traditional grub software is installed, some stages will be generated in the /usr/share/grub/RELEASE/ directory document.
[root@xuexi ~]# ls /usr/share/grub/x86_64-redhat/e2fs_stage1_5      ffs_stage1_5       jfs_stage1_5       reiserfs_stage1_5  stage2             ufs2_stage1_5      xfs_stage1_5
fat_stage1_5       iso9660_stage1_5   minix_stage1_5     stage1             stage2_eltorito    vstafs_stage1_5
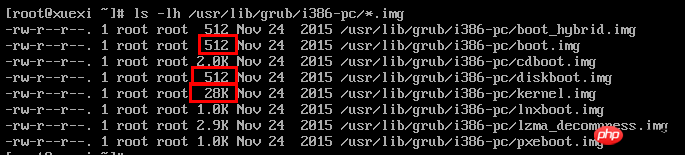
[root@server7 ~]# ls /usr/lib/grub/i386-pc/*.mod | wc -l257[root@server7 ~]# ls -lh /usr/lib/grub/i386-pc/*.lst
-rw-r--r--. 1 root root 3.7K Nov 24  2015 /usr/lib/grub/i386-pc/command.lst
-rw-r--r--. 1 root root  936 Nov 24  2015 /usr/lib/grub/i386-pc/crypto.lst
-rw-r--r--. 1 root root  214 Nov 24  2015 /usr/lib/grub/i386-pc/fs.lst
-rw-r--r--. 1 root root 5.1K Nov 24  2015 /usr/lib/grub/i386-pc/moddep.lst
-rw-r--r--. 1 root root  111 Nov 24  2015 /usr/lib/grub/i386-pc/partmap.lst
-rw-r--r--. 1 root root   17 Nov 24  2015 /usr/lib/grub/i386-pc/parttool.lst
-rw-r--r--. 1 root root  202 Nov 24  2015 /usr/lib/grub/i386-pc/terminal.lst
-rw-r--r--. 1 root root   33 Nov 24  2015 /usr/lib/grub/i386-pc/video.lst[root@server7 ~]# ls -lh /usr/lib/grub/i386-pc/*.img-rw-r--r--. 1 root root  512 Nov 24  2015 /usr/lib/grub/i386-pc/boot_hybrid.img
-rw-r--r--. 1 root root  512 Nov 24  2015 /usr/lib/grub/i386-pc/boot.img
-rw-r--r--. 1 root root 2.0K Nov 24  2015 /usr/lib/grub/i386-pc/cdboot.img
-rw-r--r--. 1 root root  512 Nov 24  2015 /usr/lib/grub/i386-pc/diskboot.img
-rw-r--r--. 1 root root  28K Nov 24  2015 /usr/lib/grub/i386-pc/kernel.img
-rw-r--r--. 1 root root 1.0K Nov 24  2015 /usr/lib/grub/i386-pc/lnxboot.img
-rw-r--r--. 1 root root 2.9K Nov 24  2015 /usr/lib/grub/i386-pc/lzma_decompress.img
-rw-r--r--. 1 root root 1.0K Nov 24  2015 /usr/lib/grub/i386-pc/pxeboot.img
1.1.5 boot loader和grub的关系
当使用grub来管理启动菜单时,那么boot loader都是grub程序安装的。
传统的grub将stage1转换后的内容安装到MBR(VBR或EBR)中的boot loader部分,将stage1_5转换后的内容安装在紧跟在MBR后的扇区中,将stage2转换后的内容安装在/boot分区中。
grub2将boot.img转换后的内容安装到MBR(VBR或EBR)中的boot loader部分,将diskboot.img和kernel.img结合成为core.img,同时还会嵌入一些模块或加载模块的代码到core.img中,然后将core.img转换后的内容安装到磁盘的指定位置处。
它们之间更具体的关系见下文。
1.1.6 grub2的安装位置
官方手册原文:
严格地说是core.img的安装位置,因为boot.img的位置是固定在MBR或VBR或EBR上的。
(1).MBR
MBR格式的分区表用于PC BIOS平台,这种格式允许四个主分区和额外的逻辑分区。使用这种格式的分区表,有两种方式安装GURB:
嵌入到MBR和第一个分区中间的空间,这部分就是大众所称的"boot track","MBR gap"或"embedding area",它们大致需要31kB的空间;
将core.img安装到某个文件系统中,然后使用分区的第一个扇区(严格地说不是第一个扇区,而是第一个block)存储启动它的代码。
这两种方法有不同的问题。
使用嵌入的方式安装grub,就没有保留的空闲空间来保证安全性,例如有些专门的软件就是使用这段空间来实现许可限制的;另外分区的时候,虽然会在MBR和第一个分区中间留下空闲空间,但可能留下的空间会比这更小。
方法二安装grub到文件系统,但这样的grub是脆弱的。例如,文件系统的某些特性需要做尾部包装,甚至某些fsck检测,它们可能会移动这些block。
GRUB开发团队建议将GRUB嵌入到MBR和第一个分区之间,除非有特殊需求,但仍必须要保证第一个分区至少是从第31kB(第63个扇区)之后才开始创建的。
现在的磁盘设备,一般都会有分区边界对齐的性能优化提醒,所以第一个分区可能会自动从第1MB处开始创建。
(2).GPT
一些新的系统使用GUID分区表(GPT)格式,这种格式是EFI固件所指定的一部分。但如果操作系统支持的话,GPT也可以用于BIOS平台(即MBR风格结合GPT格式的磁盘),使用这种格式,需要使用独立的BIOS boot分区来保存GRUB,GRUB被嵌入到此分区,不会有任何风险。
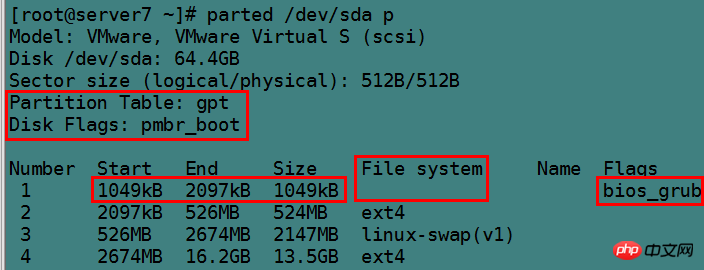
当在gpt磁盘上创建一个BIOS boot分区时,需要保证两件事:(1)它最小是31kB大小,但一般都会为此分区划分1MB的空间用于可扩展性;(2)必须要有合理的分区类型标识(flag type)。
例如使用gun parted工具时,可以设置为bios_grub标识:
# parted /dev/sda toggle partition_num bios_grub
# parted /dev/sda set partiton_num bios_grub on
如果使用gdisk分区工具时,则分类类型设置为"EF02"。
如果使用其他的分区工具,可能需要指定guid,则可以指定其guid为"21686148-6449-6e6f-744e656564454649"。
下图是某个bios/gpt格式的bios boot分区信息,从中可见,它大小为1M,没有文件系统,分区表示为bios_grub。
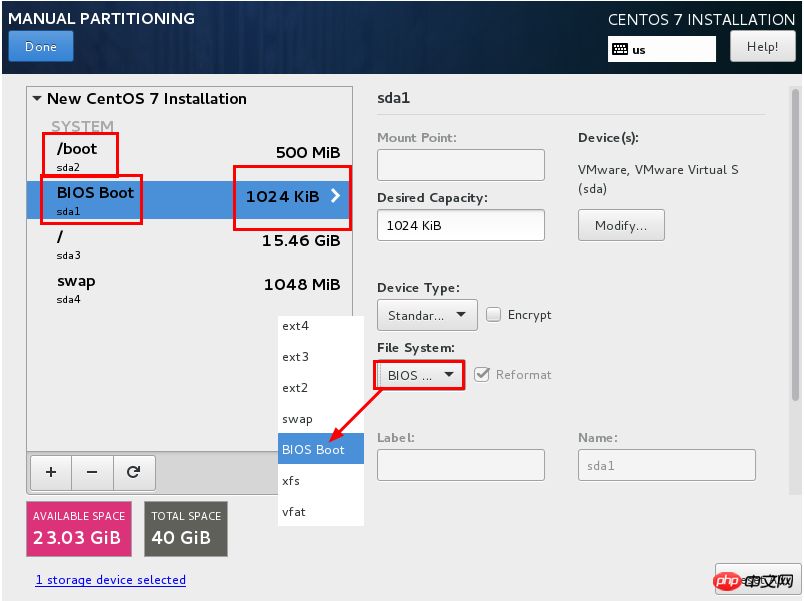
下图为gpt磁盘在图形界面下安装操作系统时创建的Bios boot分区。
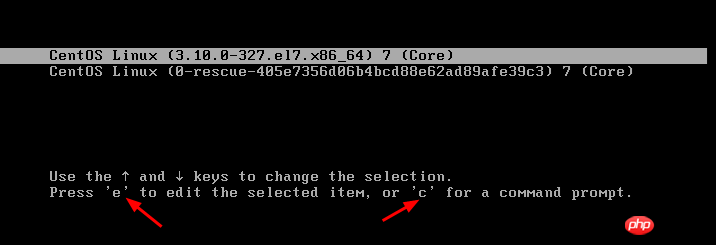
1.1.7 进入grub命令行
在传统的grub上,可以直接在bash下敲入grub命令进入命令交互模式,但grub2只能在系统启动前进入grub交互命令行。
按下e见可以编辑所选菜单对应的grub菜单配置项,按下c键可以进入grub命令行交互模式。

1.2 安装grub2
官方手册原文:
这里的安装指的不是安装grub程序,而是安装Boot loader,但一般都称之为安装grub,且后文都是这个意思。
1.2.1 grub安装命令
安装方式非常简单,只需调用grub2-install,然后给定安装到的设备名即可。
shell> grub2-install /dev/sda
这样的安装方式,默认会将img文件放入到/boot目录下,如果想自定义放置位置,则使用--boot-directory选项指定,可用于测试练习grub的时候使用,但在真实的grub环境下不建议做任何改动。
shell> grub2-install --boot-director=/mnt/boot /dev/fd0
如果是EFI固件平台,则必须挂载好efi系统分区,一般会挂在/boot/efi下,这是默认的,此时可直接使用grub2-install安装。
shell> grub2-install
如果不是挂载在/boot/efi下,则使用--efi-directory指定efi系统分区路径。
shell> grub2-install --efi-directory=/mnt/efi
grub2-install is actually a shell script used to call other tools. The real functions are completed by other tools, so if you are very familiar with grub's internal commands and mechanisms, you don't need grub2-install at all.
The corresponding traditional grub installation command is grub-install, and its usage is the same as grub2-install.
1.2.2 Description of various img and stage files
Official manual original text:
The img file is generated by grub2, and the stage file is generated by traditional grub. Below are descriptions of the various files.
1.2.2.1 img file in grub2
grub2 generates several img files, some are distributed in the /usr/lib/grub/i386-pc directory, and some are distributed in /boot/ In the grub2/i386-pc directory, I believe you will understand the relationship between them after reading the following.

The following figure describes the relationship between various img files. Among them, core.img is dynamically generated, and the path is /boot/grub2/i386-pc/core.img, while other img exists in the /usr/lib/grub/i386-pc directory. Of course, when installing grub, boot.img will be copied to the /boot/grub2/i386-pc directory.
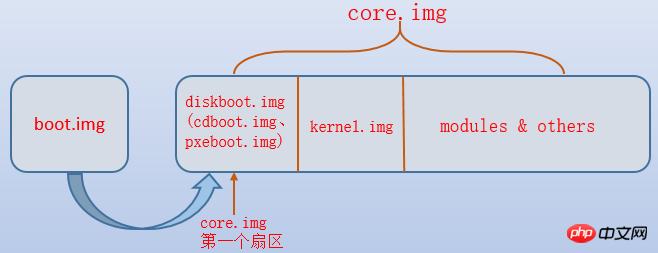
(1)boot.img
Under the BIOS platform, boot.img is the first img file started by grub, and it is written to In the MBR or the boot sector of the partition, because the size of the boot sector is 512 bytes, the size of the img file is also 512 bytes.
The only function of boot.img is to read the first sector belonging to core.img and jump to it, giving control to the img of that sector. Due to size limitations, boot.img cannot understand the structure of the file system, so grub2-install will hard-code the location of core.img into boot.img, so that the location of core.img can be found.
(2)core.img
core.img is dynamically created by the grub2-mkimage program based on diskboot.img, kernel.img and a series of modules. There are enough functional modules embedded in core.img to ensure that grub can access /boot/grub, and relevant modules can be loaded to implement related functions, such as loading the boot menu, loading information about the target operating system, etc. Since grub2 is used extensively The dynamic function module makes the size of core.img small enough.
core.img contains the contents of multiple img files, including diskboot.img/kernel.img, etc.
The installation location of core.img varies with MBR disks and GPT disks, which has been explained above.
(3)diskboot.img
If the boot device is a hard disk, that is, when booting from the hard disk, the content of the first sector in core.img is diskboot.img. The function of diskboo.img is to read the remaining parts of core.img into memory and transfer control to kernel.img. Since the file system is not recognized at this time, all locations of core.img are listed in the block list. Encoded in such a way that diskboot.img can find the remaining content.
Because the img file occupies one sector, the size is 512 bytes.
(4)cdboot.img
If the boot device is an optical drive (cd-rom), that is, when booting from the optical drive, the content of the first sector in core.img is cdboo .img. Its function is the same as diskboot.img.
(5)pexboot.img
If booted from the PXE environment of the network, the content of the first sector in core.img is pxeboot.img.
(6)kernel.img
The kernel.img file contains the basic runtime environment of grub: device framework, file handle, environment variables, command line parser in rescue mode, etc. . It is rarely used directly because they are fully embedded in core.img. Note that kernel.img is grub's kernel and has nothing to do with the operating system's kernel.
If you are careful, you will find that kernel.img itself takes up 28KB of space, but after being embedded into core.img, the core.img file is only 26KB in size. This is because kernel.img in core.img is compressed.
(7)lnxboot.img
The img file is placed at the front of core.img, making grub like the Linux kernel, so that core.img can be used by LILO's "image ="identify. Of course, this is used in conjunction with LILO, but who still uses LILO now?
(8)*.mod
Various functional modules, some of which have been embedded in core.img, or will be automatically loaded by grub, but sometimes it is also necessary to use the insmod command to load them manually.
1.2.2.2 传统grub中的stage文件
grub2的设计方式和传统grub大不相同,因此和stage之间的对比关系其实没那么标准,但是将它们拿来比较也有助于理解img和stage文件的作用。
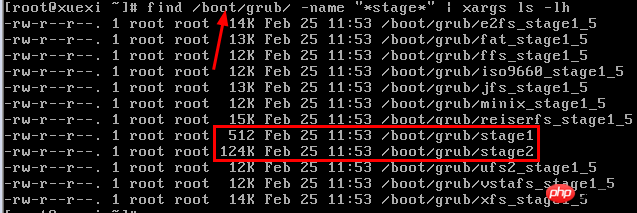
stage文件也分布在两个地方:/usr/share/grub/RELEASE目录下和/boot/grub目录下,/boot/grub目录下的stage文件是安装grub时从/usr/share/grub/RELEASE目录下拷贝过来的。
(1)stage1
stage1文件在功能上等价于boot.img文件。目的是跳转到stage1_5或stage2的第一个扇区上。
(2)*_stage1_5
*stage1_5文件包含了各种识别文件系统的代码,使得grub可以从文件系统中读取体积更大功能更复杂的stage2文件。从这一方面考虑,它类似于core.img中加载对应文件系统模块的代码部分,但是core.img的功能远比stage1_5多。
stage1_5一般安装在MBR后、第一个分区前的那段空闲空间中,也就是MBR gap空间,它的作用是跳转到stage2的第一个扇区。
其实传统的grub在某些环境下是可以不用stage1_5文件就能正常运行的,但是grub2则不能缺少core.img。
(3)stage2
stage2的作用是加载各种环境和加载内核,在grub2中没有完全与之相对应的img文件,但是core.img中包含了stage2的所有功能。
当跳转到stage2的第一个扇区后,该扇区的代码负责加载stage2剩余的内容。
注意,stage2是存放在磁盘上的,并没有像core.img一样嵌入到磁盘上。
(4)stage2_eltorito
功能上等价于grub2中的core.img中的cdboot.img部分。一般在制作救援模式的grub时才会使用到cd-rom相关文件。
(5)pxegrub
功能上等价于grub2中的core.img中的pxeboot.img部分。
1.2.3 安装grub涉及的过程
安装grub2的过程大体分两步:一是根据/usr/lib/grub/i386-pc/目录下的文件生成core.img,并拷贝boot.img和core.img涉及的某些模块文件到/boot/grub2/i386-pc/目录下;二是根据/boot/grub2/i386-pc目录下的文件向磁盘上写boot loader。
当然,到底是先拷贝,还是先写boot loader,没必要去搞清楚,只要/boot/grub2/i386-pc下的img文件一定能通过grub2相关程序再次生成boot loader。所以,既可以认为/boot/grub2/i386-pc目录下的img文件是boot loader的特殊备份文件,也可以认为是boot loader的源文件。
不过,img文件和boot loader的内容是不一致的,因为img文件还要通过grub2相关程序来转换才是真正的boot loader。
对于传统的grub而言,拷贝的不是img文件,而是stage文件。
以下是安装传统grub时,grub做的工作。很不幸,grub2上没有该命令,也没有与之等价的命令。
grub> setup (hd0)
 Checking if "/boot/grub/stage1" exists... yes
 Checking if "/boot/grub/stage2" exists... yes
 Checking if "/boot/grub/e2fs_stage1_5" exists... yes
 Running "embed /boot/grub/e2fs_stage1_5 (hd0)"...  15 sectors are embedded.
succeeded
 Running "install /boot/grub/stage1 (hd0) (hd0)1+15 p (hd0,0)/boot/grub/stage2 /boot/grub/menu.lst"... succeeded
Done.
首先检测各stage文件是否存在于/boot/grub目录下,随后嵌入stage1_5到磁盘上,该文件系统类型的stage1_5占用了15个扇区,最后安装stage1,并告知stage1 stage1_5的位置是第1到第15个扇区,之所以先嵌入stage1_5再嵌入stage1就是为了让stage1知道stage1_5的位置,最后还告知了stage1 stage2和配置文件menu.lst的路径。
1.3 grub2配置文件
grub2的默认配置文件为/boot/grub2/grub.cfg,该配置文件的写法弹性非常大,但绝大多数需要修改该配置文件时,都只需修改其中一小部分内容就可以达成目标。
grub2-mkconfig程序可用来生成符合绝大多数情况的grub.cfg文件,默认它会自动尝试探测有效的操作系统内核,并生成对应的操作系统菜单项。使用方法非常简单,只需一个选项"-o"指定输出文件即可。
shell> grub2-mkconfig -o /boot/grub2/grub.cfg
1.3.1 通过/etc/default/grub文件生成grub.cfg
官方手册原文:
grub2-mkconfig是根据/etc/default/grub文件来创建配置文件的。该文件中定义的是grub的全局宏,修改内置的宏可以快速生成grub配置文件。实际上在/etc/grub.d/目录下还有一些grub配置脚本,这些shell脚本读取一些脚本配置文件(如/etc/default/grub),根据指定的逻辑生成grub配置文件。若有兴趣,不放读一读/etc/grub.d/10_linux文件,它指导了创建grub.cfg的细节,例如如何生成启动菜单。
[root@xuexi ~]# ls /etc/grub.d/00_header 00_tuned 01_users 10_linux 20_linux_xen 20_ppc_terminfo 30_os-prober 40_custom 41_custom README
在/etc/default/grub中,使用"key=vaule"的格式,key全部为大小字母,如果vaule部分包含了空格或其他特殊字符,则需要使用引号包围。
例如,下面是一个/etc/default/grub文件的示例:
[root@xuexi ~]# cat /etc/default/grubGRUB_TIMEOUT=5GRUB_DISTRIBUTOR="$(sed 's, release .*$,,g' /etc/system-release)"GRUB_DEFAULT=saved
GRUB_DISABLE_SUBMENU=trueGRUB_TERMINAL_OUTPUT="console"GRUB_CMDLINE_LINUX="crashkernel=auto biosdevname=0 net.ifnames=0 rhgb quiet"GRUB_DISABLE_RECOVERY="true"
虽然可用的宏较多,但可能用的上的就几个:GRUB_DEFAULT、GRUB_TIMEOUT、GRUB_CMDLINE_LINUX和GRUB_CMDLINE_LINUX_DEFAULT。
以下列出了部分key。
(1).GRUB_DEFAULT
默认的菜单项,默认值为0。其值可为数值N,表示从0开始计算的第N项是默认菜单,也可以指定对应的title表示该项为默认的菜单项。使用数值比较好,因为使用的title可能包含了容易改变的设备名。例如有如下菜单项:
menuentry 'Example GNU/Linux distribution' --class gnu-linux --id example-gnu-linux {
    ...
}
Copy after login
如果想将此菜单设为默认菜单,则可设置"GRUB_DEFAULT=example-gnu-linux"。
如果GRUB_DEFAULT的值设置为"saved",则表示默认的菜单项是"GRUB_SAVEDEFAULT"或"grub-set-default"所指定的菜单项。
(2).GRUB_SAVEDEFAULT
默认该key的值未设置。如果该key的值设置为true时,如果选定了某菜单项,则该菜单项将被认为是新的默认菜单项。该key只有在设置了"GRUB_DEFAULT=saved"时才有效。
不建议使用该key,因为GRUB_DEFAULT配合grub-set-default更方便。
(3).GRUB_TIMEOUT
在开机选择菜单项的超时时间,超过该时间将使用默认的菜单项来引导对应的操作系统。默认值为5秒。等待过程中,按下任意按键都可以中断等待。
设置为0时,将不列出菜单直接使用默认的菜单项引导与之对应的操作系统,设置为"-1"时将永久等待选择。
是否显示菜单,和"GRUB_TIMEOUT_STYLE"的设置有关。
(4).GRUB_TIMEOUT_STYLE
如果该key未设置值或者设置的值为"menu",则列出启动菜单项,并等待"GRUB_TIMEOUT"指定的超时时间。
如果设置为"countdown"和"hidden",则不显示启动菜单项,而是直接等待"GRUB_TIMEOUT"指定的超时时间,如果超时了则启动默认菜单项并引导对应的操作系统。在等待过程中,按下"ESC"键可以列出启动菜单。设置为countdown和hidden的区别是countdown会显示超时时间的剩余时间,而hidden则完全隐藏超时时间。
(5).GRUB_DISTRIBUTOR
设置发行版的标识名称,一般该名称用来作为菜单的一部分,以便区分不同的操作系统。
(6).GRUB_CMDLINE_LINUX
添加到菜单中的内核启动参数。例如:
GRUB_CMDLINE_LINUX="crashkernel=ro root=/dev/sda3 biosdevname=0 net.ifnames=0 rhgb quiet"
(7).GRUB_CMDLINE_LINUX_DEFAULT
除非"GRUB_DISABLE_RECOVERY"设置为"true",否则该key指定的默认内核启动参数将生成两份,一份是用于默认启动参数,一份用于恢复模式(recovery mode)的启动参数。
该key生成的默认内核启动参数将添加在"GRUB_CMDLINE_LINUX"所指定的启动参数之后。
(8).GRUB_DISABLE_RECOVERY
该项设置为true时,将不会生成恢复模式的菜单项。
(9).GRUB_DISABLE_LINUX_UUID
默认情况下,grub2-mkconfig在生产菜单项的时候将使用uuid来标识Linux 内核的根文件系统,即"root=UUID=..."。
例如,下面是/boot/grub2/grub.cfg中某菜单项的部分内容。
menuentry 'CentOS Linux (3.10.0-327.el7.x86_64) 7 (Core)' --class centos --class gnu-linux --class gnu --class os --unrestricted $menuentry_id_option 'gnulinux-3.10.0-327.el7.x86_64-advanced-b2a70faf-aea4-4d8e-8be8-c7109ac9c8b8' {
......
linux16 /vmlinuz-3.10.0-327.el7.x86_64 root=UUID=b2a70faf-aea4-4d8e-8be8-c7109ac9c8b8 ro crashkernel=auto biosdevname=0 net.ifnames=0 quiet LANG=en_US.UTF-8
initrd16 /initramfs-3.10.0-327.el7.x86_64.img
}
虽然使用UUID的方式更可靠,但有时候不太方便,所以可以设置该key为true来禁用。
(10).GRUB_BACKGROUND
Set the background image. The background image must be readable by grub. The image file name suffix must be ".png", ".tga", ".jpg", ".jpeg". When needed, grub will press Scale down the size of the image to fit the screen.
(11).GRUB_THEME
Set the theme of grub menu.
(12).GRUB_GFXPAYLOAD_LINUX
When set to "text", Linux will be forced to start in text mode. In some cases, graphics mode may not be supported.
(13).GRUB_DISABLE_OS_PROBER
By default, grub2-mkconfig will try to use the os-prober program (if it is already installed, it should be installed by default) to detect other available operating system kernels , and generate corresponding startup menu items for it. Set to "true" to disable automatic detection.
(14).GRUB_DISABLE_SUBMENU
By default, if grub2-mkconfig finds multiple kernels of the same version or a lower version, it will only generate a top-level menu for the highest version of the kernel. All other lower-version kernel menus are placed into submenus, and setting them to "y" will generate them all as top-level menus.
(15).GRUB_HIDDEN_TIMEOUT (obsolete, but still valid for backward compatibility)
Use "GRUB_TIMEOUT_STYLE={countdown|hidden}" to replace this item
( 16).GRUB_HIDDEN_TIMEOUT_QUIET (obsolete, but still valid for backward compatibility)
Used with GRUB_HIDDEN_TIMEOUT, you can use GRUB_TIMEOUT_STYLE=countdown to replace these two items.
1.3.2 Directly write the grub.cfg file in script
Official manual original text:
Comment symbol: Characters starting with # are considered comments, so grub supports in-line comments
- ##Connection operators: { } | & $ ; < >
- Reserved keywords and symbols: ! [[ ]] { } case do done elif else esac fi for function if in menuentry select then time until while.
Not all keywords are useful, they are only provided in advance for future function expansion.
- Quotation marks and escape characters
- Variable expansion
- Simple commands
- Loop structure: while cond; do list; done
- Loop structure: until cond; do list; done
- Conditional judgment structure: if list; then list; [elif list; then list;] … [else list;] fi
- Function structure: function name { command; … }
- Menu item command: menuentry title [--class=class …] [--users=users] [ --unrestricted] [--hotkey=key] [--id=id] { command; … }
- This is the most important item in grub.cfg, official original text:
该命令定义了一个名为title的grub菜单项。当开机时选中该菜单项时,grub会将chosen环境变量的值赋给"--id"(如果给定了"--id"的话),执行大括号中的命令列表,如果直到最后一个命令都全部执行成功,且成功加载了对应的内核后,将执行boot命令。随后grub就将控制权交给了操作系统内核。
--class:该选项用于将菜单分组,从而使得grub可以通过主题样式为不同组的菜单显示不同的样式风格。一个menuentry中,可以使用多次class表示将该菜单分到多个组中去。
--users:该选项限定只有此处列出的用户才能访问该菜单项,不指定该选项时将表示所有用户都能访问该菜单。
--unrestricted:该选项表示所有用户都有权访问该菜单项。
--hotkey:该选项为该菜单项关联一个热键,也就是快捷键,关联热键后只要按下该键就会选中该菜单。热键只能是字母键、backspace键、tab键或del键。
--id:该选项为该菜单关联一个唯一的数值。id的值可以由ASCII字母、数字//下划线组成,且不得以数字开头。
所有其他的参数包括title都被当作位置参数传递给大括号中的命令,但title总是$1,除title外的其余参数,位置值从前向后类推。
break [n]:强制退出for/while/until循环
continue [n]:跳到下一次迭代,即进入下一次循环
return [n]:指定返回状态码
setparams [arg] …:从$1开始替换位置参数
shift [n]:踢掉前n个参数,使得第n+1个参数变为$1,但和shell中不一样的是,踢掉了前n个参数后,从$#-n+1到$#这些参数的位置不变
具体如何编写grub.cfg文件,继续看下文的命令和变量。
1.4 命令行和菜单项中的命令
官方手册原文:
grub2支持很多命令,有些命令只能在交互式命令行下使用,有些命令可用在配置文件中。在救援模式下,只有insmod、ls、set和unset命令可用。
无需掌握所有的命令,掌握用的上的几个命令即可。
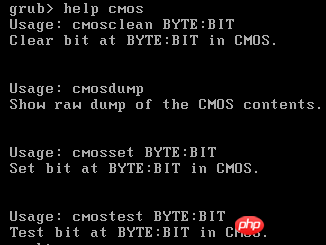
1.4.1 help命令
help [pattern]
Copy after login显示能匹配到pattern的所有命令的说明信息和usage信息,如果不指定patttern,将显示所有命令的简短信息。
例如"help cmos"。

1.4.2 boot命令
用于启动已加载的操作系统。
只在交互式命令行下可用。其实在menuentry命令的结尾就隐含了boot命令。
1.4.3 set和unset命令
set [envvar=value]
unset envvar
Copy after login前者设置环境变量envvar的值,如果不给定参数,则列出当前环境变量。
后者释放环境变量envvar。
1.4.4 lsmod命令和insmod命令
分别用于列出已加载的模块和调用指定的模块。
注意,若要导入支持ext文件系统的模块时,只需导入ext2.mod即可,实际上也没有ext3和ext4对应的模块。
1.4.5 linux和linux16命令
linux file [kernel_args]
linux16 file [kernel_args]
Copy after login都表示装载指定的内核文件,并传递内核启动参数。linux16表示以传统的16位启动协议启动内核,linux表示以32位启动协议启动内核,但linux命令比linux16有一些限制。但绝大多数时候,它们是可以通用的。
在linux或linux16命令之后,必须紧跟着使用init或init16命令装载init ramdisk文件。
一般为/boot分区下的vmlinuz-RELEASE_NUM文件。
但在grub环境下,boot分区被当作root分区,即根分区,假如boot分区为第一块磁盘的第一个分区,则应该写成:
linux (hd0,msdos1)/vmlinuz-XXX
或者相对路径的:
set root='hd0,msdos1'
linux /vmlinuz-XXX
在grub阶段可以传递内核的启动参数(内核的参数包括3类:编译内核时参数,启动时参数和运行时参数),可以传递的启动参数非常非常多,完整的启动参数列表见:。这里只列出几个常用的:
init=   :指定Linux启动的第一个进程init的替代程序。
root=   :指定根文件系统所在分区,在grub中,该选项必须给定。
ro,rw   :启动时,根分区以只读还是可读写方式挂载。不指定时默认为ro。
initrd  :指定init ramdisk的路径。在grub中因为使用了initrd或initrd16命令,所以不需要指定该启动参数。
rhgb    :以图形界面方式启动系统。
quiet   :以文本方式启动系统,且禁止输出大多数的log message。
net.ifnames=0:用于CentOS 7,禁止网络设备使用一致性命名方式。
biosdevname=0:用于CentOS 7,也是禁止网络设备采用一致性命名方式。
             :只有net.ifnames和biosdevname同时设置为0时,才能完全禁止一致性命名,得到eth0-N的设备名。
Copy after login例如:
linux16 /vmlinuz-3.10.0-327.el7.x86_64 root=UUID=edb1bf15-9590-4195-aa11-6dac45c7f6f3 ro rhgb quiet LANG=en_US.UTF-8
另外,root启动参数有多种定义方式,可以使用UUID的方式指定,也可以直接指定根文件系统所在分区,如"root=/dev/sda2",
1.4.6 initrd和initrd16命令
initrd file
Copy after login只能紧跟在linux或linux16命令之后使用,用于为即将启动的内核传递init ramdisk路径。
同样,基于根分区,可以使用绝对路径,也可以使用相对路径。路径的表示方法和linux或linux16命令相同。例如:
linux16 /vmlinuz-0-rescue-d13bce5e247540a5b5886f2bf8aabb35 root=UUID=b2a70faf-aea4-4d8e-8be8-c7109ac9c8b8 ro crashkernel=auto quiet
initrd16 /initramfs-0-rescue-d13bce5e247540a5b5886f2bf8aabb35.img
1.4.7 search命令
search [--file|--label|--fs-uuid] [--set [var]] [--no-floppy] [--hint args] name
Copy after loginSearch for devices by file [--file], volume label [--label], and file system UUID [--fs-uuid].
If the "--set" option is used, the first found device will be set to the value of the environment variable "var". The default variable "var" is 'root'.
When searching, you can use the "--no-floppy" option to disable searching for floppy disks, because floppy disks are very slow and have been eliminated.
Sometimes "--hint=XXX" is also specified, which means that devices that meet the prompt conditions are given priority. If multiple hint conditions are specified, the first hint is matched first, and then the second one is matched. And so on.
For example:
if [ x$feature_platform_search_hint = xy ]; then
search --no-floppy --fs-uuid --set=root - -hint-bios=hd0,msdos1 --hint-efi=hd0,msdos1 --hint-baremetal=ahci0,msdos1 --hint='hd0,msdos1' 367d6a77-033b-4037-bbcb-416705ead095
else
search --no-floppy --fs-uuid --set=root 367d6a77-033b-4037-bbcb-416705ead095
fi
linux16 /vmlinuz-3.10 .0-327.el7.x86_64 root=UUID=b2a70faf-aea4-4d8e-8be8-c7109ac9c8b8 ro crashkernel=auto quiet LANG=en_US.UTF-8
initrd16 /initramfs-3.10.0-327.el7 .x86_64.img
The first search in the above if statement searches for the device with uuid "367d6a77-033b-4037-bbcb-416705ead095", but multiple hint options are used, indicating that first Matches devices with the /boot partition (hd0, msdos1) under the bios platform, and then specifies several hints. However, because the search uses the uuid search method, these hint options are redundant, because the uuid of the partition on a single disk is only.
For another example, if there are two boot partitions on a boot device (such as when multiple systems coexist), they are (hd0, msdos1) and (hd0, msdos5). If uuid search is not used at this time , instead use label mode to search:
search --no-floppy --fs-label=boot --set=root --hint=hd0,msdos5
Then the boot partition (hd0, msdos5) will be selected at this time. If hint is not used, the boot partition (hd0, msdos1) will be selected.
1.4.8 true and false commands
Return true or false Boolean value directly.
1.4.9 test expression and [expression]
Calculate whether the result of "expression" is true, return 0 if true, otherwise return non-0, mainly used for if, while or until in the structure.
string1 == string2
string1 is the same as string2
string1 != string2
string1 and string2 are not the same Same
string1 < string2
string1 in letters Sequentially less than string2
string1 <= string2
string1 is alphabetical less than or equal to string2
##string1 > string2
string1 is alphabetically greater than string2
##string1 >= string2 string1 is alphabetical greater than or equal to string2 ##integer1 -eq integer2 ##integer1 -ge integer2integer1 is greater than or equal to integer2
integer1 is greater than integer2
##integer1 -le integer2
integer1 is less than or equal to integer2
##integer1 -lt integer2
integer1 is less than integer2
##integer1 -ne integer2
integer1 is not equal to integer2 ##prefixinteger1 -pgt prefixinteger2
After removing the prefix part of the non-numeric string, integer1 is greater than integer2 ##prefixinteger1 - plt prefixinteger2 After removing the prefix part of the non-numeric string, integer1 is smaller than integer2
##file1 - nt file2
The modification time of file1 is newer than file2
file1 -ot file2
The modification time of file1 is older than file2
-d file
file exists and is a directory
-e file
file exists
-f file
file exists and is not a directory
##-s file file exists and the file occupied space is greater than zero -n string The length of string is greater than zero string The length of string is greater than zero, which is equivalent to -n string -z string The length of string is equal to zero ( expression ) # Take expression as a whole ! expression NOT (NOT) expression1 -a expression2 And (AND), you can also use expression1 expression2, but it is not recommended expression1 -o expression2 ## or (OR)1.4.10 cat命令
读取文件内容,借此可以帮助判断哪个是boot分区,哪个是根分区。
交互式命令行下使用。
1.4.11 clear命令
清屏。
1.4.12 configfile命令
立即装载一个指定的文件作为grub的配置文件。但注意,导入的文件中的环境变量不在当前生效。
在grub.cfg丢失时,该命令将排上用场。
1.4.13 echo命令
echo [-n] [-e] string
Copy after login"-n"和"-e"用法同shell中echo。如果要引用变量,使用${var}的方式。
1.4.14 export命令
导出环境变量,若在configfile的file中导出环境变量,将会在当前环境也生效。
1.4.15 halt和reboot命令
关机或重启
1.4.16 ls命令
ls [args]
Copy after login如果不给定任何参数,则列出grub可见的设备。
如果给定的参数是一个分区,则显示该分区的文件系统信息。
如果给定的参数是一个绝对路径表示的目录,则显示该目录下的所有文件。
例如:
1.4.17 probe命令
probe [--set var] --partmap|--fs|--fs-uuid|--label device
Copy after login探测分区或磁盘的属性信息。如果未指定--set,则显示指定设备对应的信息。如果指定了--set,则将对应信息的值赋给变量var。
--partmap:显示是gpt还是mbr格式的磁盘。
--fs:显示分区的文件系统。
--fs-uuid:显示分区的uuid值。
--label:显示分区的label值。
1.4.18 save_env和list_env命令
将环境变量保存到环境变量块中,以及列出当前的环境变量块中的变量。
1.4.19 loopback命令
loopback [-d] device file
Copy after login将file映射为回环设备。使用-d选项则是删除映射。
例如:
loopback loop0 /path/to/imagels (loop0)/
Copy after login1.4.20 normal和normal_exit命令
进入和退出normal模式,normal是相对于救援模式而言的,只要不是在救援模式下,就是在normal模式下。
救援模式下,只能使用非常少的命令,而normal模式下则可以使用非常多的命令。
1.4.21 password和password_pbkdf2命令
password user clear-password
password_pbkdf2 user hashed-password
Copy after login前者使用明文密码定义一个名为user的用户。不建议使用此命令。
后者使用哈希加密后的密码定义一个名为user的用户,加密的密码通过"grub-mkpasswd-pbkdf2"工具生成。建议使用该命令。
1.5 几个常设置的内置变量
1.5.1 chosen变量
当开机时选中某个菜单项启动时,该菜单的title将被赋值给chosen变量。该变量一般只用于引用,而不用于修改。
1.5.2 cmdpath变量
grub2加载的core.img的目录路径,是绝对路径,即包括了设备名的路径,如(hd0,gpt1)/boot/grub2/。该变量值不应该修改。
1.5.3 default变量
指定默认的菜单项,一般其后都会跟随timeout变量。
default指定默认菜单时,可使用菜单的title,也可以使用菜单的id,或者数值顺序,当使用数值顺序指定default时,从0开始计算。
1.5.4 timeout变量
设置菜单等待超时时间,设置为0时将直接启动默认菜单项而不显示菜单,设置为"-1"时将永久等待手动选择。
1.5.5 fallback变量
当默认菜单项启动失败,则使用该变量指定的菜单项启动,指定方式同default,可使用数值(从0开始计算)、title或id指定。
1.5.6 grub_platform变量
指定该平台是"pc"还是"efi",pc表示的就是传统的bios平台。
该变量不应该被修改,而应该被引用,例如用于if判断语句中。
1.5.7 prefix变量
在grub启动的时候,grub自动将/boot/grub2目录的绝对路径赋值给该变量,使得以后可以直接从该变量所代表的目录下加载各文件或模块。
例如,可能自动设置为:
set prefix = (hd0,gpt1)/boot/grub2/
所以可以使用"$prefix/grubN.cfg"来引用/boot/grub2/grubN.cfg文件。
该变量不应该修改,且若手动设置,则必须设置正确,否则牵一发而动全身。
1.5.8 root变量
该变量指定根设备的名称,使得后续使用从"/"开始的相对路径引用文件时将从该root变量指定的路径开始。一般该变量是grub启动的时候由grub根据prefix变量设置而来的。
例如prefix=(hd0,gpt1)/boot/grub2,则root=(hd0,gpt1),后续就可以使用相对路径/vmlinuz-XXX表示(hd0,gpt1)/vmlinuz-XXX文件。
注意:在Linux中,从根"/"开始的路径表示绝对路径,如/etc/fstab。但grub中,从"/"开始的表示相对路径,其相对的基准是root变量设置的值,而使用"(dev_name)/"开始的路径才表示绝对路径。
一般root变量都表示/boot所在的分区,但这不是绝对的,如果设置为根文件系统所在分区,如root=(hd0,gpt2),则后续可以使用/etc/fstab来引用"(hd0,gpt2)/etc/fstab"文件。
该变量在grub2中一般不用修改,但若修改则必须指定正确。
另外,root变量还应该于linux或linux16命令所指定的内核启动参数"root="区分开来,内核启动参数中的"root="的意义是固定的,其指定的是根文件系统所在分区。例如:
set root='hd0,msdos1'
linux16 /vmlinuz-3.10.0-327.el7.x86_64 root=UUID=b2a70faf-aea4-4d8e-8be8-c7109ac9c8b8 ro crashkernel=auto quiet LANG=en_US.UTF-8
initrd16 /initramfs-3.10.0-327.el7.x86_64.img
一般情况下,/boot都会单独分区,所以root变量指定的根设备和root启动参数所指定的根分区不是同一个分区,除非/boot不是单独的分区,而是在根分区下的一个目录。
1.6 grub配置和安装示例
首先写一个grub.cfg。例如此处,在msdos磁盘上安装了两个操作系统,CentOS 7和CentOS 6。
# 设置一些全局环境变量
set default=0set fallback=1set timeout=3# 将可能使用到的模块一次性装载完
# 支持msdos的模块insmod part_msdos
# 支持各种文件系统的模块insmod exfatinsmod ext2insmod xfsinsmod fatinsmod iso9660

# 定义菜单
menuentry 'CentOS 7' --unrestricted {
        search --no-floppy --fs-uuid --set=root 367d6a77-033b-4037-bbcb-416705ead095
        linux16 /vmlinuz-3.10.0-327.el7.x86_64 root=UUID=b2a70faf-aea4-4d8e-8be8-c7109ac9c8b8 ro biosdevname=0 net.ifnames=0 quiet
        initrd16 /initramfs-3.10.0-327.el7.x86_64.img
}
menuentry 'CentOS 6' --unrestricted {
        search --no-floppy --fs-uuid --set=root f5d8939c-4a04-4f47-a1bc-1b8cbabc4d32
        linux16 /vmlinuz-2.6.32-504.el6.x86_64 root=UUID=edb1bf15-9590-4195-aa11-6dac45c7f6f3 ro quiet
        initrd16 /initramfs-2.6.32-504.el6.x86_64.img
}
Copy after login然后执行grub安装操作。
shell> grub2-install /dev/sda
Copy after loginCopy after login1.7 传统grub简述
因为本文主要介绍grub2,所以传统的grub只简单介绍下,其实前面已经提及了很多传统grub和grub2的比较了。另外,传统grub已足够强大,足够应付一般的需求。
1.7.1 grub安装
例如安装到/dev/sda上。
shell> grub-install /dev/sda
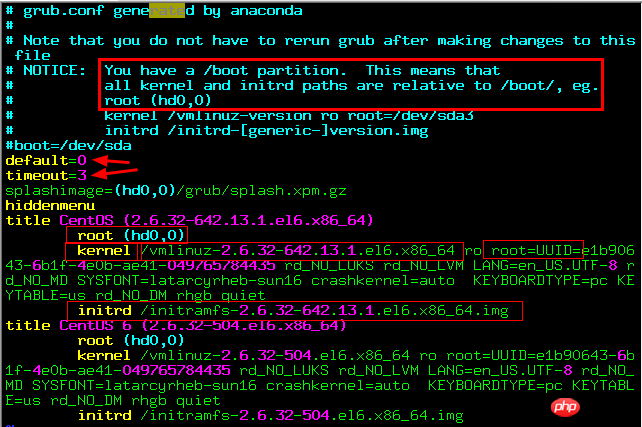
Copy after login1.7.2 grub.conf配置
default=0  # 默认启动第一个系统
timeout=5  # 等待超时时间5秒
splashimage=(hd0,0)/grub/splash.xpm.gz  # 背景图片
hiddenmenu  # 隐藏菜单,若要显式,在启动时按下ESC
title Red Hat Enterprise Linux AS (2.6.18-92.el5)  # 定义操作系统的说明信息
    root (hd0,0)
    kernel /vmlinuz-2.6.18-92.el5 ro root=/dev/sda2 rhgb quiet
    initrd /initrd-2.6.18-92.el5.img
Copy after loginBefore describing the configuration method, a key point needs to be explained, whether boot is an independent partition, which affects the configuration of subsequent paths.
Check the /boot/grub/grub.conf file in a normal operating system. You can see a prompt in the NOTICE section, saying whether you have an independent boot partition? If there is, it means that the paths of kernel and initrd start from / instead of /boot, such as /vmlinuz-xxx. If there is no independent boot partition, the boot path needs to be specified in the paths of kernel and initrd. For example, Boot does not have The partition is a directory under the / file system, then /boot/vmlinuz-xxx.
root (hd0,0) defines the root recognized by grub. Generally, the partition where boot is located is defined. grub can only recognize hd, so only hd can be used here. hd0 means that it is on the first disk. The second 0 of hd0,0 means that boot is on the first partition. grub2 The calculation of partitions starts from 1, which is the difference between traditional grub and grub2.
kernel defines the path and startup parameters of the kernel file, which is equivalent to the grub2 linux command or the linux16 command. First, explain the parameters. ro means read-only. Root=/dev/sda[N] or root=UUID="device_uuid_num" specifies the partition where the root file system is located. This is a required parameter. rhgb means to use the graphical interface to output some information during the operating system startup process. Omitting it can speed up the startup speed. Quiet means to output information silently when starting the operating system. Let’s explain the path again. If the boot is an independent partition, the kernel path is defined as /vmlinuz-xxx. If there is no independent partition, specify its absolute path. It is usually a directory under the root file system, so it is usually / boot/vmlinuz-xxx.
initrd defines the path of init ramdisk. The path is defined in the same way as kernel. There are no parameters except the path.
Or use the UUID method as shown below.
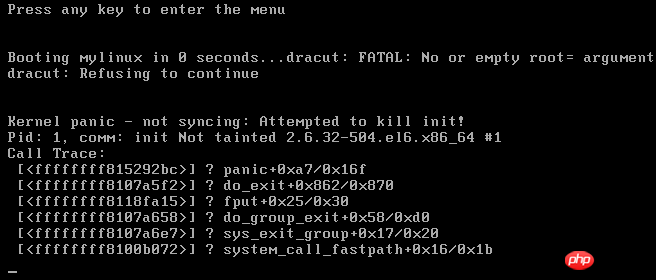
If the root= option is not specified, the error "no or empty root... dracut...kernel panic" will be reported. As shown below.
The above is the detailed content of Detailed introduction to grub2. For more information, please follow other related articles on the PHP Chinese website!
Statement of this WebsiteThe content of this article is voluntarily contributed by netizens, and the copyright belongs to the original author. This site does not assume corresponding legal responsibility. If you find any content suspected of plagiarism or infringement, please contact admin@php.cn
Hot AI Tools
Undresser.AI Undress
AI-powered app for creating realistic nude photos
AI Clothes Remover
Online AI tool for removing clothes from photos.
Undress AI Tool
Undress images for free
Clothoff.io
AI clothes remover
AI Hentai Generator
Generate AI Hentai for free.

Hot Article
R.E.P.O. Energy Crystals Explained and What They Do (Yellow Crystal)4 weeks ago By 尊渡假赌尊渡假赌尊渡假赌R.E.P.O. Best Graphic Settings4 weeks ago By 尊渡假赌尊渡假赌尊渡假赌Assassin's Creed Shadows: Seashell Riddle Solution2 weeks ago By DDDR.E.P.O. How to Fix Audio if You Can't Hear Anyone4 weeks ago By 尊渡假赌尊渡假赌尊渡假赌WWE 2K25: How To Unlock Everything In MyRise1 months ago By 尊渡假赌尊渡假赌尊渡假赌
Hot Tools
Notepad++7.3.1
Easy-to-use and free code editor
SublimeText3 Chinese version
Chinese version, very easy to use
Zend Studio 13.0.1
Powerful PHP integrated development environment
Dreamweaver CS6
Visual web development tools
SublimeText3 Mac version
God-level code editing software (SublimeText3)
Hot Topics
CakePHP Tutorial 1378
1378
 52
See all articles
Tips for organizing desktop icons in Win10
Dec 27, 2023 pm 05:00 PM
52
See all articles
Tips for organizing desktop icons in Win10
Dec 27, 2023 pm 05:00 PM
Friends who use computers all want their desktop to be arranged cleanly and neatly, but they don’t know how to operate it in the win10 system. Today I will bring you a win10 method to organize desktop icons, let’s take a look. How to organize desktop icons in Windows 10: 1. Right-click a blank space on the desktop and click "View" at the top. 2. In the window on the right, you can see functions such as "Automatically arrange icons". 3. Do not check "Automatically arrange icons" so that you can place the icons according to your needs. 4. Moreover, all these options can be selected, but this way you will not be able to express your own personality.
Demonstration of win7 official ultimate version download and installation tutorial
Jul 20, 2023 pm 04:17 PM
There are many versions of win7 system. You can find the installed version, gho version, original version and other systems online. Some netizens want to download and install the official win7 ultimate version system, but they don’t know how to download and install win7. In fact, we can use the one-click system reinstallation tool to quickly install the official original win7 ultimate version system, and then use the genuine key to activate it and use it, it will be a genuine system. The editor below will teach you a simple download and installation tutorial for the official win7 ultimate version. The specific steps are as follows: 1. First download and install Xiaoyu’s one-click system reinstallation tool on your computer and open it. Turn off the computer’s anti-virus software and back up important data on the C drive. Then select win7 ultimate system and click to install this system. 2. Select the software you want to install and click Next. 3. Wait for the software
How to defragment the disk in win10 system
Jun 29, 2023 pm 07:41 PM
How to defragment the disk in win10 system? As the usage of computers is getting higher and higher, we may sometimes encounter the setting of disk defragmentation in win10 system. If we need to set up the disk defragmentation in win10 system, how to deal with the defragmentation of disk in win10 system? Many friends don’t know how to operate it. The editor below has compiled the detailed steps for defragmenting the disk in win10 system. If you are interested, follow the editor to read below! Detailed steps for defragmenting disks in win10 system: 1. What kind of disks need to be defragmented? We need to know that not all disks need to be defragmented, such as very common solid-state hard drives and removable disk devices.
Step-by-step guide for creating folders on Realme mobile phone
Mar 23, 2024 pm 03:51 PM
Step-by-Step Guide to Creating Folders on Realme Mobile Phones In our daily lives, we use our phones to store a variety of files, including photos, videos, documents, and more. However, as time goes by, the number of files on your phone may increase, causing insufficient memory on your phone or making it difficult to manage files. In order to better organize files and improve the efficiency of mobile phone use, the establishment of mobile phone folders has become particularly important. Realme Mobile is a popular smartphone brand with a powerful system and diverse features. Creating folders on Realme phones can help users better organize files
Windows 10 Official USB Installation Guide
Jan 04, 2024 pm 05:25 PM
Microsoft provides users with an official USB flash drive installation method, but many friends don’t know how to use the win10 official USB flash drive. In fact, we only need to download the system online and put it in the USB flash drive to install it. How to use the win10 official USB disk: 1. First open the Microsoft win10 website and select "Download Tool Now" 2. Then check "Create installation media for another computer" 3. Then cancel the following options and select the system and system you want to download language version. 4. After selecting, go to the next step and select "U disk" 5. Then select our U disk to install it into the U disk. (If not, re-insert and unplug the USB flash drive) 6. After installing to the USB flash drive, insert the USB flash drive into the computer where you want to install the system. 7. Then restart the computer and use the hotkey to enter bios.
Detailed win7 official ultimate version download and installation tutorial
Jul 14, 2023 pm 12:21 PM
Win7 Ultimate system is the most popular version of Win7 system, and it is also the version with relatively complete functions. Some netizens want to install the official flagship version of win7, but they don’t know how to download and install the win7 system. The editor below will show you a simple download and installation tutorial for the official win7 ultimate version. The specific steps are as follows: 1. Download and install Xiaobai’s one-click system reinstallation tool on your computer and open it. Select the original win7 ultimate system that needs to be installed, and click to install this system. (Be sure to back up important data on drive C before installation, and turn off the anti-virus software on your computer to avoid being intercepted.) 2. Wait for the software to download system image file data, etc. 3. After the deployment is completed, choose to restart the computer. 4. After the computer restarts, you enter the boot options interface and select xi
How to use PHP functions for data analysis and statistics?
Jul 24, 2023 am 08:53 AM
How to use PHP functions for data analysis and statistics? With the rapid development of the Internet and the explosive growth of data, data analysis and statistics have become an important skill. In PHP, we can use some powerful functions and libraries to perform data analysis and statistics. This article will introduce how to use PHP functions for data analysis and statistics, and provide some code examples. Array processing In data analysis and statistics, arrays are the basic data structures that we often need to deal with. PHP provides many functions for working with arrays that can help us
WPS officially announced: It will officially shut down third-party commercial advertising!
Mar 04, 2024 pm 08:22 PM
WPS officials issued an announcement today (December 20) announcing that "WPSOffice Domestic Personal Edition will officially close third-party commercial advertising." Interested users can update WPS to the latest version to obtain a more refreshing and concise office experience. The announcement pointed out that WPS realizes that every achievement achieved is inseparable from the support of users. The company will continue to uphold the mission of "simple creation, easy expression, and value-added connection" and is committed to providing users with excellent product and service experience. Currently, competition in the office software market is fierce, and major manufacturers are working hard to improve the competitiveness of their products. WPS decided to cancel third-party commercial advertisements, which is an important upgrade to user experience. This initiative will bring users a more refreshing and concise office experience and further enhance the role of WPS in