

Introduction and usage examples of tarnado

Directory
tarnado
##tarnado source code installation
tarnado test program
# #Application class analysis
1. Introduction to tarnado
Recently I was learning Python and came into contact with tarnado accidentally. , I feel that tarnado is pretty good, so what exactly is tarnado? tarnado is a non-blocking web server framework developed in Python. It is very different from many mainstream web frameworks (of course I really don’t know much about other web frameworks). The epoll and non-blocking methods allow it to Thousands of connections per second, ideal for real-time web services. The following address is the official explanation of tarnado
2. Tarnado source code installation
Go to the above address to download tornado-1.2.1.tar.gz
After decompressing it, go to cmd Find this path in the command box and install it. The specific steps are as follows:
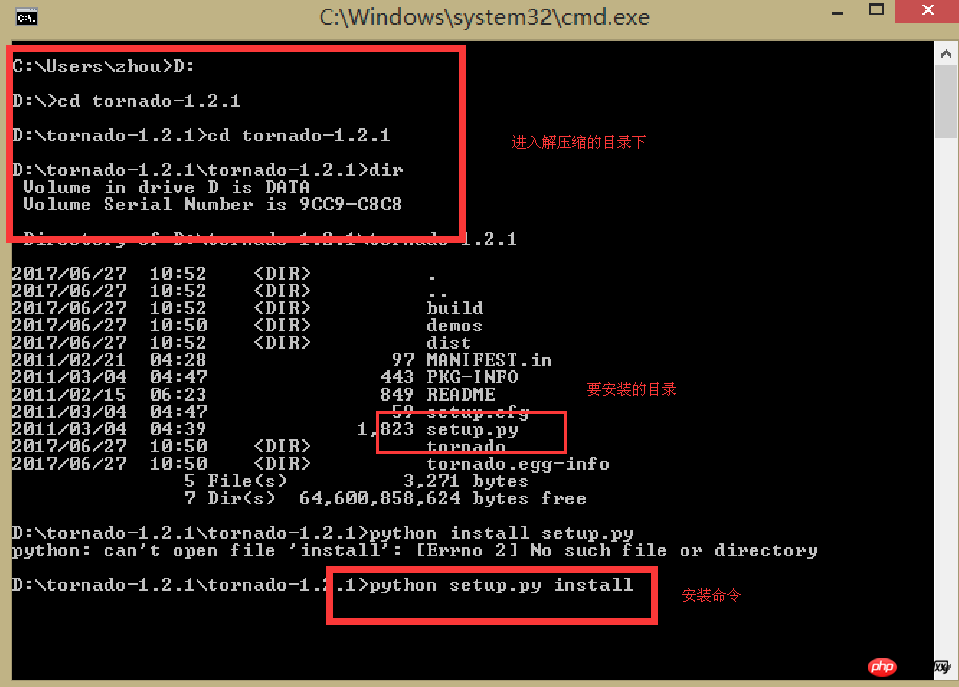
Note: After testing by myself, this code cannot be executed on python3.5 , it can be executed on 2.7, so it is recommended to install it on python2.7 for testing and learning. 3. Test program
After the installation is complete, open pycharm, create a new py file, and write the following test code. After execution, enter http in the browser: //127.0.0.1:8888 will display the words hello and world, which means the installation is successful.

1 import tornado.ioloop 2 import tornado.web 3 4 class MainHandler(tornado.web.RequestHandler): 5 def get(self): 6 self.write("Hello, world") 7 8 application = tornado.web.Application([ 9 (r"/", MainHandler),10 ])11 12 if __name__ == "__main__":13 application.listen(8888)14 tornado.ioloop.IOLoop.instance().start()
4. Analysis of application class
Now we are finally going to parse the application, but before parsing, let’s talk about the execution process of the test code.

1 #!/usr/bin/env python 2 # -*- coding:utf-8 -*- 3 # zhou 4 # 2017/6/27 5 6 # 导入两个模块 7 import tornado.ioloop 8 import tornado.web 9 10 # 1. 把类RequestHandler载入到内存中11 # 2. 把类RequestHandler做为参数传入MainHandler中12 # 3. 把类MainHandler载入到内存中13 # 以上三个步骤实质上都不会坐任何操作,仅仅只是把类装载到内存中以便后续调用14 class MainHandler(tornado.web.RequestHandler):15 def get(self):16 self.write("Hello, world")17 18 19 # 丛这一步骤开始才开始真正的创建对象20 # 1. 类Application创建了一个对象,名称为application21 # 2. r"/" 这个是正则表达式类型的/,也就是我们在浏览器中输入的url22 # 3. 把类MainHandler作为参数传递到application中23 # 4. 这里面传递的仅仅只是一个变量[]24 application = tornado.web.Application([25 (r"/", MainHandler),26 ])27 28 if __name__ == "__main__":29 30 # 调用application对象中的listen方法,把8888作为端口号传递进去31 application.listen(8888)32 tornado.ioloop.IOLoop.instance().start()
application =
A collection of request handlers that make up a web application.把许多请求处理器组合起来以实现web应用
<br>

1 def __init__(self, handlers=None, default_host="", transforms=None, 2 wsgi=False, **settings): 3 if transforms is None: 4 self.transforms = [] 5 if settings.get("gzip"): 6 self.transforms.append(GZipContentEncoding) 7 self.transforms.append(ChunkedTransferEncoding) 8 else: 9 self.transforms = transforms10 self.handlers = []11 self.named_handlers = {}12 self.default_host = default_host13 self.settings = settings14 self.ui_modules = {}15 self.ui_methods = {}16 self._wsgi = wsgi17 self._load_ui_modules(settings.get("ui_modules", {}))18 self._load_ui_methods(settings.get("ui_methods", {}))19 if self.settings.get("static_path"):20 path = self.settings["static_path"]21 handlers = list(handlers or [])22 static_url_prefix = settings.get("static_url_prefix",23 "/static/")24 handlers = [25 (re.escape(static_url_prefix) + r"(.*)", StaticFileHandler,26 dict(path=path)),27 (r"/(favicon\.ico)", StaticFileHandler, dict(path=path)),28 (r"/(robots\.txt)", StaticFileHandler, dict(path=path)),29 ] + handlers30 if handlers: self.add_handlers(".*$", handlers)31 32 # Automatically reload modified modules33 if self.settings.get("debug") and not wsgi:34 import autoreload35 autoreload.start()
<1>. It encapsulates tranforms variables for the object application,
<2>. If the user does not specify the variables, the system defaults to one between the server and the client. During the transmission process, it must be compressed to a certain extent and transmitted piece by piece
###################################################if transforms is None:
    self.transforms = []if settings.get("gzip"):
        self.transforms.append(GZipContentEncoding)
    self.transforms.append(ChunkedTransferEncoding)else:
    self.transforms = transforms###################################################这里面主要包含了三个类:
    GZipContentEncoding(OutputTransform)        # gzip内容编码ChunkedTransferEncoding(OutputTransform)    # 分块传输编码OutputTransform()                           # 是上面两个类的父类        解释:A transform modifies the result of an HTTP request(e.g., GZip encoding)
主要是用来对一个http请求的结果进行转换的,可以是gzip压缩Code 2
< 1>. It encapsulates a series of variables for the object application. The two variables ui_modules and ui_methods are not understood yet, and will be supplemented later.
self.handlers = []
self.named_handlers = {}
self.default_host = default_host
self.settings = settings
self.ui_modules = {}
self.ui_methods = {}
self._wsgi = wsgiCode 3
What is the difference between methods? I think it should be the modules and methods defined by yourself and those provided by the system by default.
self._load_ui_modules(settings.get("ui_modules", {}))
self._load_ui_methods(settings.get("ui_methods", {}))他主要调用了两个方法,在此仅仅对第一个方法进行简单的描述(_load_ui_modules)
因为第二个方法和这个modules是一样的


1 def _load_ui_modules(self, modules): 2 if type(modules) is types.ModuleType: 3 self._load_ui_modules(dict((n, getattr(modules, n)) 4 for n in dir(modules))) 5 elif isinstance(modules, list): 6 for m in modules: self._load_ui_modules(m) 7 else: 8 assert isinstance(modules, dict) 9 for name, cls in modules.iteritems():10 try:11 if issubclass(cls, UIModule):12 self.ui_modules[name] = cls13 except TypeError:14 pass
对于上面源代码解析
# 把传入的模块modules全部变成字典的形式封装到ui_modules变量中def _load_ui_modules(self, modules):# types是一个.py文件,他主要是为了定义一些简单的函数,类似于内置函数可以直接拿来使用的# types里面关于ModuleType的描述是:ModuleType = type(sys) 也就是sys的类型<type 'module'># 这里其实就是为了判断传出的modules是不是一个模块的类型,如果是就把它变成一个字典形式递归判断if type(modules) is types.ModuleType: self._load_ui_modules(dict((n, getattr(modules, n)) for n in dir(modules)))#判断modules是不是一个列表,如果是列表,就把列表里面的元素重新代入方法中进行调用 elif isinstance(modules, list):for m in modules: self._load_ui_modules(m)else:# 此处是一个断言机制,也就是说已经肯定了modules一定是一个字典形式的样子assert isinstance(modules, dict)# 因为modules是一个字典,所以就把键和值分别赋值给name和cls,然后判断每一个键的值cls是不是UIModule的一个子类,如果是# 就把这个值添加到前面封装的一个变量中self.ui_modules[name] = clsfor name, cls in modules.iteritems():try:if issubclass(cls, UIModule): self.ui_modules[name] = clsexcept TypeError:pass
代码四
<1>. 它定义了一系列的变量,最重要的变量是handler, 其中又引出了一个类StaticFileHandler而这个类又是继承了RequestHandler,因为此处并没有创建任何关于这个类的对象,所以此处不再深究等真正调用时候在来关注。
但是从条件语句中,我们就可以看出来,当setting中不含static的时候,并不会去创建这些变量,这一点是要注意的。
# 定义了一系列的变量如handlers,path,static_url_prefix   # 当settings中包含了static_path这个键的时候,才会去定义这些变量         if self.settings.get("static_path"):
    path = self.settings["static_path"]
    handlers = list(handlers or [])
    static_url_prefix = settings.get("static_url_prefix",                                     "/static/")
    handlers = [
        (re.escape(static_url_prefix) + r"(.*)", StaticFileHandler,
         dict(path=path)),
        (r"/(favicon\.ico)", StaticFileHandler, dict(path=path)),
        (r"/(robots\.txt)", StaticFileHandler, dict(path=path)),
    ] + handlers
代码五
<1>. 添加给定的处理器到系统的处理器列表中。(其实这样说可能不太准确, 因为我们从代码四就可以看出来,如果我们给定的url包含了static_path,那么给定的处理器无论如何都会发生改变)
if handlers: self.add_handlers(".*$", handlers)代码六
add_handles函数的解析
def add_handlers(self, host_pattern, host_handlers):# 添加给定的处理器到系统的处理器列表中,注意主机模式是按顺序进行处理的,直到第一个被匹配到的这就意味着所有给定主机的处理器必须被添加到处理器中"""Appends the given handlers to our handler list.

    Note that host patterns are processed sequentially in the
    order they were added, and only the first matching pattern is
    used.  This means that all handlers for a given host must be
    added in a single add_handlers call."""# 如果给定主机模式不是以"$"结尾的,就添加$到结尾if not host_pattern.endswith("$"):
        host_pattern += "$"handlers = []# The handlers with the wildcard host_pattern are a special# case - they're added in the constructor but should have lower# precedence than the more-precise handlers added later.# If a wildcard handler group exists, it should always be last# in the list, so insert new groups just before it.# 带有通配符的handlers是一个特殊情况,他们本来在构造方法就已经被添加了,但是他们的优先级却低于一些重要的处理器,因此应该在之后被添加# 所以如果带有通配符的处理器组存在,就应该把他们放在一个列表的最后面,否则就插在他的前面# 下面这段代码就是这个意思,如果他的pattern是'.*$'开头的,代表他是没有通配符的,所以就把他插入最后一个的前面,否则有通配符的就直接添加到后面if self.handlers and self.handlers[-1][0].pattern == '.*$':
        self.handlers.insert(-1, (re.compile(host_pattern), handlers))else:
        self.handlers.append((re.compile(host_pattern), handlers))# 这个是对我们传入的host_handlers进行一个解析,把第一个采纳数给pattern,第二个给handler如果有三个,就赋值给kwargs如果没有第三个kwargs=={}for spec in host_handlers:if type(spec) is type(()):assert len(spec) in (2, 3)
            pattern = spec[0]
            handler = spec[1]if len(spec) == 3:
                kwargs = spec[2]else:
                kwargs = {}# 赋值完成之后就把这些参数封装到类URLSpec中spec = URLSpec(pattern, handler, kwargs)# 类URLSpec创建了对象spec之后,会重新给self.named_handlers添加一个handlers的键值对,如果键值本身就存在,就会往日志里面写入警告信息        handlers.append(spec)if spec.name:if spec.name in self.named_handlers:
                logging.warning("Multiple handlers named %s; replacing previous value",
                    spec.name)
            self.named_handlers[spec.name] = spec
代码七
类URLSpec的解析
在代码六中创建了一个spec对象,用的类URLSpec创建的
class URLSpec(object):# 这个类的作用主要是在url和handlers之间做一个特定的映射,主要的体现应该就是前面的变量name_handlers# 前面的赋值语句:self.named_handlers[spec.name] = spec"""Specifies mappings between URLs and handlers."""def __init__(self, pattern, handler_class, kwargs={}, name=None):"""Creates a URLSpec.

        Parameters:
        # 传递进来得主机模式
        pattern: Regular expression to be matched.  Any groups in the regex
            will be passed in to the handler's get/post/etc methods as
            arguments.

        # 这个不是特别懂,但是意思是RequestHandler的子类将被调用
        handler_class: RequestHandler subclass to be invoked.
        kwargs (optional): A dictionary of additional arguments to be passed
            to the handler's constructor.

        # 这个handler的名字,是一个额外的参数
        name (optional): A name for this handler.  Used by
            Application.reverse_url."""if not pattern.endswith('$'):
            pattern += '$'self.regex = re.compile(pattern)
        self.handler_class = handler_class
        self.kwargs = kwargs
        self.name = name
self._path, self._group_count = self._find_groups()代码八
方法self._find_groups()
这个方法比较有意思,后面会带一个例子来解释一下
def _find_groups(self):# 就是给特定的url返回一个元组,下面的就是例子,括号里面的内容都会转换成%s,后面的2代表小括号括号的个数"""Returns a tuple (reverse string, group count) for a url.

    For example: Given the url pattern /([0-9]{4})/([a-z-]+)/, this method
    would return ('/%s/%s/', 2)."""# 得到pattern的字符串形式,去掉开头的^和结尾的$符号pattern = self.regex.patternif pattern.startswith('^'):
        pattern = pattern[1:]if pattern.endswith('$'):
        pattern = pattern[:-1]# 如果正常情况下regex.groups的值应该是等于count的,除非特别复杂的url,会返回两个noneif self.regex.groups != pattern.count('('):# The pattern is too complicated for our simplistic matching,# so we can't support reversing it.return (None, None)        # 这个就是把url转换成元组的具体代码,代码实现的是把括号里面的内容全部转换成%spieces = []for fragment in pattern.split('('):if ')' in fragment:
            paren_loc = fragment.index(')')if paren_loc >= 0:
                pieces.append('%s' + fragment[paren_loc + 1:])else:
pieces.append(fragment) # 把picese重新拼接成字符,返回回去return (''.join(pieces), self.regex.groups)import re
pattern = "/abcd123([0-9]{4})/lwjeg([a-z-]+)/"regex = re.compile(pattern)
pieces = []print(pattern.split('('))for fragment in pattern.split('('):if ')' in fragment:# 找到‘)’的位置paren_loc = fragment.index(')')if paren_loc >= 0:# 把')'之后的所有内容拼接起来pieces.append('%s' + fragment[paren_loc + 1:])else:
pieces.append(fragment)print(pieces)
结果:
['/abcd123', '[0-9]{4})/lwjeg', '[a-z-]+)/']
['/abcd123', '%s/lwjeg', '%s/']代码九
# 自动的去重载改变的模块,这个调用的是autorelaad模块实现的    # Automatically reload modified modulesif self.settings.get("debug") and not wsgi:import autoreload
autoreload.start()至此
application = tornado.web.Application([<br> (r"/", MainHandler),<br>])
The above is the detailed content of Introduction and usage examples of tarnado. For more information, please follow other related articles on the PHP Chinese website!

Hot AI Tools

Undresser.AI Undress
AI-powered app for creating realistic nude photos

AI Clothes Remover
Online AI tool for removing clothes from photos.

Undress AI Tool
Undress images for free

Clothoff.io
AI clothes remover

AI Hentai Generator
Generate AI Hentai for free.

Hot Article
Hot Tools

Notepad++7.3.1
Easy-to-use and free code editor

SublimeText3 Chinese version
Chinese version, very easy to use

Zend Studio 13.0.1
Powerful PHP integrated development environment

Dreamweaver CS6
Visual web development tools

SublimeText3 Mac version
God-level code editing software (SublimeText3)
Hot Topics


 Application practice of Python in software source code protection
Jun 29, 2023 am 11:20 AM
Application practice of Python in software source code protection
Jun 29, 2023 am 11:20 AM
As a high-level programming language, Python language is easy to learn, easy to read and write, and has been widely used in the field of software development. However, due to the open source nature of Python, the source code is easily accessible to others, which brings some challenges to software source code protection. Therefore, in practical applications, we often need to take some methods to protect Python source code and ensure its security. In software source code protection, there are a variety of application practices for Python to choose from. Below are some common
 Xiaomi 15 series full codenames revealed: Dada, Haotian, Xuanyuan
Aug 22, 2024 pm 06:47 PM
Xiaomi 15 series full codenames revealed: Dada, Haotian, Xuanyuan
Aug 22, 2024 pm 06:47 PM
The Xiaomi Mi 15 series is expected to be officially released in October, and its full series codenames have been exposed in the foreign media MiCode code base. Among them, the flagship Xiaomi Mi 15 Ultra is codenamed "Xuanyuan" (meaning "Xuanyuan"). This name comes from the Yellow Emperor in Chinese mythology, which symbolizes nobility. Xiaomi 15 is codenamed "Dada", while Xiaomi 15Pro is named "Haotian" (meaning "Haotian"). The internal code name of Xiaomi Mi 15S Pro is "dijun", which alludes to Emperor Jun, the creator god of "The Classic of Mountains and Seas". Xiaomi 15Ultra series covers
 The best time to buy Huawei Mate 60 series, new AI elimination + image upgrade, and enjoy autumn promotions
Aug 29, 2024 pm 03:33 PM
The best time to buy Huawei Mate 60 series, new AI elimination + image upgrade, and enjoy autumn promotions
Aug 29, 2024 pm 03:33 PM
Since the Huawei Mate60 series went on sale last year, I personally have been using the Mate60Pro as my main phone. In nearly a year, Huawei Mate60Pro has undergone multiple OTA upgrades, and the overall experience has been significantly improved, giving people a feeling of being constantly new. For example, recently, the Huawei Mate60 series has once again received a major upgrade in imaging capabilities. The first is the new AI elimination function, which can intelligently eliminate passers-by and debris and automatically fill in the blank areas; secondly, the color accuracy and telephoto clarity of the main camera have been significantly upgraded. Considering that it is the back-to-school season, Huawei Mate60 series has also launched an autumn promotion: you can enjoy a discount of up to 800 yuan when purchasing the phone, and the starting price is as low as 4,999 yuan. Commonly used and often new products with great value
 How to view the source code of tomcat in idea
Jan 25, 2024 pm 02:01 PM
How to view the source code of tomcat in idea
Jan 25, 2024 pm 02:01 PM
Steps to view tomcat source code in IDEA: 1. Download Tomcat source code; 2. Import Tomcat source code in IDEA; 3. View Tomcat source code; 4. Understand the working principle of Tomcat; 5. Precautions; 6. Continuous learning and updating ; 7. Use tools and plug-ins; 8. Participate in the community and contribute. Detailed introduction: 1. Download the Tomcat source code. You can download the source code package from the official website of Apache Tomcat. Usually these source code packages are in ZIP or TAR format, etc.
 How to choose between iPhone 15 and iPhone 15 Pro? Nine major differences at once
Sep 14, 2023 am 08:01 AM
How to choose between iPhone 15 and iPhone 15 Pro? Nine major differences at once
Sep 14, 2023 am 08:01 AM
iPhone15 and iPhone15Pro were officially released today. However, as high-end models, the Pro series not only has a higher price, but also has many exclusive features. Consumers must recognize the differences before buying, so as not to discover some problems after buying iPhone15. The function is only available in the Pro series. Although the monitors are equipped with the same display panel, the ProMotion automatic adaptive update frequency technology and the always-on display function are still exclusive to the Pro series. The rest of the iPhone 15 and iPhone 15 Pro series are the same in terms of resolution, contrast, peak brightness, etc. Action button The action button is currently an exclusive design for the iPhone 15 Pro series, allowing users to personalize it.
 How to display the source code of PHP code in the browser without being interpreted and executed?
Mar 11, 2024 am 10:54 AM
How to display the source code of PHP code in the browser without being interpreted and executed?
Mar 11, 2024 am 10:54 AM
How to display the source code of PHP code in the browser without being interpreted and executed? PHP is a server-side scripting language commonly used to develop dynamic web pages. When a PHP file is requested on the server, the server interprets and executes the PHP code in it and sends the final HTML content to the browser for display. However, sometimes we want to display the source code of the PHP file directly in the browser instead of being executed. This article will introduce how to display the source code of PHP code in the browser without being interpreted and executed. In PHP, you can use
 Can vue display source code?
Jan 05, 2023 pm 03:17 PM
Can vue display source code?
Jan 05, 2023 pm 03:17 PM
Vue can display the source code. The method for viewing the source code in Vue is: 1. Obtain Vue through "git clone https://github.com/vuejs/vue.git"; 2. Install dependencies through "npm i"; 3. Through " npm i -g rollup" to install rollup; 4. Modify the dev script; 5. Debug the source code.
 Website to view source code online
Jan 10, 2024 pm 03:31 PM
Website to view source code online
Jan 10, 2024 pm 03:31 PM
You can use the browser's developer tools to view the source code of the website. In the Google Chrome browser: 1. Open the Chrome browser and visit the website where you want to view the source code; 2. Right-click anywhere on the web page and select "Inspect" or press the shortcut key Ctrl + Shift + I to open the developer tools; 3. In the top menu bar of the developer tools, select the "Elements" tab; 4. Just see the HTML and CSS code of the website.
