
TypeScript Guide
TypeScript is the recommended scripting language for angularjs2. It was first released by Microsoft in 2012.
1. From the perspective of the specifications followed:
Javascript follows the ECMA5 specification, and TypeScript is a syntactic implementation of ECMA6.
2. Functionally speaking:
TypeScript provides classes, modules and interfaces to help build components, making it easier to write object-oriented programs, so it is called a better typescript.
3. In terms of support:
All browsers support ES5 and earlier javascript, but no browser supports typescript, so compilation is required. In addition, typescript supports all javascript syntax.
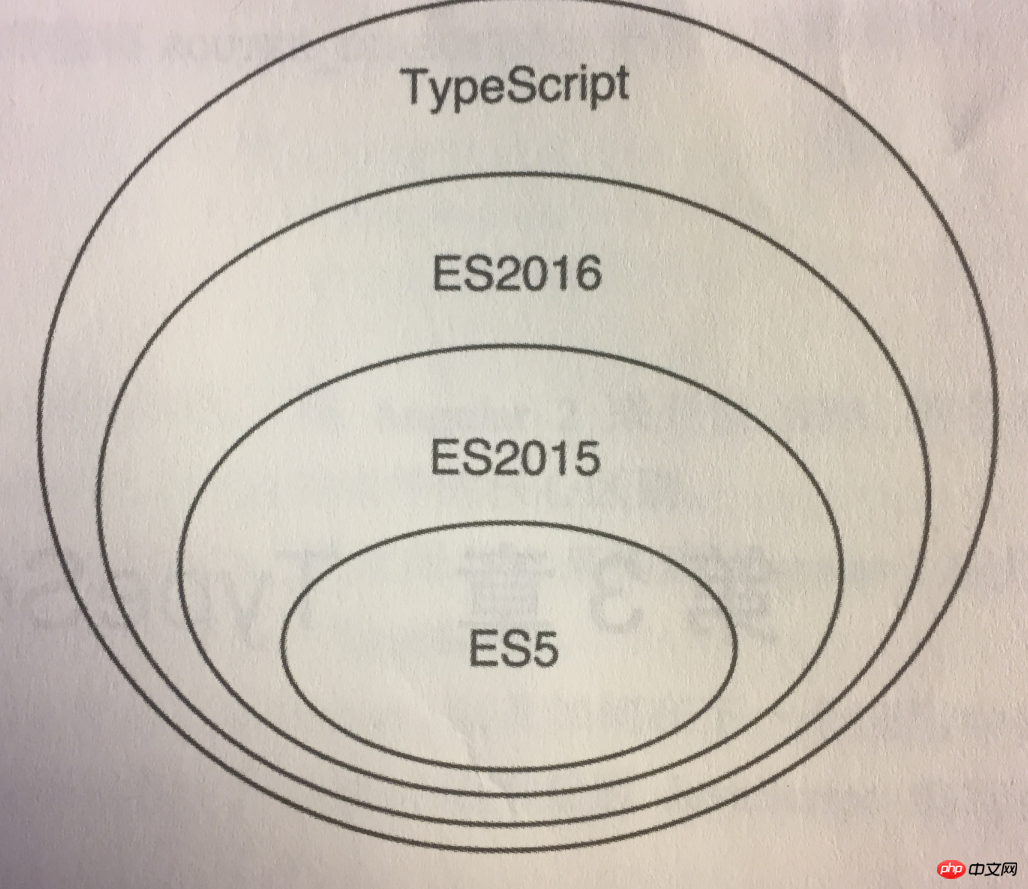
The photo shows the relationship between ES5, ES2015, ES2016 and typescript.
(1) npm installation
npm install -g typescript@1.8 全局安装了1.8版本的typescript编译器和tsc程序,并且添加到环境变量中。为了确认正常,打印-v命令。
$ npm -v //首先看一下npm是不是新版本$ npm install -g typescript@1.8. //全局安装typescript$ tsc -v
Display typescript version is:

(2) Run the first ts program.
The first way.
First enter in the 1.hello.ts program:
console.log("hello world!")Then execute the command:
$ tsc 1.hello.ts //把ts文件转换为等价的hello.js
Finally run node to execute the js file.
$ node 1.hello.js //打印出hello world。成功!
The second way.
First install typescript and ts-node.
$ npm install typescript@1.8 -g //装好ts$ npm install -g ts-node //装ts-node模块,选项是-g哦。
Then run the command execution file.
$ ts-node 1.hello.ts //打印hello world,成功!
ES2015 and ES2016 have relatively big changes.
(1) Arrow function of ES2015
Origin: JavaScript has the characteristics of first-level functions, that is to say, functions can be passed as parameters. It is a good usage but too verbose, so ES2015 provides arrow functions, which is more concise.
ts Example 1:
var even=[3,1,56,7].filter(el=>!(el%2));//对数组调用过滤器filter函数,!(el%2)只有偶数的取模操作为0,那么整体就是true,所以el获取的是偶数console.log(even);//打印56咯。
By running the ts-node command, the screen display result is:

ts Example 2:
var result=[1,2,3]
    .reduce((total,current)=>total+current,0);//reduce对每个数组元素比如1、2、3调用回调函数,初始值为0。//回调函数的参数是total和current,total是上一次回调函数的值,第一次就为初始值0.// current是当前数组元素的值。返回值是total+current。//那么就清晰了,第一个total为0,当前元素是1,返回的0+1.console.log(result);
By running the ts-node command, the screen display result is:

ts Example 3:
var data=[
    {price:10,total:70},
    {price:94,total:340},
    {price:14,total:34}
];var sorted=data.sort((a,b)=>{//a、b为依次遍历的数组元素//这里的对象是函数体var diff=a.price-b.price;if(diff!==0){return diff;
    }return a.total-b.total;
})
console.log(sorted);By running the ts-node command (compile), the screen displays the correct sorting result:

ts Example 4:
function MyComponent(){this.age=42;
    console.log(this);
    setTimeout(()=>{//箭头函数的特性,它的执行上下文指向外层的代码,即组件实例的this对象this.age+=1;
        console.log(this.age);
},100);//等待100ms,age加1等于43,并打印出来}new MyComponent();By compiling, the screen displays :

(2) Classes in ES2015 and ES2016
First of all, let me explain that ES6 is ES2015. ECMAScript 6 (hereinafter referred to as ES6) is the next generation standard of the JavaScript language. Because the current version of ES6 was released in 2015, it is also called ECMAScript 2015.
Then ECMAScript 2016 is ES7.
ES6 classes still use constructors and prototype-based inheritance, but the syntax is more convenient and concise.
The following is the syntax for defining a class in ES2016:
class Human{
    static totalPeople=0;
    _name;//ES2016的属性定义语法    constructor(name){this._name=name;
        Human.totalPeople+=1;
    }
    get name(){return this._name;
    }
    set name(val){this._name=val;
    }//name属性的get和set方法    talk(){return "Hi,I'm"+this.name;
    }
}
class Developer extends Human{
    _languages;//ES2016的属性语法    constructor(name,languages){
        super(name);this._languages=languages;
    }
    get languages(){return this._languages;
    }
    talk(){return super.talk()+" And I Know "+this.languages.join('.');

    }
}var human=new Human("foobar");var dev=new Developer("bar",["javascript"]);
console.log(dev.talk());喜欢!除了类的定义体是对象外,属性和方法的书写和java很像,我喜欢的方式。
通过编译,屏幕显示结果为:

(3)定义块级作用域中可见的变量
java和c++是块级作用域。
只列举代码,表现为2点,第一个是特定代码块的变量只能代码块内部可见,第二,嵌套在内部的代码块中也可见。
public class Demo{// 属性块,在类初始化属性时候运行    {int j = 2;// 块级变量    }public void test1() {int j = 3;  // 方法级变量if(j == 3) {//j变量在代码嵌套的内部if语句中可见int k = 5;  // 块级变量        }
}javascript是函数作用域。
var fns=[];for(var i=0;i<5;i+=1){
    fns.push(function(){
        console.log(i);
    })
}
fns.forEach(fn=>fn());打印结果,很奇怪。
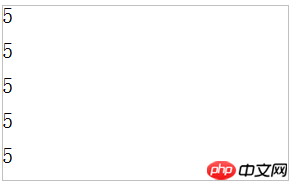
ES6代码:
var fns=[];for(let i=0;i<5;i+=1){
    fns.push(function(){
        console.log(i);
    })
}
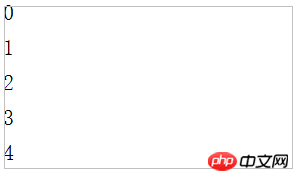
fns.forEach(fn=>fn());打印结果:
(4)使用ES2016装饰器进行元编程。
装饰器是ES2016的一个提案,它的依据是“在设计阶段可以对类和属性进行注释和修改”。在angular2很常用,可用来定义组件、指令以及管道,并且还能配合依赖注入机制来使用。
首先,装饰器能干吗。
装饰器典型的用法是把方法和属性标记为过期,另一个应用场景是声明式语法,从而实现面向切面的编程。其实呢,装饰器只是一个语法糖而已。装饰器目前并没有得到真正的使用。
Experimental support for decorators is a feature that is subject to change in a future release.
//编写了Person类,它只有一个getter,名字为kidCountclass Person{//kidCount有一个装饰器nonenumerable    @nonenumerable
    get kidCount(){return 42;
    }
}//装饰器函数接收3个参数,最后返回descriptor属性。function nonenumerable(target,name,descriptor){
    descriptor.enumerable=false;//可枚举性return descriptor;
}var person=new Person();for(let prop in person){
    console.log(prop);
}对应的ES5语法类似于:
descriptor=nonenumerable(Person.prototype,'kidCount',descriptor);//descriptorObject.defineProperty(Person.prototype,'kidCount',descriptor);
接下来,介绍angular 2装饰器的用法。
"app""./app.html""/",component:Home,name:'home'"/",component:About,name:'about'
如果装饰器需要接收参数,那么就定义为接收参数的函数,然后由函数返回真正的装饰器。
(5)使用ES2015编写模块化的代码
angular 1.x引入了一套模块系统,不过并不支持懒加载特性。angular 2种充分利用了ES2015提供的模块系统。ES2015提供了声明式API,以及使用模块加载器的命令式API。
语法分为export和import两个方面。
第一,看一个简单的DEMO:
math.ts:
export function square(x){return Math.pow(x,2);
}
export function log(x){return Math.log(x);
}
export const PI=Math.PI;math2.ts,更简洁的写法而已:
function square(x){return Math.pow(x,2);
}function log(x){return Math.log(x);
}
const PI=Math.PI;
export {square,log,PI}app.ts调用,要编译的是app.ts哦:
import {square,log} from "./math";
console.log(square(2));
console.log(log(100));屏幕显示效果:

第二,ES2015模块化语法带有隐式的异步行为。
比如说,
A模块依赖于B、C模块。当用户请求A模块,JS模块加载器会先加载B和C模块,才能调用A模块。这里B和C模块都是异步加载的。
第三,典型的应用场景会给导出的内容起一个名字。
使用别名导入整个模块的DEMO:
import * as math from "./math";//as语法咯console.log(math.square(2));
console.log(math.log(100));
第四,默认导出。
模块导出使用了export default语法,是一种带名字的导出。
基本的默认导出DEMO:
math3.ts:
export default function cube(x){return Math.pow(x,3);//默认导出的名字是cube}
export function square(x){return Math.pow(x,2);
}app3.ts:
import cube from "./math3";//等同于import {default as cube} from "./math3console.log(cube(3));显示结果正常:

默认导出混合其他导出的DEMO:
math3.ts:
export default function cube(x){return Math.pow(x,3);//默认导出的名字是cube}
export function square(x){return Math.pow(x,2);
}import cube,{square} from "./math3";
console.log(square(2));
console.log(cube(3));显示结果OK:

(6)ES2015的模块加载器
通过编程的方式加载app模块执行main函数,使用System对象的import方法就好了。现在代码因为缺乏配置项,所以还运行不起来。
app.ts:
export function main(){
    console.log(2);
}init.js
System.import("./app")
.then(app=>{
    app.main();
})
.catch(error=>{
   console.log("致命的错误");
});有了静态类型,那么IDE开发环境除了避免输入错误的语法高亮,还提供精确静态分析的建议。很棒。
typescript的所有类型包含几类:
● 原生类型
● 组合类型
● Object类型
● 泛型
● any类型
(1)使用显式类型定义
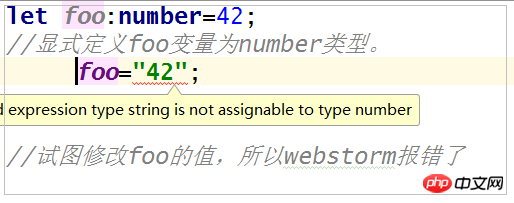
除了webstorm报类型(type)错误,运行编译命令,typescript 也报错 Type 'string' is not assignable to type 'number' 。那么就是说,一旦foo设置了类型,就不能赋值为其他类型了。
(2)any类型
any类型是所有其他类型的父类,代表可以拥有任何类型的值,类似于动态类型,一方面不会报错,另一方面则放弃了typescript的优点了。
let foo:any;
foo={};
foo="bar";
foo+=24;
console.log(foo);//结果为"bar 24"。(3)原生类型
就是javascript比较熟悉的Number、String、Boolean、Null、以及Undefined。而Enum是用户自定义的原生类型,它是Number的子类。含义是枚举用户自定义的类型,由一系列有名称的值也就是元素构成。
定义enum如下:
enum STATES{
    CONNECTING,
    WAITING,
    CONNECTED
}//定义枚举类型if(this.state==STATES.CONNECTING){//通过点语法引入}(4)Object类型
首先,讲更加通用的Array类型,它是Object的子类。
Typescript的数组,要求元素类型相同。都可以使用js的各种数组方法,比如push、join、splice等,也可以使用方括号运算符对数组元素进行访问。
数值型数组DEMO:
let primes:number[]=[];
primes.push(2);
primes.push(3);
console.log(primes);
any型数组:
let randomItems:any[]=[];
randomItems.push(1);
randomItems.push("foo");
randomItems.push("{}");
console.log(randomItems);屏幕结果为

第二,说Function类型,也是Object的子类哦。
javascript有两种方式创建新函数:
//函数表达式var isPrime=function(n){

}//函数声明function isPrime(n){

}//或者,使用箭头函数var isPrime=n=>{ //函数体}Typescript增加的是参数和返回值的类型。
函数表达式:
let isPrime:(n:number)=>boolean=n=>{//整个函数赋给变量isPrime,参数是number类型的n,返回值是boolean类型的n,函数体在{}里面}函数声明:
function isPrime(n:number):boolean{//参数为number类型,返回值为boolean类型}对象字面量的定义写法:
let person={
     _name:null,
     setName(name:string):void{       //参数是string类型,返回值是void   this._name=name;
     }
}(5)定义类
typescript定义类,属性的声明式强类型的。
class-basic.ts:
class Human {
    static totalPeople=0;
    _name:string;//强类型的哦    constructor(name){      this._name=name;
      Human.totalPeople+=1;
    };
    get name(){return this.name;
    }
    set name(val){this._name=val;
    }
    talk(){return "HI,I'am"+this._name;
    }
}
let human=new Human("foo");
console.log(human._name);打印结果为

成功!
(6)访问修饰符
有3个。更好的实现封装和更优雅的接口。
●public。public的属性和方法在任何地方可以访问。
●private。private的属性和方法只能在类定义内部进行访问。
●protected。protected的属性和方法可以类定义内部访问,也可以从子类访问。
//typescript实现class Human{
    static totalPeople=0;
    constructor(protected name:string,private age:number){//定義了一個protected型的屬性,名為name,類型為string//age屬性。好處是避免显示式的赋值操作Human.totalPeople+=1;
    }
    talk(){return "Hi,I'm"+this.name;
    }
}
class Developer extends Human{
    constructor(name:string,private languages:string[],age:number){//显式使用访问修饰符,或者定义接收的参数类型,都可以混合使用的。        super(name,age);
    }
    talk(){return super.talk()+" And I Know "+this.languages.join('.');

    }
}//创建developer类的一个新实例let Dev=new Developer("foo",["javascript","Go"],42);//dev.languages=["java"];这行代码会报一个私有属性的错误let human=new Human("foo",42);//human.age=42;由于私有属性,所以报错//human.name="bar",会报一个protected错误。它只能在类类内部或者子类中访问(6)接口
接口定义了一组对象共同的属性和方法,称作接口签名。要实现接口,那么实现定义接口规定的所有属性和方法。
关键字就2个,interface和implements。
interface Accountable1{
    goIncome():number;
    accountNumber:string
}
class Value implements Accountable1{
    constructor( public accountNumber:string){this.accountNumber=accountNumber;
    }
    goIncome():number{return 100;
    }
}var extra=new Value("余额");
console.log(extra.accountNumber);打印为

接口实现,成功!
接口继承
接口之间可以互相继承。接口继承另外一个接口,使用extends关键字。
interface-extends.ts:
interface Accountable2{
    accountNumber:string;
    getIncome():number;
}
interface Individual extends Accountable2{
    ssn:string;
}实现多个接口:
interface People{
    age:number;
    name:string;
}
interface Accountable{
    accountNumber:string;
    goIncome():number
}
class Person implements People,Accountable{  //实现多个接口,用逗号分隔    age:number;
    name:string;
    accountNumber:string;
    constructor(age:number,name:string,accountNumber:string){

    }
    goIncome():number{return 10;
    }
}var person=new Person(10,"100","1000"); 可以写类似java的泛型代码,好精彩!使用“
(1)使用泛型类
定义一组类型的class。
class Nodes<T> {
    value:T;
    left:Nodes<T>;
    right:Nodes<T>;
}
let numberNode=new Nodes<number>();

let stringNode=new Nodes<string>();

numberNode.right=new Nodes<number>();//类型匹配numberNode.value=42;//类型匹配//numberNode.value="42";报错,类型不匹配//numberNode.left=stringNode;报错,类型不匹配(2)使用泛型函数
定义一组类型的函数。
function identify<T>(arg:T){return arg;
}
interface Comparable{
    compare(a:Comparable):number;
}function sort<I extends Comparable>(arr:Comparable[]){//}(3)多重泛型
class Pair<K,V>{
    key:K;
    value:V;
}
let pair=new Pair<string,number>()
pair.key="foo";
pair.value=42;好精彩!
typescript可以猜测代码中的静态类型。好智能哦,所以可以用来省略一些代码。
let answer=42;
answer="42";//会提示错误,因为一开始的赋值,typescript已经把它当做number类型了。let answer;
answer=42;
answer="42";//这个时候不会报错,因为第一次声明时,typescript给到的静态类型是any。
(1)最常见的类型
let x=["42",42];//x的类型推断为any[]数组。
let x=[42.null,32];//typescript的类型推断为number[]。
(2)与上下文有关的类型推断

这里可以看到e并没有规定类型,可是typescript就根据上下文推断它为MouseEvent鼠标事件。
尽管静态类型很酷,但是我们使用的大部分前端类库都是基于javascript构建的,都是动态类型。而typescript提供了额外的类型定义,来给编译器提供提示。
(1)使用预定义的外部类型定义
step1:安装typings工具
npm install -g typings
于是就安装好了typings目录,tsconfig.json、typings.json中,内容为:
//tsconfig.json{  "compilerOptions": {"module": "commonjs","target": "es5","sourceMap": true
  },  "exclude": ["node_modules"
  ]
}//typings.json{ "dependencies": {}
}step2:创建基础配置
typings init
step3:搜索
$ typings search module
step4:安装is-builtin-module
$ typings install is-builtin-module --save
这个时候,typings.json的内容变为
{  "dependencies": {"is-builtin-module": "registry:npm/is-builtin-module#1.0.0+20161031191623"
  }
}typings目录变为
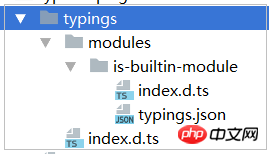
(2)自定义外部类型
step1:定义好类库的接口。
define-external-type.ts:
interface LibraryInterface{
    selectElements(selector:string):HTMLElement[];
    hide(element:HTMLElement):void;
    show(element:HTMLElement):void;
}step2:定义ts.d文件。
interface DOMLibraryInterface{
    selectElements(selector:string):HTMLElement[];
    hide(element:HTMLElement):void;
    show(element:HTMLElement):void;
}
declare var DOM:DOMLibraryInterface;step3:DOM通过reference引入,编译器就会找到对应的外部类型定义了。
///<reference path="dom.d.ts" />var DOM={
    selectElements:function(selector:string):HTMLElement[]{return [];
    },
    hide:function(element:HTMLElement):void {
        element.hidden=true;
    }
};这个时候,会报错。直到完全实现定义的接口为止,如下:
///<reference path="dom.d.ts" />var DOM={
    selectElements:function(selector:string):HTMLElement[]{return [];
    },
    hide:function(element:HTMLElement):void {
        element.hidden=true;
    },
    show:function(element:HTMLElement):void{
        element.hidden=false;
    }
};这样分离出来,就可以把全部的外部类型定义放在同一个文件里,方便管理了。
The above is the detailed content of Typescript guide explained in detail. For more information, please follow other related articles on the PHP Chinese website!


