 Web Front-end
 JS Tutorial
 Detailed explanation of examples of animation transition effects for Vue elements
Detailed explanation of examples of animation transition effects for Vue elements
This article mainly introduces the vue element to achieve animation Transition effect. The editor thinks it is quite good. Now I will share it with you and give it a reference. Let’s follow the editor and take a look.
1 In vue, use the <transition> tag to contain a single sub-element using v-show or v-if Before switching the display and hiding, it will first determine whether there is a corresponding class style that can match the sub-element:
<script src="/public/javascripts/vuejs"></script>
<style>
red {background-color: red; width: 100px; height: 100px;}
redv-leave { margin-top: 50px; }
redv-leave-active { transition: all 3s;}
redv-leave-to { margin-top: 100px; opacity: 0;}
redv-enter { margin-top: 50px; }
redv-enter-active { transition: all 3s;}
redv-enter-to { margin-top: 10px; opacity: 0;}
</style>
<body>
<p id="app">
<transition>
<p class="red" v-show="show"></p>
</transition>
<button v-on:click="change">button</button>
</p>
<script>
new Vue({
el: '#app',
data: {
show: true
},
methods: {
change: function(){
thisshow = !thisshow;
}
}
});
</script>
</script>
</body>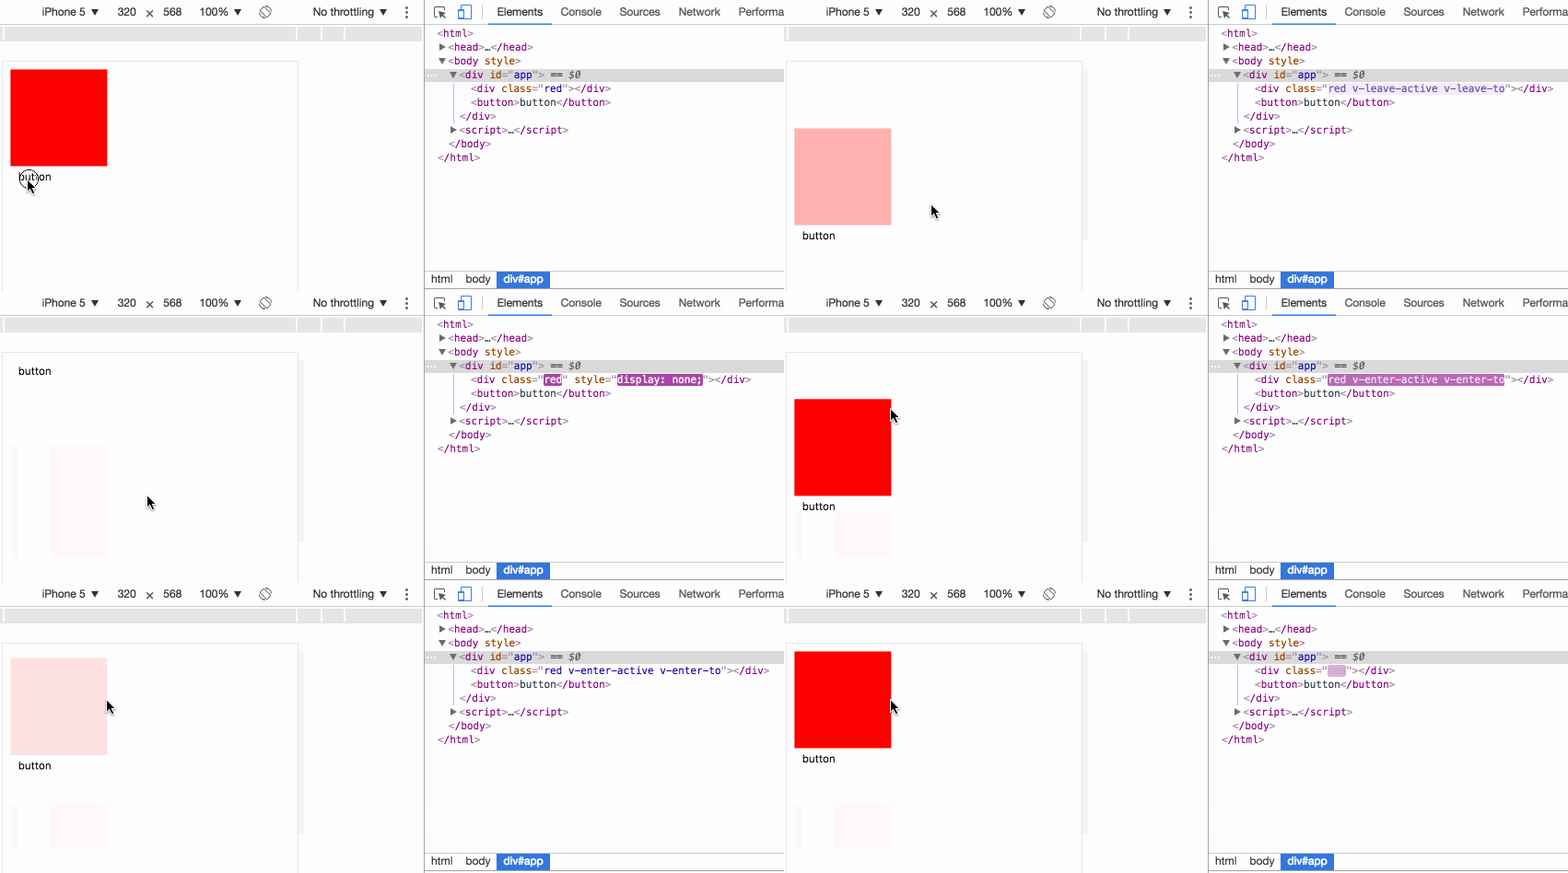
v-leave The current element is ready to be changed from displayed to hidden. It is added to the element before the animation starts. It will be deleted immediately once the animation starts;
v- leave-active: During the animation transition process, the element always has this style. It will be automatically deleted until the end of the animation. It is used to set the transition effect;
v-leave-to During the animation transition process , the element always has this style, and will be automatically deleted until the end of the animation, which is used to set the final effect of the animation;
In the example, when the button is clicked, p will not display immediately: none , instead, v-leave is set first, v-leave is deleted the next moment, and v-leave-active v-leave-to is added at the same time. When the transition time in v-leave-active is completed, v-leave-active is deleted v-leave-to, and add display: none.
v-enter The current element is ready to change from hidden to displayed. It is added to the element before the animation starts. It will be deleted immediately once the animation starts;
v-enter-active During the animation transition process, the element always has this style. It will be automatically deleted until the end of the animation. It is used to set the transition effect;
v-enter-to During the animation transition process, the element always has this style, and is automatically deleted until the end of the animation. It is used to set the final effect of the animation;
In the example, when the button is clicked, p immediately clears the display : none, then set v-enter, delete v-enter the next moment, and add v-enter-active v-enter-to. When the transition time in v-enter-active is completed, delete v-enter-active v-enter-to.
2 Custom animation class name:
<script src="/public/javascripts/vuejs"></script>
<style>
red {background-color: red; width: 100px; height: 100px;}
redslide-leave { margin-top: 50px; }
redslide-leave-active { transition: all 3s;}
redslide-leave-to { margin-top: 100px; opacity: 0;}
redslide-enter { margin-top: 50px; }
redslide-enter-active { transition: all 3s;}
redslide-enter-to { margin-top: 10px; opacity: 0;}
</style>
<body>
<p id="app">
<transition name="slide">
<p class="red" v-show="show"></p>
</transition>
<button v-on:click="change">button</button>
</p>
<script>
new Vue({
el: '#app',
data: {
show: true
},
methods: {
change: function(){
thisshow = !thisshow;
}
}
});
</script>This effect is exactly the same as the previous example, transition elements can use name attribute to specify the class name prefix used to replace the v- field, for example, name="slide" in the example makes the original v-enter became slide-enter.
3 When transition and animation are used at the same time
<script src="/public/javascripts/vuejs"></script>
<style>
@keyframes aslide {
0% {
margin-left: 10px;
}
100% {
margin-left: 100px;
}
}
red {background-color: red; width: 100px; height: 100px;}
blue {background-color: blue; width: 100px; height: 100px;}
v-leave { margin-top: 50px; }
v-leave-active { transition: all 3s; animation: aslide 5s;}
v-leave-to { margin-top: 100px;}
</style>
<body>
<p id="app">
<transition type="transition" >
<p class="red" v-show="show"></p>
</transition>
<br>
<transition type="animation" >
<p class="blue" v-show="show"></p>
</transition>
<button v-on:click="change">button</button>
</p>
<script>
new Vue({
el: '#app',
data: {
show: true
},
methods: {
change: function(){
thisshow = !thisshow;
}
}
});
</script>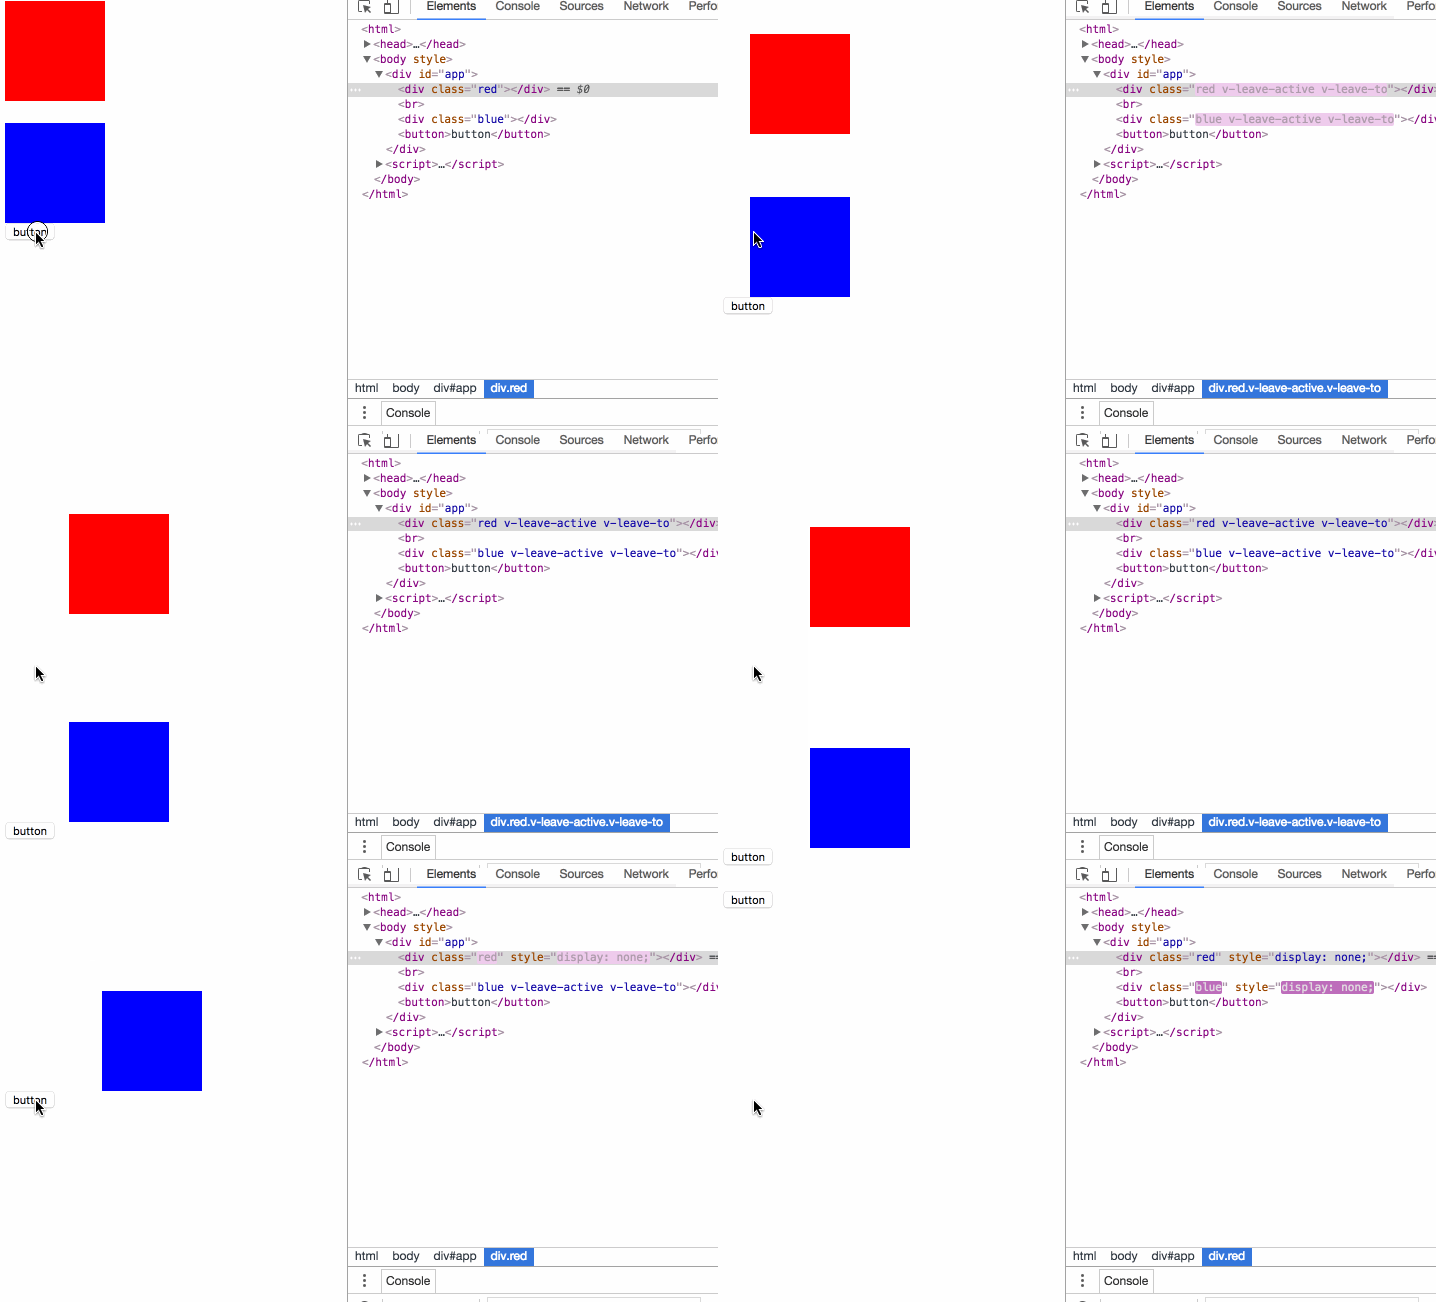
In the case, the animation specifies both transition and animation animation, and the transition element The type attribute can specify which animation time is used as the end time of the element. If the animation monitoring method is not specified, the longest time will prevail.
4 javascript monitoring animation
<script src="/public/javascripts/vuejs"></script>
<style>
red {background-color: red; width: 100px; height: 100px;}
v-leave { margin-top: 50px; }
v-leave-active { transition: all 3s;}
v-leave-to { margin-top: 100px;}
</style>
<body>
<p id="app">
<transition
v-on:before-enter="beforeEnter"
v-on:enter="enter"
v-on:after-enter="afterEnter"
v-on:enter-cancelled="enterCancelled"
v-on:before-leave="beforeLeave"
v-on:leave="leave"
v-on:after-leave="afterLeave"
v-on:leave-cancelled="leaveCancelled"
>
<p class="red" v-show="show"></p>
</transition>
<button v-on:click="change">button</button>
</p>
<script>
new Vue({
el: '#app',
data: {
show: true
},
methods: {
change: function() {
thisshow = !thisshow;
consolelog('-----------click---------');
},
beforeEnter: function (el) {
consolelog('beforeEnter:');
},
enter: function (el, done) {
consolelog('enter:');
// done()
},
afterEnter: function (el) {
consolelog('afterEnter:');
},
enterCancelled: function (el) {
consolelog('enterCancelled:');
},
beforeLeave: function (el) {
consolelog('beforeLeave:');
},
leave: function (el, done) {
consolelog('leave:');
done()
},
afterLeave: function (el) {
consolelog('afterLeave:');
},
leaveCancelled: function (el) {
consolelog('leaveCancelled:');
}
}
});
</script>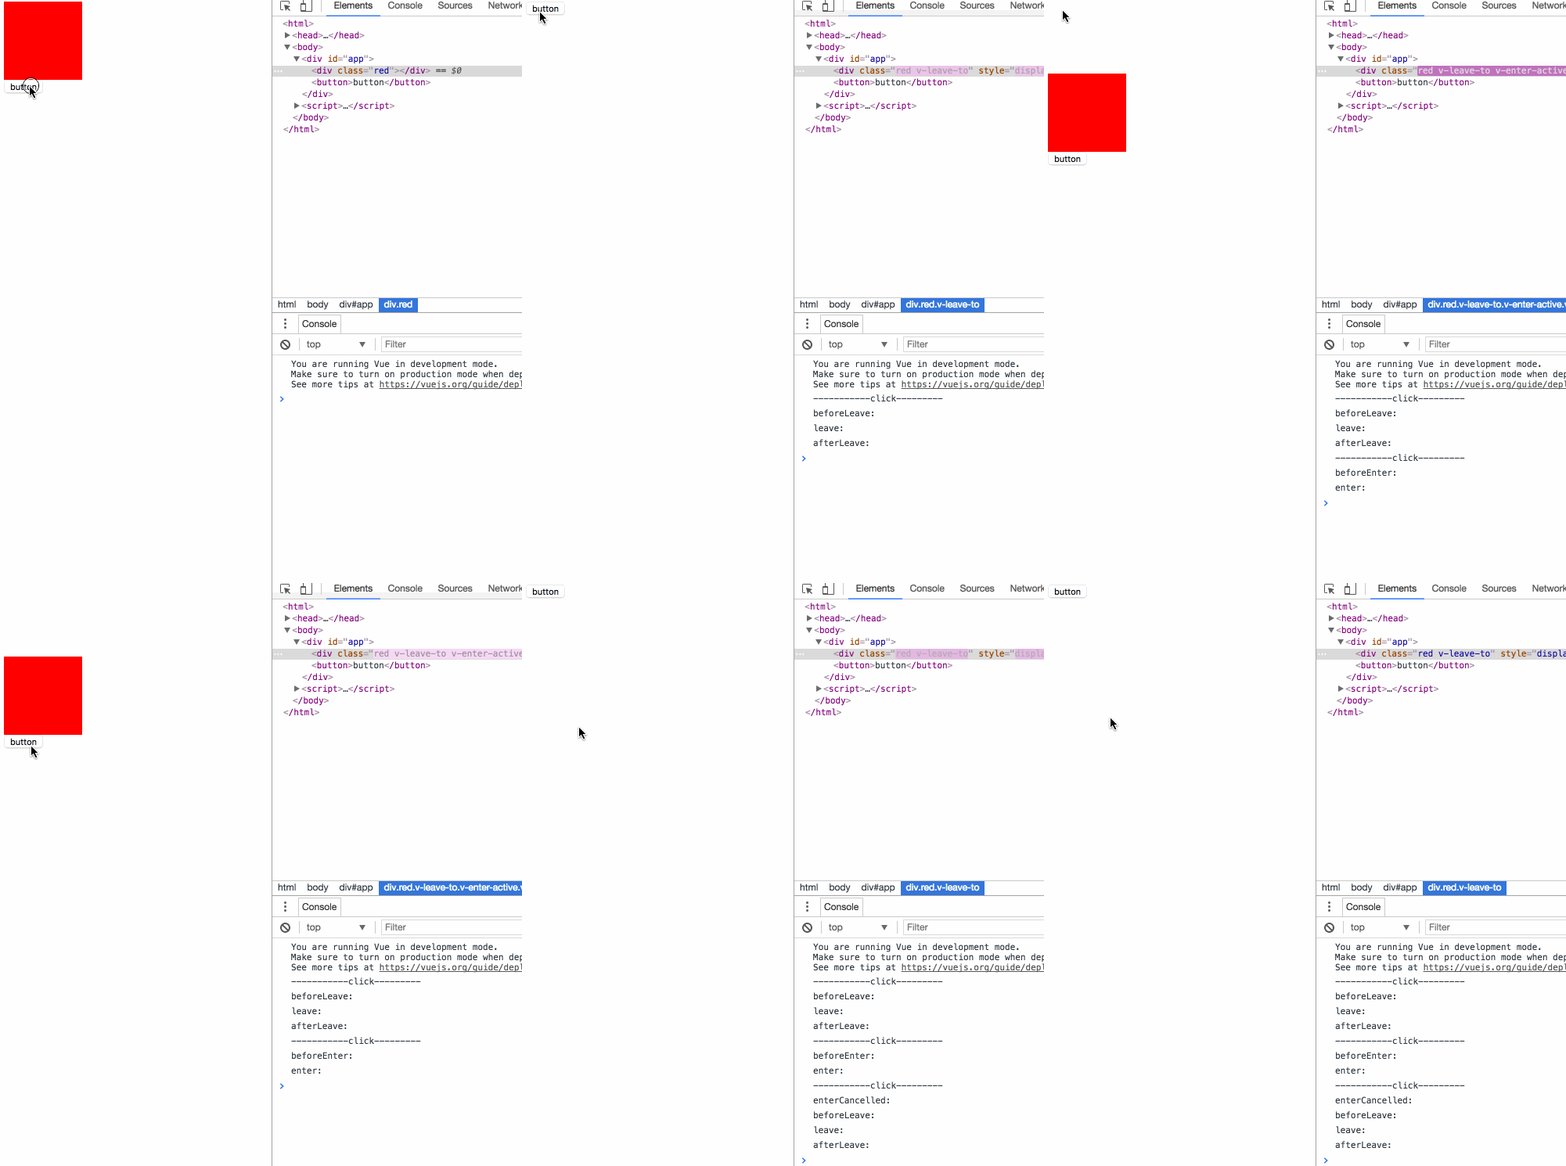
Once the js event is used, the original css animation transition effect will Invalid, the official recommendation is to set v-bind:css="false" on
to avoid the need for Vue's internal mechanism to monitor css animation event callbacks , improve performance.Enter and leave events need to manually call the done method, otherwise the event will never call the subsequent after event. If the after event is not called but other events start, it will be regarded as animation. Was canceled.
5 Animation during page initialization:
<script src="/public/javascripts/vuejs"></script>
<style>
@keyframes aslide {
0% {
margin-left: 10px;
}
100% {
margin-left: 100px;
}
}
red {background-color: red; width: 100px; height: 100px;}
apper { margin-top: 50px; }
apper-active { margin-top: 100px; animation: aslide 4s; transition: all 3s;}
</style>
<body>
<p id="app">
<transition
appear
appear-class="apper"
appear-active-class="apper-active"
v-on:before-appear="customBeforeAppearHook"
v-on:appear="customAppearHook"
v-on:after-appear="customAfterAppearHook" >
<p class="red" ></p>
</transition>
<button v-on:click="change">button</button>
</p>
<script>
new Vue({
el: '#app',
data: {
show: true
},
methods: {
change: function() {
thisshow = !thisshow;
consolelog('-----------click---------');
},
customBeforeAppearHook: function (el) {
consolelog('customBeforeAppearHook:');
},
customAppearHook: function (el) {
consolelog('customAppearHook:');
// done()
},
customAfterAppearHook: function (el) {
consolelog('customAfterAppearHook:');
}
}
});
</script>
The appear attribute indicates that the initialization animation is turned on, the appear-class attribute specifies the style before initialization, and the appear-active-class attribute specifies the style of the initialization animation process;
transition animation cannot be started in the initialization animation. Effective, while animation animation can;
before-appear appear after-appear is an event callback, it is quite clear to see the example.
6 Key of animation element:
<script src="/public/javascripts/vuejs"></script>
<style>
v-enter-active { transition: all 15s;}
v-enter-to { margin-top: 100px;}
v-leave-active { transition: all 15s;}
v-leave-to { margin-top: 10px;}
</style>
<body>
<p id="app">
<p class="show1">
<transition>
<button v-if="show1" @click="show1 = false">on</button>
<button v-else @click="show1 = true">off</button>
</transition>
</p>
<p class="show2">
<transition>
<button v-if="show2" key="on" @click="show2 = false">on</button>
<button v-else key="off" @click="show2 = true">off</button>
</transition>
</p>
</p>
<script>
var app = new Vue({
el: '#app',
data: {
show1: true,
show2: true
}
});
</script>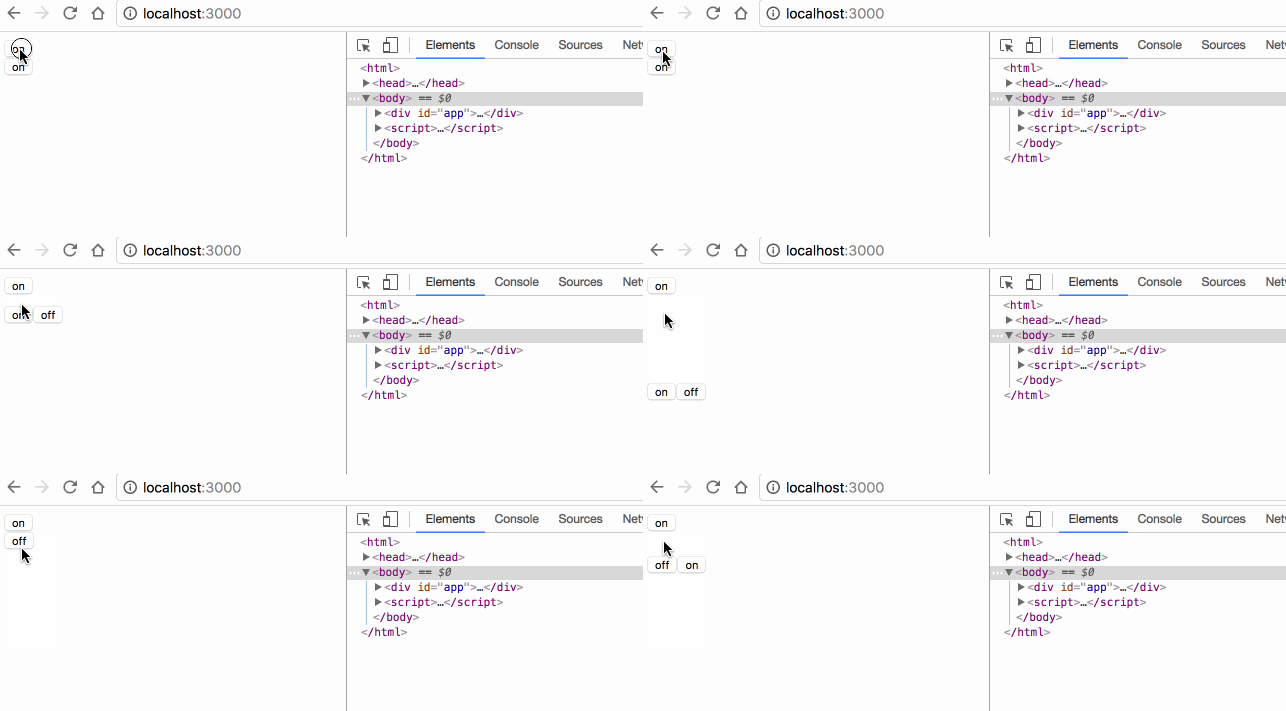
#show1 Why is there no animation effect? Because vue will recognize the two buttons in the switch as the same element, but only modify the different contents in the buttons, so the DOM element switching does not actually occur on the page;
If you want vue To clearly identify that these are two different button elements, specify different key attribute values for each element.
7 Animation mode for element switching:
<script src="/public/javascripts/vuejs"></script>
<style>
v-enter { margin-left: 100px;}
v-enter-active { transition: all 5s;}
v-enter-to { margin-left: 10px;}
v-leave { margin-left: 10px;}
v-leave-active { transition: all 5s;}
v-leave-to { margin-left: 100px;}
</style>
<body>
<p id="app">
<p class="default">
<transition>
<button v-if="show" key="on" @click="show = false">on</button>
<button v-else key="off" @click="show = true">off</button>
</transition>
</p>
<p class="inout">
<transition mode="in-out">
<button v-if="show" key="on" @click="show = false">on</button>
<button v-else key="off" @click="show = true">off</button>
</transition>
</p>
<p class="outin">
<transition mode="out-in">
<button v-if="show" key="on" @click="show = false">on</button>
<button v-else key="off" @click="show = true">off</button>
</transition>
</p>
</p>
<script>
var app = new Vue({
el: '#app',
data: {
show: true
}
});
</script>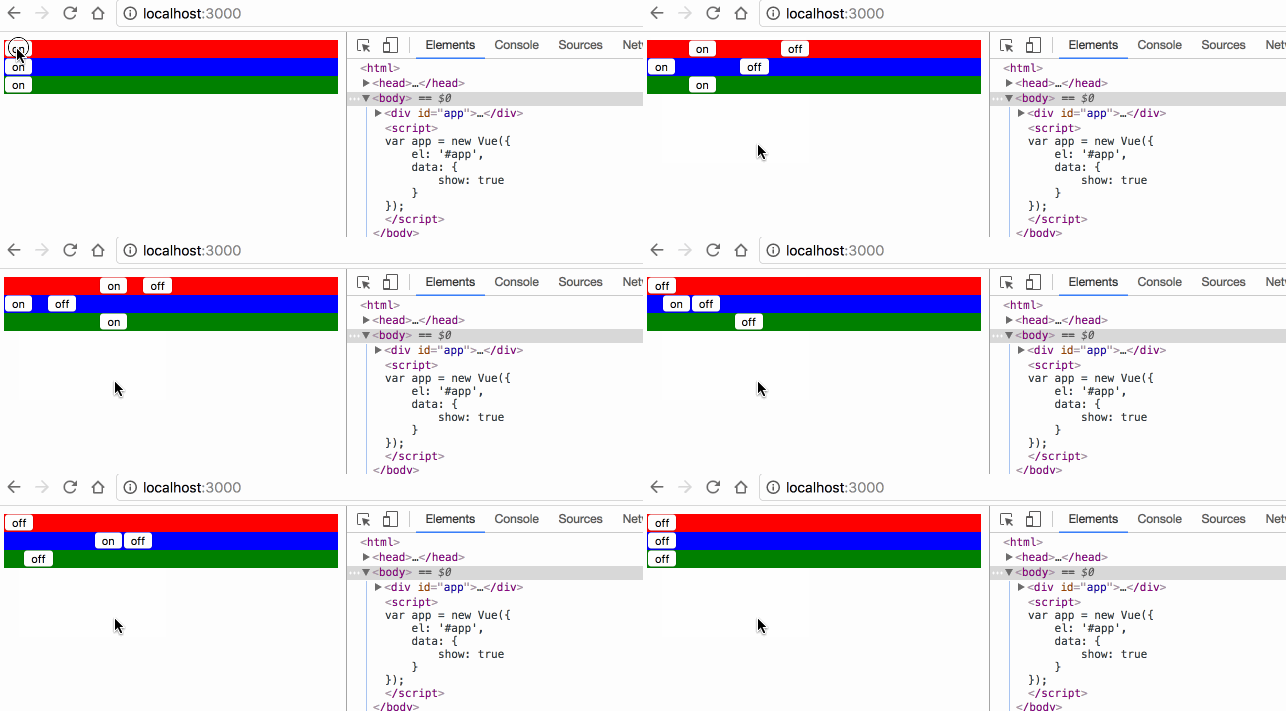
transition 默认是同时执行2个元素的切换动画的,案例中红色的 off 按钮其实是会同时向左移动的,只是因为布局上没有脱离布局流,被 on 按钮顶住,无法移动;
mode="in-out" 可以使切换元素先执行将要显示元素的动画,再执行将要隐藏元素的动画;
mode="out-in" 可以使切换元素先执行将要隐藏元素的动画,再执行将要显示元素的动画;
8 多元素动画:
<script src="/public/javascripts/vuejs"></script>
<style>
v-enter { margin-left: 100px;}
v-enter-active { transition: all 2s;}
v-enter-to { margin-left: 10px;}
</style>
<body>
<p id="app">
<transition-group>
<li v-for="item in items" :key="item">{{item}}</li>
</transition-group>
<transition-group tag="ul">
<li v-for="item in items" :key="item">{{item}}</li>
</transition-group>
<button @click="itemspush(itemslength)">add</button>
</p>
<script>
var app = new Vue({
el: '#app',
data: {
items: [0,1]
}
});
</script>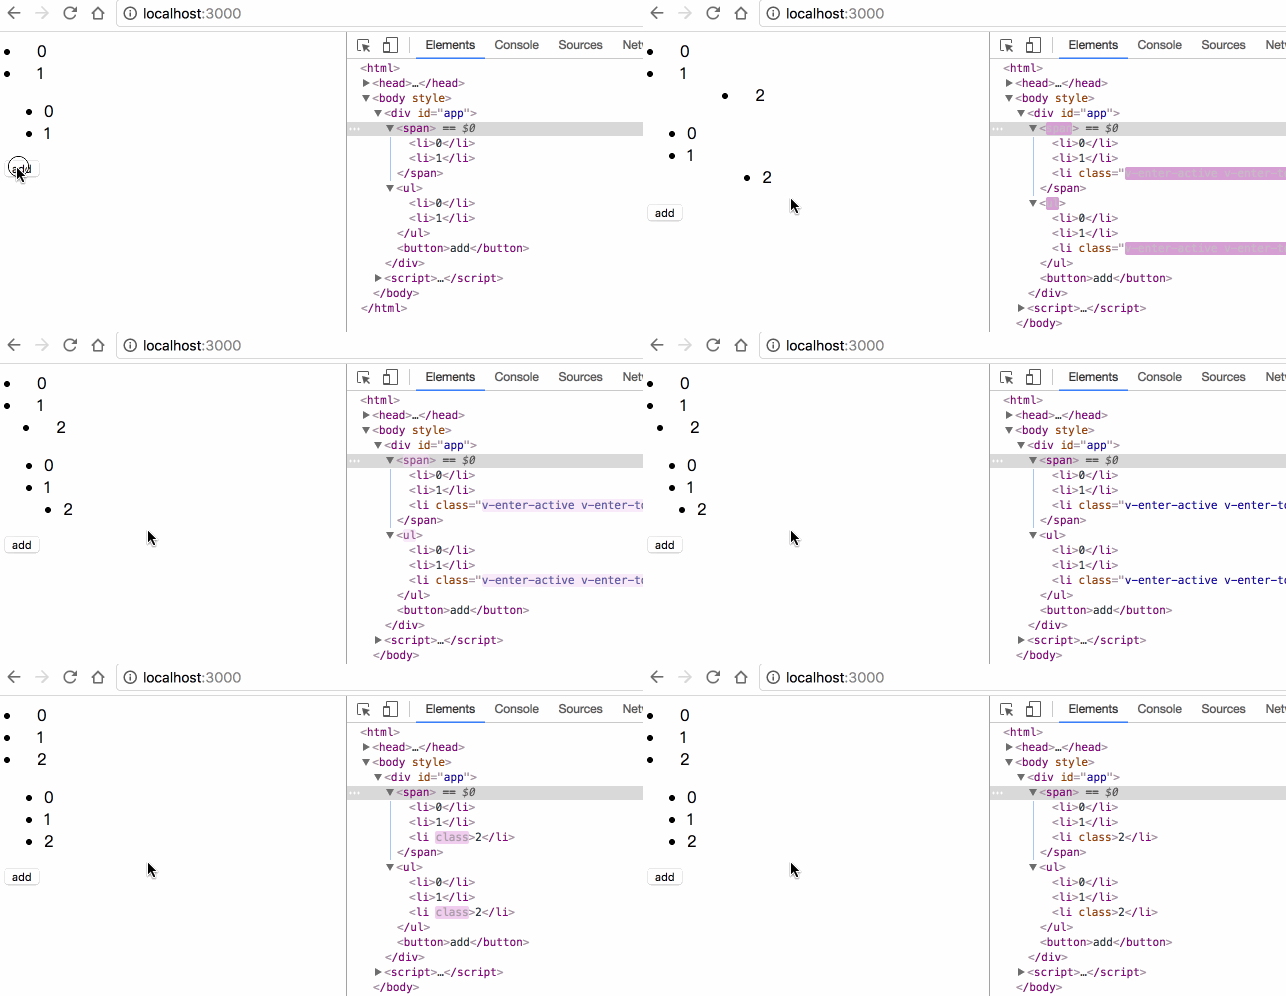
transition 里面只能放置单个元素或使用 v-if v-show 切换的单个元素,要想使用多个元素的动画,必须使用 transition-group;
transition-group 默认会在 DOM 里渲染成 span 标签,可使用 tag="ul" 指定渲染成其他标签;
transition-group 必须为每一个子元素指定 key;
8 多元素的位移动画:
<script src="/public/javascripts/vuejs"></script>
<style>
v-move { transition: all 1s; }
</style>
<body>
<p id="app">
<transition-group tag="ul" >
<li v-for="item in items" :key="item">{{item}}</li>
</transition-group>
<button @click="itemsreverse()">reverse</button>
</p>
<script>
var app = new Vue({
el: '#app',
data: {
items: [0,1,2,3]
}
});
</script>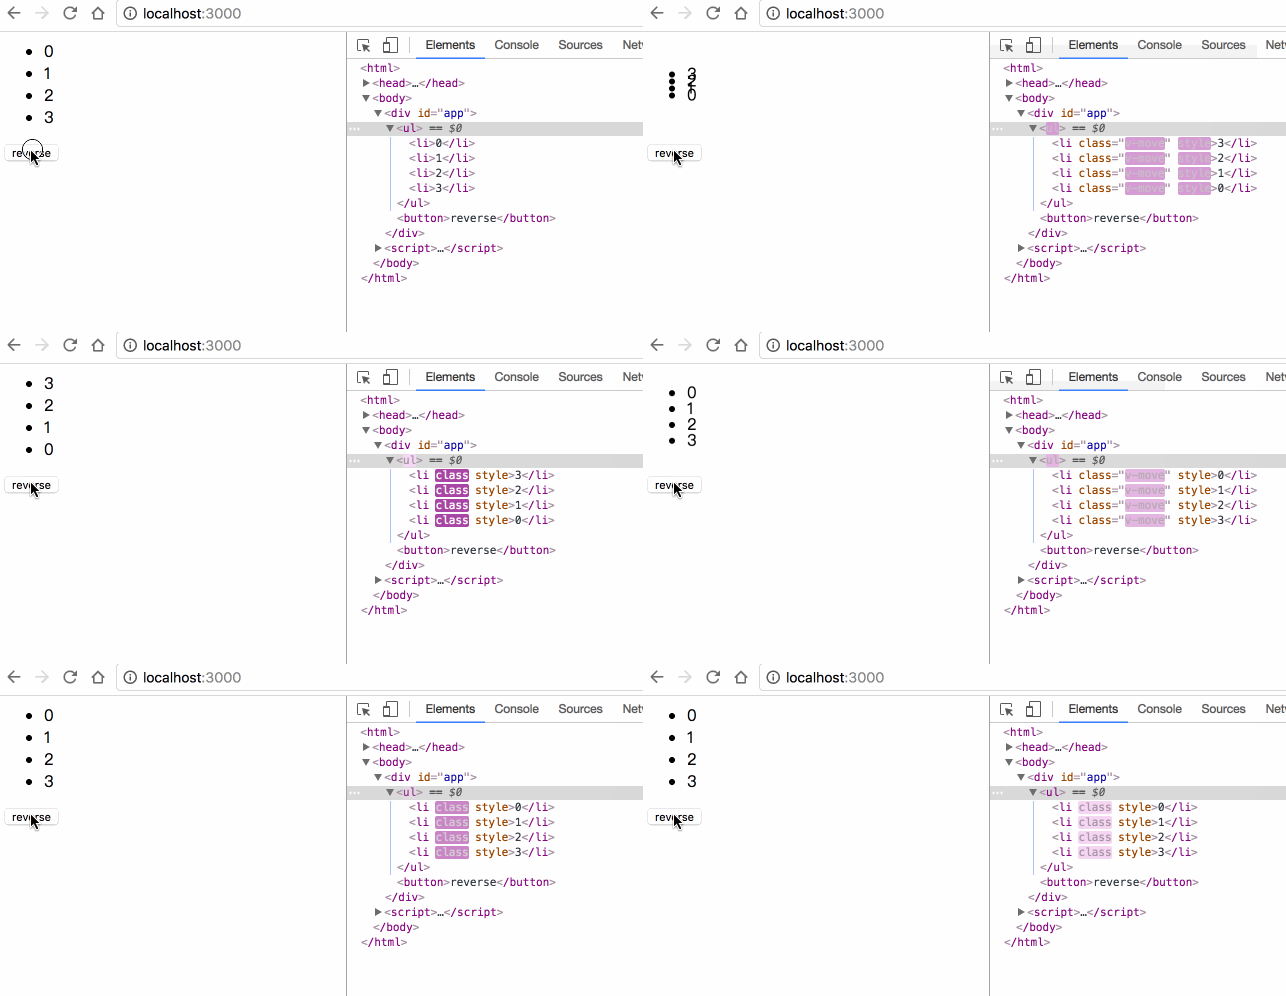
transition-group 允许在每个元素移动时,添加 v-move 的样式,移动完成后自动清除该样式;
transition 的属性, transition-group 都有,包括 name enter leave;
The above is the detailed content of Detailed explanation of examples of animation transition effects for Vue elements. For more information, please follow other related articles on the PHP Chinese website!

Hot AI Tools

Undresser.AI Undress
AI-powered app for creating realistic nude photos

AI Clothes Remover
Online AI tool for removing clothes from photos.

Undress AI Tool
Undress images for free

Clothoff.io
AI clothes remover

Video Face Swap
Swap faces in any video effortlessly with our completely free AI face swap tool!

Hot Article

Hot Tools

Notepad++7.3.1
Easy-to-use and free code editor

SublimeText3 Chinese version
Chinese version, very easy to use

Zend Studio 13.0.1
Powerful PHP integrated development environment

Dreamweaver CS6
Visual web development tools

SublimeText3 Mac version
God-level code editing software (SublimeText3)

Hot Topics
 1386
1386
 52
52
 Users encounter rare glitches: Samsung Watch smartwatches suddenly experience white screen issues
Apr 03, 2024 am 08:13 AM
You may have encountered the problem of green lines appearing on the screen of your smartphone. Even if you have never seen it, you must have seen related pictures on the Internet. So, have you ever encountered a situation where the smart watch screen turns white? On April 2, CNMO learned from foreign media that a Reddit user shared a picture on the social platform, showing the screen of the Samsung Watch series smart watches turning white. The user wrote: "I was charging when I left, and when I came back, it was like this. I tried to restart, but the screen was still like this during the restart process." Samsung Watch smart watch screen turned white. The Reddit user did not specify the smart watch. Specific model. However, judging from the picture, it should be Samsung Watch5. Previously, another Reddit user also reported
 CSS Animation: How to Achieve the Flash Effect of Elements
Nov 21, 2023 am 10:56 AM
CSS animation: How to achieve the flash effect of elements, specific code examples are needed. In web design, animation effects can sometimes bring a good user experience to the page. The glitter effect is a common animation effect that can make elements more eye-catching. The following will introduce how to use CSS to achieve the flash effect of elements. 1. Basic implementation of flash First, we need to use the animation property of CSS to achieve the flash effect. The value of the animation attribute needs to specify the animation name, animation execution time, and animation delay time
![Animation not working in PowerPoint [Fixed]](https://img.php.cn/upload/article/000/887/227/170831232982910.jpg?x-oss-process=image/resize,m_fill,h_207,w_330) Animation not working in PowerPoint [Fixed]
Feb 19, 2024 am 11:12 AM
Animation not working in PowerPoint [Fixed]
Feb 19, 2024 am 11:12 AM
Are you trying to create a presentation but can't add animation? If animations are not working in PowerPoint on your Windows PC, then this article will help you. This is a common problem that many people complain about. For example, animations may stop working during presentations in Microsoft Teams or during screen recordings. In this guide, we will explore various troubleshooting techniques to help you fix animations not working in PowerPoint on Windows. Why aren't my PowerPoint animations working? We have noticed that some possible reasons that may cause the animation in PowerPoint not working issue on Windows are as follows: Due to personal
 CSS transition effect: how to achieve the fade-in and fade-out effect of elements
Nov 21, 2023 am 08:03 AM
CSS transition effect: How to achieve the fade-in and fade-out effect of elements Introduction: In web design, making elements have transition effects is one of the important means to improve user experience. The fade-in-fade-out effect is a common and concise transition effect that can make elements appear from scratch, from shallow to deep. This article will introduce how to use CSS to achieve the fade-in and fade-out effect of elements, and give specific code examples. 1. Use the transition attribute to achieve the fade-in and fade-out effect of the element. The transition attribute of CSS can add elements to the element.
 Kyushu Fengshen Assassin 4S Radiator Review Air-cooled 'Assassin Master' Style
Mar 28, 2024 am 11:11 AM
Speaking of ASSASSIN, I believe players will definitely think of the master assassins in "Assassin's Creed". They are not only skilled, but also have the creed of "devoting themselves to the darkness and serving the light". The ASSASSIN series of flagship air-cooled radiators from the appliance brand DeepCool coincide with each other. Recently, the latest product of this series, ASSASSIN4S, has been launched. "Assassin in Suit, Advanced" brings a new air-cooling experience to advanced players. The appearance is full of details. The Assassin 4S radiator adopts a double tower structure + a single fan built-in design. The outside is covered with a cube-shaped fairing, which has a strong overall sense. It is available in white and black colors to meet different colors. Tie
 How to set up ppt animation to enter first and then exit
Mar 20, 2024 am 09:30 AM
We often use ppt in our daily work, so are you familiar with every operating function in ppt? For example: How to set animation effects in ppt, how to set switching effects, and what is the effect duration of each animation? Can each slide play automatically, enter and then exit the ppt animation, etc. In this issue, I will first share with you the specific steps of entering and then exiting the ppt animation. It is below. Friends, come and take a look. Look! 1. First, we open ppt on the computer, click outside the text box to select the text box (as shown in the red circle in the figure below). 2. Then, click [Animation] in the menu bar and select the [Erase] effect (as shown in the red circle in the figure). 3. Next, click [
 Exquisite light and shadow art in spring, Haqu H2 is the cost-effective choice
Apr 17, 2024 pm 05:07 PM
With the arrival of spring, everything revives and everything is full of vitality and vitality. In this beautiful season, how to add a touch of color to your home life? Haqu H2 projector, with its exquisite design and super cost-effectiveness, has become an indispensable beauty in this spring. This H2 projector is compact yet stylish. Whether placed on the TV cabinet in the living room or next to the bedside table in the bedroom, it can become a beautiful landscape. Its body is made of milky white matte texture. This design not only makes the projector look more advanced, but also increases the comfort of the touch. The beige leather-like material adds a touch of warmth and elegance to the overall appearance. This combination of colors and materials not only conforms to the aesthetic trend of modern homes, but also can be integrated into
 After a two-year delay, the domestic 3D animated film 'Er Lang Shen: The Deep Sea Dragon' is scheduled to be released on July 13
Jan 26, 2024 am 09:42 AM
This website reported on January 26 that the domestic 3D animated film "Er Lang Shen: The Deep Sea Dragon" released a set of latest stills and officially announced that it will be released on July 13. It is understood that "Er Lang Shen: The Deep Sea Dragon" is produced by Mihuxing (Beijing) Animation Co., Ltd., Horgos Zhonghe Qiancheng Film Co., Ltd., Zhejiang Hengdian Film Co., Ltd., Zhejiang Gongying Film Co., Ltd., Chengdu The animated film produced by Tianhuo Technology Co., Ltd. and Huawen Image (Beijing) Film Co., Ltd. and directed by Wang Jun was originally scheduled to be released in mainland China on July 22, 2022. Synopsis of the plot of this site: After the Battle of the Conferred Gods, Jiang Ziya took the "Conferred Gods List" to divide the gods, and then the Conferred Gods List was sealed by the Heavenly Court under the deep sea of Kyushu Secret Realm. In fact, in addition to conferring divine positions, there are also many powerful evil spirits sealed in the Conferred Gods List.


