

This article analyzes the implementation principle of HashMap, and how resize may cause thread unsafe behaviors such as infinite loops and Fast-fail. At the same time, combined with the source code, the implementation principle of ConcurrentHashMap in JDK 1.7 and JDK 1.8 is analyzed from the perspectives of data structure, addressing method, synchronization method, size calculation, etc. Thread-unsafe HashMap As we all know, HashMap is not thread-safe. The thread insecurity of HashMap is mainly reflected in the infinite loop during resize and fast-fail when using iterators.
Note: The code in this chapter is based on JDK 1.7.0_67
Commonly used underlying data structures mainly include arrays and linked list. The array storage range is continuous, takes up a lot of memory, is easy to address, and difficult to insert and delete. The linked list has discrete storage intervals, takes up less memory, is difficult to address, and easy to insert and delete.
HashMap aims to achieve the effect of a hash table, and try to achieve O(1) level additions, deletions, modifications and queries. Its specific implementation uses both arrays and linked lists. It can be considered that the outermost layer is an array, and each element of the array is the head of a linked list.
For newly inserted data or data to be read, HashMap takes the hash value of the Key modulo the length of the array, and the result is used as the index of the Entry in the array . In computers, the cost of modulo is much higher than the cost of bit operations, so HashMap requires that the length of the array must be 2 to the Nth power. At this time, the hash value of Key is ANDed to 2^N-1, and the effect is equivalent to modulo. HashMap does not require the user to pass in an integer of 2 to the Nth power when specifying the HashMap capacity. Instead, it will calculate the largest 2^N value smaller than the specified integer through Integer.highestOneBit. The implementation method is as follows.
public static int highestOneBit(int i) {
  i |= (i >>  1);
  i |= (i >>  2);
  i |= (i >>  4);
  i |= (i >>  8);
  i |= (i >> 16);  return i - (i >>> 1);
}Since the distribution of Key’s hash value directly determines the distribution of all data on the hash table or determines the possibility of hash conflict, in order to prevent bad Key HashCode implementation (for example, the low bits are the same, only the high bits are different, and the results after ANDing with 2^N-1 are the same), JDK 1.7's HashMap uses the following method to make the 1's in the binary form of the final hash value as uniform as possible Distributed to minimize hash collisions.
int h = hashSeed;
h ^= k.hashCode();
h ^= (h >>> 20) ^ (h >>> 12);return h ^ (h >>> 7) ^ (h >>> 4);
When the size of HashMap exceeds Capacity*loadFactor, HashMap needs to be expanded. The specific method is to create a new array with twice the length of the original Capacity to ensure that the new Capacity is still 2 to the Nth power, thereby ensuring that the above addressing method is still applicable. At the same time, all the original data needs to be reinserted (rehash) into the new array through the following transfer method.
void transfer(Entry[] newTable, boolean rehash) {  int newCapacity = newTable.length;  for (Entry<K,V> e : table) {while(null != e) {
      Entry<K,V> next = e.next;      if (rehash) {
        e.hash = null == e.key ? 0 : hash(e.key);
      }      int i = indexFor(e.hash, newCapacity);
      e.next = newTable[i];
      newTable[i] = e;
      e = next;
    }
  }
}This method does not guarantee thread safety, and when multiple threads call it concurrently, an infinite loop may occur. Its execution process is as follows. As can be seen from step 2, the order of the linked list is reversed during transfer.
Traverse the elements in the original array
Traverse each node on the linked list: use next to get the next element to be transferred, Transfer e to the head of the new array, use head interpolation to insert nodes
Loop 2, until all linked list nodes are transferred
Loop 1 , until all elements are transferred
In single-thread case, rehash has no problem. The following figure demonstrates the rehash process under single-thread conditions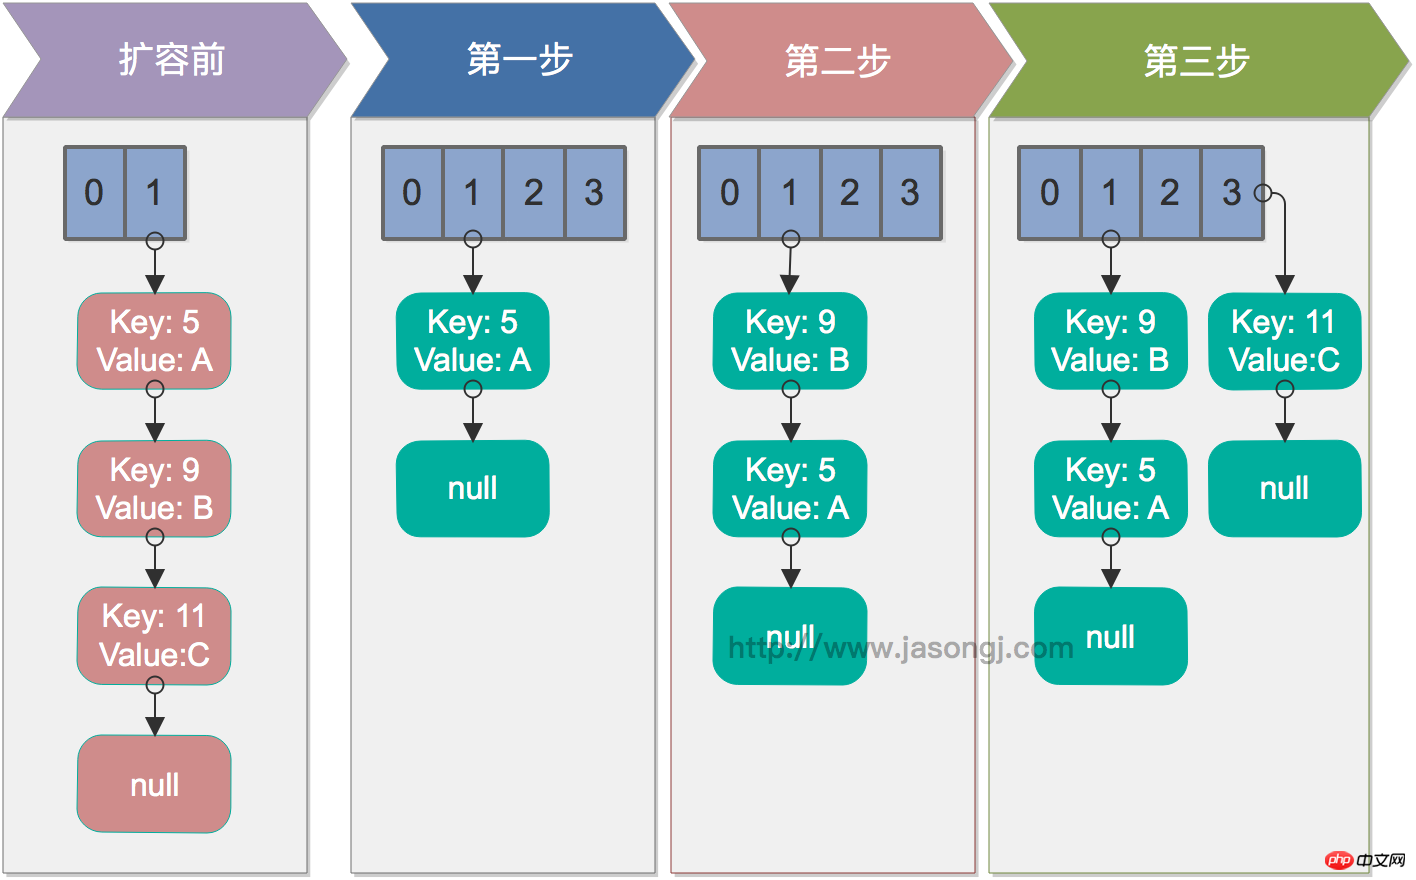
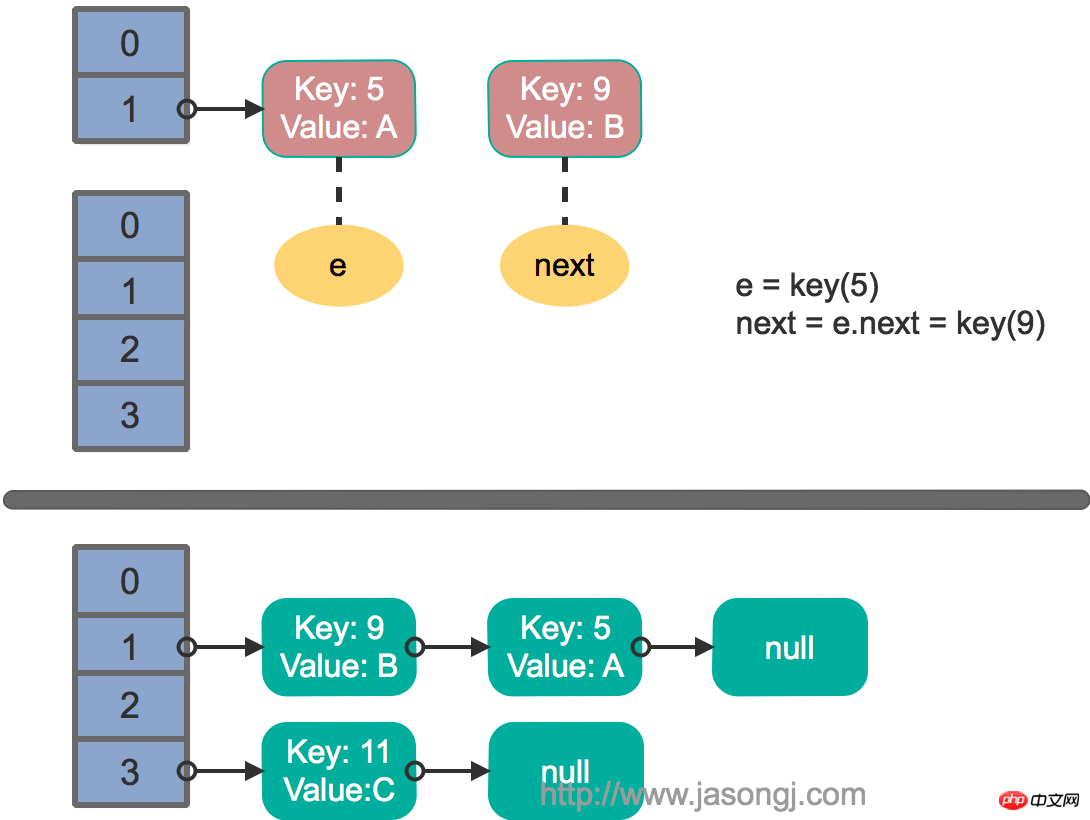
It is assumed that two threads execute the put operation at the same time and trigger rehash , the transfer method is executed, and it is assumed that after thread one enters the transfer method and executes next = e.next, it is "paused" because the time slice allocated by thread scheduling is used up. At this time, thread two completes the execution of the transfer method. The status at this time is as follows.
Then thread 1 is awakened and continues to execute the remainder of the first round of the loop
e.next = newTable[1] = nullnewTable[1] = e = key(5)
e = next = key(9)
结果如下图所示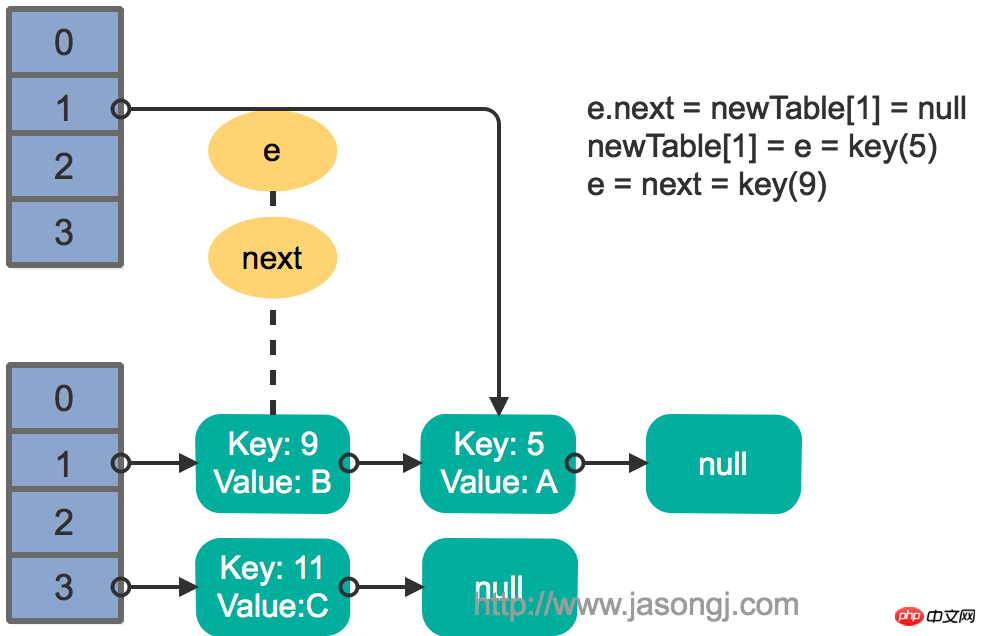
接着执行下一轮循环,结果状态图如下所示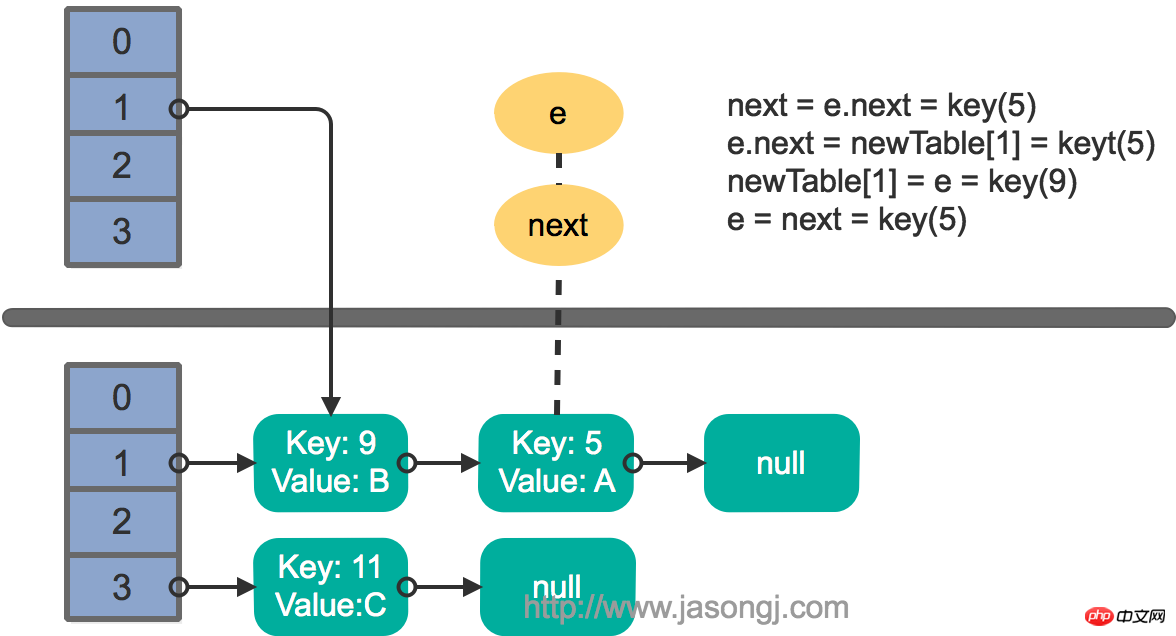
继续下一轮循环,结果状态图如下所示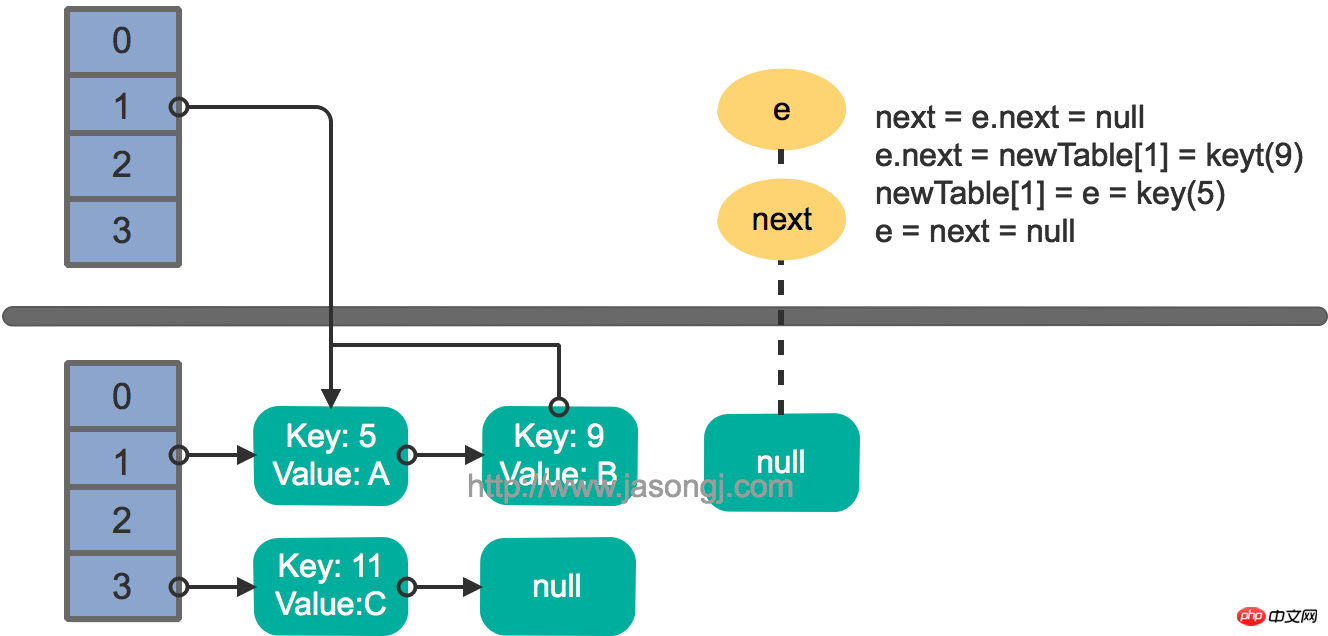
此时循环链表形成,并且key(11)无法加入到线程1的新数组。在下一次访问该链表时会出现死循环。
在使用迭代器的过程中如果HashMap被修改,那么ConcurrentModificationException将被抛出,也即Fast-fail策略。
当HashMap的iterator()方法被调用时,会构造并返回一个新的EntryIterator对象,并将EntryIterator的expectedModCount设置为HashMap的modCount(该变量记录了HashMap被修改的次数)。
HashIterator() {
  expectedModCount = modCount;  if (size > 0) { // advance to first entry
  Entry[] t = table;  while (index < t.length && (next = t[index++]) == null)
    ;
  }
}在通过该Iterator的next方法访问下一个Entry时,它会先检查自己的expectedModCount与HashMap的modCount是否相等,如果不相等,说明HashMap被修改,直接抛出ConcurrentModificationException。该Iterator的remove方法也会做类似的检查。该异常的抛出意在提醒用户及早意识到线程安全问题。
单线程条件下,为避免出现ConcurrentModificationException,需要保证只通过HashMap本身或者只通过Iterator去修改数据,不能在Iterator使用结束之前使用HashMap本身的方法修改数据。因为通过Iterator删除数据时,HashMap的modCount和Iterator的expectedModCount都会自增,不影响二者的相等性。如果是增加数据,只能通过HashMap本身的方法完成,此时如果要继续遍历数据,需要重新调用iterator()方法从而重新构造出一个新的Iterator,使得新Iterator的expectedModCount与更新后的HashMap的modCount相等。
多线程条件下,可使用Collections.synchronizedMap方法构造出一个同步Map,或者直接使用线程安全的ConcurrentHashMap。
注:本章的代码均基于JDK 1.7.0_67
Java 7中的ConcurrentHashMap的底层数据结构仍然是数组和链表。与HashMap不同的是,ConcurrentHashMap最外层不是一个大的数组,而是一个Segment的数组。每个Segment包含一个与HashMap数据结构差不多的链表数组。整体数据结构如下图所示。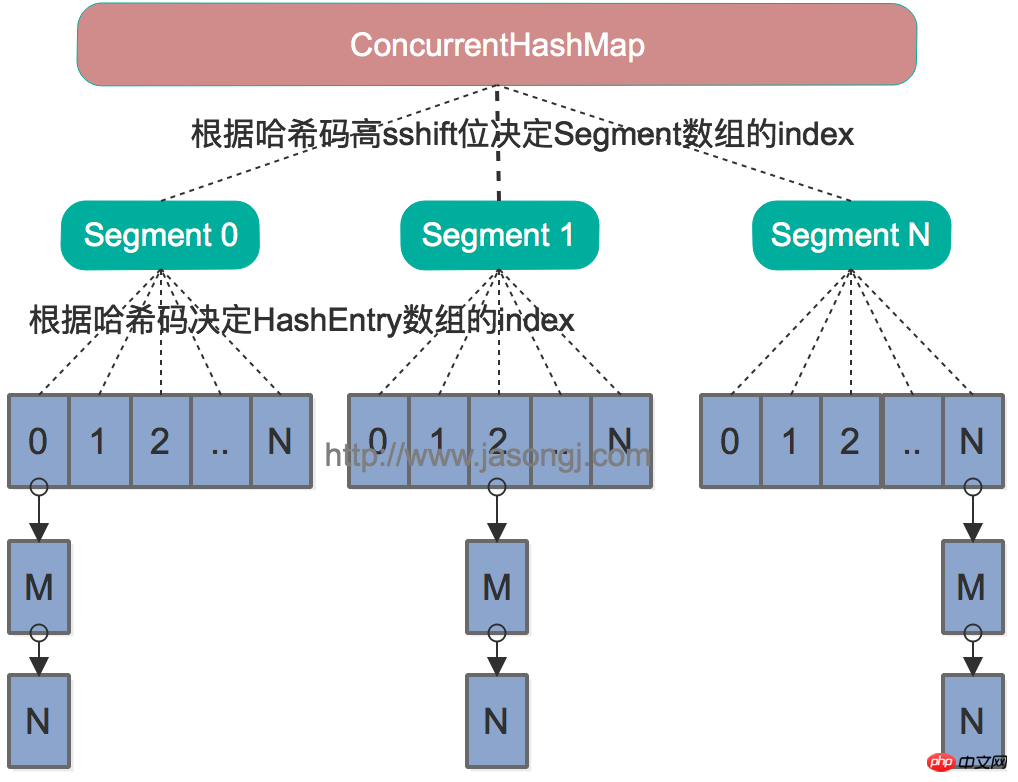
在读写某个Key时,先取该Key的哈希值。并将哈希值的高N位对Segment个数取模从而得到该Key应该属于哪个Segment,接着如同操作HashMap一样操作这个Segment。为了保证不同的值均匀分布到不同的Segment,需要通过如下方法计算哈希值。
private int hash(Object k) {  int h = hashSeed;  if ((0 != h) && (k instanceof String)) {return sun.misc.Hashing.stringHash32((String) k);
  }
  h ^= k.hashCode();
  h += (h <<  15) ^ 0xffffcd7d;
  h ^= (h >>> 10);
  h += (h <<   3);
  h ^= (h >>>  6);
  h += (h <<   2) + (h << 14);  return h ^ (h >>> 16);
}同样为了提高取模运算效率,通过如下计算,ssize即为大于concurrencyLevel的最小的2的N次方,同时segmentMask为2^N-1。这一点跟上文中计算数组长度的方法一致。对于某一个Key的哈希值,只需要向右移segmentShift位以取高sshift位,再与segmentMask取与操作即可得到它在Segment数组上的索引。
int sshift = 0;int ssize = 1;while (ssize < concurrencyLevel) {
  ++sshift;
  ssize <<= 1;
}this.segmentShift = 32 - sshift;this.segmentMask = ssize - 1;
Segment<K,V>[] ss = (Segment<K,V>[])new Segment[ssize];Segment继承自ReentrantLock,所以我们可以很方便的对每一个Segment上锁。
对于读操作,获取Key所在的Segment时,需要保证可见性(请参考如何保证多线程条件下的可见性)。具体实现上可以使用volatile关键字,也可使用锁。但使用锁开销太大,而使用volatile时每次写操作都会让所有CPU内缓存无效,也有一定开销。ConcurrentHashMap使用如下方法保证可见性,取得最新的Segment。
Segment<K,V> s = (Segment<K,V>)UNSAFE.getObjectVolatile(segments, u)
获取Segment中的HashEntry时也使用了类似方法
HashEntry<K,V> e = (HashEntry<K,V>) UNSAFE.getObjectVolatile
  (tab, ((long)(((tab.length - 1) & h)) << TSHIFT) + TBASE)
对于写操作,并不要求同时获取所有Segment的锁,因为那样相当于锁住了整个Map。它会先获取该Key-Value对所在的Segment的锁,获取成功后就可以像操作一个普通的HashMap一样操作该Segment,并保证该Segment的安全性。
同时由于其它Segment的锁并未被获取,因此理论上可支持concurrencyLevel(等于Segment的个数)个线程安全的并发读写。
获取锁时,并不直接使用lock来获取,因为该方法获取锁失败时会挂起(参考可重入锁)。事实上,它使用了自旋锁,如果tryLock获取锁失败,说明锁被其它线程占用,此时通过循环再次以tryLock的方式申请锁。如果在循环过程中该Key所对应的链表头被修改,则重置retry次数。如果retry次数超过一定值,则使用lock方法申请锁。
这里使用自旋锁是因为自旋锁的效率比较高,但是它消耗CPU资源比较多,因此在自旋次数超过阈值时切换为互斥锁。
put、remove和get操作只需要关心一个Segment,而size操作需要遍历所有的Segment才能算出整个Map的大小。一个简单的方案是,先锁住所有Sgment,计算完后再解锁。但这样做,在做size操作时,不仅无法对Map进行写操作,同时也无法进行读操作,不利于对Map的并行操作。
为更好支持并发操作,ConcurrentHashMap会在不上锁的前提逐个Segment计算3次size,如果某相邻两次计算获取的所有Segment的更新次数(每个Segment都与HashMap一样通过modCount跟踪自己的修改次数,Segment每修改一次其modCount加一)相等,说明这两次计算过程中无更新操作,则这两次计算出的总size相等,可直接作为最终结果返回。如果这三次计算过程中Map有更新,则对所有Segment加锁重新计算Size。该计算方法代码如下
public int size() { final Segment<K,V>[] segments = this.segments; int size; boolean overflow; // true if size overflows 32 bits
long sum; // sum of modCounts
long last = 0L; // previous sum
int retries = -1; // first iteration isn't retry
try {for (;;) { if (retries++ == RETRIES_BEFORE_LOCK) {for (int j = 0; j < segments.length; ++j) ensureSegment(j).lock(); // force creation }
sum = 0L;
size = 0;
overflow = false; for (int j = 0; j < segments.length; ++j) {
Segment<K,V> seg = segmentAt(segments, j);if (seg != null) {
sum += seg.modCount; int c = seg.count; if (c < 0 || (size += c) < 0)
overflow = true;
}
} if (sum == last)break;
last = sum;
}
} finally {if (retries > RETRIES_BEFORE_LOCK) { for (int j = 0; j < segments.length; ++j)segmentAt(segments, j).unlock();
}
} return overflow ? Integer.MAX_VALUE : size;
}ConcurrentHashMap与HashMap相比,有以下不同点
ConcurrentHashMap线程安全,而HashMap非线程安全
HashMap允许Key和Value为null,而ConcurrentHashMap不允许
HashMap不允许通过Iterator遍历的同时通过HashMap修改,而ConcurrentHashMap允许该行为,并且该更新对后续的遍历可见
注:本章的代码均基于JDK 1.8.0_111
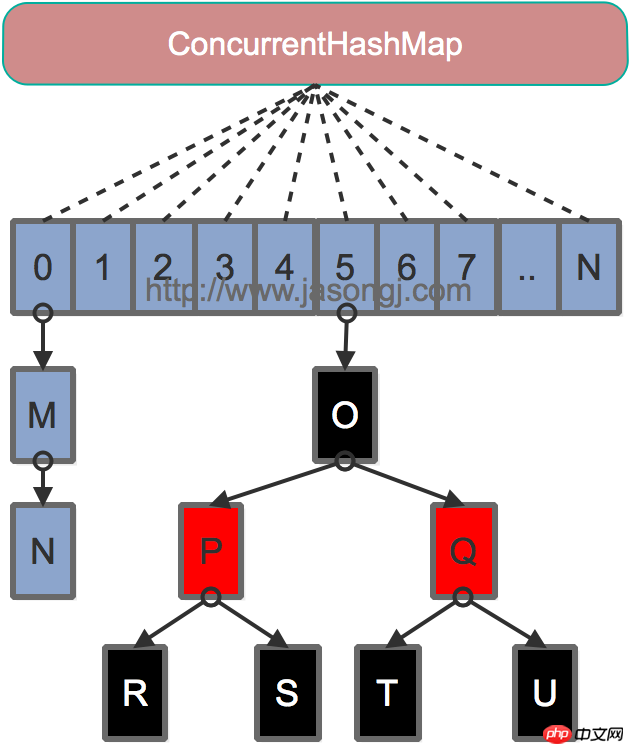
Java 7为实现并行访问,引入了Segment这一结构,实现了分段锁,理论上最大并发度与Segment个数相等。Java 8为进一步提高并发性,摒弃了分段锁的方案,而是直接使用一个大的数组。同时为了提高哈希碰撞下的寻址性能,Java 8在链表长度超过一定阈值(8)时将链表(寻址时间复杂度为O(N))转换为红黑树(寻址时间复杂度为O(long(N)))。其数据结构如下图所示
Java 8的ConcurrentHashMap同样是通过Key的哈希值与数组长度取模确定该Key在数组中的索引。同样为了避免不太好的Key的hashCode设计,它通过如下方法计算得到Key的最终哈希值。不同的是,Java 8的ConcurrentHashMap作者认为引入红黑树后,即使哈希冲突比较严重,寻址效率也足够高,所以作者并未在哈希值的计算上做过多设计,只是将Key的hashCode值与其高16位作异或并保证最高位为0(从而保证最终结果为正整数)。
static final int spread(int h) {  return (h ^ (h >>> 16)) & HASH_BITS;
}对于put操作,如果Key对应的数组元素为null,则通过CAS操作将其设置为当前值。如果Key对应的数组元素(也即链表表头或者树的根元素)不为null,则对该元素使用synchronized关键字申请锁,然后进行操作。如果该put操作使得当前链表长度超过一定阈值,则将该链表转换为树,从而提高寻址效率。
对于读操作,由于数组被volatile关键字修饰,因此不用担心数组的可见性问题。同时每个元素是一个Node实例(Java 7中每个元素是一个HashEntry),它的Key值和hash值都由final修饰,不可变更,无须关心它们被修改后的可见性问题。而其Value及对下一个元素的引用由volatile修饰,可见性也有保障。
static class Node<K,V> implements Map.Entry<K,V> {  final int hash;  final K key;  volatile V val;  volatile Node<K,V> next;
}对于Key对应的数组元素的可见性,由Unsafe的getObjectVolatile方法保证。
static final <K,V> Node<K,V> tabAt(Node<K,V>[] tab, int i) {  return (Node<K,V>)U.getObjectVolatile(tab, ((long)i << ASHIFT) + ABASE);
}The put method and the remove method will maintain the size of the Map through the addCount method. The size method uses sumCount to obtain the size of the Map maintained by the addCount method.
Java Advanced (1) Annotation
Java Advanced (2) When we say thread safety, what exactly are we talking about?
Java Advanced (3) Key Technologies for Multi-Thread Development
Java Advanced ( 4) Comparison of communication methods between threads
Java Advanced (5) NIO and Reactor Mode Advanced
Java Advanced (6) From The evolution of ConcurrentHashMap looks at Java multi-threading core technology
The above is the detailed content of Analyze the implementation principle of HashMap. For more information, please follow other related articles on the PHP Chinese website!


![[Web front-end] Node.js quick start](https://img.php.cn/upload/course/000/000/067/662b5d34ba7c0227.png)


