
 Database
Mysql Tutorial
Share an example of data monitoring using the oplog mechanism in MongoDB
Database
Mysql Tutorial
Share an example of data monitoring using the oplog mechanism in MongoDB
Share an example of data monitoring using the oplog mechanism in MongoDB

MongoDB's Replication stores write operations through a log. This log is called oplog. The following article mainly introduces you to the relevant information on using the oplog mechanism in MongoDB to achieve quasi-real-time data operation monitoring. What is needed Friends can refer to it, let’s take a look below.
Preface
Recently there is a need to obtain newly inserted data into MongoDB in real time, and the insertion program itself already has a set of processing logic , so it is inconvenient to write related programs directly in the insertion program. Most traditional databases come with this trigger mechanism, but Mongo does not have related functions to use (maybe I don’t know too much, please Correction), of course, there is another point that needs to be implemented in python, so I collected and compiled a corresponding implementation method.
1. Introduction
#First of all, it can be thought that this requirement is actually very similar to the master-slave backup mechanism of the database. Therefore, the main database can be synchronized because there are certain indicators for control. We know that although MongoDB does not have ready-made triggers, it can realize master-slave backup, so we start with its master-slave backup mechanism.
2. OPLOG
First of all, you need to open the mongod daemon in master mode. Use the command line –master, or Configuration fileAdd the master key to true.
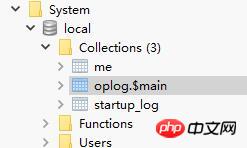
At this time, we can see the new collection-oplog in the local system library of Mongo. At this time, the oplog information will be stored in oplog.$main. If this If Mongo exists as a slave database, there will also be some slave information. Since we are not master-slave synchronization here, these sets do not exist.
Let’s take a look at the oplog structure:
"ts" : Timestamp(6417682881216249, 1), 时间戳
"h" : NumberLong(0), 长度
"v" : 2,
"op" : "n", 操作类型
"ns" : "", 操作的库和集合
"o2" : "_id" update条件
"o" : {} 操作值,即documentYou need to know the op here Several attributes:
insert,'i'
update, 'u'
remove(delete), 'd'
cmd, 'c'
noop, 'n' 空操作
As can be seen from the above information, we only need to continuously read ts for comparison, and then judge the current situation based on the op What operation occurs is equivalent to using a program to implement a receiving end from the database.
3. CODE
I found someone else’s implementation on Github, but its function library is too old, so Make modifications based on his work.
Github address: github.com/RedBeard0531/mongo-oplog-watcher
mongo_oplog_watcher.py is as follows:
#!/usr/bin/python
import pymongo
import re
import time
from pprint import pprint # pretty printer
from pymongo.errors import AutoReconnect

class OplogWatcher(object):
  def init(self, db=None, collection=None, poll_time=1.0, connection=None, start_now=True):
    if collection is not None:
      if db is None:
        raise ValueError('must specify db if you specify a collection')
      self._ns_filter = db + '.' + collection
    elif db is not None:
      self._ns_filter = re.compile(r'^%s\.' % db)
    else:
      self._ns_filter = None

    self.poll_time = poll_time
    self.connection = connection or pymongo.Connection()

    if start_now:
      self.start()

  @staticmethod
  def get_id(op):
    id = None
    o2 = op.get('o2')
    if o2 is not None:
      id = o2.get('_id')

    if id is None:
      id = op['o'].get('_id')

    return id

  def start(self):
    oplog = self.connection.local['oplog.$main']
    ts = oplog.find().sort('$natural', -1)[0]['ts']
    while True:
      if self._ns_filter is None:
        filter = {}
      else:
        filter = {'ns': self._ns_filter}
      filter['ts'] = {'$gt': ts}
      try:
        cursor = oplog.find(filter, tailable=True)
        while True:
          for op in cursor:
            ts = op['ts']
            id = self.get_id(op)
            self.all_with_noop(ns=op['ns'], ts=ts, op=op['op'], id=id, raw=op)
          time.sleep(self.poll_time)
          if not cursor.alive:
            break
      except AutoReconnect:
        time.sleep(self.poll_time)

  def all_with_noop(self, ns, ts, op, id, raw):
    if op == 'n':
      self.noop(ts=ts)
    else:
      self.all(ns=ns, ts=ts, op=op, id=id, raw=raw)

  def all(self, ns, ts, op, id, raw):
    if op == 'i':
      self.insert(ns=ns, ts=ts, id=id, obj=raw['o'], raw=raw)
    elif op == 'u':
      self.update(ns=ns, ts=ts, id=id, mod=raw['o'], raw=raw)
    elif op == 'd':
      self.delete(ns=ns, ts=ts, id=id, raw=raw)
    elif op == 'c':
      self.command(ns=ns, ts=ts, cmd=raw['o'], raw=raw)
    elif op == 'db':
      self.db_declare(ns=ns, ts=ts, raw=raw)

  def noop(self, ts):
    pass

  def insert(self, ns, ts, id, obj, raw, **kw):
    pass

  def update(self, ns, ts, id, mod, raw, **kw):
    pass

  def delete(self, ns, ts, id, raw, **kw):
    pass

  def command(self, ns, ts, cmd, raw, **kw):
    pass

  def db_declare(self, ns, ts, **kw):
    pass

class OplogPrinter(OplogWatcher):
  def all(self, **kw):
    pprint (kw)
    print #newline

if name == 'main':
OplogPrinter()First, implement a database Initialization, set a delay time (quasi real-time):
self.poll_time = poll_time
self.connection = connection or pymongo.MongoClient()
The main function is start() , to achieve a time comparison and perform Processing of corresponding fields:
def start(self):
 oplog = self.connection.local['oplog.$main']
 #读取之前提到的库
 ts = oplog.find().sort('$natural', -1)[0]['ts']
 #获取一个时间边际
 while True:
 if self._ns_filter is None:
  filter = {}
 else:
  filter = {'ns': self._ns_filter}
 filter['ts'] = {'$gt': ts}
 try:
  cursor = oplog.find(filter)
  #对此时间之后的进行处理
  while True:
  for op in cursor:
   ts = op['ts']
   id = self.get_id(op)
   self.all_with_noop(ns=op['ns'], ts=ts, op=op['op'], id=id, raw=op)
   #可以指定处理插入监控,更新监控或者删除监控等
  time.sleep(self.poll_time)
  if not cursor.alive:
   break
 except AutoReconnect:
time.sleep(self.poll_time)Loop this start function, and write the corresponding monitoring and processing logic here in all_with_noop.
In this way, a simple quasi-real-time Mongodatabase operationmonitor can be implemented. In the next step, the newly entered program can be processed accordingly in conjunction with other operations.
The above is the detailed content of Share an example of data monitoring using the oplog mechanism in MongoDB. For more information, please follow other related articles on the PHP Chinese website!

Hot AI Tools

Undresser.AI Undress
AI-powered app for creating realistic nude photos

AI Clothes Remover
Online AI tool for removing clothes from photos.

Undress AI Tool
Undress images for free

Clothoff.io
AI clothes remover

AI Hentai Generator
Generate AI Hentai for free.

Hot Article
Hot Tools

Notepad++7.3.1
Easy-to-use and free code editor

SublimeText3 Chinese version
Chinese version, very easy to use

Zend Studio 13.0.1
Powerful PHP integrated development environment

Dreamweaver CS6
Visual web development tools

SublimeText3 Mac version
God-level code editing software (SublimeText3)
Hot Topics
 1378
1378
 52
52

 What to do if navicat expires
Apr 23, 2024 pm 12:12 PM
What to do if navicat expires
Apr 23, 2024 pm 12:12 PM
Solutions to resolve Navicat expiration issues include: renew the license; uninstall and reinstall; disable automatic updates; use Navicat Premium Essentials free version; contact Navicat customer support.
 How to connect navicat to mongodb
Apr 24, 2024 am 11:27 AM
How to connect navicat to mongodb
Apr 24, 2024 am 11:27 AM
To connect to MongoDB using Navicat, you need to: Install Navicat Create a MongoDB connection: a. Enter the connection name, host address and port b. Enter the authentication information (if required) Add an SSL certificate (if required) Verify the connection Save the connection
 What is the use of net4.0
May 10, 2024 am 01:09 AM
What is the use of net4.0
May 10, 2024 am 01:09 AM
.NET 4.0 is used to create a variety of applications and it provides application developers with rich features including: object-oriented programming, flexibility, powerful architecture, cloud computing integration, performance optimization, extensive libraries, security, Scalability, data access, and mobile development support.
 Integration of Java functions and databases in serverless architecture
Apr 28, 2024 am 08:57 AM
Integration of Java functions and databases in serverless architecture
Apr 28, 2024 am 08:57 AM
In a serverless architecture, Java functions can be integrated with the database to access and manipulate data in the database. Key steps include: creating Java functions, configuring environment variables, deploying functions, and testing functions. By following these steps, developers can build complex applications that seamlessly access data stored in databases.
 How to configure MongoDB automatic expansion on Debian
Apr 02, 2025 am 07:36 AM
How to configure MongoDB automatic expansion on Debian
Apr 02, 2025 am 07:36 AM
This article introduces how to configure MongoDB on Debian system to achieve automatic expansion. The main steps include setting up the MongoDB replica set and disk space monitoring. 1. MongoDB installation First, make sure that MongoDB is installed on the Debian system. Install using the following command: sudoaptupdatesudoaptinstall-ymongodb-org 2. Configuring MongoDB replica set MongoDB replica set ensures high availability and data redundancy, which is the basis for achieving automatic capacity expansion. Start MongoDB service: sudosystemctlstartmongodsudosys
 How to ensure high availability of MongoDB on Debian
Apr 02, 2025 am 07:21 AM
How to ensure high availability of MongoDB on Debian
Apr 02, 2025 am 07:21 AM
This article describes how to build a highly available MongoDB database on a Debian system. We will explore multiple ways to ensure data security and services continue to operate. Key strategy: ReplicaSet: ReplicaSet: Use replicasets to achieve data redundancy and automatic failover. When a master node fails, the replica set will automatically elect a new master node to ensure the continuous availability of the service. Data backup and recovery: Regularly use the mongodump command to backup the database and formulate effective recovery strategies to deal with the risk of data loss. Monitoring and Alarms: Deploy monitoring tools (such as Prometheus, Grafana) to monitor the running status of MongoDB in real time, and
 Can navicat connect to mongodb?
Apr 23, 2024 pm 05:15 PM
Can navicat connect to mongodb?
Apr 23, 2024 pm 05:15 PM
Yes, Navicat can connect to MongoDB database. Specific steps include: Open Navicat and create a new connection. Select the database type as MongoDB. Enter the MongoDB host address, port, and database name. Enter your MongoDB username and password (if required). Click the "Connect" button.
 Major update of Pi Coin: Pi Bank is coming!
Mar 03, 2025 pm 06:18 PM
Major update of Pi Coin: Pi Bank is coming!
Mar 03, 2025 pm 06:18 PM
PiNetwork is about to launch PiBank, a revolutionary mobile banking platform! PiNetwork today released a major update on Elmahrosa (Face) PIMISRBank, referred to as PiBank, which perfectly integrates traditional banking services with PiNetwork cryptocurrency functions to realize the atomic exchange of fiat currencies and cryptocurrencies (supports the swap between fiat currencies such as the US dollar, euro, and Indonesian rupiah with cryptocurrencies such as PiCoin, USDT, and USDC). What is the charm of PiBank? Let's find out! PiBank's main functions: One-stop management of bank accounts and cryptocurrency assets. Support real-time transactions and adopt biospecies
