
People have always asked how to do HTML encryption obfuscation. In fact, this is a topic that has been studied by many people in the industry.
I compiled an article to share with you during the holidays.
Let’s first understand the requirements. What is the purpose of encryption? What level of encryption is it? What can we sacrifice for this? We know that there is no absolute security in this world, encryption will be cracked, and obfuscation will be deobfuscated. Technical novices, developers, and hackers are all at completely different levels, and the strategies for preventing people at different levels are different. The greater the prevention efforts, the greater the investment cost, such as hiring a professional security company. In addition to investment, we also need to consider the execution performance and user experience of the program. Encrypted code must be decrypted at runtime. After obfuscation, especially after obfuscating HTML, the execution performance of the program will decrease. Whether this type of source code protection is really necessary requires careful decision-making. Generally speaking, the front-end code is responsible for user experience, and the back-end code is responsible for safer data processing. The front-end should not involve leaking too much confidential information, so the meaning of encryption is not particularly significant.
I rarely see content worth protecting in front-end code, such as advanced algorithms. There is no need to sacrifice user experience to protect many codes. However, some front-end codes involve end-user data security, and efforts should still be made to protect data at this time.
Very easy to understand , which means removing comments, excess spaces, simplifying identifiers, etc. There are many tools, including YUI Compressor, UglifyJS, Google Closure Compiler, etc.
Make the code difficult to read without destroying the execution results of the code. Commonly used obfuscation rules: splitting strings, splitting arrays, adding waste code, compression actually has certain obfuscation functions. The essence is to change the structure of the abstract syntax tree (AST) of the input code string. Other tools: v8 is one, as well as Mozilla's SpiderMonkey, the well-known esprima, and uglify; commercial obfuscation services include: jscramble.
The encryption here refers to the reversible encoding of text, which is encryption in a narrow sense, which is what we often call encryption. . This part still relies on some tools, such as: Packer, bcrypt, etc.
Place the code in non-js files to increase the difficulty of positioning. There are two commonly used methods here: place it in png, obtain the characteristics of binary data through HTML Canvas 2D Context, and use images to store script resources; place it in css files, and use the content style to store the characteristics of strings. The same can be done .
To save js code in png, you need to encode the png first, and then decode it when using it. With canvas and base64 and binary encoding.
1. Convert the string into ascii code;
2. Create enough storage space canvas;
3. Fill the characters into the pixels (ignoring the alpha value);
4. Get the data url;
canvas.toDataURL(“image/png”);
5. Save as png image.
function encodeUTF8(str) { return String(str).replace( /[\u0080-\u07ff]/g, function(c) { let cc = c.charCodeAt(0);return String.fromCharCode(0xc0 | cc >> 6, 0x80 | cc & 0x3f);
}
).replace( /[\u0800-\uffff]/g, function(c) { let cc = c.charCodeAt(0);return String.fromCharCode(0xe0 | cc >> 12, 0x80 | cc >> 6 & 0x3f, 0x80 | cc & 0x3f);
}
);
}function request(url, loaded) { let xmlhttp = new XMLHttpRequest();
xmlhttp.onreadystatechange = function() { if (xmlhttp.readyState == 4) if (xmlhttp.status == 200)
loaded(xmlhttp);
}
xmlhttp.open("GET", url, true);
xmlhttp.send();
}void function(){ let source = '../image/test.js';
request(source, function(xmlhttp){let text = encodeUTF8(xmlhttp.responseText);let pixel = Math.ceil((text.length + 2) / 3); // 1一个像素存3个字节, let size = Math.ceil(Math.sqrt(pixel));//console.log([text.length, pixel, size, size * size * 3]);let canvas = document.createElement('canvas');
canvas.width = canvas.height = size;let context = canvas.getContext("2d"),
imageData = context.getImageData(0, 0, canvas.width, canvas.height),
pixels = imageData.data;for(let i = 0, j = 0, l = pixels.length; i < l; i++){ if (i % 4 == 3) { // alpha会影响png还原
pixels[i] = 255;continue;
}let code = text.charCodeAt(j++);if (isNaN(code)) break;
pixels[i] = code;
}
context.putImageData(imageData, 0, 0);
document.getElementById('base64').src = canvas.toDataURL("image/png");
});
}();Encoded picture: <br/>
1. Load png; <br/>2. Draw the png original size into canvas; <br/>3. Read the string in the pixel; <br/>4. Generate the data url of the corresponding protocol for use.
void function(){ let source = '../image/test.png';let img = document.createElement('img');
img.onload = function(){ let canvas = document.createElement('canvas');
canvas.width = img.width;
canvas.height = img.height;let context = canvas.getContext("2d");
context.drawImage(img, 0, 0);let imageData = context.getImageData(0, 0, canvas.width, canvas.height),
pixels = imageData.data;let script = document.createElement('script');let buffer = [];for (let i = 0, l = pixels.length; i < l; i++) { if (i % 4 == 3) continue; // alpha会影响png还原 if (!pixels[i]) break;
buffer.push(String.fromCharCode(pixels[i]));
}
script.src = 'data:text/javascript;charset=utf-8,' + encodeURIComponent(buffer.join(''));
document.body.appendChild(script);
script.onload = function(){
console.log('script is loaded!');
}
img = null;
}
img.src = source;
}();You need to manually download the encoded images here. I have not written a function for automatic downloading. This is another issue that can be discussed in depth, so I won’t expand too much.
It’s much easier to use content.
let div = document.getElementById('content');let content = window.getComputedStyle(div, ':before').content;
Just create a new srcript tag like the above code, and use the data protocol to execute the js code saved in the content.
截获 eval() / new Function() 的示例代码
eval = function() {
  console.log('eval', JSON.stringify(arguments));
};eval('console.log("Hello world!")');Function = function() {
  console.log('Function', JSON.stringify(arguments));  return function() {};
};new Function('console.log("Hello world!")')();但是可能不是全局使用:
(function(){}).constructor('console.log("Hello world!")')()截获 constructor 的示例代码
Function.prototype.__defineGetter__('constructor', function () {return function () {
        console.log('constructor', JSON.stringify(arguments));
    };
});
(function() {}).constructor('console.log("Hello world!")');目前能想到的是判断 eval 是否被重定向
示例,如果 eval 被重定向 z 变量不会被泄露
<span style="font-size: 18px"><code class="language-js hljs has-numbering">(<span class="hljs-function">function<span class="hljs-params">(x){<span class="hljs-keyword">var z = <span class="hljs-string">'console.log("Hello world!")';<span class="hljs-built_in">eval(<span class="hljs-string">'function x(){eval(z)}');
x();
})(<span class="hljs-function">function<span class="hljs-params">() { <span class="hljs-comment">/* ... */ });<br/><br/><span style="font-size: 18pt; background-color: #ff0000"><strong>uglify介绍<br/></strong></span></span></span></span></span></span></span></span></span></span></code></span>概述:
<br/>
案例:Cesium打包流程,相关技术点和大概流程
原理:代码优化的意义:压缩 优化 混淆
优化:如何完善Cesium打包流程
<br/>
关键字:Cesium gulp uglifyjs
<br/>
字数:2330 | 阅读时间:7min+
<br/>
<br/>
1 Cesium打包流程
<br/>
如果没有记错,Cesium从2016年初对代码构建工具做了一次调整,从grunt改为gulp。作为一名业余选手,就不揣测两者的差别了。个人而言,gulp和Ant的思路很相似,通过管道连接,都是基于流的构建风格,而且gulp更像是JS的编码风格,自带一种亲切感。
<br/>
gulp.task('task1',['task0'], function() {
return fun_task1();
});
<br/>
Task语句是gulp中最常见的,懂了这句话,就等于你看懂脚本了。这句话的意思是,要执行task1,需要先执行task0,而task1的具体工作都在fun_task1方法中。这就是之前说的基于流的构建风格。有了这句话,在命令行中键入:gulp task1,回车执行该指令即可。
<br/>
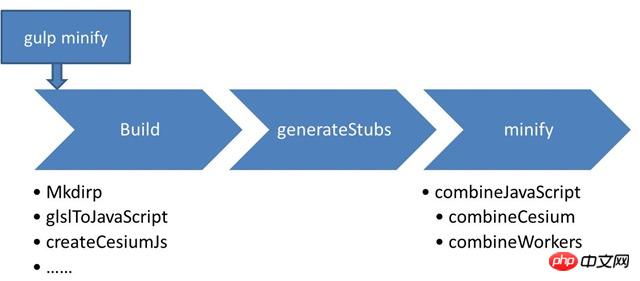
先安装Node,环境变量等,并安装npm包后,即可使用gulp打包工具,这里推荐cnpm。环境搭建好后,命令行中键入gulp minify开始打包。完整的过程是build->generateStubs->minify。
<br/>
<br/>
Cesium打包流程
<br/>
build:准备工作,创建Build文件夹;将glsl文件转为js形式;最主要的是createCesiumJs方法,遍历Source中所有js脚本,将所有Object记录到Source/Cesium.js;其他的是范例,单元测试相关模块。
<br/>
generateStubs:用于单元测试,略。
<br/>
minify; 首先combineJavaScript主要做了两件事情,打包Cesium和Workers脚本,这是打包的最终结果。Gulp根据指令的不同,比如minify下采用uglify2优化,而combine对应的参数为none,生成路径为CesiumUnminified。
<br/>
另外,细心的人会发现,combineCesium的实现中有这样一句话path.relative('Source',require.resolve('almond')),这是一个小优化,almond是requirejs的精简包,因此,最终的Cesium.js中包含'almond脚本,内置了requirejs的主要方法。
<br/>
如上是Cesium打包的主要流程,简单说主要有3+1类个指令:
<br/>
Clean
清空文件
minify
打包&压缩
combine
只打包,不压缩
JScoverage
单元测试覆盖率,不了解
<br/>
2 代码优化
<br/>
对流程有了一个大概了解,下面,我们详细了解一下uglify2过程都做了哪些代码优化,一言以蔽之,压缩,优化,混淆。
<br/>
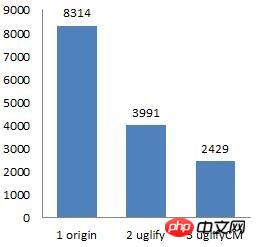
uglify2主要有三个参数:-o,-c,-m,-o参数必选,指定输出文件,-c压缩,-m混淆变量名。如下分别为combine、(uglifyjs -o)、(uglifyjs –c -m -o)的文件对比,单位是k:
<br/>
<br/>
uglify2的压缩对比
<br/>
都在一个屋檐下,差距怎么就这么大呢?我们简单说一下从1~2,2~3之间青取之于蓝而胜于蓝的过程。
<br/>
1~2的过程其实很简单,就是干了三件事,去掉注释, 去掉多余的空格(换行符),去掉不必要的分号(;)。就这三件事情,文件一下子小了一半多,换句话就是平时你写的代码有一大半都是废话,此时你旁边的AI程序员可能会喃喃道来“你们人类好愚蠢~”。
<br/>
2~3则是很多小细节的综合应用:
<br/>
去掉一些实际没有调用的函数(Dead code);
将零散的变量声明合并,比如 var a; var b;变为var a,b;
逻辑函数的精简,比如if(a) b(); else c()变为a ? b() : c();
变量名的简化,比如var strObject;变为var s;
……
<br/>
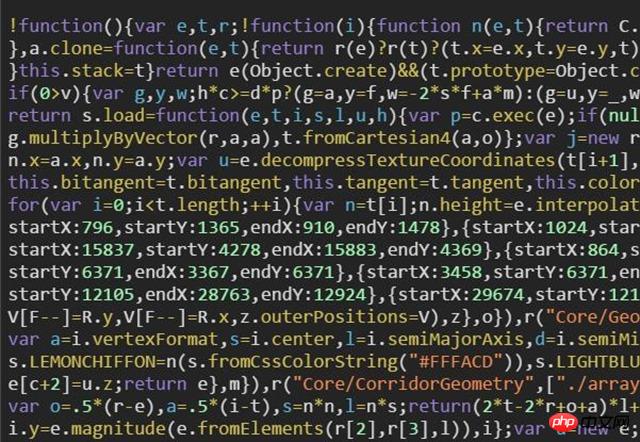
这些小技巧有很多,具体要看不同的压缩工具的考虑优劣,但有些压缩高效的工具并不稳定,可能会破坏语法规范或语意,所以没必要为了几个kb承担过多的风险,目前比较成熟的工具主要有三个uglify2,google closure以及yuicompressor,具体优劣得自己来体会了,我是按照自己的理解给出的先后顺序。最终的效果如下:
<br/>
<br/>
Cesium脚本效果
<br/>
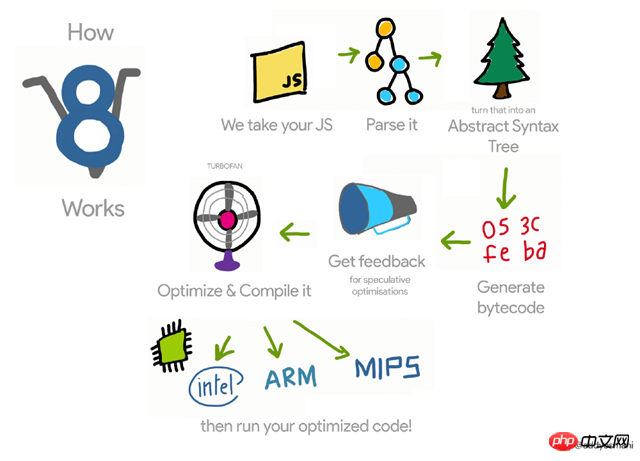
这样的代码只能用单位“坨”来形容了,人类是无法直接读懂的,那浏览器能读懂吗?这是一个好问题!如下是V8引擎对JS语法解析的大概流程:
<br/>
<br/>
V8引擎解析JS脚本
<br/>
下面是在我本机Chrome解析Cesium.js脚本花费时间(脚本从下载完到浏览器解析完的时间差),单位毫秒,因为只测试了一次,可能会有误差,但基本吻合期望值:
<br/>
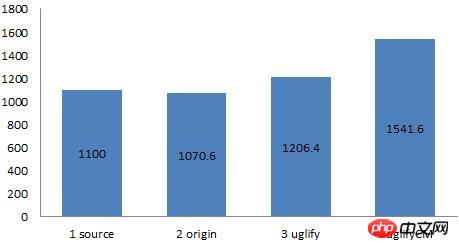
<br/>
JS脚本解析时间对比
<br/>
首先因为是本机测试,脚本无论是最大的8M还是最小的2.4M,下载速度都很快,因此我们不讨论(但实际应用中要考虑)脚本下载所需时间。
<br/>
其次,如上图,多了一个source,这是源码情况下,这个时间水分比较大,因为是零散的文件,可以做到按需下载,但因为文件比较琐碎,性能也不高。
<br/>
结论是,这种JS脚本优化策略对浏览器的影响不大,浏览器看到优化后的代码,可能会愣一会神,但很快就克服了。
<br/>
3实战
<br/>
知道了代码优化的大概原理,回顾一下代码优化的目的(压缩,优化,混淆),匹配一下结果是否符合期望值。嗯,其一,脚本的大小小了,其二,代码效率也优化了,其三,别人也看不懂了。似乎该做的都已经做了,这个脚本已经很完美了。
<br/>
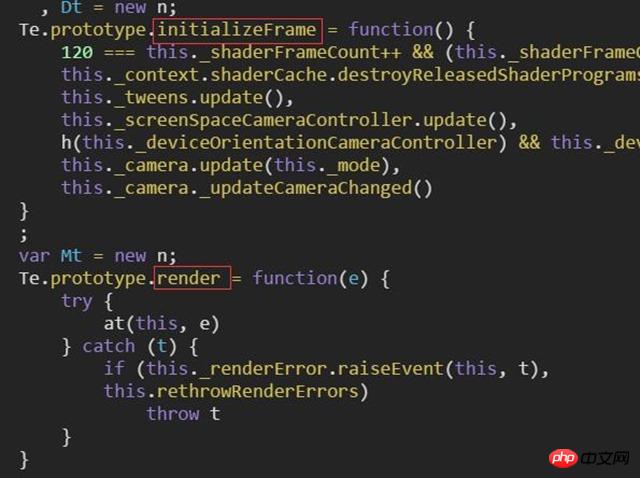
<br/>
Format后的效果
<br/>
毛爷爷说,与人斗其乐无穷。确实,前两点的目的达到了,但第三点,还差很多。如上,和刚才的脚本是同一个文件,我只是用Chrome的调试工具format而已。这就是理想和现实之间的差距。
<br/>
可见,Cesium默认打包工具在压缩和优化上都没有问题,但在混淆上并不充分,当然Cesium本身是开源的,也没必要搞这些。客观说,JS脚本是明码的,所以反编译只是时间和能力的问题,所以不妨换个态度来看待这个问题,增加反编译的成本,当该成本大于购买成本即可
<br/>
The above is the detailed content of Detailed explanation of examples of code compression and obfuscation encryption. For more information, please follow other related articles on the PHP Chinese website!


