Basics
Vue.js allows you to register custom instructions, which essentially allows you to teach Vue some new skills: how to map data changes to DOM behavior. You can use the Vue.directive(id, definition) method to register a global custom directive by passing in the directive id and definition object. Defining the object requires providing some hook functions (all optional):
bind: Called only once, when the instruction binds the element for the first time.
update: The first time it is called immediately after bind, the parameter obtained is the initial value of the binding; in the future, it will be called whenever the bound value changes, and both the new value and the old value are obtained. parameters.
unbind: Called only once, when the instruction unbinds the element.
Vue.js is a progressive framework for building user interfaces. It is not a comprehensive framework in itself - it only focuses on the view layer. Therefore it is very easy to learn and very easy to integrate with other libraries or existing projects. When used with related tools and supporting libraries, Vue.js is also perfectly capable of powering complex single-page applications. Its syntax is very similar to AngularJS. If you have been exposed to AngularJS, you will get started faster. And vue is much simpler and more flexible to use than AngularJS.
Today, I will tell you about this Vue.js in detail. The following is the directory we have explained in detail this time. Friends can selectively read it according to their own situation. All operations are accompanied by code implementation.
1. How to bind Vue.js to the page and use its functions.
Jump
2. The life cycle of Vue instantiated objects.
Jump
3. All data binding instructions of Vue
Jump
Then, let’s start Today’s introduction!
1. How to bind Vue.js to the page and use its functions.
First look at the following piece of code:
<!DOCTYPE html><html><head><meta charset="UTF-8"><title></title></head><body>    <button id="app1"  onclick="app1.func()">我是app1,点我</button></body><script type="text/javascript" src="js/jquery-3.1.1.min.js?1.1.11" ></script><script type="text/javascript" src="js/vue.js?1.1.11" ></script><script type="text/javascript">//通过Vue.js的构造函数 实例化出一个根实例var app1= new Vue({
            el:"#app1",
            data:{
                message:"我在app1中显示出来了吗?",
                func:function(){
                    alert(this.message);
                }
            }
        });
console.log(app1.$data.message); //这个要知道哈,app1就是一个变量,一个对象类型的变量,链式语法直接用即可</script></html>The effect is as follows:

The above code is a pop-up window when clicking the button. Let’s analyze this code.
<span style="color: #000000"> var app1= new Vue({
    el:"#app1",
    data:{
       message:"我在app1中显示出来了吗?",
       func:function(){
            alert(this.message);
          }
       }
});<br>console.log(app1.$data.message); <br></span>Instantiate a root instance app1 through the constructor of Vue.js. To put it bluntly, this is our object-oriented object Instantiation, directly new an object.
el:"#app1", This is the element node where our instantiated object is mounted, which is the tag within which the app1 object scope is. This can be id, class, tagname. But mainly use ID because of its uniqueness.
data:{} are the variables and methods that define this object. Note that all variables and methods related to app1 must be declared in data.
Note: (1) Scope. js5 only has function scope, so if the function in data wants to call a variable, it must be called through this. or directly through the object name.
(2) External call. app1.$data.message; When directly calling the properties and methods of the vue object in js, chain syntax is required, and it is pointed out layer by layer. $data is used here, mainly with js Variables are distinguished
(3) Binding with HTML code. Here I bind directly through onclick of js. Of course, vue has its own event binding. I won’t talk about it here for now. If you use inline binding of js, please note that you need to bring the object name. This is pure OOP thinking. I believe everyone is familiar with object-oriented. If you really don’t know what it is, hurry up and learn it on Baidu.
The above is the most basic method of using vue.
#2. The life cycle of Vue instantiated objects.
Next, let’s talk about what the life cycle of an instantiated object is like and what stages it has to go through. Please look at the following piece of code:
<!DOCTYPE html><html><head><meta charset="UTF-8"><title></title></head><body><div id="container">我的声明周期,大家看吧!</div></body><script type="text/javascript" src="js/jquery-3.1.1.min.js?1.1.11" ></script><script type="text/javascript" src="js/vue.js?1.1.11" ></script><script type="text/javascript">//以下代码时显示vm整个生命周期的流程var vm = new Vue({
            el: "#container",
            data: {
                test : 'hello world'},
            beforeCreate: function(){
                console.log(this);
                showData('创建vue实例前',this);
            },
            created: function(){
                showData('创建vue实例后',this);
            },
            beforeMount:function(){
                showData('挂载到dom前',this);
            },
            mounted: function(){
                showData('挂载到dom后',this);
            },
            beforeUpdate:function(){
                showData('数据变化更新前',this);
            },
            updated:function(){
                showData('数据变化更新后',this);
            },
            beforeDestroy:function(){
                vm.test ="3333";
                showData('vue实例销毁前',this);
            },
            destroyed:function(){
                showData('vue实例销毁后',this);
            }

        });function realDom(){
            console.log('真实dom结构:' + document.getElementById('container').innerHTML);
        }function showData(process,obj){
            console.log(process);
            console.log('data 数据:' + obj.test)
            console.log('挂载的对象:')
            console.log(obj.$el)
            realDom();
            console.log('------------------')
            console.log('------------------')
} </script></html>那接下来看看效果图:

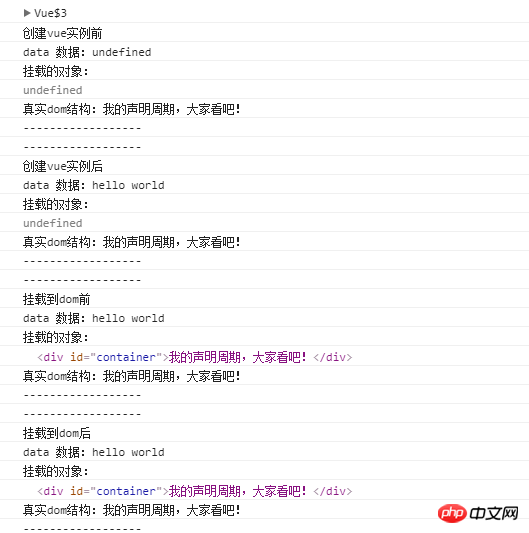
通过控制台的打印效果可以看出来,实例化 vue 对象大致分为 创建vue实例、挂载到dom、数据变化更新、vue实例销毁 4个阶段,,注意每个阶段都有对应的钩子,我们可以通过对这些钩子进行操作,达成一些功能。虽然初学者用不太上,但是提前了解一下还是好的,到时候碰到实际功能要能想得到生命周期的钩子。
3. Vue 的 所有 数据绑定指令
那现在我们就总结一下 vue 的最大亮点,各种灵活的数据绑定方法。这里主要列举实例详解 {{}} 、 v-once 、 v-html 、 v-bind 和 v-model 。
(1)首先是 {{}} 、 v-once 、 v-html 的用法,请看下面的代码:
<!DOCTYPE html><html><head><meta charset="UTF-8"><title>数据绑定篇</title></head><body><!--数据绑定篇--><div id="app1"><!--1. {{}} v-once v-html--><!--Mustache 标签,也就是双大括号,刷新页面时会显示出双大括号--><button onclick="app1.func()">点我,改变变量message的值</button><br /><br /><!--即时绑定,div的内容随变量变化而变化的,绑定内容作纯文本处理--><!--双大括号里边也可以写表达式,和AngularJs一样的--><div>{{message}}</div><br /><!--只绑定一次,整个div的所有绑定数据,都只会加载一次,再更新就不会变了--><div v-once>{{message}}</div><br /><!--双大括号只能当纯文本显示,v-html 可以直接绑定HTML标签的--><div v-html="h1"></div><br /></div> </body><script type="text/javascript" src="js/jquery-3.1.1.min.js?1.1.11" ></script><script type="text/javascript" src="js/vue.js?1.1.11" ></script><script type="text/javascript">//通过Vue.js的构造函数 实例化出一个根实例var app1= new Vue({
el:"#app1", //我们实例化的 app1 的挂载的 元素节点,一般用 id,class,或者tagname也可以,但是多了会冲突 data:{
message:"我是变量message的内容!",
h1:"<h1 style='color: fuchsia;'>我是h1标签</h1>", //注意单引号//message改变函数 func:function(){if (this.message == "我是变量message的内容!") {this.message = "message的内容改变了!";
}else{this.message = "我是变量message的内容!";
}
} </script></html>然后看一下效果:

还是分析一下这个小demo。
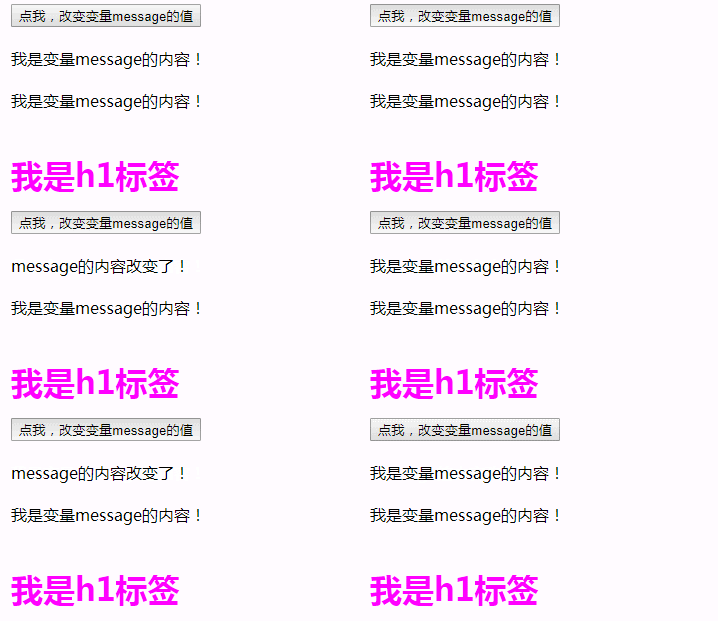
<div>{{message}}div> Mustache 标签,也就是双大括号,他和 AnjularJs 的双大括号完全相同,就是直接将数据动态绑定到标签中,当变量发生变化的时候,标签内容也是改变,上大括号里面也是可以写表达式的。上述代码是做了一个 在button中点击改变变量message的值,然后通过数据绑定使div的text即时变化。
<div v-once>{{message}}div> 他也是数据绑定,但是只绑定一次。要注意 v-once是加载div上的,所以整个div的所有绑定数据,都只会加载一次,再更新就不会变了,所以点击 button时,第二个div的数据并没有发生改变。
<div v-html="h1">div> 是绑定HTML标签,注意 他可以直接绑定 HTML模板,但是这一堆HTML标签不能是多层嵌套的。什么意思呢,就是你之间绑定一段标签可以,绑定一个模板也可以,但是如果绑定一个模板,那这个模板内部不能再嵌套模板了。否则无法渲染的。上述代码就是直接导入了一个加了行内样式的h1标签,功能十分强大,比直接操作dom节点强太多了,效率是几何倍的增长。
(2) 其次是 v-bind
<!DOCTYPE html><html><head><meta charset="UTF-8"><title>数据绑定篇</title><style type="text/css">.aaa{margin: 10px;width: 100px;height: 100px;background-color: red;}.bbb{margin: 10px;width: 50px;height: 50px;background-color: blue;}</style></head><body><!--数据绑定篇--><div id="app1"><!--2. v-bind--> <!--v-bind 他是专门用来绑定属性的 ,主要用来操作元素的 class 列表和它的内联样式--><!--这个和用 js 直接操作dom节点功能一样,不过简单特别多--><div v-bind:style = "{backgroundColor:myColor,width: myWidth+'px',height: myHeight+'px'}" onclick="app1.func1()"></div><!--还可以直接绑定更改 class--> <div v-bind:class="myClass" onclick="app1.func2()"></div>-------------------------------------------------------------------------------------<div class="img" style="width: 100px;height: 100px;"><img style="width: 100%;" v-bind:src="mySrc" onclick="app1.func3()"/></div></div></body><script type="text/javascript" src="js/jquery-3.1.1.min.js?1.1.11" ></script><script type="text/javascript" src="js/vue.js?1.1.11" ></script><script type="text/javascript">//通过Vue.js的构造函数 实例化出一个根实例var app1= new Vue({
el:"#app1",
data:{
myColor:"blue",
myWidth:100,
myHeight:100,
myClass:"aaa",
mySrc:"img/2.png",
func1:function(){if (this.myColor == "blue") {this.myColor = "red";this.myWidth = 50,this.myHeight = 50}else{this.myColor = "blue";this.myWidth = 100,this.myHeight = 100}
},
func2:function(){if (this.myClass == "aaa") {this.myClass = "bbb";
}else{this.myClass = "aaa";
}
},
func3:function(){if (this.mySrc == "img/2.png") {this.mySrc = "img/u=1622626696,1630096734&fm=23&gp=0.jpg";
}else{this.mySrc = "img/2.png";
}
}
}
}); </script></html>然后看一下效果:

那我们解析一下上面的代码。
v-bind 他是专门用来绑定属性的 ,主要用来操作元素的 class 列表和它的内联样式。这一点和AnjularJs的 ng-bind 是完全不同的,要注意!!!
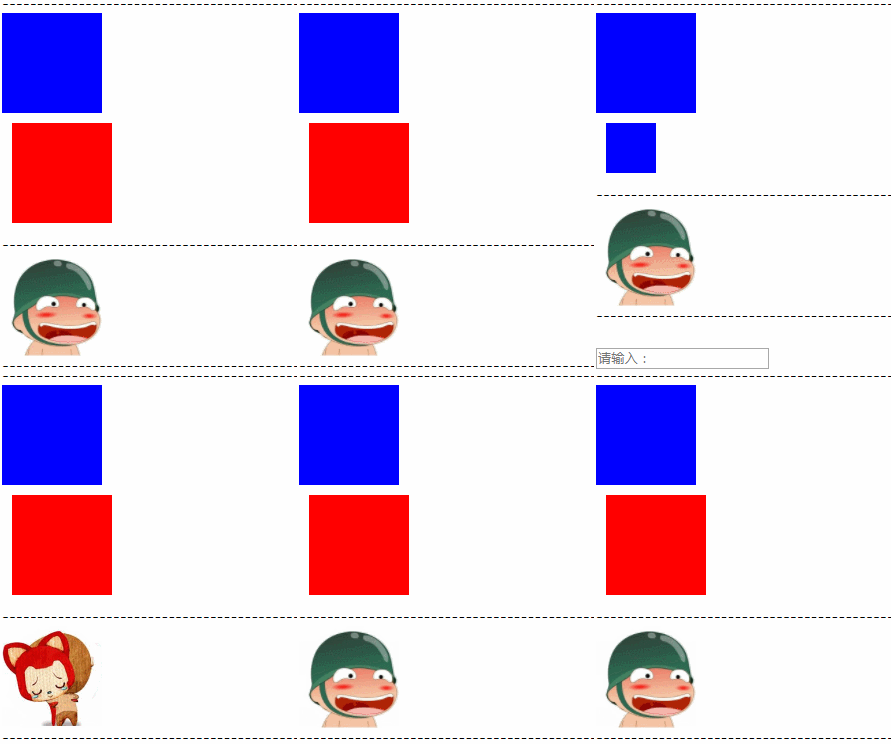
<div v-bind:style = "{backgroundColor:myColor,width: myWidth+'px',height: myHeight+'px'}" onclick="app1.func1()">div> 这是在直接绑定行内样式style。然后通过绑定点击函数,为各个比那两赋值,达到点击更改div样式的目的。
<div v-bind:class="myClass" onclick="app1.func2()">div> 这个是直接绑定修改 class类名,在页内样式表中有我定义的 .aaa 和 .bbb 两个类名,通过动态修改class名修改样式,这也比 JQuery 直接操作dom节点快捷不少。
<img style="width: 100%;" v-bind:src="mySrc" onclick="app1.func3()"/> 这是直接绑定属性,动态修改 img 的src 属性。达到点击图像显示不同的图像的效果。
这里要特别强调一下,v-bind 直接绑定的是属性,而不是样式 ,对于 img ,他的src是属性,但是对于 div ,width 啥的是样式,不是属性,所以 v-bind:width="100+'px'" 不好使.
至于 v-bind 属性绑定,也就常用用法也就这么多了。
(3) v-model
用 v-model 指令在表单控件元素上创建双向数据绑定。它会根据控件类型自动选取正确的方法来更新元素。它负责监听用户的输入事件以更新数据,并特别处理一些极端的例子。v-model 并不关心表单控件初始化所生成的值。因为它会选择 Vue 实例数据来作为具体的值。在默认情况下, v-model 在 input 事件中同步输入框的值与数据,但你可以添加一个修饰符 lazy ,从而转变为在 change 事件中同步
下面我们看一段代码:
<!DOCTYPE html><html><head><meta charset="UTF-8"><title>数据绑定篇</title><style type="text/css">.aaa{margin: 10px;width: 100px;height: 100px;background-color: red;}.bbb{margin: 10px;width: 50px;height: 50px;background-color: blue;}</style></head><body><!--数据绑定篇--><div id="app1"><!--3. v-model-->    <input type="text" v-model="myText" placeholder="请输入:"/><div >{{ myText }}</div><br /><br />-------------------------------------------------------------------------------------<!--绑定单选按钮--><input type="radio" id="one" name="aa" value="男" v-model="picked"><label for="one">男</label><br><input type="radio" id="two" name="aa" value="女" v-model="picked"><label for="two">女</label><br><span>您选择了: {{ picked }}</span><br><br>-------------------------------------------------------------------------------------<!--绑定复选按钮--><div onclick="app1.funcCheckedNames()"><input type="checkbox" id="jack" value="好帅!" v-model="checkedNames"><label for="jack">好帅!</label><input type="checkbox" id="john" value="你是我的男神!" v-model="checkedNames"><label for="john">你是我的男神!</label><input type="checkbox" id="mike" value="我爱你,飞哥!" v-model="checkedNames"><label for="mike">我爱你,飞哥!</label></div><br><span>您对飞哥的评价: {{ names }}</span><br><br>--------------------------------------------------------------------------<!--绑定单选列表--><br><select v-model="selected1">  <option>亲飞哥</option>  <option>向飞哥表白</option>  <option>请飞哥吃饭</option></select><br><span>真心话大冒险: {{ selected1 }}</span><br><br>------------------------------------------------------------------------------            <div onclick="app1.funcselected22()"><select v-model="selected2" multiple>  <option>亲亲</option>  <option>抱抱</option>  <option>举高高</option></select></div><br><span>你想和飞哥偷偷干些啥: {{ selected22 }}</span><br></div>
        </body><script type="text/javascript" src="js/jquery-3.1.1.min.js?1.1.11" ></script><script type="text/javascript" src="js/vue.js?1.1.11" ></script><script type="text/javascript">//通过Vue.js的构造函数 实例化出一个根实例var app1= new Vue({
            el:"#app1",
            data:{
                myText:"",
                picked:"",
                selected1:"",//这是复选列表的变量,函数                selected2:[],
                selected22:"",
                funcselected22:function(){this.selected22 = this.selected2.join(" ");
                },//复选框的函数,及其相关变量                checkedNames:[],
                names:"",
                funcCheckedNames:function(){this.names = this.checkedNames.join(" ");
}</script></html>然后看一下效果:

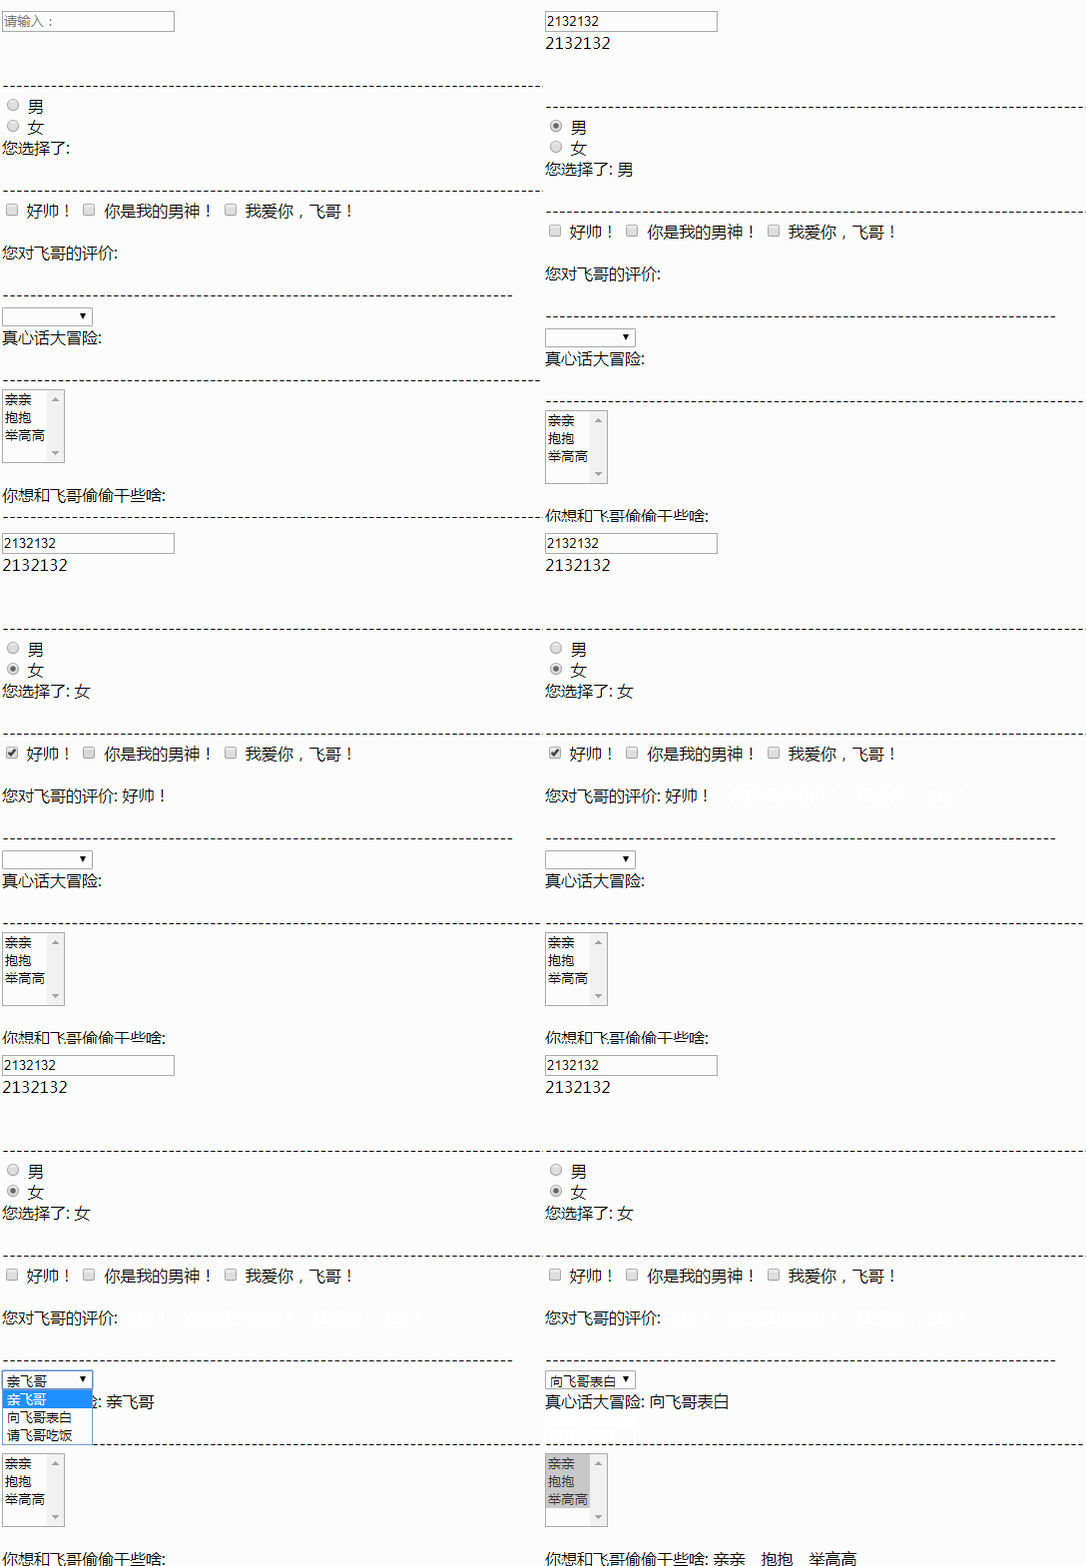
然后解析一下这段代码。这里就不一一详细解释代码了,挑几个典型的详解,其他的便很简单了。
我们就以 多选按钮为例:
<div onclick="app1.funcCheckedNames()">  <input type="checkbox" id="jack" value="好帅!" v-model="checkedNames">  <label for="jack">好帅!</label>  <input type="checkbox" id="john" value="你是我的男神!" v-model="checkedNames">  <label for="john">你是我的男神!</label>  <input type="checkbox" id="mike" value="我爱你,飞哥!" v-model="checkedNames">  <label for="mike">我爱你,飞哥!</label>
 </div>
//这是复选列表的变量,函数
   selected2:[],
   selected22:"",
   funcselected22:function(){
       this.selected22 = this.selected2.join(" ");
},这里要强调一下,v-model 动态绑定这种多选框之类的,会以数组的形式存取,所以,我们用 selected2:[], 变量接收 选择框 的数据,但是我们又不能直接用双大括号显示数据,朋友们可以试验一下,双大括号是纯文本显示,他会把整个数组的中括号,引号,逗号都显示出来,太丑了。所以这里,我用了JQuery的数组分割为字符串的函数 join(" "),把选中的数据分割成字符串,再用一个字符串类型的变量接收数据,这样打印出来就好多了。注意,这里 join(" ") 我用的分隔符是 空白字符,它占一个汉字的空间,但是不会显示出来。
好啦,以上这些就是Vue.js 的基础内容,至于后续的各种渲染,以及组件 API等等,等我们下周再分享。如果感觉我的博客还不错请记得关注我,之前的博客也有精品吆!
The above is the detailed content of A collection of examples of Vue.js directives. For more information, please follow other related articles on the PHP Chinese website!


