

Detailed explanation of the integration of the three major frameworks in SSH

SSH refers to the classic framework of javaweb. It cannot be said that 100% of people need to know the SSH framework, but most companies are using it. When it comes to frameworks, they will mention ssh. This time I will use a very simple one. Register an example to integrate the SSH framework. When integrating frameworks, you should pay attention to testing each framework separately before integrating, otherwise it will be difficult to troubleshoot problems after integration.
Environment: windows + MyEclipse + JDK1.7 + Tomcat7 + MySQL
The code has been tested. If there is an error, it may be because I did not describe it clearly in some places. Please leave a message.
1. Integration principle
2. Guide package (41)
1.hibernate
(1)hibernate/lib/required
(3) Database driver

2.struts2
(1) struts-blank.war/WEB-INF /lib/*
(2) Struts integrates the spring plug-in package
Note: Once this package is imported, struts2 will look for the spring container when it starts. If it cannot find it, an exception will be thrown
3.spring
(1)Basic:4+2
<?xml version="1.0" encoding="UTF-8"?><beans xmlns:xsi="http://www.w3.org/2001/XMLSchema-instance"xmlns="http://www.springframework.org/schema/beans"
        xmlns:context="http://www.springframework.org/schema/context"xmlns:aop="http://www.springframework.org/schema/aop"
        xmlns:tx="http://www.springframework.org/schema/tx"xsi:schemaLocation="http://www.springframework.org/schema/beans
                             http://www.springframework.org/schema/context/spring-context-4.2.xsd
                             http://www.springframework.org/schema/aop/spring-aop-4.2.xsd
                             http://www.springframework.org/schema/tx/spring-tx-4.2.xsd "><bean name="userAction" class="cn.xyp.web.action.UserAction"></bean></beans>
Copy after login
<?xml version="1.0" encoding="UTF-8"?><beans xmlns:xsi="http://www.w3.org/2001/XMLSchema-instance"xmlns="http://www.springframework.org/schema/beans"
xmlns:context="http://www.springframework.org/schema/context"xmlns:aop="http://www.springframework.org/schema/aop"
xmlns:tx="http://www.springframework.org/schema/tx"xsi:schemaLocation="http://www.springframework.org/schema/beans
http://www.springframework.org/schema/context/spring-context-4.2.xsd
http://www.springframework.org/schema/aop/spring-aop-4.2.xsd
http://www.springframework.org/schema/tx/spring-tx-4.2.xsd "><bean name="userAction" class="cn.xyp.web.action.UserAction"></bean></beans> 2. Configure spring to start with the project (web.xml )
  <!-- 让spring随web启动而创建的监听器 -->
  <listener>  <listener-class>org.springframework.web.context.ContextLoaderListener</listener-class>
  </listener>
  <!-- 配置spring配置文件位置参数 -->
  <context-param>  <param-name>contextConfigLocation</param-name>  <param-value>classpath:applicationContext.xml</param-value>
  </context-param>
<?xml version="1.0" encoding="UTF-8"?>
  <!DOCTYPE struts PUBLIC
    "-//Apache Software Foundation//DTD Struts Configuration 2.3//EN"
"http://struts.apache.org/dtds/struts-2.3.dtd"><struts><package name="crm" namespace="/" extends="struts-default"><action name="UserAction_*" class="cn.xyp.web.action.UserAction" method="{1}"><result name="success">/success.jsp</result></action></package></struts><!-- struts2核心过滤器 --> <filter> <filter-name>struts2</filter-name> <filter-class>org.apache.struts2.dispatcher.ng.filter.StrutsPrepareAndExecuteFilter</filter-class> </filter> <filter-mapping> <filter-name>struts2</filter-name> <url-pattern>/*</url-pattern> </filter-mapping>
### if specified, the default object factory can be overridden here
### Note: short-hand notation is supported in some cases, such as "spring"
###       Alternatively, you can provide a com.opensymphony.xwork2.ObjectFactory subclass name here
# struts.objectFactory = spring

### specifies the autoWiring logic when using the SpringObjectFactory.
### valid values are: name, type, auto, and constructor (name is the default)
struts.objectFactory.spring.autoWire = name
Add constants to struts.xml
    <!-- #  struts.objectFactory = spring    将action的创建交给spring容器
struts.objectFactory.spring.autoWire = name spring负责装配Action依赖属性--><constant name="struts.objectFactory" value="spring"></constant> <!-- 整合方案1:class属性上仍然配置action的完整类名
struts2仍然创建action,由spring负责组装Action中的依赖属性 --><action name="UserAction_*" class="cn.xyp.web.action.UserAction" method="{1}" ><result name="toHome" type="redirect" >/index.htm</result><result name="error" >/login.jsp</result></action>
<!-- action --><!-- 注意:Action对象作用范围一定是多例的.这样才符合struts2架构 --><bean name="userAction" class="cn.itcast.web.action.UserAction" scope="prototype" ><property name="userService" ref="userService" ></property></bean>
Copy after login
<!-- action --><!-- 注意:Action对象作用范围一定是多例的.这样才符合struts2架构 --><bean name="userAction" class="cn.itcast.web.action.UserAction" scope="prototype" ><property name="userService" ref="userService" ></property></bean>
struts.xml:
         <!--
             整合方案2:class属性上填写spring中action对象的BeanName
                 完全由spring管理action生命周期,包括Action的创建
                 注意:需要手动组装依赖属性          --><action name="UserAction_*" class="userAction" method="{1}" ><result name="toHome" type="redirect" >/index.htm</result><result name="error" >/login.jsp</result></action>
1. Import entity classes & orm metadata
Example: User.javapackage cn.xyp.web.domain;import java.util.HashSet;import java.util.Set;public class User {private Long user_id;private String user_code;private String user_name;private String user_password;private Character user_state;public Long getUser_id() {return user_id;
}public void setUser_id(Long user_id) {this.user_id = user_id;
}public String getUser_code() {return user_code;
}public void setUser_code(String user_code) {this.user_code = user_code;
}public String getUser_name() {return user_name;
}public void setUser_name(String user_name) {this.user_name = user_name;
}public String getUser_password() {return user_password;
}public void setUser_password(String user_password) {this.user_password = user_password;
}public Character getUser_state() {return user_state;
}public void setUser_state(Character user_state) {this.user_state = user_state;
}
@Overridepublic String toString() {return "User [user_id=" + user_id + ", user_code=" + user_code + ", user_name=" + user_name + ", user_password="
+ user_password + "]";
}
} User.hbm.xml:
<?xml version="1.0" encoding="UTF-8"?><!DOCTYPE hibernate-mapping PUBLIC
    "-//Hibernate/Hibernate Mapping DTD 3.0//EN"
"http://www.hibernate.org/dtd/hibernate-mapping-3.0.dtd"><hibernate-mapping package="cn.xyp.domain" ><class name="User" table="sys_user" ><id name="user_id" ><generator class="native"></generator></id><property name="user_code" ></property><property name="user_name" ></property><property name="user_password" ></property><property name="user_state" ></property></class></hibernate-mapping><?xml version="1.0" encoding="UTF-8"?><!DOCTYPE hibernate-configuration PUBLIC
"-//Hibernate/Hibernate Configuration DTD 3.0//EN"
"http://www.hibernate.org/dtd/hibernate-configuration-3.0.dtd"><hibernate-configuration><session-factory>
<!-- 数据库驱动 --><property name="hibernate.connection.driver_class">com.mysql.jdbc.Driver</property> <!-- 数据库url --><property name="hibernate.connection.url">jdbc:mysql:///crm_32</property> <!-- 数据库连接用户名 --><property name="hibernate.connection.username">root</property> <!-- 数据库连接密码 --><property name="hibernate.connection.password">1234</property><!-- 数据库方言
注意: MYSQL在选择方言时,请选择最短的方言. --><property name="hibernate.dialect">org.hibernate.dialect.MySQLDialect</property>
<!-- 将hibernate生成的sql语句打印到控制台 --><property name="hibernate.show_sql">true</property><!-- 将hibernate生成的sql语句格式化(语法缩进) --><property name="hibernate.format_sql">true</property><!--
自动导出表结构. 自动建表 --><property name="hibernate.hbm2ddl.auto">update</property>
<!-- 引入实体配置文件 --><mapping resource="cn/xyp/domain/Customer.hbm.xml" /><mapping resource="cn/xypt/domain/LinkMan.hbm.xml" /><mapping resource="cn/xyp/domain/User.hbm.xml" /></session-factory></hibernate-configuration>
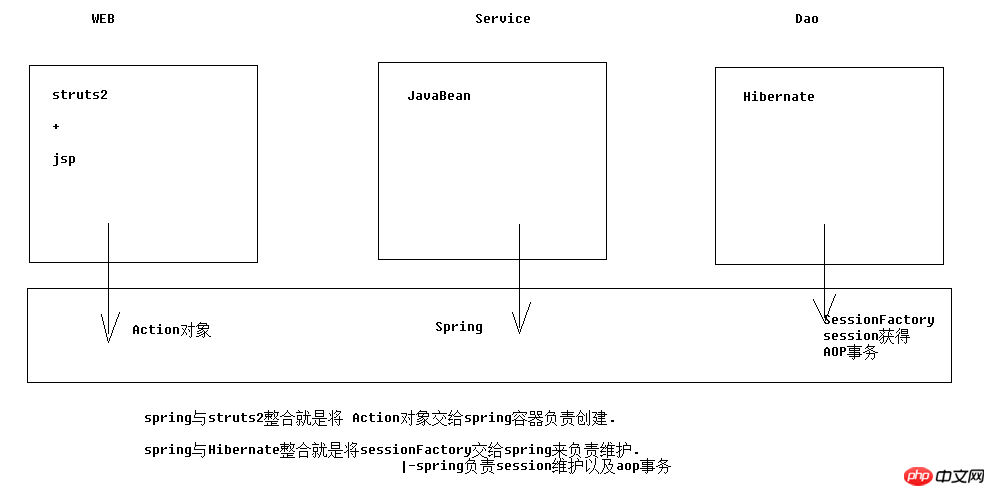
七、spring整合hibernate
1.整合原理
将sessionFactory对象交给spring容器管理
2.在spring中配置sessionFactory
(1)配置方案一:(了解)
<!-- 加载配置方案1:仍然使用外部的hibernate.cfg.xml配置信息 --><bean name="sessionFactory" class="org.springframework.orm.hibernate5.LocalSessionFactoryBean" ><property name="configLocation" value="classpath:hibernate.cfg.xml" ></property></bean>
(2)配置方案二:(推荐)
<!-- 加载配置方案2:在spring配置中放置hibernate配置信息 --><bean name="sessionFactory" class="org.springframework.orm.hibernate5.LocalSessionFactoryBean" ><!-- 将连接池注入到sessionFactory, hibernate会通过连接池获得连接 --><property name="dataSource" ref="dataSource" ></property><!-- 配置hibernate基本信息 --><property name="hibernateProperties"><props><!-- 必选配置 --><prop key="hibernate.connection.driver_class" >com.mysql.jdbc.Driver</prop><prop key="hibernate.connection.url" >jdbc:mysql:///crm_32</prop><prop key="hibernate.connection.username" >root</prop><prop key="hibernate.connection.password" >1234</prop> <prop key="hibernate.dialect" >org.hibernate.dialect.MySQLDialect</prop><!-- 可选配置 --><prop key="hibernate.show_sql" >true</prop><prop key="hibernate.format_sql" >true</prop><prop key="hibernate.hbm2ddl.auto" >update</prop></props></property><!-- 引入orm元数据,指定orm元数据所在的包路径,spring会自动读取包中的所有配置 --><property name="mappingDirectoryLocations" value="classpath:cn/itcast/domain" ></property></bean>
八、spring整合c3p0连接池
1.配置db.properties
jdbc.jdbcUrl=jdbc:mysql:///xyp_crm
jdbc.driverClass=com.mysql.jdbc.Driver
jdbc.user=root
jdbc.password=123456
2.引入连接池到spring中
<!-- 读取db.properties文件 --><context:property-placeholder location="classpath:db.properties" /><!-- 配置c3p0连接池 --><bean name="dataSource" class="com.mchange.v2.c3p0.ComboPooledDataSource" ><property name="jdbcUrl" value="${jdbc.jdbcUrl}" ></property><property name="driverClass" value="${jdbc.driverClass}" ></property><property name="user" value="${jdbc.user}" ></property><property name="password" value="${jdbc.password}" ></property></bean>3.将连接池注入给SessionFactory
<bean name="sessionFactory" class="org.springframework.orm.hibernate5.LocalSessionFactoryBean" ><!-- 将连接池注入到sessionFactory, hibernate会通过连接池获得连接 --><property name="dataSource" ref="dataSource" ></property>
九、spring整合hibernate环境操作数据库
1.Dao类创建:继承HibernateDaoSupport
注意:项目中要确保使用统一版本。

//HibernateDaoSupport 为dao注入sessionFactorypublic class UserDaoImpl extends HibernateDaoSupport implements UserDao {2.hibernate模板的操作
(1)execute
    @Overridepublic User getByUserCode(final String usercode) {//HQLreturn getHibernateTemplate().execute(new HibernateCallback<User>() {
            @Overridepublic User doInHibernate(Session session) throws HibernateException {
                    String hql = "from User where user_code = ? ";
                    Query query = session.createQuery(hql);
                    query.setParameter(0, usercode);
                    User user = (User) query.uniqueResult();return user;
            }
});(2)findByCriteria
        //CriteriaDetachedCriteria dc = DetachedCriteria.forClass(User.class);

        dc.add(Restrictions.eq("user_code", usercode));

        List<User> list = (List<User>) getHibernateTemplate().findByCriteria(dc);            if(list != null && list.size()>0){return list.get(0);
        }else{return null;
}3.spring中配置dao
<!-- Dao --><bean name="userDao" class="cn.xyp.dao.impl.UserDaoImpl" ><!-- 注入sessionFactory --><property name="sessionFactory" ref="sessionFactory"></property></bean>
十、spring的aop事务
1.准备工作
<!-- 核心事务管理器 --><bean name="transactionManager" class="org.springframework.orm.hibernate5.HibernateTransactionManager" ><property name="sessionFactory" ref="sessionFactory" ></property></bean>
2.xml配置aop事务
(1)配置通知
    <!-- 配置通知 --><tx:advice id="txAdvice" transaction-manager="transactionManager" >
    <tx:attributes><tx:method name="save*" isolation="REPEATABLE_READ" propagation="REQUIRED" read-only="false" />
    <tx:method name="persist*" isolation="REPEATABLE_READ" propagation="REQUIRED" read-only="false" />
    <tx:method name="update*" isolation="REPEATABLE_READ" propagation="REQUIRED" read-only="false" />
    <tx:method name="modify*" isolation="REPEATABLE_READ" propagation="REQUIRED" read-only="false" />
    <tx:method name="delete*" isolation="REPEATABLE_READ" propagation="REQUIRED" read-only="false" />
    <tx:method name="remove*" isolation="REPEATABLE_READ" propagation="REQUIRED" read-only="false" />
    <tx:method name="get*" isolation="REPEATABLE_READ" propagation="REQUIRED" read-only="true" />
    <tx:method name="find*" isolation="REPEATABLE_READ" propagation="REQUIRED" read-only="true" />
    </tx:attributes>
    </tx:advice>
(2)配置织入
    <!-- 配置将通知织入目标对象
    配置切点
    配置切面 --><aop:config>
    <aop:pointcut expression="execution(* cn.itcast.service.impl.*ServiceImpl.*(..))" id="txPc"/>
    <aop:advisor advice-ref="txAdvice" pointcut-ref="txPc" />
</aop:config>3.注解配置aop事务
(1)开启注解事务
<!-- 开启注解事务 --><tx:annotation-driven transaction-manager="transactionManager" />
(2)Service类中使用注解
@Transactional(isolation=Isolation.REPEATABLE_READ,propagation=Propagation.REQUIRED,readOnly=true)public class UserServiceImpl implements UserService{ @Override
@Transactional(isolation=Isolation.REPEATABLE_READ,propagation=Propagation.REQUIRED,readOnly=false)public void saveUser(User u) {
ud.save(u);
}
十一、扩大session作用范围
1.配置filter
为了避免使用懒加载时出现no-session问题.需要扩大session的作用范围。
  <!-- 扩大session作用范围
      注意: 任何filter一定要在struts的filter之前调用
      因为struts是不会放行的   -->
   <filter>  <filter-name>openSessionInView</filter-name>  <filter-class>org.springframework.orm.hibernate5.support.OpenSessionInViewFilter</filter-class>
  </filter>

  <filter-mapping>  <filter-name>openSessionInView</filter-name>  <url-pattern>/*</url-pattern>
  </filter-mapping>
十二、练习:用户登录
1.struts.xml核心配置
<struts><!-- #  struts.objectFactory = spring    将action的创建交给spring容器
            struts.objectFactory.spring.autoWire = name spring负责装配Action依赖属性--><constant name="struts.objectFactory" value="spring"></constant><package name="crm" namespace="/" extends="struts-default" ><global-exception-mappings><exception-mapping result="error" exception="java.lang.RuntimeException"></exception-mapping></global-exception-mappings> <!--
             整合方案:class属性上填写spring中action对象的BeanName
                 完全由spring管理action生命周期,包括Action的创建
注意:需要手动组装依赖属性 --><action name="UserAction_*" class="userAction" method="{1}" ><result name="toHome" type="redirect" >/index.htm</result><result name="error" >/login.jsp</result></action></package></struts>2.Action代码
public class UserAction extends ActionSupport implements ModelDriven<User> {private User user = new User();    private UserService userService ;    public void setUserService(UserService userService) {this.userService = userService;
    }
    public String login() throws Exception {
    //
    1 调用Service执行登陆逻辑User u = userService.getUserByCodePassword(user);
    //
    2 将返回的User对象放入session域ActionContext.getContext().getSession().put("user", u);//
    3 重定向到项目首页return "toHome";
    }

    @Overridepublic User getModel() {return user;
    }

}2.Service核心代码
    public User getUserByCodePassword(User u) {
    // 1 根据登陆名称查询登陆用户User existU = ud.getByUserCode(u.getUser_code());// 2 判断用户是否存在.不存在=>抛出异常,提示用户名不存在if (existU == null) {throw new RuntimeException("用户名不存在!");
        }
        // 3 判断用户密码是否正确=>不正确=>抛出异常,提示密码错误if (!existU.getUser_password().equals(u.getUser_password())) {throw new RuntimeException("密码错误!");
        }
        // 4 返回查询到的用户对象return existU;
}3.Dao核心代码
    public User getByUserCode(final String usercode) {
    //CriteriaDetachedCriteria dc = DetachedCriteria.forClass(User.class);
        dc.add(Restrictions.eq("user_code", usercode));
        List<User> list = (List<User>) getHibernateTemplate().findByCriteria(dc);        if(list != null && list.size()>0){return list.get(0);
        }else{return null;
        }
}The above is the detailed content of Detailed explanation of the integration of the three major frameworks in SSH. For more information, please follow other related articles on the PHP Chinese website!

Hot AI Tools

Undresser.AI Undress
AI-powered app for creating realistic nude photos

AI Clothes Remover
Online AI tool for removing clothes from photos.

Undress AI Tool
Undress images for free

Clothoff.io
AI clothes remover

AI Hentai Generator
Generate AI Hentai for free.

Hot Article
Hot Tools

Notepad++7.3.1
Easy-to-use and free code editor

SublimeText3 Chinese version
Chinese version, very easy to use

Zend Studio 13.0.1
Powerful PHP integrated development environment

Dreamweaver CS6
Visual web development tools

SublimeText3 Mac version
God-level code editing software (SublimeText3)
Hot Topics


 Integration and use of Spring Boot and NoSQL database
Jun 22, 2023 pm 10:34 PM
Integration and use of Spring Boot and NoSQL database
Jun 22, 2023 pm 10:34 PM
With the development of the Internet, big data analysis and real-time information processing have become an important need for enterprises. In order to meet such needs, traditional relational databases no longer meet the needs of business and technology development. Instead, using NoSQL databases has become an important option. In this article, we will discuss the use of SpringBoot integrated with NoSQL databases to enable the development and deployment of modern applications. What is a NoSQL database? NoSQL is notonlySQL
 Deploy JavaEE applications using Docker Containers
Jun 05, 2024 pm 08:29 PM
Deploy JavaEE applications using Docker Containers
Jun 05, 2024 pm 08:29 PM
Deploy Java EE applications using Docker containers: Create a Dockerfile to define the image, build the image, run the container and map the port, and then access the application in the browser. Sample JavaEE application: REST API interacts with database, accessible on localhost after deployment via Docker.
 UniApp realizes perfect integration of Vue.js framework
Jul 04, 2023 pm 08:49 PM
UniApp realizes perfect integration of Vue.js framework
Jul 04, 2023 pm 08:49 PM
UniApp realizes the perfect integration of the Vue.js framework Introduction: UniApp is a cross-platform development tool based on the Vue.js framework. It can compile a Vue.js project into applications for multiple different platforms, such as iOS, Android, small Programs etc. The advantage of UniApp is that it allows developers to write only one set of code and adapt to multiple platforms at the same time, speeding up development efficiency and reducing development costs. The following will introduce how to use UniApp to achieve perfect integration of the Vue.js framework
 The difference between java and javaee
Nov 02, 2023 am 10:50 AM
The difference between java and javaee
Nov 02, 2023 am 10:50 AM
Java and Javaee are defined and used, components and functions, platforms and environments, application scope and development models, etc. Detailed introduction: 1. Definition and purpose, Java is an object-oriented programming language, launched by Sun Microsystems in 1995. Java has the characteristics of cross-platform, portability, security and simplicity, and is widely used to develop various Applications, and Java EE is an enterprise-level extension of the Java platform, designed to develop and deploy large-scale, scalable, reliable enterprise-level applications, etc.
 Changes in Vue3 compared to Vue2: more powerful network request library integration
Jul 08, 2023 pm 08:34 PM
Changes in Vue3 compared to Vue2: more powerful network request library integration
Jul 08, 2023 pm 08:34 PM
Changes in Vue3 compared to Vue2: More powerful network request library integration As Vue.js continues to develop and update, Vue3, as the next version of Vue.js, brings some exciting changes and improvements. One of the most significant changes is more powerful network request library integration. In Vue2, we usually use third-party libraries such as axios to make network requests. In Vue3, the Vue development team has provided a built-in network request library, which provides us with a more intuitive and flexible method.
 Practical tips for integrating PHPcms with other systems
Mar 15, 2024 am 08:18 AM
Practical tips for integrating PHPcms with other systems
Mar 15, 2024 am 08:18 AM
Practical tips for integrating PHPcms with other systems With the continuous development of Internet technology, the field of website development has become more diverse and complex. In actual projects, we often face situations where different systems need to be integrated, which requires us to have certain skills and experience to solve these problems. This article will introduce some practical tips and specific code examples for the integration of the PHPcms system with other systems to help developers better cope with challenges. 1. Basic Principles of Integration When performing system integration, it is first necessary to
 Compatibility issues between JavaEE and container technology
Jun 03, 2024 pm 05:11 PM
Compatibility issues between JavaEE and container technology
Jun 03, 2024 pm 05:11 PM
When using Java EE containerized applications, you may encounter compatibility issues such as session state management, dependency injection, resource pooling, and security. Solutions to these problems include using external session storage, configuring JNDI, managing resource pools, and configuring security to ensure that Java EE applications are seamlessly integrated with container technology and gain the advantages of containerization.
 PHP WebDriver integration: from beginner to proficient
Jun 15, 2023 am 09:52 AM
PHP WebDriver integration: from beginner to proficient
Jun 15, 2023 am 09:52 AM
With the rapid development of the Internet, the demand for Web applications is also increasing, and software testing, as an important part of ensuring the quality of enterprise applications, has become increasingly important. However, traditional manual testing methods are time-consuming, laborious, and error-prone. Automated testing is a way to solve this problem. Automated testing of web applications has become a common way of testing. Among them, using WebDriver for automated testing of web applications is a very popular way. This article
