

Detailed explanation of MySQL user rights management examples

This article mainly introduces the relevant information of MySQL user Permission management in detail. Interested friends can refer to
User permission management mainly has the following functions:
1. You can restrict which libraries and tables users can access
2. You can restrict which tables users can perform SELECT, CREATE, DELETE, DELETE, ALTER and other operations
3. You can restrict user login's IP or domain name
4. You can limit whether the user's own permissions can be authorized to other users
1. User authorization
The code is as follows:
1 |
|
•all privileges: means granting all privileges to the user. Specific permissions can also be specified, such as: SELECT, CREATE, DROP, etc.
•on: indicates which databases and tables these permissions are effective for, format: database name. table name, writing "*" here indicates all databases and all tables. If I want to specify permissions to be applied to the user table of the test library, I can write: test.user
•to:To which user the permissions are granted. Format: "Username"@"Login IP or domain name". % means there is no restriction and you can log in from any host. For example: "yangxin"@"192.168.0.%" means that the user yangxin can only log in in the 192.168.0 IP segment
•identified by: Specify the user's login password
•With grant option: means allowing users to authorize their permissions to other users
You can use GRANT to add permissions to users , permissions will be automatically superimposed and will not overwrite previously granted permissions. For example, if you first add a SELECT permission to the user, and then add an INSERT permission to the user, then the user will have both SELECT and INSERT permissions.
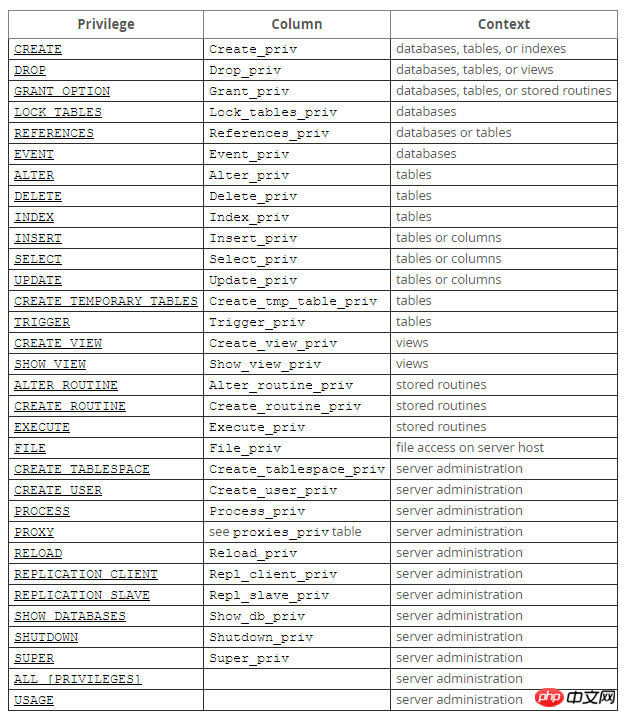
For the permission list of user details, please refer to the MySQL official website instructions: http://dev.mysql.com/doc/refman/5.7/en/privileges-provided.html
2. Refresh permissions
After making permission changes to the user, be sure to remember to reload the permissions and change the permissions Information is written from memory to the database.
mysql> flush privileges;
3. View user permissions
The code is as follows:
1 2 |
|

4. Recover permissions
Delete the create permission of the user yangxin, and the user will not be able to create databases and tables.
1 2 |
|
5. Delete user
1 2 3 4 5 6 7 8 9 10 11 12 13 14 15 |
|
6. Rename user
##shell> rename user 'test3 '@'%' to 'test1'@'%';
7. Change password
1> Update mysql. user table
1 2 3 4 5 6 |
|
2> Use the set password command
Syntax: set password for 'Username'@'Login address'=password('password')
mysql> set password for 'root'@'localhost'=password('123456');
3> mysqladmin
Syntax: mysqladmin -u username -p old password password new password
mysql> mysqladmin -uroot -p123456 password 1234abcd
Note: mysqladmin is located in the bin directory of the mysqlinstallation directory
8. Forgot password
##1> Add login skip permission check configurationModify my.cnf, Add skip-grant-tables configuration to the mysqld configuration node
[mysqld]skip-grant-tables
shell> service mysqld restart
3> Change passwordAt this time You do not need a user password when logging in with the mysql command on the terminal, and then change the password according to the first method of changing the password.
4> Restore login permissions and skip checking configuration
Delete the skip-grant-tables configuration of the mysqld node in my.cnf, and then restart the service That’s it.
The above is the detailed content of Detailed explanation of MySQL user rights management examples. For more information, please follow other related articles on the PHP Chinese website!

Hot AI Tools

Undresser.AI Undress
AI-powered app for creating realistic nude photos

AI Clothes Remover
Online AI tool for removing clothes from photos.

Undress AI Tool
Undress images for free

Clothoff.io
AI clothes remover

Video Face Swap
Swap faces in any video effortlessly with our completely free AI face swap tool!
Hot Article
Hot Tools

Notepad++7.3.1
Easy-to-use and free code editor

SublimeText3 Chinese version
Chinese version, very easy to use

Zend Studio 13.0.1
Powerful PHP integrated development environment

Dreamweaver CS6
Visual web development tools

SublimeText3 Mac version
God-level code editing software (SublimeText3)
Hot Topics
 1393
1393
 52
37
110
52
37
110

 How to open phpmyadmin
Apr 10, 2025 pm 10:51 PM
How to open phpmyadmin
Apr 10, 2025 pm 10:51 PM
You can open phpMyAdmin through the following steps: 1. Log in to the website control panel; 2. Find and click the phpMyAdmin icon; 3. Enter MySQL credentials; 4. Click "Login".
 MySQL: An Introduction to the World's Most Popular Database
Apr 12, 2025 am 12:18 AM
MySQL: An Introduction to the World's Most Popular Database
Apr 12, 2025 am 12:18 AM
MySQL is an open source relational database management system, mainly used to store and retrieve data quickly and reliably. Its working principle includes client requests, query resolution, execution of queries and return results. Examples of usage include creating tables, inserting and querying data, and advanced features such as JOIN operations. Common errors involve SQL syntax, data types, and permissions, and optimization suggestions include the use of indexes, optimized queries, and partitioning of tables.
 How to use single threaded redis
Apr 10, 2025 pm 07:12 PM
How to use single threaded redis
Apr 10, 2025 pm 07:12 PM
Redis uses a single threaded architecture to provide high performance, simplicity, and consistency. It utilizes I/O multiplexing, event loops, non-blocking I/O, and shared memory to improve concurrency, but with limitations of concurrency limitations, single point of failure, and unsuitable for write-intensive workloads.
 MySQL's Place: Databases and Programming
Apr 13, 2025 am 12:18 AM
MySQL's Place: Databases and Programming
Apr 13, 2025 am 12:18 AM
MySQL's position in databases and programming is very important. It is an open source relational database management system that is widely used in various application scenarios. 1) MySQL provides efficient data storage, organization and retrieval functions, supporting Web, mobile and enterprise-level systems. 2) It uses a client-server architecture, supports multiple storage engines and index optimization. 3) Basic usages include creating tables and inserting data, and advanced usages involve multi-table JOINs and complex queries. 4) Frequently asked questions such as SQL syntax errors and performance issues can be debugged through the EXPLAIN command and slow query log. 5) Performance optimization methods include rational use of indexes, optimized query and use of caches. Best practices include using transactions and PreparedStatemen
 Why Use MySQL? Benefits and Advantages
Apr 12, 2025 am 12:17 AM
Why Use MySQL? Benefits and Advantages
Apr 12, 2025 am 12:17 AM
MySQL is chosen for its performance, reliability, ease of use, and community support. 1.MySQL provides efficient data storage and retrieval functions, supporting multiple data types and advanced query operations. 2. Adopt client-server architecture and multiple storage engines to support transaction and query optimization. 3. Easy to use, supports a variety of operating systems and programming languages. 4. Have strong community support and provide rich resources and solutions.
 How to connect to the database of apache
Apr 13, 2025 pm 01:03 PM
How to connect to the database of apache
Apr 13, 2025 pm 01:03 PM
Apache connects to a database requires the following steps: Install the database driver. Configure the web.xml file to create a connection pool. Create a JDBC data source and specify the connection settings. Use the JDBC API to access the database from Java code, including getting connections, creating statements, binding parameters, executing queries or updates, and processing results.
 How to start mysql by docker
Apr 15, 2025 pm 12:09 PM
How to start mysql by docker
Apr 15, 2025 pm 12:09 PM
The process of starting MySQL in Docker consists of the following steps: Pull the MySQL image to create and start the container, set the root user password, and map the port verification connection Create the database and the user grants all permissions to the database
 Centos install mysql
Apr 14, 2025 pm 08:09 PM
Centos install mysql
Apr 14, 2025 pm 08:09 PM
Installing MySQL on CentOS involves the following steps: Adding the appropriate MySQL yum source. Execute the yum install mysql-server command to install the MySQL server. Use the mysql_secure_installation command to make security settings, such as setting the root user password. Customize the MySQL configuration file as needed. Tune MySQL parameters and optimize databases for performance.
