
 Backend Development
Python Tutorial
Detailed explanation of Python 7 process threads and coroutines
Backend Development
Python Tutorial
Detailed explanation of Python 7 process threads and coroutines
Detailed explanation of Python 7 process threads and coroutines

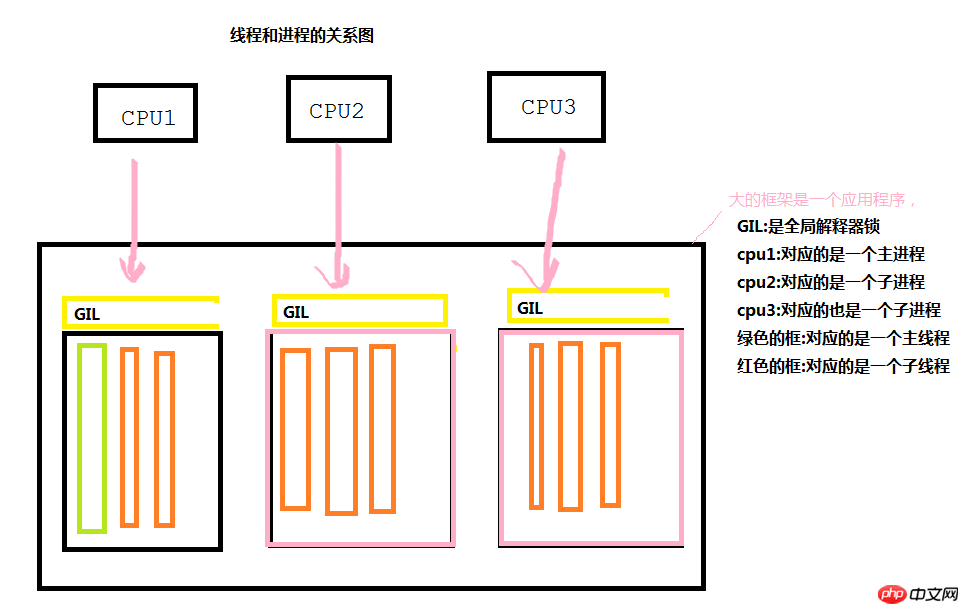
Foreword: Relationship diagram between threads and processes
As can be seen from the figure below, during the execution of each application, a main process and main thread will be generated to complete the work. When we need concurrent When executing, a series of sub-processes will be generated through the main process (and then a series of sub-threads will be generated through the sub-process) to make different CPU calls, thereby achieving concurrency effects. However, it should be noted that in general, each process is independent of each other.
The GIL global interpreter lock is unique to Python and does not exist in Java or C#. What is its main function? We all know that the smallest unit of execution of a program is a thread. When cpu1 calls a thread through a process (only when the cpu calls), it can only call threads in a certain process in a polling manner. Threads cannot execute concurrently. , that is to say, each CPU can only complete a certain work through one thread in one process at a time.
In our general program, if we do not specifically create processes and threads, then our program is executed step by step in sequence. When we create processes and threads, concurrent execution will occur. Effect.
Process
Advantages: Can use multiple CPUs at the same time to perform multiple operations
Disadvantages: Reopening memory space is very resource-intensive
Number: Generally the same as the number of CPUs
Usage places: Generally computationally intensive
Threads
Advantages: Shared memory (within one process), I/O Operations can be executed concurrently
Disadvantages: Seizing resources and switching contexts is very time-consuming
Quantity: Generally depends on the situation
Usage places: I/O intensive
1. Process
Definition of process
Process (Process) is a running activity of a program in the computer on a certain data collection , is the basic unit for resource allocation and scheduling in the system. In fact, a process is an instance of program execution. The program will not be executed if it is placed there. The operation of the program can only be completed by creating a process. For example: I want to cook now. First I pick up the kitchen knife, then I cut the vegetables, and then I turn on the fire and stir-fry the vegetables. Cooking is actually a program. I hold a knife, cut vegetables, turn on the fire, and stir-fry can be regarded as processes one by one. They are executed in an orderly manner in the execution flow of the program to complete an operation.
1. Create a process (Process class)
For a program we write, by default there will be a main process and a main thread to execute the code from top to bottom. If Once you encounter the need to create processes and threads, then the main process will create the processes and threads (then the created sub-processes and sub-threads will execute the code they want to execute). After the creation is completed, there are two operations: One is to wait for the operation of the sub-process or sub-thread to complete before ending the program. The other is to end the program immediately after my main process is completed, regardless of whether your sub-process or sub-thread is completed.
# 在windows下做实验的话,第一句必须加上if __name__ == "__main__":# 创建进程,# 参数target后面的代表的是此进程要执行的函数名称# args后面跟的是一个元组,代表target后面函数所需要的参数p = multiprocessing.Process(target=foo, args=(1,))

    p.join(5)   # 当执行完此子进程之后再去执行其他的进程,参数5代表执行此子进程等待的最长时间,默认为s# daemon是指主进程是否要等待子进程完成之后再结束,默认是等待# True 代表不等待# False 代表等待p.daemon = True
    p.start()   # 启动子进程


 1 # 下面这段代码显示结果为空,因为在主进程结束之后就结束程序了 2 # 并不会去执行foo函数 3 import multiprocessing 4 import time 5  6 def foo(args): 7     # 这是个要通过子进程执行的函数 8     time.sleep(3)   # 延迟三秒 9     print(args)10     11 if __name__ == "__main__":12     p = multiprocessing.Process(target=foo, args=(1,))13     p.daemon = True # 不等待子进程结束14     p.start()
15 16 17 # 下面这段代码的执行结果为1 因为daemon的值为false,所以主进程要等待子进程执行完foo之后才会去结束程序18 import multiprocessing19 import time20 21 def foo(args):22     # 这是个要通过子进程执行的函数23     time.sleep(3)   # 延迟三秒24     print(args)25     26 if __name__ == "__main__":27     p = multiprocessing.Process(target=foo, args=(1,))28     p.daemon = False # 不等待子进程结束29     p.start()


# 当没有join的时候,输入结果为基本上是同时输出的123456789import multiprocessingimport timedef foo(args):# 这是个要通过子进程执行的函数time.sleep(1)print(args)if __name__ == "__main__":for i in range(10):
        p = multiprocessing.Process(target=foo, args=(i,))
        p.start()#有join的时候,他是一个一个输出的,因为join代表的就是当这个子进程执行完之后才会去执行其他的进程import multiprocessingimport timedef foo(args):# 这是个要通过子进程执行的函数time.sleep(1)print(args)if __name__ == "__main__":for i in range(10):
        p = multiprocessing.Process(target=foo, args=(i,))
        p.start()
        p.join(2)

 ##
### 下面这个代码不会输出任何值,当程序执行了1s之后就会结束原因是join默认等待的时间为1s中,但是你的子进程却需要10s的时间,所以子进程还没有执行完主进程就结束了import multiprocessingimport timedef foo(args):# 这是个要通过子进程执行的函数time.sleep(10)print(args)if __name__ == "__main__": p = multiprocessing.Process(target=foo, args=(1,)) p.daemon = True p.start() p.join(1)
2. 进程池(pool模块)
什么叫做进程池呢?通俗点就是装进程的容器,在我们写程序的时候,我们不可能来一个程序,我们就去创建一个进程,进程是非常耗费资源的,因此我们通过事先定义一个装进程的容器(进程的个数是固定的),当我们程序需要的时候就会自动的去进程池中区取,如果进程池中的子进程数被取完了,我们就只有等待其他的程序释放了之后我们才能够继续使用。
if __name__ == "__main__":# 创建进程池proc_pool = multiprocessing.Pool(5)# 以下两个都是使用进程池的方式# apply:他内部使用了join方法,每一个子进程进行了完了之后才会去进行下一个子进程的使用# apply_async:他内部没有使用join方法,因此是所有的子进程并发的执行    proc_pool.apply()
    proc_pool.apply_async()


1 # 从结果可以看出来,每一个子进程完成了之后才会打印出最后的子进程创建完成 2 import multiprocessing 3 import time 4 5 def foo(s1): 6 time.sleep(1) 7 print(s1) 8 if __name__ == "__main__": 9 # 创建进程池,进程的个数为510 proc_pool = multiprocessing.Pool(5)11 for i in range(10):12 # 创建十个子进程,每个子进程都去执行foo函数,传入的参数为i13 proc_pool.apply(foo, args=(i, ))14 print("子进程创建完成")15 16 输出结果:17 018 119 220 321 422 523 624 725 826 927 子进程创建完成

# 结果是先打印了进程创建完毕,从执行结果可以看出来,apply_async函数会使所有的子进程并发执行,后面的join函数要使主进程等待子进程完成之后在关闭程序import multiprocessingimport time# 执行的函数def foo(s1):
    time.sleep(1)return s1# 回调函数def foo2(s1):print(s1)if __name__ == "__main__":# 创建进程池,进程的个数为5proc_pool = multiprocessing.Pool(5)for i in range(10):# 创建十个子进程,每个子进程都去执行foo函数,传入的参数为i,把foo函数的返回值当做参数给foo2,然后执行foo2函数proc_pool.apply_async(foo, args=(i, ), callback=foo2)print("子进程创建完成")# 关闭进程池    proc_pool.close()# 等待子进程执行完毕之后返回    proc_pool.join()

输出结果:
子进程创建完成
01
2
3
4
5
6
7
83. 进程之间的共享
进程之间本来是独立,互不影响的,如果实在想要在进程之间进行通信的话有两种方法。
<1>. 数组
<2>. manage模块创建特殊的数据类型
import multiprocessingimport multiprocessingdef f1(s1, dic):
    dic[s1] = s1if __name__ == "__main__":# 创建一个manage的对象manage = multiprocessing.Manager()# 通过manage创建一个特殊类型的dict,供进程之间进行使用dic = manage.dict()print("没有修改之前的dic:",dic)for i in range(10):
        p = multiprocessing.Process(target=f1, args=(i, dic))
        p.start()
        p.join()print("修改之后的dic:",dic)

结果:
没有修改之前的dic: {}
修改之后的dic: {0: 0, 1: 1, 2: 2, 3: 3, 4: 4, 5: 5, 6: 6, 7: 7, 8: 8, 9: 9}
二.线程
线程是程序最下的执行单元,他本质上也是一个进程,只不过是把进程更加的细微化的一个东西,也是用来执行程序的。
1. 创建线程
# 线程的创建和进程的创建都差不多,因为从形式上来将线程就是进程# 下面的方法和进程的方法是一样的,就是把daemon变成了setDaemon而已if __name__ == "__main__":# 创建线程foo函数为要用子线程执行的函数,args为传递的参数thread = threading.Thread(target=foo, args=(1, ))# 启动线程 thread.start()# 子线程等的最长时间thread.join(5)# 设置主进程完成之后是否要等待子线程完成,默认是不等待的thread.setDaemon(True)


1 # 下面这段代码是没有结果的,因为线程和进程不太一样,线程默认是不等待子线程的 2 import threading 3 import time 4 # 执行的函数 5 def foo(s1): 6 time.sleep(1) 7 print(s1) 8 9 if __name__ == "__main__":10 thread = threading.Thread(target=foo, args=(1, ))11 thread.start()12 13 # 修改成下面这段代码,就可以显示结果了,14 import threading15 import time16 # 执行的函数17 def foo(s1):18 time.sleep(1)19 print(s1)20 21 if __name__ == "__main__":22 thread = threading.Thread(target=foo, args=(1, ))23 thread.setDaemon(False)24 thread.start()


1 import threading 2 import time 3 4 # 执行的函数 5 def foo(s1): 6 time.sleep(1) 7 print(s1) 8 9 if __name__ == "__main__":10 for i in range(5):11 thread = threading.Thread(target=foo, args=(i, ))12 thread.start()13 thread.join(2)
2. Rlock模块
Rlock模块从名字就可以看出来是一个锁模块,我们都知道线程之间是内存共享的,因此当两个线程同时修改某个值的时候,就会出现脏值(也就是我们预期不到的值),因为我们不知道到底哪个线程修改的有效,因此这个模块就应运而生了,当我们想去修改某个值的时候,就可以用到锁模块,把值锁定起来


1 # 其实这个例子看不出来数据的混乱。。。。 2 # 只是简单的说了一下rlock模块的使用方法 3 import threading 4 import time 5 6 # 创建一个全局变量,要运用线程对其进行修改 7 num = [] 8 # 创建一个锁对象 9 lock = threading.RLock()10 # 执行的函数11 def foo(s1):12 # 加锁13 # lock.acquire()14 global num15 num.append(s1)16 print(num)17 # 释放锁18 # lock.release()19 if __name__ == "__main__":20 for i in range(40):21 thread = threading.Thread(target=foo, args=(i, ))22 thread.start()23 print(num)
3. event模块
event模块其实就是暂停的意思,当我们使用了此模块之后,线程就会停在此处,当我们设置了相应的值之后,就会继续执行。


 1 import threading 2 import time 3  4 # 创建一个全局变量,要运用线程对其进行修改 5 num = [] 6 # 创建一个锁对象 7 lock = threading.RLock() 8 event = threading.Event() 9 # 执行的函数10 def foo(s1):11     # 加锁12     lock.acquire()13     # 线程在此暂停(红灯)14     event.wait()15     global num16     num.append(s1)17     print(num)18     # 释放锁19     lock.release()20 if __name__ == "__main__":21     for i in range(5):22         thread = threading.Thread(target=foo, args=(i, ))23         thread.start()24     event.clear()   # 设置为红灯25     inp = input("输入q继续:")26     if inp == 'q':27         # 如果输入的为q,就把event的等待状态改变,继续执行28         event.set()
29 30 31 结果输出32 输入True继续:q33 [0]34 [0, 1]35 [0, 1, 2]36 [0, 1, 2, 3]37 [0, 1, 2, 3, 4]

1 import threading 2 import time 3 4 # 创建一个全局变量,要运用线程对其进行修改 5 num = [] 6 # 创建一个锁对象 7 lock = threading.RLock() 8 event = threading.Event() 9 # 执行的函数10 def foo(s1):11 # 加锁12 # lock.acquire()13 # 线程在此暂停(红灯)14 event.wait()15 global num16 num.append(s1)17 print(num)18 # 释放锁19 # lock.release()20 if __name__ == "__main__":21 for i in range(5):22 thread = threading.Thread(target=foo, args=(i, ))23 thread.start()24 event.clear() # 设置为红灯25 inp = input("输入q继续:")26 if inp == 'q':27 # 如果输入的为q,就把event的等待状态改变,继续执行28 event.set()29 30 输出结果:31 输入q继续:q32 [0]33 [0, 2]34 [0, 2, 1]35 [0, 2, 1, 4]36 [0, 2, 1, 4, 3]4. 生产者消费者模型(queue模块)
生产者消费者模型其实说的就是队列,队列我们只需要记住先进先出就可以了。
# 导入队列的模块import queue# 创建一个队列,队列的长度最多为5obj = queue.Queue(5)# 从队列中获取值,如果队列为空,则等待obj.get()# 从队列中获取值,如果队列为空,则放弃取值(不等待)obj.get_nowait()# 给队列中上传一个值obj.put("value")5. 线程池
在Python中默认没有创建线程池的方法,因此在此处总结了wupeiqi老师的两个方法,方法的地址如下
这段代码的有些地方是比较难懂的,主要的原因是之前写的代码都是顺序执行的,而对于线程和进程而言,都是可以并发执行的,因此对于执行流还是需要注意的。


1 import queue 2 import threading 3 import time 4 5 class ThreadPool: 6 def __init__(self, max_num): 7 self.ThreadQueue = queue.Queue(max_num) 8 for i in range(max_num): 9 self.ThreadQueue.put(threading.Thread)10 def get_Thread(self):11 return self.ThreadQueue.get()12 13 def add_Thread(self):14 self.ThreadQueue.put(threading.Thread)15 16 def func(pool, args):17 time.sleep(2)18 print(args)19 pool.add_Thread()


1 # -*- coding:utf-8 -*- 2 # zhou 3 # 2017/7/5 4 5 import threading 6 import queue 7 import time 8 9 # 列表退出标志位 10 StopEvent = object() 11 12 class ThreadPool: 13 def __init__(self, max_num): 14 # 创建一个空的队列用来存放任务而不是线程 15 self.q = queue.Queue() 16 # 设置空闲的线程数为0 17 self.free_list = [] 18 # 已经创建的线程数 19 self.generate_list = [] 20 # 创建线程的最大个数 21 self.max_num = max_num 22 # 创建任务列表为空 23 self.task = [] 24 self.terminal_flag = False 25 26 def apply(self, target, args, callback=None): 27 # 得到任务列表 28 task = (target, args, callback, ) 29 # print('***', args) 30 # 把任务列表加入队列中 31 self.q.put(task) 32 # 去执行 33 if len(self.free_list) == 0 and len(self.generate_list) < self.max_num: 34 # 如果没有空闲的线程并且创建的线程数小于最大线程数,就创建一个线程 35 self.generate_thread() 36 37 def generate_thread(self): 38 t = threading.Thread(target=self.run) 39 t.start() 40 41 def run(self): 42 current_thread = threading.currentThread 43 self.generate_list.append(current_thread) 44 event = self.q.get() 45 while event != StopEvent: 46 # 是任务,解开任务包,执行任务 47 func1, argument, func2 = event 48 # print("++",argument) 49 try: 50 ret = func1(*argument) 51 state = True 52 except Exception as e: 53 state = False 54 ret = e 55 if func2 is not None: 56 try: 57 func2(state, ret) 58 except Exception as e: 59 pass 60 if not self.terminal_flag: 61 self.free_list.append(current_thread) 62 event = self.q.get() 63 self.free_list.remove(current_thread) 64 else: 65 event = StopEvent 66 else: 67 # 不是任务,就移除 68 self.generate_list.remove(current_thread) 69 70 def close(self): 71 # StopEvent作为循环结束的标志,有多少个线程就会给他创建多少个标志位 72 num = len(self.generate_list) 73 while num: 74 self.q.put(StopEvent) 75 num -= 1 76 77 def terminal(self): 78 self.terminal_flag = True 79 while self.generate_list: 80 self.q.put(StopEvent) 81 # self.close() 82 self.q.empty() 83 # 执行函数 84 def foo(s1): 85 # time.sleep(0.5) 86 print(s1) 87 # 回调函数 88 def f2(state, s2): 89 print(s2) 90 91 if __name__ == "__main__": 92 # 创建一个线程池 93 pool = ThreadPool(5) 94 for i in range(40): 95 # 应用线程池 96 # print('___',i) 97 pool.apply(target=foo, args=(i, )) 98 time.sleep(4) 99 pool.terminal()100 101
三.协程
协程是什么呢?协程其实就是微线程,如下图,协程一般用在web页面请求上面,使用协程要导入模块gevent,下面贴一个简单的使用例子


1 # -*- coding:utf-8 -*- 2 # zhou 3 # 2017/7/5 4 import gevent 5 import requests 6 7 def f1(url): 8 requests.get(url) 9 10 gevent.joinall([11 gevent.spawn(f1, ""),12 gevent.spawn(f1, ""),13 ]14 )
四. 上下文切换(contextlib)
其实这个上下文切换和装饰器有点类似,也是在一个操作的前后在去加上一点操作。
下面代码执行流程
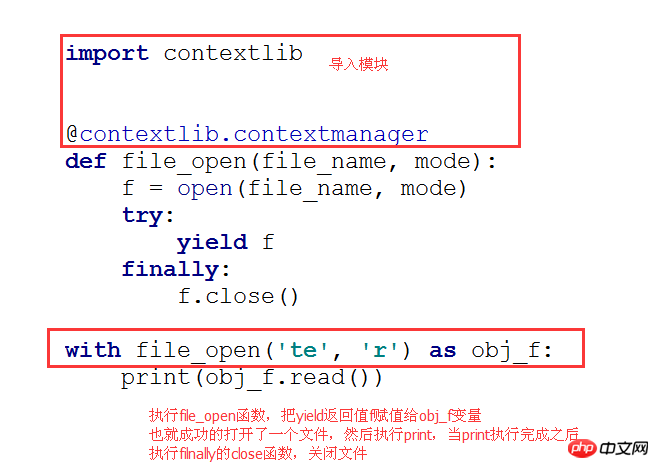
import contextlib

@contextlib.contextmanagerdef file_open(file_name, mode):
    f = open(file_name, mode)try:yield ffinally:
        f.close()

with file_open('te', 'r') as obj_f:print(obj_f.read())
The above is the detailed content of Detailed explanation of Python 7 process threads and coroutines. For more information, please follow other related articles on the PHP Chinese website!

Hot AI Tools

Undresser.AI Undress
AI-powered app for creating realistic nude photos

AI Clothes Remover
Online AI tool for removing clothes from photos.

Undress AI Tool
Undress images for free

Clothoff.io
AI clothes remover

AI Hentai Generator
Generate AI Hentai for free.

Hot Article
Hot Tools

Notepad++7.3.1
Easy-to-use and free code editor

SublimeText3 Chinese version
Chinese version, very easy to use

Zend Studio 13.0.1
Powerful PHP integrated development environment

Dreamweaver CS6
Visual web development tools

SublimeText3 Mac version
God-level code editing software (SublimeText3)
Hot Topics


 Can the Python interpreter be deleted in Linux system?
Apr 02, 2025 am 07:00 AM
Can the Python interpreter be deleted in Linux system?
Apr 02, 2025 am 07:00 AM
Regarding the problem of removing the Python interpreter that comes with Linux systems, many Linux distributions will preinstall the Python interpreter when installed, and it does not use the package manager...
 How to solve the problem of Pylance type detection of custom decorators in Python?
Apr 02, 2025 am 06:42 AM
How to solve the problem of Pylance type detection of custom decorators in Python?
Apr 02, 2025 am 06:42 AM
Pylance type detection problem solution when using custom decorator In Python programming, decorator is a powerful tool that can be used to add rows...
 Python asyncio Telnet connection is disconnected immediately: How to solve server-side blocking problem?
Apr 02, 2025 am 06:30 AM
Python asyncio Telnet connection is disconnected immediately: How to solve server-side blocking problem?
Apr 02, 2025 am 06:30 AM
About Pythonasyncio...
 How to solve permission issues when using python --version command in Linux terminal?
Apr 02, 2025 am 06:36 AM
How to solve permission issues when using python --version command in Linux terminal?
Apr 02, 2025 am 06:36 AM
Using python in Linux terminal...
 Python 3.6 loading pickle file error ModuleNotFoundError: What should I do if I load pickle file '__builtin__'?
Apr 02, 2025 am 06:27 AM
Python 3.6 loading pickle file error ModuleNotFoundError: What should I do if I load pickle file '__builtin__'?
Apr 02, 2025 am 06:27 AM
Loading pickle file in Python 3.6 environment error: ModuleNotFoundError:Nomodulenamed...
 Do FastAPI and aiohttp share the same global event loop?
Apr 02, 2025 am 06:12 AM
Do FastAPI and aiohttp share the same global event loop?
Apr 02, 2025 am 06:12 AM
Compatibility issues between Python asynchronous libraries In Python, asynchronous programming has become the process of high concurrency and I/O...
 What should I do if the '__builtin__' module is not found when loading the Pickle file in Python 3.6?
Apr 02, 2025 am 07:12 AM
What should I do if the '__builtin__' module is not found when loading the Pickle file in Python 3.6?
Apr 02, 2025 am 07:12 AM
Error loading Pickle file in Python 3.6 environment: ModuleNotFoundError:Nomodulenamed...
 How to ensure that the child process also terminates after killing the parent process via signal in Python?
Apr 02, 2025 am 06:39 AM
How to ensure that the child process also terminates after killing the parent process via signal in Python?
Apr 02, 2025 am 06:39 AM
The problem and solution of the child process continuing to run when using signals to kill the parent process. In Python programming, after killing the parent process through signals, the child process still...
