 Backend Development
 Python Tutorial
 Python development tools and framework installation example steps
Python development tools and framework installation example steps
Introduction:
In fact, before I knew Python, I only knew about this language. Most of them were developed using .net. I also learned MVC+EF development before, but since I didn’t use it at work, I didn’t record what I learned on the blog.
I recently came into contact with the crawler technology, and then I learned that Python seems to be very powerful in developing crawlers. So I became interested, and interest is an important thing, so I slowly started to get in touch with Python.
Then start with the most basic configuration of the development environment. Suddenly I found that it is really convenient to do .net. You don’t have to worry about the development environment at all. You only need to install Visual Studio and MSSQL Server on the Windows system to develop.
Of course, it may not be as simple as I said. Closer to home, let’s start with the most basic installation of development tools and configuration of the development environment.
Step one: Install development tools
Here I chose JetBrains Pycharm IDE, which is an IDE specially developed for Python by JetBrains company.
Download address (JetBrains official website):
After the download is completed, run the downloaded file and install it step by step according to the instructions. The installation process is very simple, but I still record my installation steps.
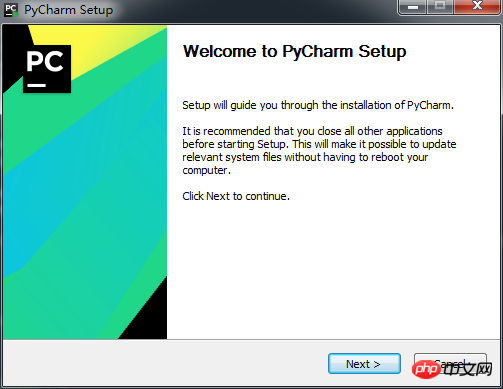
After running the downloaded .exe file, the following interface will appear, click Next directly.
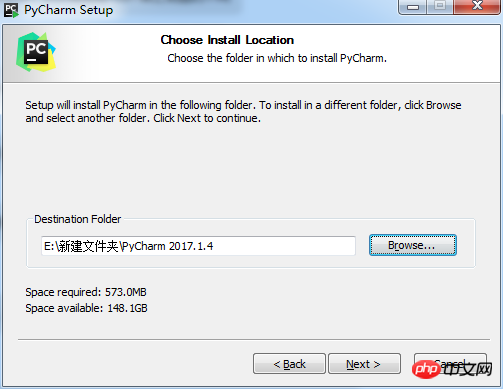
Then select the installation address and Next again.
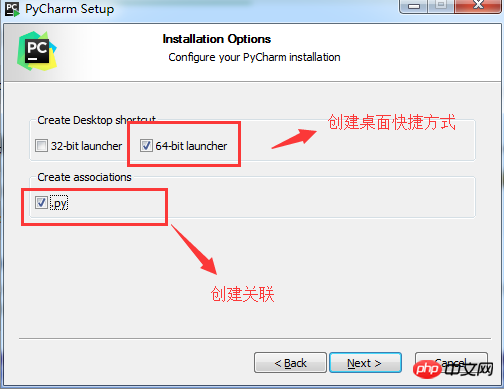
#Then choose to create a desktop shortcut and create an association. Of course, you can also choose Next without checking it by default. random.
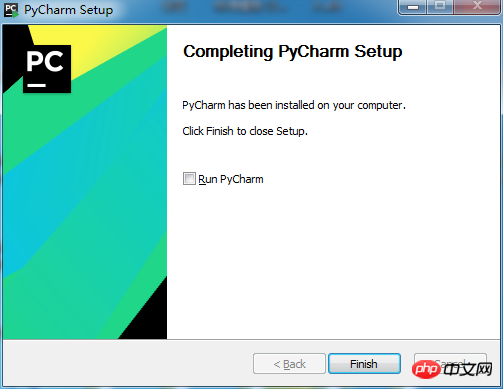
Then wait a few minutes for the installation to be completed. Click Finish below to complete the installation.
How about it? Is the installation very simple? The next step is activation.
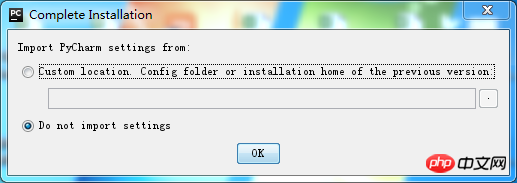
run. The following prompt will appear when you open it for the first time, which probably means choosing to import settings. Generally, if you use it for the first time, just select the second one without importing settings, and then click OK.
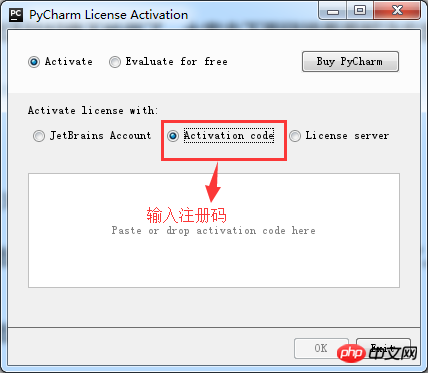
The following interface will appear. This is the most important step, activation. There are three options (the first is to enter the JetBrains account, which will not be introduced here).
The second method is to enter the registration code. You can find the registration code online. For example:
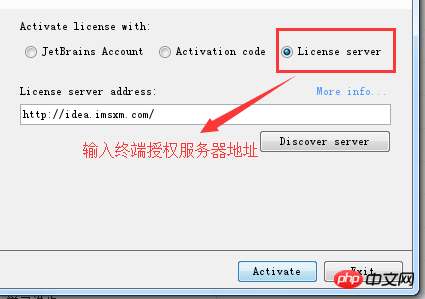
Here I choose the third option, using a server address authorized by the terminal. You can configure this server yourself, or you can find it online. I just found it online. . .
Can refer to: Or
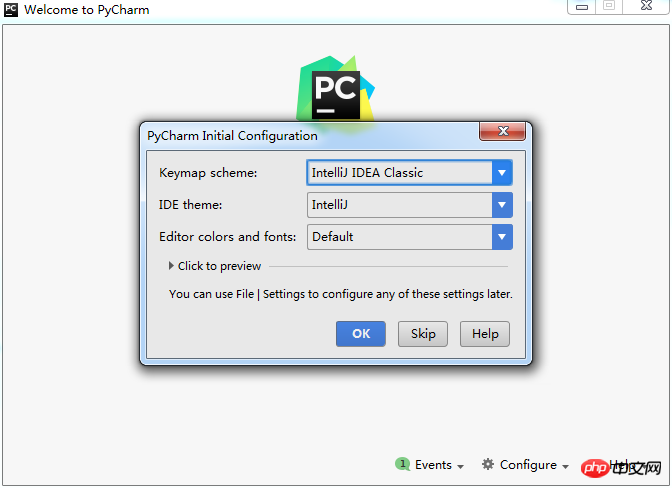
The following is the last step, which is to choose the shortcut key of which development tool to use , IDE theme, font and color settings, etc. I chose the default and clicked OK.
The installation of development tools has come to an end. Next, configure the Python development environment, that is, install the Python code parser.
For the installation of Python, you can refer to this installation of Python. It is very detailed and I won’t go into too much introduction.
After completing the installation of Python, let’s start installing the Python web development framework.
There are many development frameworks for Python, you can learn about them by yourself. I learned about both Flask and Django.
Beginners are generally recommended to learn Flask, a relatively lightweight web development framework, and Django, a heavyweight web development framework that belongs to MVC. (I won’t install this here, after all, I am also a beginner...)
First install Flask, a lightweight web development framework.
First run the windows command line. (i.e. cmd)
Input: pip install flask
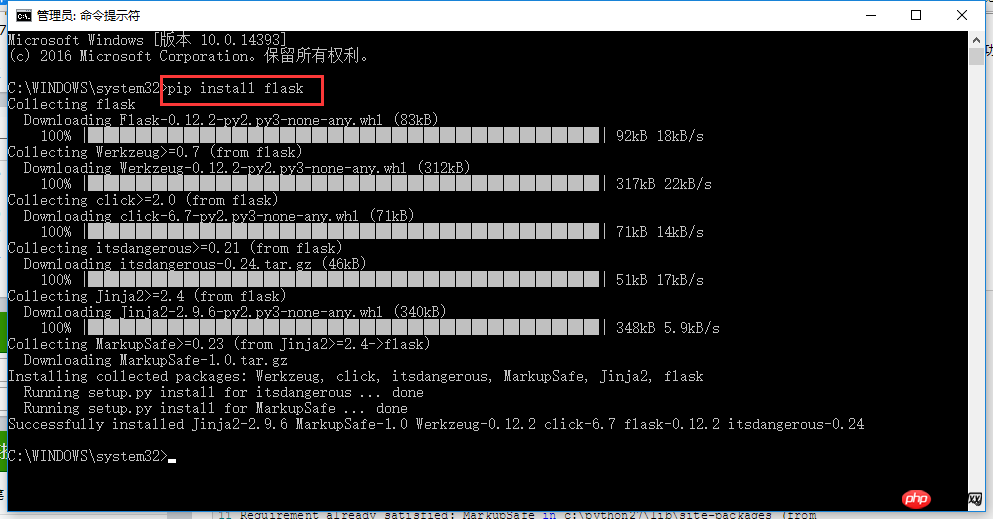
After the installation is completed, test whether it is successful. Enter: python

Then enter: from flask import Flask

If no error is reported, the installation is successful. . Continue to the next step. Install flask-sqlalchemy package, sqlalchemy I understand it as an ORM framework, similar to .net's EF framework.
First install sqlalchemy. Input: pip install sqlalchemy

After the installation is complete, then install flask-sqlalchemy. Enter: pip install flask_sqlalchemy
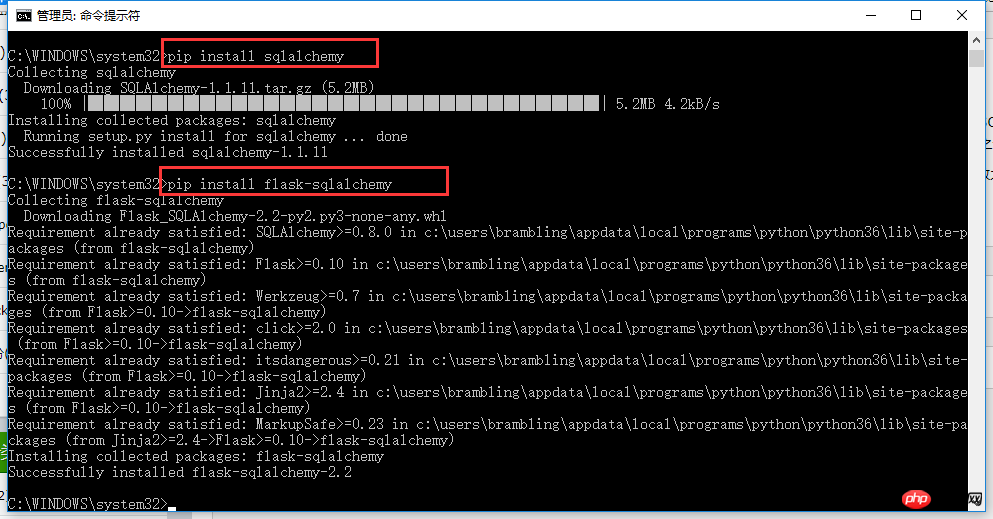
and then test whether the installation is successful. Input: from flask_sqlalchemy import SQLAlchemy

If there is still no error, the installation is successful. At this point, the Flask web development framework is installed.
The above is the detailed content of Python development tools and framework installation example steps. For more information, please follow other related articles on the PHP Chinese website!

Hot AI Tools

Undresser.AI Undress
AI-powered app for creating realistic nude photos

AI Clothes Remover
Online AI tool for removing clothes from photos.

Undress AI Tool
Undress images for free

Clothoff.io
AI clothes remover

AI Hentai Generator
Generate AI Hentai for free.

Hot Article

Hot Tools

Notepad++7.3.1
Easy-to-use and free code editor

SublimeText3 Chinese version
Chinese version, very easy to use

Zend Studio 13.0.1
Powerful PHP integrated development environment

Dreamweaver CS6
Visual web development tools

SublimeText3 Mac version
God-level code editing software (SublimeText3)

Hot Topics
 1371
1371
 52
52
 What is the function of C language sum?
Apr 03, 2025 pm 02:21 PM
There is no built-in sum function in C language, so it needs to be written by yourself. Sum can be achieved by traversing the array and accumulating elements: Loop version: Sum is calculated using for loop and array length. Pointer version: Use pointers to point to array elements, and efficient summing is achieved through self-increment pointers. Dynamically allocate array version: Dynamically allocate arrays and manage memory yourself, ensuring that allocated memory is freed to prevent memory leaks.
 Who gets paid more Python or JavaScript?
Apr 04, 2025 am 12:09 AM
There is no absolute salary for Python and JavaScript developers, depending on skills and industry needs. 1. Python may be paid more in data science and machine learning. 2. JavaScript has great demand in front-end and full-stack development, and its salary is also considerable. 3. Influencing factors include experience, geographical location, company size and specific skills.
 Is distinctIdistinguish related?
Apr 03, 2025 pm 10:30 PM
Although distinct and distinct are related to distinction, they are used differently: distinct (adjective) describes the uniqueness of things themselves and is used to emphasize differences between things; distinct (verb) represents the distinction behavior or ability, and is used to describe the discrimination process. In programming, distinct is often used to represent the uniqueness of elements in a collection, such as deduplication operations; distinct is reflected in the design of algorithms or functions, such as distinguishing odd and even numbers. When optimizing, the distinct operation should select the appropriate algorithm and data structure, while the distinct operation should optimize the distinction between logical efficiency and pay attention to writing clear and readable code.
 Does H5 page production require continuous maintenance?
Apr 05, 2025 pm 11:27 PM
The H5 page needs to be maintained continuously, because of factors such as code vulnerabilities, browser compatibility, performance optimization, security updates and user experience improvements. Effective maintenance methods include establishing a complete testing system, using version control tools, regularly monitoring page performance, collecting user feedback and formulating maintenance plans.
 How to understand !x in C?
Apr 03, 2025 pm 02:33 PM
!x Understanding !x is a logical non-operator in C language. It booleans the value of x, that is, true changes to false, false changes to true. But be aware that truth and falsehood in C are represented by numerical values rather than boolean types, non-zero is regarded as true, and only 0 is regarded as false. Therefore, !x deals with negative numbers the same as positive numbers and is considered true.
 What does sum mean in C language?
Apr 03, 2025 pm 02:36 PM
There is no built-in sum function in C for sum, but it can be implemented by: using a loop to accumulate elements one by one; using a pointer to access and accumulate elements one by one; for large data volumes, consider parallel calculations.
 How to obtain real-time application and viewer data on the 58.com work page?
Apr 05, 2025 am 08:06 AM
How to obtain dynamic data of 58.com work page while crawling? When crawling a work page of 58.com using crawler tools, you may encounter this...
 Copy and paste Love code Copy and paste Love code for free
Apr 04, 2025 am 06:48 AM
Copying and pasting the code is not impossible, but it should be treated with caution. Dependencies such as environment, libraries, versions, etc. in the code may not match the current project, resulting in errors or unpredictable results. Be sure to ensure the context is consistent, including file paths, dependent libraries, and Python versions. Additionally, when copying and pasting the code for a specific library, you may need to install the library and its dependencies. Common errors include path errors, version conflicts, and inconsistent code styles. Performance optimization needs to be redesigned or refactored according to the original purpose and constraints of the code. It is crucial to understand and debug copied code, and do not copy and paste blindly.


