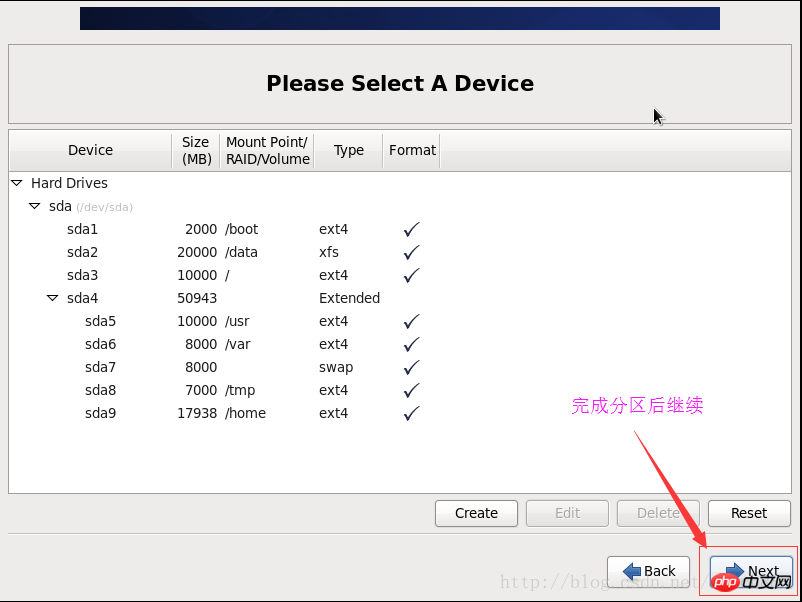
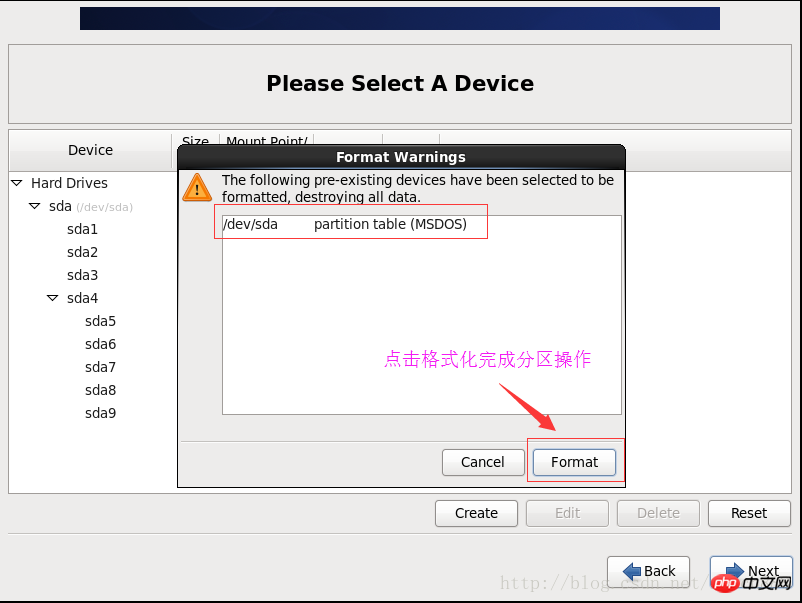
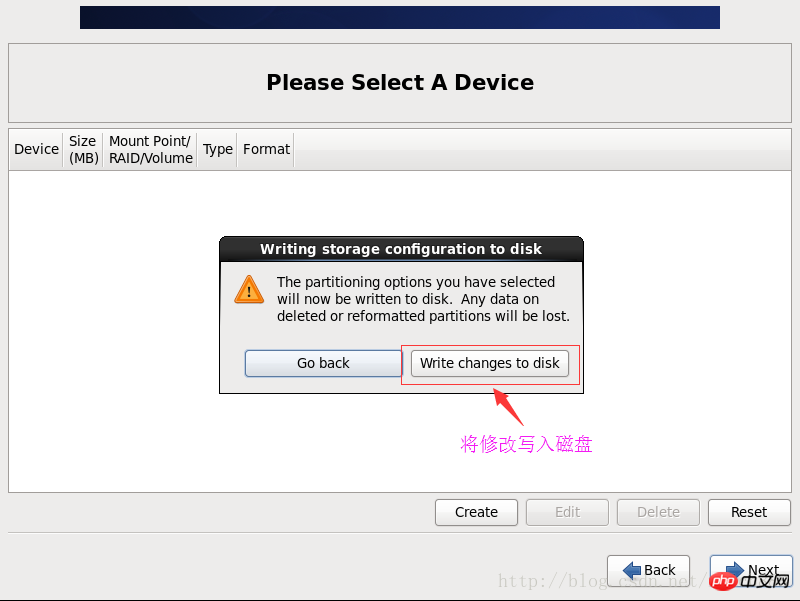
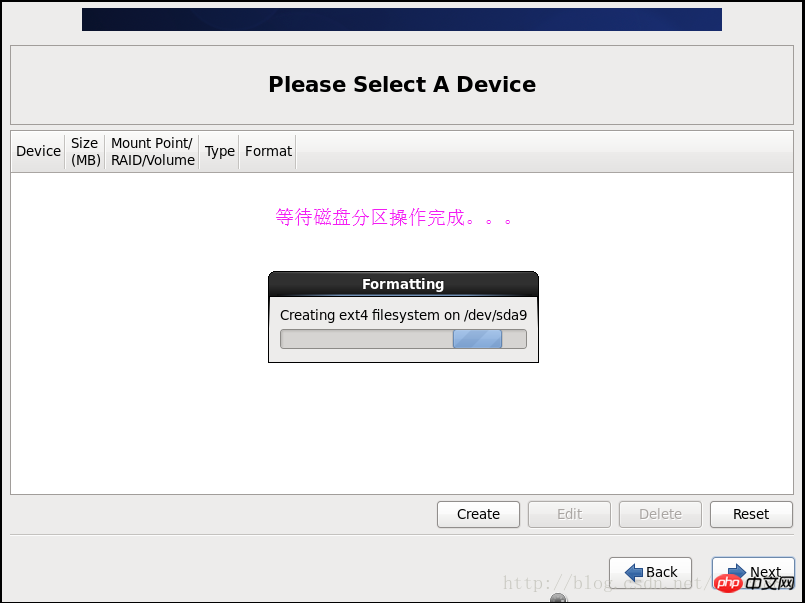
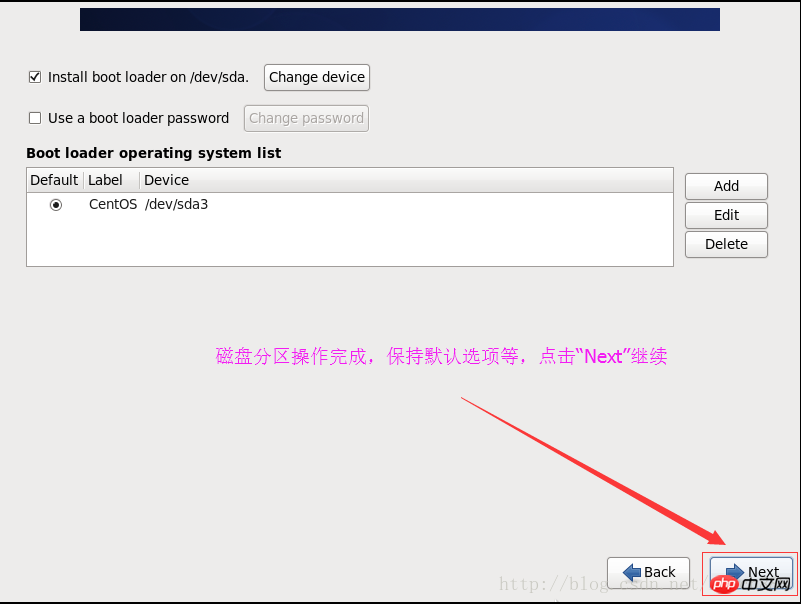
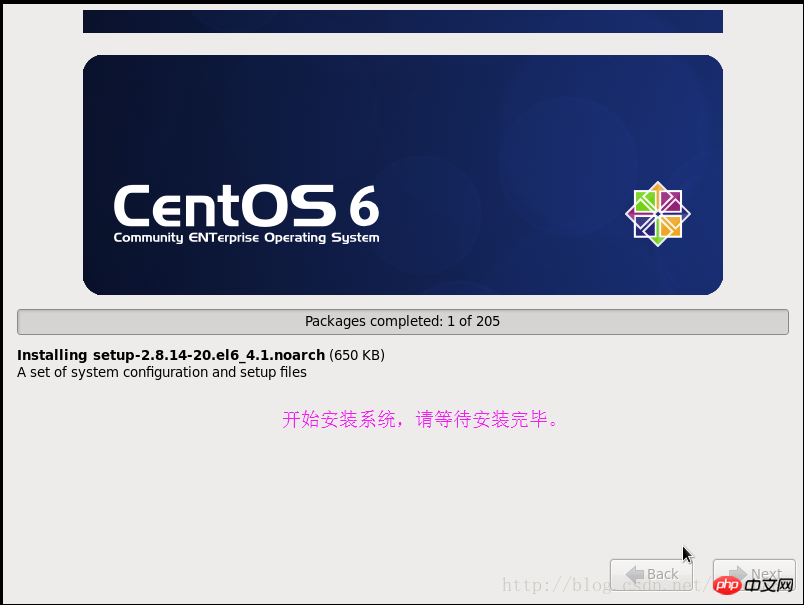
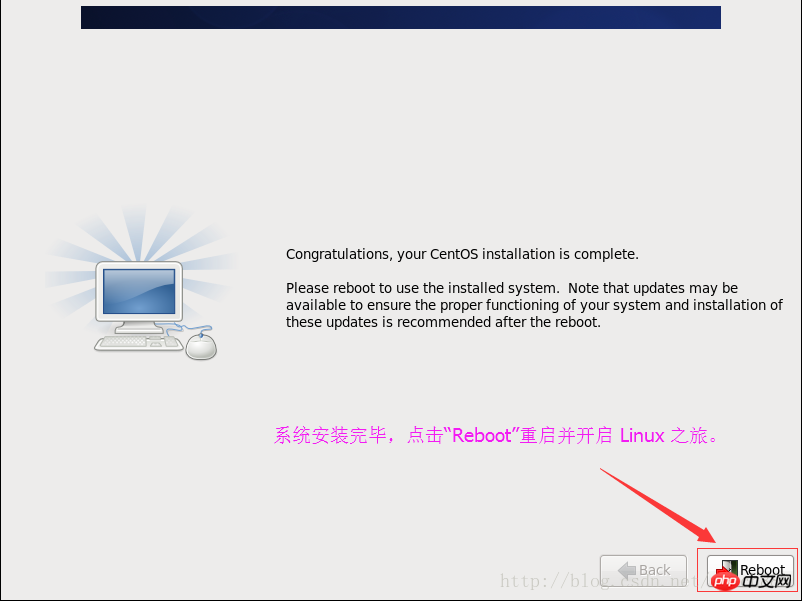
|
⑥ Restart the system
Command line mode modification IP address, gateway, DNS: (Invalid after restart)
① Modify IP address:
#ifconfigeth0 192.168.100.254 netmask 255.255.255.0
② Modify gateway
#routeadd default gw 192.168.100.1
③ Modify DNS
#echo"nameserver 192.168.100.1" >> /etc/resolv.conf
##④ Restart the network service
#/etc/init.d/networkrestrart or #service network restart
2. Virtual machine tool installation steps and methods
(1). Install VMware Tools steps
a. Install the perl script management tool
# yuminstall perl
b. Create the mount point directory
#mkdir/mnt/cdrom
c. Mount CD-ROM drive
mount/dev/cdrom /mnt/cdrom
d. Go to the system temporary directory and delete the previous vmware-tools-distrib directory
#cd /tmp
e. List the contents of the mount point directory and note the file name of the VMware Tools tar installer
#ls/mnt/cdrom
f. Unzip the installer
tar zxpf/mnt/cdrom/VMwareTools-x.x.x-yyyy.tar.gz
g. Unmount the CD-ROM drive
umount/dev/cdrom
h. Run the installation program (press Enter all the way)
#cdvmware-tools-distrib
#./vmware-install.pl
i . Configure VMware Tools (press Enter all the way)
#vmware-config-tools.pl ## j. Restart the system
(2), Install VirtualBox enhanced function steps
a. Install dependency packages
#yuminstall kernel-headers
#yuminstall kernel-devel
#yuminstall gcc*#yuminstall make
b. Install the enhancement package
#mkdir /mnt/cdrom
#mount/dev/cdrom /mnt/cdrom
#cd/mnt/cdrom
#./ VBoxLinuxAdditions.run
## c. Sharing settings
① Device->Allocate data space
② Mount/unmount command
mkdir/mnt/share
#mount –t vboxsfmyshare /mnt/share/
#umount -f/mnt/share
③ Automatically share at boot
#vim/etc/ fstab
Add an itemà myshare /mnt/share vboxsfrw,gid=100,uid=1000,auto 0 0
d. Re- Start the system
3. Linux basic environment configuration
Install wget network download tool
#yum-y install wget
Modify the CentOS installation source to increase downloads Speed
① Back up the original source
#mv/etc/yum.repos.d/CentOS-Base.repo /etc/yum .repos.d/CentOS-Base.repo.backup
② Install Alibaba Cloud Source
#wget -O/etc/yum. repos.d/CentOS-Base.repo
③ Generate cache
yummakecache
Install VIM editor
#yum-y install vim*
Turn off the firewall (modify SELINUX to disabled, use "#sestatus" to view Status)
#vim/etc/selinux/config
Turn off the iptables filter (use "#/sbin/chkconfig --list iptables "You can view the status)
#/sbin/chkconfigiptables off
##3. Common Linux commands
(001) You can use SecureCRT terminal software to operate Linux Management
(002) The most basic daily commands
Serial number |
##Command line |
Command Description |
Remarks |
| ##001
|
#su
| ##Get administrative rights |
|
##002
|
#passwd |
Change the current account password |
|
|
003
|
shutdown -h now |
Shut down immediately |
|
| ##004
reboot |
Reboot now |
|
##005 |
#dhclient |
Automatically obtain an IP address |
|
##006 |
more |
Show more file contents |
|
007 |
#cd .. |
Return to the previous directory |
|
##008 |
| #cd \
| ##Return to the root directory
|
|
009 |
#cd /etc
| Enter the etc directory, and so on |
|
##010 |
#rm -rf dirName |
Delete the directory with the specified name |
|
| ##011
|
df -Th
|
View partition information and format type
|
|
| 012
|
#service network status
|
Check the network card status
|
|
##013
| #service network stop
##Stop the network card |
|
|
014
|
#service network start |
Start the network card |
|
| ##015
service network restart |
Restart the network card |
|
| 016
#hostname |
##View the current host name |
|
##017 |
#sestatus |
View firewall status |
|
##018 |
| /sbin/chkconfig --list iptables
|
View iptables status
|
|
019 |
| ifconfig
|
Check the current network (network card) status |
##-a |
| ##020
|
/etc/init.d/network reload
|
Reimport the ifcfg-eth0 network configuration file
|
|
##021
| #netstat -r
| View current routing and gateway information
|
|
##022
|
|
|
|
|
|
|
|
|
|
|
|
|
|
|
|
|
|
|
|
|
|
|
|
|
|
|
|
|
|
## |
|
|
(003) Add new user
Add account: #useradd userName
Set password: #passwd userName
(004) Disable screensaver and power saving options
a. Disable options
-Blank -Store & GT; & GT; /etc/rc.Local Center and Ubuntu 10.04 Valid
Echo -NE "\ 033 [9; 0] & gt;/etc;/etc; /issue CentOS6/7 ArchlinuxUbuntu14.04 is valid
b. Restart
c. Execute command: #cat /sys/module/kernel/ parameters/consoleblank is 0 to take effect
4. Commonly used commands for Vim programmer
u 1 Switch to insert mode:
In command mode
A (lowercase) After the cursor, insert
# A (uppercase) The tail of the cursor is inserted
## i (Lowercase) Insert before the cursor ##I Newly inserted one empty line for inserting
O (uppercase) The newly inserted in one empty line before the cursor is inserted to insert
In the insert mode, press the ESC key Return to command mode
u 2 Switch to edit mode
Press [:] in command mode to enter edit mode, type the command and press Enter automatically Return to command mode or press the ESC key to return to command mode.
u 3 Save the file
In edit mode: W (lowercase) Save file
? Name 1 Save the file as file name 1
:ZZ (uppercase) Save the file and exit, equivalent to:wq
##:wq! (Lowercase) The file owner forces the save of the read-only file. If this operation is performed by someone other than the file owner, it will not succeed.
:q! #u 4 Copy (yank)
In command mode
yy or Y Copy the entire line where the cursor is
Y^Copy to the first of the traveling of the cursor, excluding the cursor location character
# $ Copy to the tail of the cursor, including the position character of the cursor
yw Copy a word, the cursor must be at the beginning of the word ##yG Copy to the end of the file
y1G Copy to the beginning of the file
nyy Copy n lines starting from the line where the cursor is located
u 5 Paste
In command mode
p (Lowercase) Paste after the cursor
P (Uppercase) Paste before the cursor
u 6 Delete
In command mode
x ## ( Lower case) Delete a word at the cursor position
##dG Deletes the entire line from the cursor position to the end of the file #dgg
D (uppercase) Delete to the end of the line, including the character at the cursor ## D $ the same effect
# D0 Delete to the head of the line, without the character at the cursor
D^is the same as D0 effect
: n1 ,n2d In edit mode, delete lines n1-n2
u 7 Undo
In command mode
u (Lower case) Undo not impossible to save unlimited times (approximately more than 500 times)
ctrl+r
In command mode
r (uppercase) Start replacing until you press the ESC key to exit the replacement, which is equivalent to pressing the insert key on the keyboard. ##S (uppercase) has the same effect as ss (lowercase)
C (uppercase) replaced the tail, including the character of the cursor
# C0 (lowercase, number 0) replaced the head of the line, excluding the character character of the cursor
c^ (lowercase) has the same effect as c0 (lowercase, number 0)
u 9 String search and replacement In command mode
/string Starting from the cursor and starting to search for the string string
/In search mode Press n (lowercase) to find the next one, press N (uppercase) to find the previous one
##?string Starting from the cursor and looking upward, search for characters from string ? Find n (lowercase) to find the previous one, press n (uppercase) to find the next
*Full match with the word under the light label
# g ## The upward part matches the cursor and goes down to the word
In edit mode
:setic When searching, ignore the case
:setnoic Ignore case when canceling search
:fstring (lowercase f and string have spaces) Search for strings matched in a line :%s/old/new/g out out out out out out out out out of
Whether to replace
:n1,n2s/old/new/g In the n1-n2 line, replace old with new without prompting
:n1,n2s/old/new/c In lines n1-n2, replace old with new and prompt whether to replace
. When there is / character in the replacement text old or new, it is required Use \ to escape
u 10 Display line number
In edit mode
: setnu(mber) Display line number :setnonu Cancel the display of line numbers
:setnu!
# Edit mode
: CE (NTER) Central Display Cursor ) Display the cursor of the right show ##: LE (FT) Left Display Cursor's Line Section Mode
J Merge the next line under the cursor to the line where the cursor is
##> # & lt; & lt; the line of the cursor is reduced (a tab)
# N & GT; & gt. ##n < Mode mx Set bookmarks, x is any letter, usually lowercase (a-z), when x is a lowercase letter, it is limited to switching between one file; when it is an uppercase letter, it can Switch between files. :marks View tags u 13 Cursor movement method In command mode H (uppercase, head) Move to the top of the first non -empty white character on the top of the screen M (uppercase, MID) move to the first non -blank white in the middle of the screen character L (uppercase, Last) Move to the bottom of the first non -empty white character at the bottom of the screen ((left small bracket) to move to the first sentence #) (right parenthesis) moves to the beginning of the next sentence { (left brace) moves to the beginning of the previous paragraph } (right large brackets) Move to the next paragraph %cursor jump to matching to the bracket, support {} () [[The cursor jumps to the beginning of the code block, that is, {处, request {exclusive one line ## steos cursor jump to the local variable definition point ## '' (Two single quotes) cursor jumps to the last stop of the stoppage ## H (lowercase) Move a character in the left direction, which is equivalent to the left direction key
L (lowercase) Move a character right, which is equivalent to the right direction key
k Use the up arrow key
j (lowercase) to move the cursor vertically down one line, which is equivalent to the down arrow key
ctrl+f (lowercase) Turn the whole page down
ctrl+b (backward) Turn the whole page up##ctrl+u (up) Turn half the page up ## Ctrl+D (down) turn down the half page ZZ (lowercase) to let the cursor live on the center of the screen #zt out out out out out there. ZB (
: N specifies to move to the first Line n u 14 Number prefix and repetition In command mode Add the number Before the command, indicate how many times the command will be processed. For example, 5dd indicates that the dd operation (delete the entire line where the cursor is located) will be executed 5 times. . (English period) is a command to repeat. Press it again to execute the last executed command. u 15 Browse the directory In edit mode :e Directory List the specified directory Files and directories under u 16 vim tips Tip 1 Import file or shell command execution results In edit mode :r file name 1 Introducing the content of file 1 into this file #:!Shell command Execute the shell command in vim. After execution, press Enter to go to the vim interface :r !shell command (there is a space between r and !) and import the result of the shell command execution into In this file Tip 2 Custom shortcut key operation In edit mode : map ^x command (There is a space between map and ^, and between x and the command. The ^ here is not the ^ on the keyboard. Instead, press ctrl+v to display the shortcut key, indicating the ctrl key. The following x is any Letter) After pressing ctrl+x, the corresponding command will be executed. Example: :map ^pI# When pressing When pressing the ctrl+p shortcut key combination, add a # sign at the beginning of the line where the cursor is located and return to the command mode
## Tip 3 Continuous line comments
Edit mode
: n1, n2/^/#/g (#is the annotation symbol, the annotation symbol in shell is#, c ++ is //)
:n1,n2/^/\/\//g C++ source file multi-line continuous comments
Tip 4 Replacement
:ab string1string2 After entering string1 in vim and pressing space or enter, string1 will be automatically replaced with string2
:unabstring1 Cancel the replacement of string1
vim configuration file
~/.vimrc
You can write the commands in edit mode inside, each command on a separate line, so that the commands inside will be automatically executed every time it is started.
five, Linux FAQs (excerpts^_^)
-------------------------- -------------------------------------------------- --------------------------------------------------
Use virtual machine cloning operation:
After cloning the virtual machine, there is a network card problem, resulting in the inability to access the Internet
After cloning: Use ip addr show to find that the network card name is eth1, not the default eth0
##View: /etc/sysconfig/network-scripts/ directory but can only see it Network card of eth0
Cause of failure:
Due to the cloned system, The virtual machine just modified the name of the virtual machine, MAC, etc., and added a line named eth1 to the /etc/udev/rules.d/70-persistent-net.rules file. The device name,
Solution:
1. Modify /etc/udev/rules.d/70-persistent-net.rules File
Delete the information about eth0. Modify the name of the second eth1 network card to eth0.
2. Modify the MAC address in the file /etc/udev/rules.d/70-persistent-net.rules
and the MAC address in /etc/sysconfig/network-scripts/ifcfg-eth0 should correspond to the MAC address of the virtual machine network card.
Question: Use the ifconfig command to check the CentOS in the virtual machine and find that there is no ipv4 address!
Solution:
Step 1: Change the network connection method from bridge to NAT connection
Step 2: Run in the terminal
#/etc/init.d/network restart
Step 3: Restart the system and run ifconfig Check.
-------------------------- -------------------------------------------------- -------------------------------------------------- -
six , Casually attachment (excerpt^_^)
## This first peek at linux most commonly used # 1, CD commandThis is a very basic command that everyone often needs to use. It is used to switch the current directory. Its parameter is the path of the directory to be switched to, which can be an absolute path or a relative path. For example:
[plain] viewplain copy
print?
1. cd /root/Docements # Switch to the directory /root/Docements
2. cd ./path # Switch to the path directory under the current directory, "." indicates the current directory
3. cd ../path # Switch to the path directory in the upper directory, ".." indicates the upper directory
2. ls command
This is a very useful command to view files and directories. It means list. It has many parameters. Here are some of the parameters I commonly use. Well, as follows:
[plain] viewplain copy
print?
1. -l: List long data strings, including file attributes and permission data, etc.
2. -a: List all files, including hidden files (beginning with . files) together (commonly used)
3. -d: Only list the directory itself, not the file data of the directory
4. -h: List the file capacity in a more readable way (GB, kB, etc.)
5. -R: List together with the contents of the subdirectory (recursively List), equal to all files in the directory will be displayed
Note: These parameters can also be used in combination, here are two examples: [plain] viewplain copy
print?
1. ls -l #Use long data string List the data files and directories in the current directory in the form of
2. ls -lR #List all files in the current directory in the form of a long data string
3. grep command
This command is often used to analyze a line of information. If there is the information we need, the line will be displayed. This command is usually used together with the pipeline command to filter and process the output of some commands. Its simple syntax is
[plain] viewplain copy print?
##1. grep [-acinv] [--color=auto] 'Find string' filename
Its common parameters are as follows:
[plain] viewplain copy
print?
1. -a: Search the binary file as a text file
2. -c: Calculate the number of times the 'search string' is found
3. -i: Ignore the difference between upper and lower case, that is, treat upper and lower case as the same
4. -v: Reverse selection, That is, the line without the 'search string' content is displayed
##5. # For example:
6. # Take out the file /etc/ The line containing MANPATH in man.config and coloring the found keyword
7. grep --color=auto 'MANPATH' /etc/man.config
8. # Output the contents of the output of ls -l that contain the letters file (not case sensitive)
9. ls -l | grep -i file
4. Find command
find is a very powerful command based on search. Relatively speaking, its use is relatively complicated and has many parameters. , so here we will list them in categories. Its basic syntax is as follows:
[plain] viewplain copy
print?
##1. find [PATH] [option] [action]
2.
3. # Time-related parameters:
4. -mtime n: n is a number, which means files that were changed "within one day" n days ago;
5. -mtime +n : List the file names that were changed n days ago (excluding n days itself);
6. -mtime -n: List the file names that have been changed within n days (including n days itself);
7. -newer file: List the file names that have been changed within n days (including n days itself); Also need a new file name ##8. # For example:
9. find /root -mtime 0 # Find today in the current directory Files with changes
10. ##11. # Parameters related to user or user group name:
12. -user name: List the files whose owner is name
##13. -group name: List the files whose user group is name
14. -uid n : List the files whose owner is user ID n
15. -gid n : List The user group to which the file belongs is the file with user group ID n
16. # For example:
17. find /home/ljianhui -user ljianhui # Find the file whose owner is ljianhui in the directory /home/ljianhui
18.
19. #With file permissions and Name-related parameters:
20. -name filename: Find the file named filename
21. -size [+- ]SIZE: Find files that are larger (+) or smaller (-) than SIZE
22. -tpye TYPE: Find files whose file type is TYPE, the value of TYPE Mainly include: general files (f), device files (b, c),
23. Directory (d), connection file (l), socket (s), FIFO pipe file (p);
24. -perm mode: search For files whose file permissions are exactly equal to mode, mode is represented by a number, such as 0755;
25. -perm -mode: Searching for file permissions must include all files with mode permissions, and mode is represented by a number Represents
##26. -perm +mode: Find files whose file permissions contain the permissions of any mode. The mode is represented by a number ##27. # For example:
28. find / -name passwd # Find the file named passwd
29. find . -perm 0755 # Find files with file permissions of 0755 in the current directory
30. find . -size +12k # Find files larger than 12KB in the current directory. Note that c means byte
5. cp command
This command is used to copy files, which means copy. It can also copy multiple files to a directory at one time. Below, its common parameters are as follows:
[plain] viewplain copy
print?
1. -a: Copy the attributes of the file together
2. -p: Copy the attributes of the file together instead of using the default method, similar to -a, Commonly used for backup
3. -i: If the target file already exists, it will first ask about the operation before overwriting ##4. -r: Recursive continuous copying, used for directory copying behavior
5. -u: The target file will be copied only when there is a difference between the target file and the source file
For example: [plain] viewplain copy
print?
1. cp -a file1 file2 #Copy file file1 to file file2 together with all the characteristics of the file
2. cp file1 file2 file3 dir #Copy files file1, file2, Copy file3 to the directory dir
6. mv command
This command is used to move files, directories or rename them, which means move. Its common parameters are as follows:
[plain] viewplain copy
print?
1. -f: force means if The target file already exists, and will be overwritten without asking.
2. -i: If the target file already exists, it will be asked whether to overwrite it
3. -u: If the target file already exists and is newer than the target file, it will be updated
Note: This command can move one file or multiple files at one time In a folder, but the last target file must be "directory".
For example:
[plain] viewplain copy
print?
1. mv file1 file2 file3 dir # Move the files file1, file2, and file3 to the directory dir
2. mv file1 file2 # Rename file file1 to file2
7, rm command
This command Used to delete files or directories, between removes, its common parameters are as follows:
[plain] viewplain copy
## print?
1. -f: means force, ignore files that do not exist, and no warning message will appear
2. -i : Interactive mode, the user will be asked whether to operate before deletion
3. -r : Recursive deletion, most commonly used for directory deletion, it is a very dangerous parameter
For example:
[plain] viewplain copy
print?
1. rm -i file # Delete the file file, you will be asked whether to perform the operation before deleting
2. rm -fr dir # Forced deletion of the directory All files in dir
8. ps command
This command is used to select and output the running status of a process at a certain point in time. It means process. Its common parameters are as follows:
[plain] viewplain copy
print?
##1. -A : All processes are displayed
2. -a : All processes not related to terminal ##3. -u : Effective user Related processes
4. -x: Generally used with the a parameter to list more complete information
5. -l : Longer, lists the PID information in more detail
In fact, we only need to remember the command parameters commonly used by ps. There are not many of them, as follows:
[plain] viewplain copy
print?
##1. ps aux # View all process data in the system
2. ps ax # View all processes not related to terminal
3. ps -lA # View all process data in the system
4. ps axjf # View the status of part of the process tree
9. Kill command
This command is used to send a signal to a certain job (%jobnumber) or a certain PID (number). It is usually used together with the ps and jobs commands. Its basic syntax is as follows:
[plain] viewplain copy
print?
##1. kill - signal PID
The common parameters of
signal are as follows:
Note: The first number is the code of the signal. You can use the code to replace the corresponding signal when using it.
[plain] viewplain copy
print?
##1. 1: SIGHUP, starts the terminated process
2. 2: SIGINT, equivalent to entering ctrl+c, interrupts the progress of a program
3 . 9: SIGKILL, forcefully interrupts a process
4. 15: SIGTERM, terminate the process in the normal way
5. 17: SIGSTOP, which is equivalent to entering ctrl+z to pause a process
For example:
[plain] viewplain copy
print?
1. # To end the first background job in the normal way of ending the process, you can use jobs Command to view the first worker process in the background
2. kill -SIGTERM %1
3. #Re-change the process ID to PID Process, PID can be obtained by filtering with ps command and grep command through pipe command
4. Kill -SIGHUP PID
10. Killall command
This command is used to send a signal to the process started by a command. Its general syntax is as follows:
[plain ] viewplain copy
print?
##1. killall [-iIe] [command name]
Its parameters are as follows:
[plain] viewplain copy
print?
1. -i: Interactive meaning, if you need to delete, the user will be asked
2. -e: Indicates the command name that follows Be consistent, but the command name cannot exceed 15 characters
3. -I: The command name ignores case
4. # For example:
5. kill all -SIGHUP syslogd # Restart syslogd
11. file command
This command is used to determine the basic data of the file following the file command, because the file type under Linux does not have the suffix points, so this command is very useful for us. Its usage is very simple. The basic syntax is as follows:
[plain] viewplain copy
print?
1. file filename
2. #For example:
3. file ./test
12. tar command
This command is used to package files. By default, compression is not performed. If the corresponding parameters are specified, it will also call the corresponding compression program (such as gzip, bzip, etc.) for compression and decompression. Its common parameters are as follows:
[plain] viewplain copy
## print?
1. -c: Create a new packaged file
2. -t: View the file names contained in the packaged file ##3. -x: Unpacking or decompression function, can be used with -C (uppercase) to specify the decompression directory. Note that -c, -t, -x cannot appear in the same command at the same time
4. -j: Compression/decompression via bzip2 support
5. -z: Compression/decompression via gzip support
6. -v: During the compression/decompression process, the file name being processed is displayed
7. -f filename: filename is the file to be processed
8. -C dir: Specify the compressed/decompressed directory dir
The above explanation may have made you faint. , but usually we only need to remember the following three commands:
[plain] viewplain copy
print?
1. Compression: tar -jcv -f filename.tar.bz2 The name of the file or directory to be processed
2. Query: tar - jtv -f filename.tar.bz2
3. Decompression: tar -jxv -f filename.tar.bz2 -C Directory to be decompressed
Note: The file name does not necessarily end with the suffix tar.bz2. This is mainly to illustrate that the compression program used is bzip2
13. cat command
This command is used to view the contents of a text file, followed by the file name to be viewed. Pipes can usually be used together with more and less, so that Data can be viewed page by page. For example:
[plain] viewplain copy
print?
1. cat text | less # View the contents of the text file
##2. # Note: This command can also be replaced by less text
14. chgrp command
This command is used to change the user group to which a file belongs. Its use is very simple. Its basic usage is as follows: [plain] viewplain copy
print?
##1. chgrp [-R] dirname/filename 2. -R: Make recursive and continuous changes to all files and subdirectories
3. # For example: 4. chgrp users -R ./dir # Recursively change the user group of all files in the dir directory and all files in the subdirectory to users
15 , chown command
This command is used to change the owner of the file. It is used in the same way as the chgrp command, except that the file attributes modified are different and will not be described in detail.
16. chmod command
This command is used to change the permissions of the file. Generally The usage is as follows:
[plain] viewplain copy ## print?
1. chmod [-R] xyz file or directory
2. -R: Make recursive and continuous changes, that is, all files in the subdirectory will be changed
At the same time, chmod can also use u (user), g (group), o (other), a (all) and + (join), - (delete), = (set) with rwx. Make changes to the file's permissions.
[plain] viewplain copy
## print?
1. # For example:
2. chmod 0755 file # Change the file permissions of file to -rxwr-xr-x
3. chmod g+w file # Add user group writable permissions to the file permissions
18. vim command
This command is mainly used for text editing. It takes one or more file names as parameters. If the file exists, it will be opened. If the file does not If it exists, create a file with that file name. Vim is a very easy-to-use text editor. It has many very easy-to-use commands, which I won’t go into details here. You can download detailed instructions for common vim operations from here.
19. gcc command
For a person who uses Linux to develop C programs Say, this command is very important. It is used to compile C language source program files into executable programs. Since many parameters of g++ are very similar to it, only the parameters of gcc are introduced here. Its common parameters are as follows:
[plain] viewplain copy
print?
##1. -o : means output, used to specify the file name to generate an executable file
2. -c : used to generate the source file into an object file (.o) and prevent the compiler Create a complete program
3. -I: Increase the path to search for header files during compilation
4. -L: Increase the path to search for header files during compilation Search the path of the static link library
5. -S: Generate the assembly code file from the source file
6. -lm: Indicates the standard library The function library named libm.a in the directory
7. -lpthread: Connect the thread library implemented by NPTL ##8. -std =: Used to specify the version of the C language to be used
9.
10. # For example:
11. # Compile the source file test.c into an executable program test according to the c99 standard
12. gcc -o test test.c -lm -std=c99
13. #Convert the source file test.c into the corresponding assembler source file test.s
14. gcc -S test .c
20. time command
This command is used to measure the execution time of a command (ie, program). It is very simple to use, just like entering commands normally, but just add a time in front of the command, for example:
[plain] viewplain copy
print?
##1. time ./process ##2. time ps aux
After the program or command is run, three times are output at the end. They are:
user: user CPU time, the user it takes to complete the command execution. CPU time, that is, the total execution time of commands in user mode;
system: system CPU time, the system CPU time taken to complete command execution, that is, the total execution time of commands in core mode;
real: actual time, the elapsed time from the start of the command line execution to the end of the run;
Note: The sum of user CPU time and system CPU time is CPU time, that is, the total time occupied by the CPU for execution of commands. The actual time is greater than the CPU time because Linux is a multi-tasking operating system. When executing a command, the system often has to process other tasks. Another issue that needs attention is that even if the same command is executed each time, the time it takes is different, and the time it takes is related to the system operation.
##50 Most Commonly Used Unix/Linux Commands
tar |
##grep
|
find
|
ssh
| ##sed | awk
| vim
| diff
| sort
##export |
|
args
|
ls |
pwd |
##cd |
##gzip |
bzip2 |
unzip |
shutdown |
##ftp |
crontab |
service
|
ps |
free |
top |
df |
kill |
rm |
cp |
mv |
cat |
mount |
chmod |
chown |
passwd |
mkdir |
ifconfig |
uname |
whereis |
whatis |
locate |
man |
tail |
less |
su |
mysql |
yum |
rpm |
ping |
date |
wget |
1. tar
Create a new tar file
##$ tar cvf archive_name.tar dirname/ Unzip the tar file
$ tar xvf archive_name.tar View tar file
$ tar tvf archive_name.tar More examples: The Ultimate Tar Command Tutorial with 10 PracticalExamples
2.grep
Find strings in files (case insensitive)
$ grep -i "the" demo_file Output the successfully matched line and the three lines after that line
$ grep -A 3 -i "example" demo_text Recursively query files containing the specified string in a folder
More examples: Get a Grip on the Grep! – 15 Practical Grep CommandExamples
3.find
Find the file with the specified file name (not case sensitive)
$ find -iname "MyProgram.c" Execute a command on the found file
$ find -iname "MyProgram.c" -exec md5sum {} \; Find all empty files in the home directory
More examples: Mommy, I found it! — 15 Practical Linux Find CommandExamples
4. ssh
Log in to the remote host
##$ ssh -l jsmith remotehost.example.com
Debug ssh client
##$ ssh -v -l jsmith remotehost.example.com
Display ssh client version
$ ssh -V More examples: 5 Basic Linux SSH Client Commands
5. sed
When you put the After the file is copied to Unix/Linux, each line of the file will end with \r\n. Sed can easily convert it to a Unix format file, using files ending with \n
Reverse the file contents and output
$ sed -n '1!G; h; p' filename Add line numbers to non-blank lines
$ sed '/./=' thegeekstuff.txt | sed 'N; s/\n/ /' More examples: Advanced Sed Substitution Examples
6. awk
Delete duplicate rows
$ awk '!($0 in array ) { array[$0]; print}' temp Print all lines in /etc/passwd that contain the same uid and gid
$ awk -F ':' '$3=$4'/etc/passwd
Print the specified part of the fields in the file
$ awk '{print $2,$5;}' employee.txt ##More examples: 8 Powerful Awk Built-in Variables – FS, OFS, RS, ORS, NR,NF, FILENAME, FNR
7. vim
Open the file and jump to page 10 Line
Open the file and jump to the first matching line
$ vim +/search-term filename.txt Open the file in read-only mode
More examples: How To Record and Play in Vim Editor
8.diff
Ignore whitespace characters when comparing
##$ diff -w name_list.txt name_list_new .txt
Sort the file contents in ascending order
$ sort names.txt
Sort the file contents in descending order
The third field sorts the contents of /etc/passwd
$ sort -t: -k 3n /etc/passwd | more 10.export
Output environment variables matching the string oracle
$ export | grep ORCALE
declare -x ORACLE_BASE="/u01/app/oracle"
##declare -x ORACLE_HOME="/u01/app/oracle/ product/10.2.0"
declare -x ORACLE_SID="med" ##declare -x ORACLE_TERM="xterm"
Set global environment variables
$ exportORACLE_HOME=/u01/app/oracle/product/10.2.0
11.xargs
Copy all image files to the external drive
$ ls *.jpg | xargs -n1 -i cp {}/external-hard-drive/directory
Compress and package all jpd files in the system
$ find / -name *.jpg -type f -print |xargs tar -cvzf images.tar.gz
Download file columns The pages corresponding to all the urls out
$ cat url-list.txt | xargs wget –c
12. ls
Display the file size in an easy-to-read format (displayed as MB, GB...)
$ ls -lh
-rw-r----- 1 ramesh team-dev 8.9M Jun12 15:27 arch-linux.txt.gz
List files in ascending order of last modification time
after the file name Display file types
$ ls -F
More examples: Unix LS Command: 15 Practical Examples
13.pwd
Output current working directory
14. cd
cd - can be used to switch between the two most recent working directories
shopt-s cdspell can be set to automatically spell-check cd commands
More examples: 6 Awesome Linux cd command Hacks
15.gzip
Create a *.gz compressed file
Extract *.gz file
Display Compression ratio
$ gzip -l *.gz
Compressed Uncompressed ratiouncompressed_name
23709 97975 75.8% asp-patch-rpms.txt
##16.bzip2
Create *.bz2 compressed file
##Unzip the *.bz2 file
More examples: BZ is Eazy! bzip2, bzgrep, bzcmp, bzdiff, bzcat, bzless,bzmore examples
17.uzip
Unzip the *.zip file
##$ unzip test. zip View the contents of the *.zip file
$ unzip -l jasper.zip
Archive: jasper .zip
Length Date Time Name
-------- ---- ---- ---- ----
40995 11-30-98 23:50 META-INF/MANIFEST.MF
##32169 08-25-98 21:07 classes_
15964 08-25-98 21:07 classes_names ##10542 08-25-98 21:07 classes_ncomp
18.shutdown
Turn off the system and shut it down immediately
Shut down after 10 minutes
##$ shutdown -h +10
$ shutdown -r now
Force system check during restart
$ shutdown -Fr now
ftp command and sftp The usage of the command is basically similar to connect to the ftp server and download multiple files
$ ftp IP/hostname
##ftp> mget *. html
Display the file list on the remote host
##ftp> mls *.html -
/ftptest/features.html
/ftptest/index.html
/ftptest/othertools.html
/ftptest/samplereport.html
/ftptest/usage.html
More Multiple examples: FTP and SFTP Beginners Guide with 10 Examples
20.crontab
View a user’s crontab entry
$ crontab -u john -l
Set a scheduled task to be executed every ten minutes
##*/10 * * * */home/ramesh/check-disk-space More examples: Linux Crontab: 15 Awesome Cron Job Examples
21.service
The service command is used to run SystemV init scripts. These scripts are generally located under the /etc/init.d file. This command can directly run the scripts in this folder without adding the path View service status
View all service status
Restart service
22. ps
ps command is used to display information about running processes. The ps command has many options , only a few are listed here
View all currently running processes
Display the currently running processes in a tree structure. The H option indicates the hierarchical structure of the process.
23.free
This command is used to display the current memory usage of the system, including used memory, Available memory and swap memory
By default free will output the memory usage in bytes
$ free ## total used buffers cached
##Mem: 3566408 1580220 1986188 2 03988 902960
-/+ buffers/cache: 473272 3093136
Swap: 4000176 0 4000176
If you want to output the memory usage in other units, you need to add an option, -g is GB, -m is MB, -k is KB, -b is bytes
$ free -g
## 0 ##-/+ buffers/cache: 0 2 ##Swap: 3 0 3
If you want to see a summary of all memory, please use the -t option. Using this option will add a summary line to the output
##ramesh@ramesh-laptop:~ $ free -t
## 204260 912556
-/+ buffers/cache: 475332 3091076 ##Swap: 4000176 0 4000176 ##Total: 7566584 159214 8 5974436 24.top
The top command will display the processes that occupy the most resources in the current system (sorted by CPU usage by default). If you want to change the sorting method, you can Clicking O (capital letter O) in the results list will display all the columns that can be used for sorting. At this time, you can select the column you want to sort
Current Sort Field: P forwindow 1:Def
##Select sort field via field letter,type any other key to return
a:PID = Process Id v: nDRT = Dirty Pages count # d:UID = User Id y: WCHAN = Sleeping in Function e: USER = User Name z: Flags = Task Flags
........
If you only want to display the processes of a specific user, you can use the -u option
More examples: Can You Top This? 15 Practical Linux Top Command Examples
25. df
Display the disk usage of the file system By default, df -k will output the disk usage in bytes
$ df -k
Filesystem 1K-blocks Used Available Use%Mounted on ##/dev/sda1 29530400 3233104 24797232 12% /
##/dev/sda2 120367992 50171596 64082060 44% /home
Use the -h option to display disk usage in a more readable way
$ df -h
Filesystem size used avail capacity iUree%Iused Mountain on
# This
#devfs 187Ki 187Ki 0Bi 100% 648 0 100% /dev
map -hosts 0Bi 0Bi 0Bi 100% 0 0 100% /net
map auto_home 0Bi 0Bi 100% 0 100% /home
/dev/disk0s4 466Gi 45Gi 421Gi 10% 112774 440997174 0% /Volumes/BOOTCAMP
//app@izenesoft.cn/public 2.7Ti 1.3Ti 1.4Ti 48% 0 18446744073709551615 0% /Volumes/public
Use the -T option Display file system type
$ df -T ##Filesystem Type 1K-blocks Used Available Use%Mounted on
/dev/sda1 ext4 29530400 3233120 24797216 12% / ##/dev/sda2 ext4 120367992 50171596 64082060 44% /home 26.kill
kill is used to terminate a process. Generally, we will first use ps -ef to find a process to get its process number, and then use kill -9 process number to terminate the process. You can also use killall, pkill, xkill to terminate the process
$ ps -ef | grep vim
ramesh 7243 7222 9 22:43 pts/2 00:00:00 vim
##$ kill -9 7243
More examples: 4 Ways to Kill a Process – kill, killall, pkill, xkill ##27. rm
Confirm before deleting the file
Use shell in the file name Metacharacters can be very useful. Print the file name and confirm before deleting the file
##$ rm -i file*
Recursively delete the folder Download all files and delete the folder
##$ rm -r example
Copy file 1 to file 2, keeping the file’s permissions, owner and timestamp
##$ cp -p file1 file2
Copy file1 to file2. If file2 exists, you will be prompted whether to overwrite it $ cp -i file1 file2
Rename the file name file1 to file2. If file2 exists, it will prompt whether to overwrite it
$ mv -i file1 file2
Note that if you use the -f option, there will be no prompt -v will output the renaming process. This option is very convenient when the file name contains wildcard characters
##$ mv -v file1 file2
You can view the contents of multiple files at one time. The following command will first print the contents of file1, and then print the contents of file2
$ cat file1 file2 The -n command can add a line number in front of each line
$ cat -n /etc/logrotate.conf
1 /var/log/btmp{
2 missingok
## 3 monthly
# 4 create 0660 root utmp ## 5 rotate 1 ## 6 }
##31.mount
If you want to mount a file system, you need to create a directory first, and then mount the file system to this directory
# mkdir /u01
# mount /dev/sdb1 /u01
You can also add it to fstab for automatic mounting, so that the file system will be loaded whenever the system is restarted
/ dev/sdb1 /u01 ext2 defaults 0 2
chmod is used to change the permissions of files and directories
Give the owner and group of the specified file all permissions (including read, write, execute)
$ chmod ug+rwx file .txt
Delete all permissions of the group belonging to the specified file ##$ chmod g-rwx file.txt
Modify the permissions of the directory, and recursively modify the permissions of all files and subdirectories under the directory $ chmod -R ug +rwx file.txt
More examples: 7 Chmod Command Examples for Beginners 33.chown
chown is used to change the file owner and group
At the same time, change the owner of a file to oracle and the group to db
$ chown oracle:dba dbora.sh
Use the -R option to recursively modify the directory and files under the directory $ chown -R oracle:dba /home/oracle
34.passwd
passwd is used to change the password on the command line. Using this command will ask you to enter the old password first, and then enter the new password
Super users can use this command to change the passwords of other users. At this time, there is no need to enter the user’s password
passwd can also delete a user's password. This command can only be operated by the root user to delete the password. After that, the user can log in to the system without entering a password
35. mkdir
Create a directory named temp in the home directory
Use the -p option to create all non-existing directories on a path
##$ mkdir -p dir1/dir2/dir3/dir4/ 36.ifconfig
ifconfig is used to view and configure the network interface of the Linux system View all network interfaces and their status
Use the up and down commands to start or Stop an interface
$ ifconfig eth0 up
##$ ifconfig eth0 down
More examples: Ifconfig: 7 Examples To Configure Network Interface 37.uname
uname can display some important system information, such as kernel name, host name, kernel version number, processor type and other information
$ uname - a
Linux john-laptop 2.6.32-24-generic #41-Ubuntu SMP Thu Aug 19 01:12:52 UTC 2010i686 GNU/Linux
38.whereis
When you don’t know the location of a command, you can use the whereis command. Use whereis below to find the location of ls
$ whereis ls
ls: /bin/ls/usr/share/man/man1/ls.1.gz /usr/share/man/ man1p/ls.1p.gz
When you want to find the location of an executable program, but the program is not in the default directory of whereis, you can use the -B option and specify the directory as the parameter of this option. The following command searches for the lsmk command in the /tmp directory
$ whereis -u -B /tmp -f lsmk
lsmk : /tmp/lsmk
##39.whatis
wathis displays the description information of a command
$ whatis ls ##ls (1) -list directory contents
$ whatis ifconfig ##ifconfig (8) - configure a network interface
##40.locate
locate naming can display the path of a specified file (or a group of files), it will use the database created by updatedb
The following command will Display all files containing crontab strings in the system
##$ locate crontab
/etc/anacrontab
/etc/crontab
/usr/bin/crontab ##/usr/share/doc/cron/examples /crontab2english.pl.gz
/usr/share/man/man1/crontab.1.gz
/usr/share/man /man5/anacrontab.5.gz ##/usr/share/man/man5/crontab.5.gz
/usr/share /vim/vim72/syntax/crontab.vim
41.man
Display the man page of a certain command
$ man crontab
Some commands may have multiple man pages, each man page corresponds to a command type
man page can generally be divided into 8 command types
1. User command
2. System call
3. c library functions
4. Device and network interface
5. File format
6. Games and screensavers
7. Environment, tables, macros
8. System Administrator commands and background running commands
For example, we execute whatiscrontab, you can see that crontab has two command types 1 and 5, so we can view command type 5 through the following command The man page
$ whatis crontab
##crontab (1) - maintain crontab files for individual users (V3)
crontab (5) - tables for driving cron
##$ man 5 crontab
42.tail
The tail command displays the last 10 lines of text in the file by default
You can specify the number of lines to display using the -n option
$ tail - n N filename.txt
More examples :3 Methods To View tail -f output of Multiple Log Files inOne Terminal
43.less
This naming can be used without loading the entire file Display the file content under the premise, this command will be very useful when viewing large log files
When you use the less command to open a file, the following two keys will bring you a lot of help. They are used to scroll forward and backward
CTRL+F – forward one window
CTRL+B – backward one window
More examples: Unix Less Command: 10 Tips for Effective Navigation
44. su
su command is used Switch user accounts. The super user can use this command to switch to any other user without entering the password
Use another username to execute a command. In the following example, user john uses the raj username to execute the ls command. After execution, the account of john is returned.
[john@ dev-server]$ su - raj -c 'ls'
[john@dev-server]$
Log in with the specified user and use the specified shell program instead of the default
##$ su -s 'SHELLNAME' USERNAME 45.mysql
mysql is probably the most widely used database on Linux, even if you don’t have mysql installed on your server , you can also use the mysql client to connect to the remote mysql server
To connect to a remote database, you need to enter the password
$ mysql -u root -p -h 192.168.1.2 Connect to local database
#You can also enter the database password in the command line. You only need to add the password as a parameter after -p. You can write it directly after p without adding a space
46.yum
Use yum to install apache
Update apache
Uninstall/delete apache
47.rpm Install apache using rpm
rpm -ivh httpd-2.2.3-22.0.1.el5.i386.rpm
Update apache
rpm -uvh httpd-2.2.3-22.0.1.el5.i386.rpm Uninstall/delete apache
# rpm -ev httpd
More examples: RPM Command: 15 Examples to Install, Uninstall, Upgrade,Query RPM Packages
##48.ping
ping a remote host, only send 5 packets
More examples: Ping Tutorial: 15 Effective Ping Command Examples
49.date
Set the system date
# date -s "01/31/201023:59:53" When you modify the system time, you need to synchronize the hardware time And system time
# hwclock –systohc
hwclock -- systohc –utc
##50.wget
Use wget to download software, music, and videos from the Internet
Download the file and save the file with the specified file name
|
 Operation and Maintenance
 Linux Operation and Maintenance
 How to install and configure CentOS 6.x?
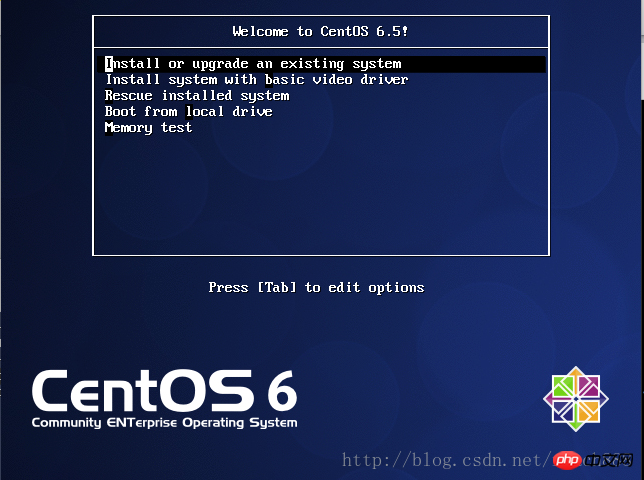
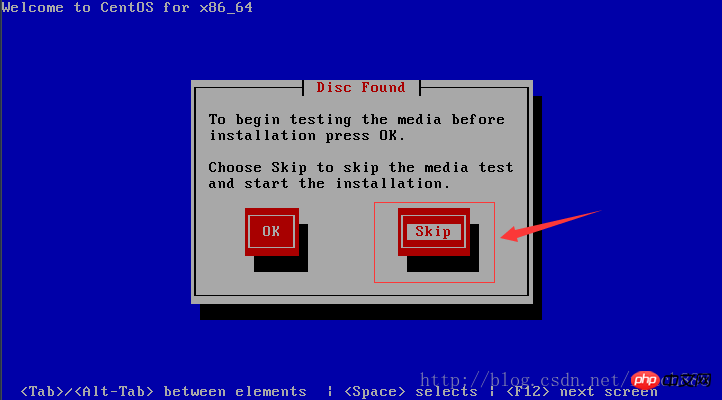

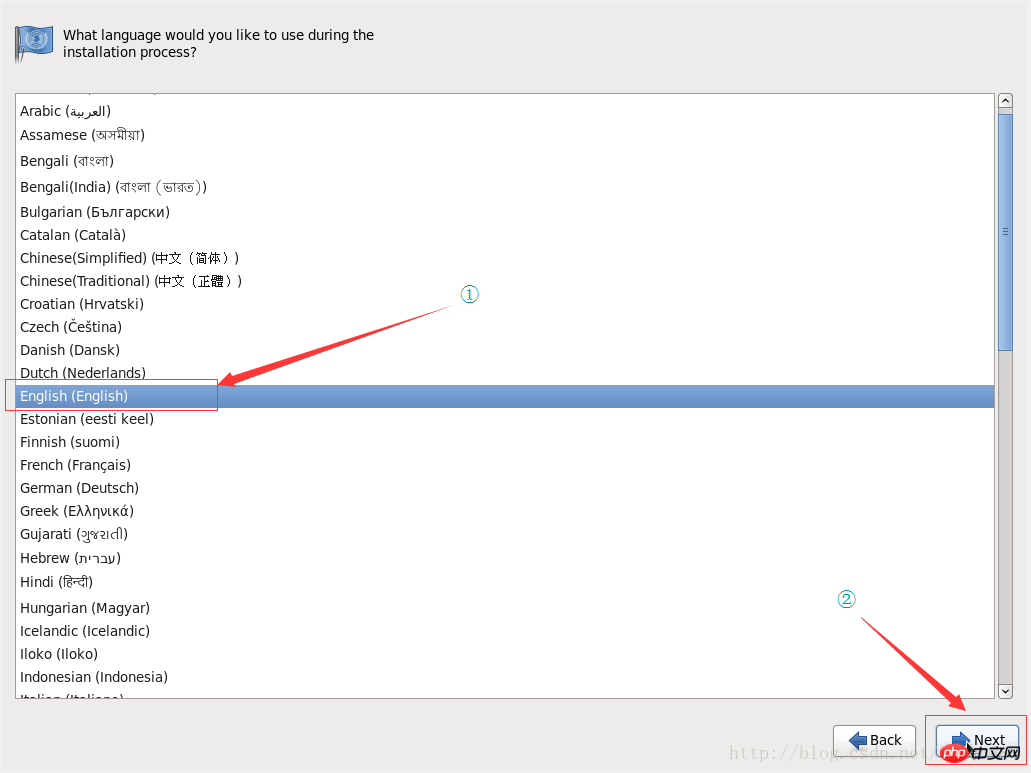
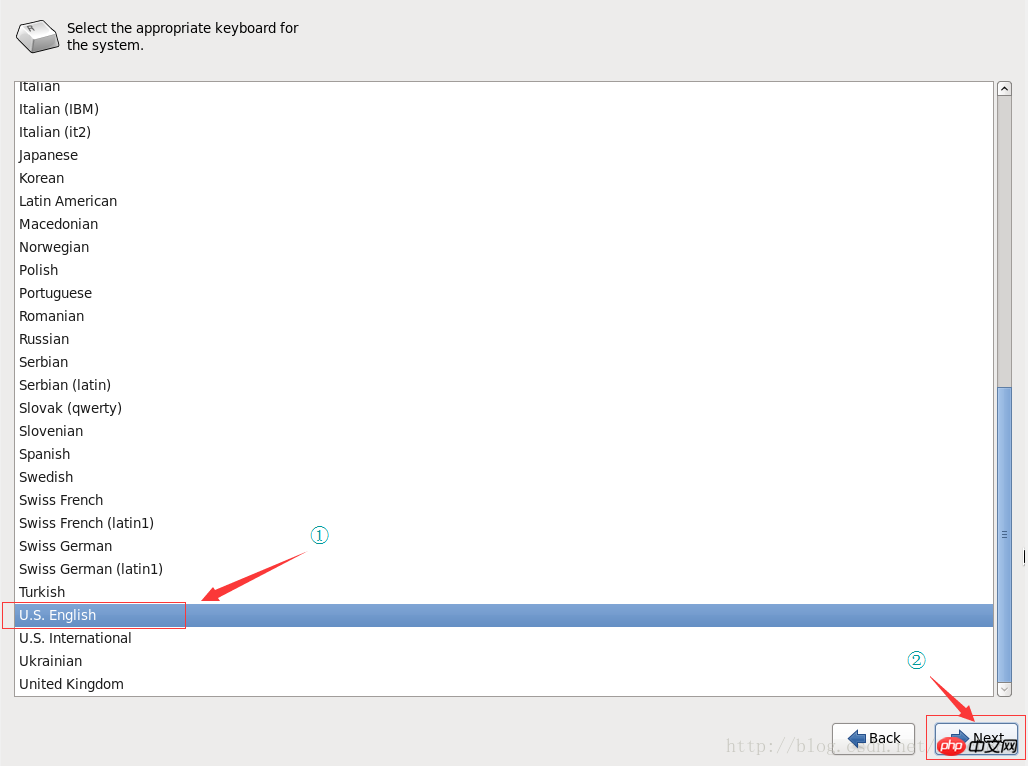
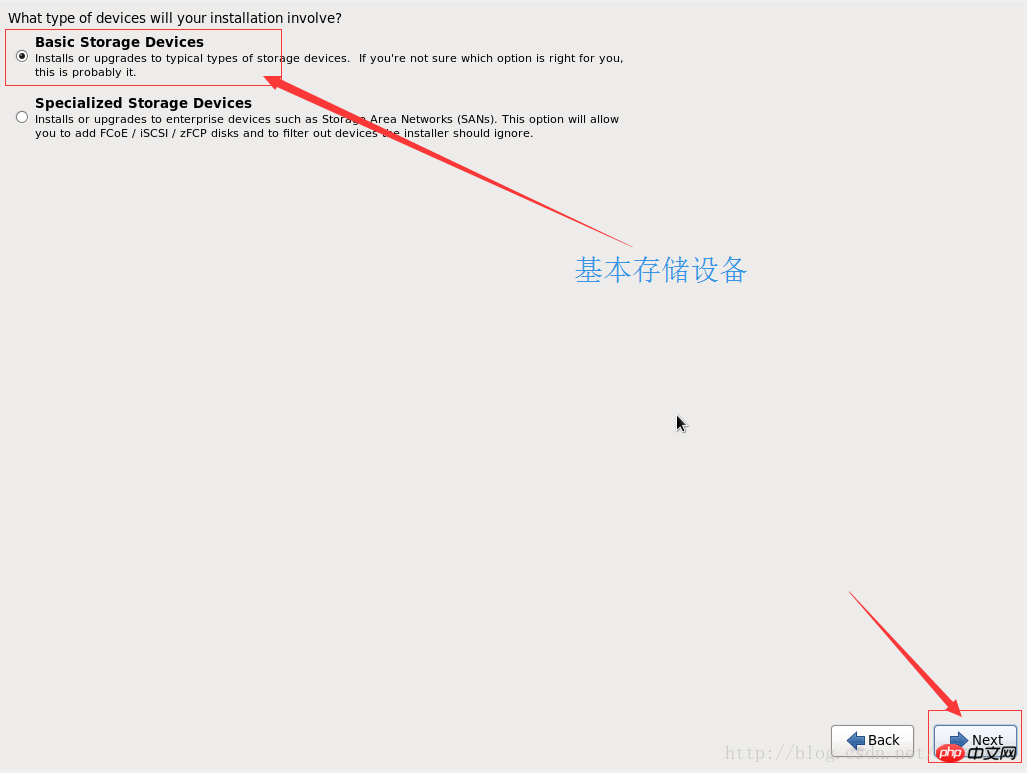
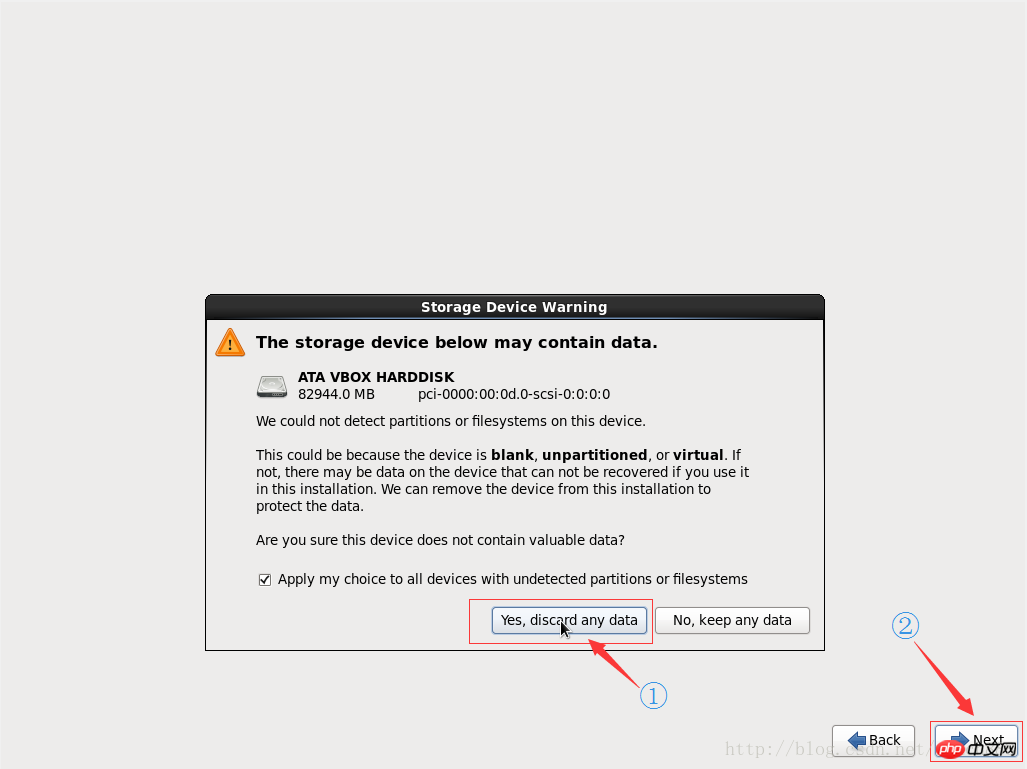
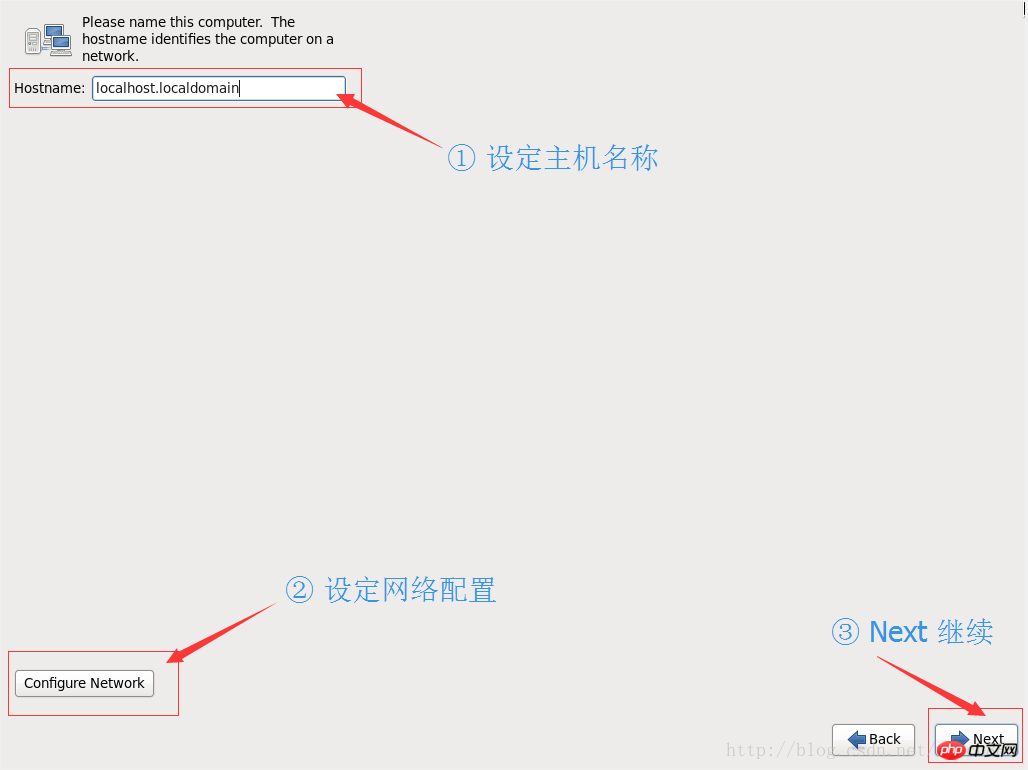
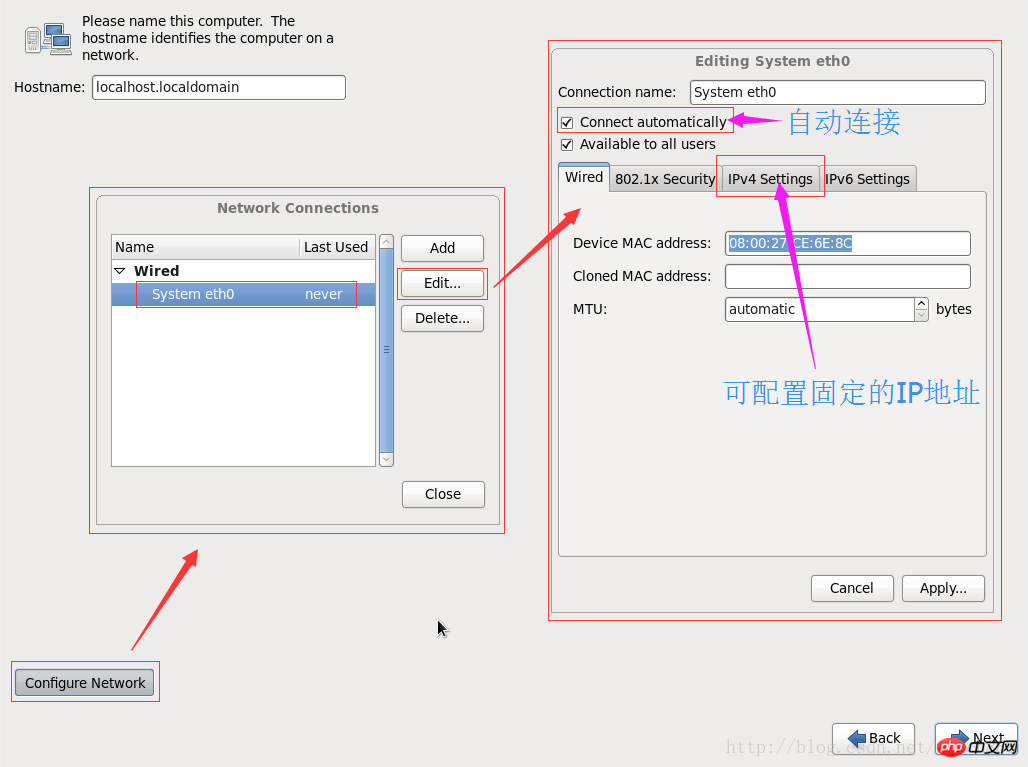
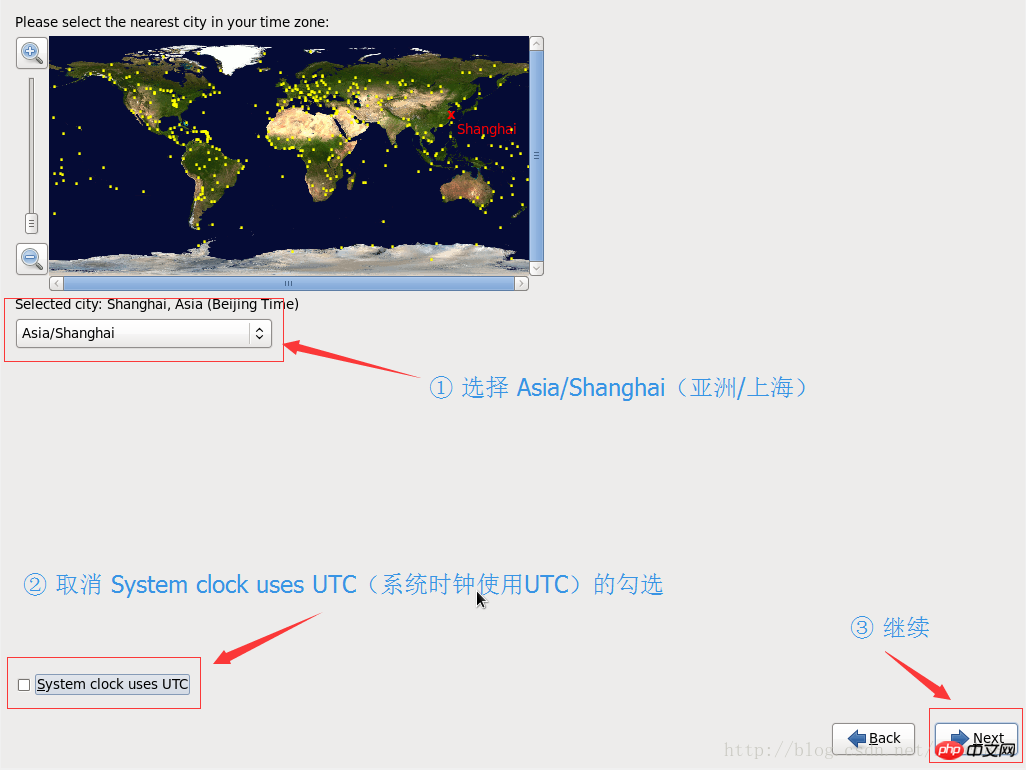

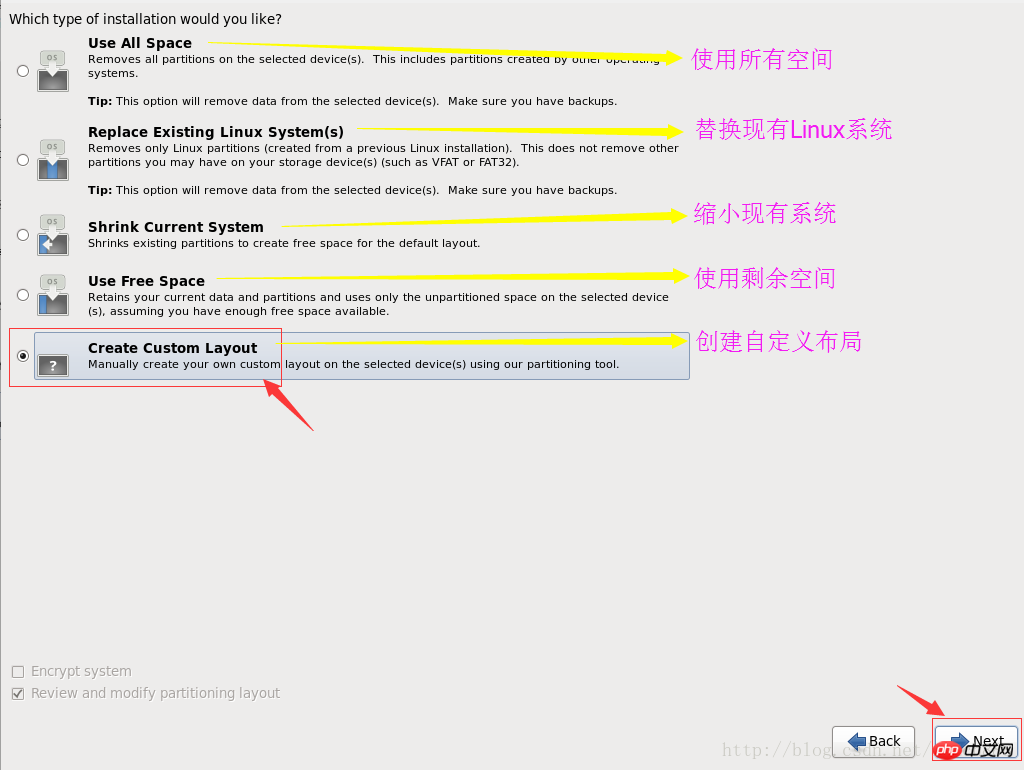
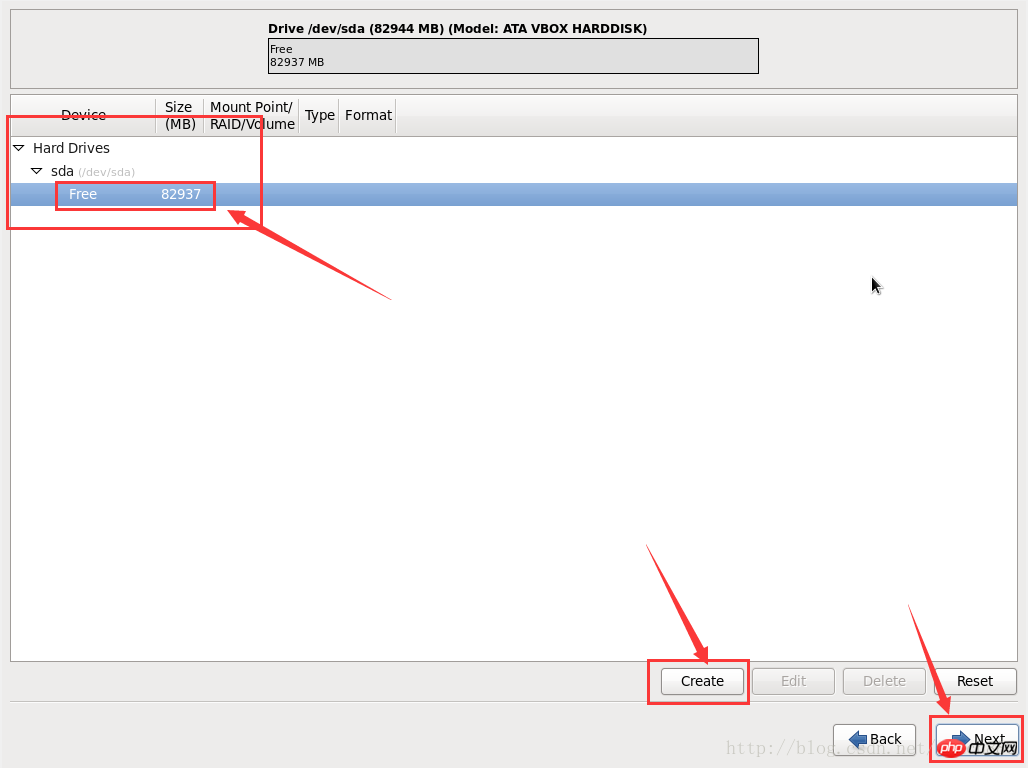
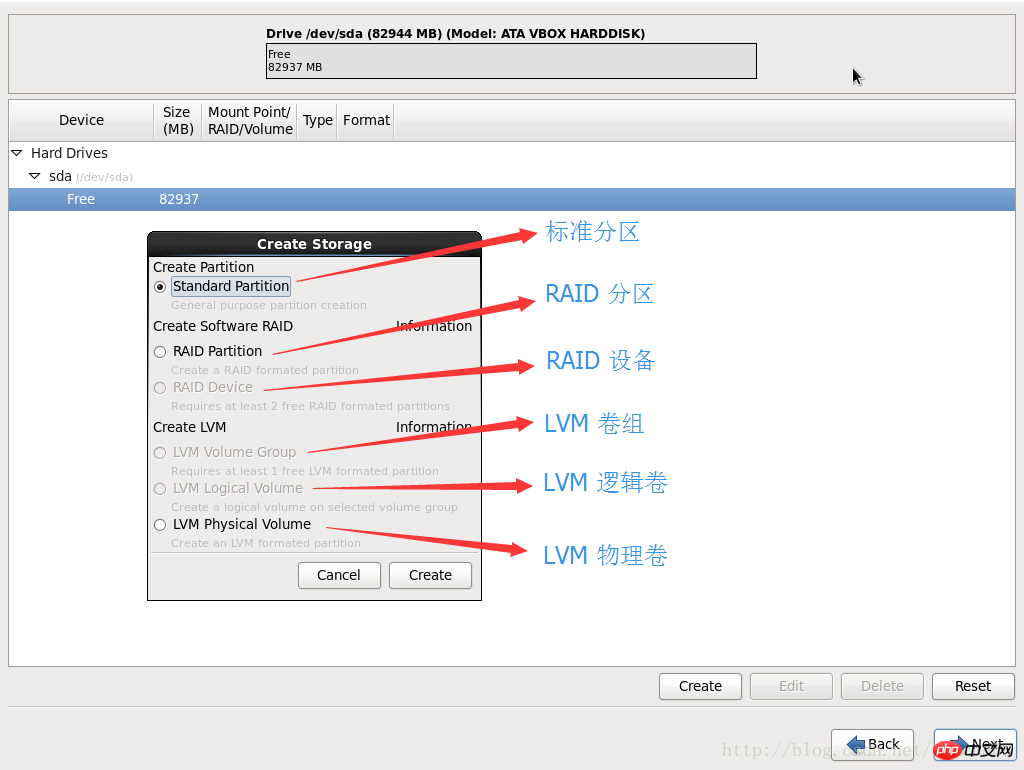
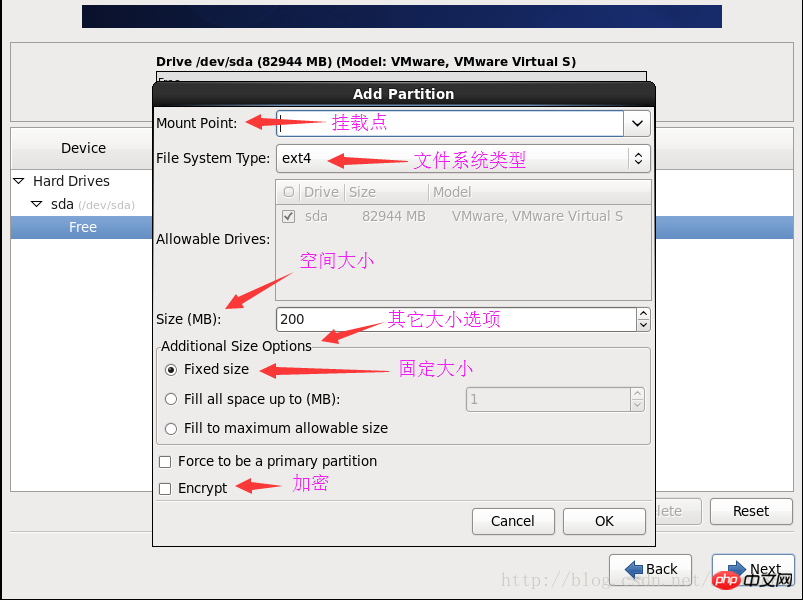 ## You can refer to the following plan to set up the disk partition:


 1376
1376
 52
52
 How to input Chinese in centos
Apr 07, 2024 pm 08:21 PM
 How to read USB disk files in centos7
Apr 07, 2024 pm 08:18 PM
 SCP usage tips-recursively exclude files
Apr 22, 2024 am 09:04 AM
 What to do if you forget your password to log in to centos
Apr 07, 2024 pm 07:33 PM
 How to enable root permissions in centos7
Apr 07, 2024 pm 08:03 PM
 How to obtain root permissions in centos7
Apr 07, 2024 pm 07:57 PM
 How to enter root permissions in centos
Apr 07, 2024 pm 08:06 PM
 How to configure gateway in centos
Apr 07, 2024 pm 08:51 PM


