The interface only defines some methods but does not implement them. It is mostly used in programming. It only designs what functions are needed, but does not implement any functions. These functions need to be inherited by another class (B). Class B is used to implement one or all of the functions.
Basic knowledge of interfaces:
Let’s briefly talk about interface testing. The two commonly used interfaces now are http api and rpc protocol interfaces. Today we mainly talk about: http api interface takes the path of http protocol. To distinguish the calling method, the request message format is in key-value format, and the return message is generally a json string;
Interface protocol: http, webservice, rpc, etc.
Request method: get, post method
Request parametersFormat:
a. Get requests are all through url?param=xxx¶m1=xxx
b. Common types of request parameters for post requests include: application/json, application/x-www-form-urlencoded, multipart/form-data, text/html, etc.
You also need to know the url of the interface, parameter type, data format of the returned result, and whether the interface has header, cookie and other information.
Implementation of the interface: request method -get, interface writing method:
1 2 3 4 5 6 7 8 9 10 11 12 13 14 15 16 17 18 19 20 21 22 23 24 25 26 27 28 29 30 31 32 33 34 35 36 37 38 39 40 41 42 43 44 45 46 47 48 | import flask
from flask import request
from flask import jsonify
import tools
import OP_db
import settings
'''
flask: web框架,可以通过flask提供的装饰器@server.route()将普通函数转换为服务
登录接口,需要传url、username、passwd
'''
#创建一个服务,把当前这个python文件当做一个服务
server = flask.Flask(name)
#server.config['JSON_AS_ASCII'] = False
# @server.route()可以将普通函数转变为服务 登录接口的路径、请求方式
@server.route('/login', methods=['get'])
def login():
# 获取通过url请求传参的数据
username = request.values.get('name')
# 获取url请求传的密码,明文
pwd = request.values.get('pwd')
# 判断用户名、密码都不为空,如果不传用户名、密码则username和pwd为None
if username and pwd:
# 获取加密后的密码
password = tools.md5_pwd(pwd)
#执行sql,如果查询的username和password不为空,说明数据库存在admin的账号
sql = 'select name,password from test where name= "%s" and password= "%s";' %(username, password)
# 从数据查询结果后,res返回是元组
res = OP_db.getconn(
host=settings.mysql_info['host'],
user=settings.mysql_info['user'],
passwd=settings.mysql_info['pwd'],
db=settings.mysql_info['db'],
port=settings.mysql_info['port'],
sql=sql
)
if res: #res的结果不为空,说明找到了username=admin的用户,且password为加密前的123456
resu = {'code': 200, 'message': '登录成功'}
return jsonify(resu) #将字典转换为json串, json是字符串
else:
resu = {'code': -1, 'message': '账号/密码错误'}
return jsonify(resu)
else:
res = {'code': 999, 'message': '必填参数未填写'}
return jsonify(res)
if name == 'main':
server.run(debug=True, port=8888, host=0.0.0.0) #指定端口、host,0.0.0.0代表不管几个网卡,任何ip都可以访问
|
Copy after login
For details on md5 encryption and database mysql operations, please refer to my other blogs~~ ~~~
get access interface:
After the project is started, the address of the interface is: http://127.0.0.1:5000/, and the default port is 5000.
Open the browser, enter the url http://127.0.0.1:5000/xxx?name=xxx&pwd=123456, followed by the interface address login, and use the parameters and url directly? Connected, each request parameter is directly connected using &. If the request is successful, {'code': 200, 'message': 'Login successful'} will be returned.
Request method-post, interface writing method:
1 2 3 4 5 6 7 8 9 10 11 12 13 14 15 16 17 18 19 20 21 22 23 24 25 26 27 28 29 30 31 32 33 34 35 36 37 38 39 40 41 42 43 44 45 46 47 | import flask
from flask import jsonify
from flask import request
from conf import opMysql
from conf import md5_create
'''
注册接口:
post请求,请求参数入参类型json
{
"username":"aaa",
"pwd":"123456",
"c_pwd":"123456"
}
'''
server = flask.Flask(name)
@server.route('/register', methods=['get', 'post'])
def registerPost():
#判断接口的请求方式是GET还是POST
if request.method == 'POST':
# 获取请求参数是json格式,返回结果是字典
params = request.json
username = params.get('username')
pwd = params.get('pwd')
confirmpwd = params.get('confirmpwd')
if username and pwd and confirmpwd: # 判断输入的用户名、密码、确认密码都不为空
select_sql = 'select username from lhldemo where username = "%s" ;'%username
# 查询注册的用户是否存在数据库,如果存在,则username不为空,否则username为空
res_mysql = opMysql.op_select(select_sql)
if res_mysql:
return jsonify({"code": 999, "mesg": "用户已注册"})
else:
if pwd == confirmpwd: # 判断pwd和confirmpwd一致
new_pwd = md5_create.md5_test(pwd) # 加密后的密码
insert_sql = 'insert into lhldemo(username,password) values("%s", "%s") ;' % (username, new_pwd)
opMysql.op_insert(insert_sql)
return jsonify({"code": 200, "msg": "注册成功"})
else:
return jsonify({"code":998, "msg":"密码不一样"})
else:
return jsonify({"code": 504, "msg": "必填项不能为空"})
else:
return jsonify({"code": 201, "msg": "请求方式不正确"})
if name == 'main':
#port可以指定端口,默认端口是5000
#host写成0.0.0.0的话,其他人可以访问,代表监听多块网卡上面,默认是127.0.0.1
server.run(debug=True, port=8899, host='0.0.0.0')
|
Copy after login
post access interface:
After the project is started, the interface address is: http://127.0.0.1:5000/, the default port is 5000.
Open the browser, enter the url http://127.0.0.1:5000/xxx, followed by the interface address register, use postman or jmeter to request the parameters, and the parameter type is json. If the request is successful, {'code': 200, 'message': 'Login successful'} will be returned.
Request method - both get and post can be accessed. The writing method is as follows:
1 2 3 4 5 6 7 8 9 10 11 12 13 14 15 16 17 18 19 20 21 22 23 24 25 26 27 28 29 30 31 32 33 34 35 36 37 38 39 40 41 42 43 | import flask
from flask import jsonify
from flask import request
from conf import opMysql
from conf import md5_create
'''
注册接口:
post请求,请求参数入参类型json
{
"username":"aaa",
"pwd":"123456",
"c_pwd":"123456"
}
'''
server = flask.Flask(name)
@server.route('/register', methods=['get', 'post'])
def registerPost():
#post请求获取请求的参数,返回结果类型是str
username = request.values.get('username')
pwd = request.values.get('pwd')
confirmpwd = request.values.get('confirmpwd')
if username and pwd and confirmpwd: # 判断输入的用户名、密码、确认密码都不为空
select_sql = 'select username from lhldemo where username = "%s" ;'%username
# 查询注册的用户是否存在数据库,如果存在,则username不为空,否则username为空
res_mysql = opMysql.op_select(select_sql)
if res_mysql:
return jsonify({"code": 999, "mesg": "用户已注册"})
else:
if pwd == confirmpwd: # 判断pwd和confirmpwd一致
new_pwd = md5_create.md5_test(pwd) # 加密后的密码
insert_sql = 'insert into lhldemo(username,password) values("%s", "%s") ;' % (username, new_pwd)
opMysql.op_insert(insert_sql)
return jsonify({"code": 200, "msg": "注册成功"})
else:
return jsonify({"code": 998, "msg": "密码不一样"})
else:
return jsonify({"code": 504, "msg": "必填项不能为空"})
if name == 'main':
#port可以指定端口,默认端口是5000
#host默认是127.0.0.1,写成0.0.0.0的话,其他人可以访问,代表监听多块网卡上面,
server.run(debug=True, port=8899, host='0.0.0.0')
|
Copy after login
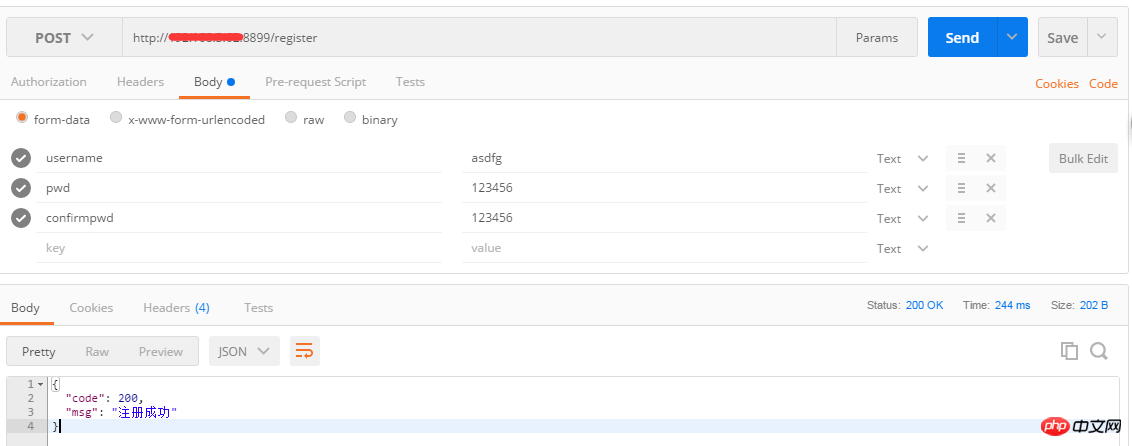
You can make a post request in the following two ways, one is as follows:
Splicing parameters through url:

Second access method: access through key-value method:

For redis-related operations, add hash type values to redis. The interface implementation is as follows:
1 2 3 4 5 6 7 8 9 10 11 12 13 14 15 16 17 18 19 20 21 22 23 24 25 26 27 28 | import flask
from flask import jsonify
from conf import opRedis
from flask import request
'''
redis添加数据,存入数据的类型是hash类型,格式如下:
post请求,请求参数入参类型json
{name:{"key":"value"}}
{"username":"url"}
'''
server = flask.Flask(name)
@server.route('/set_sties', methods =['post'])
def set_sties():
# 获取url请求参数,返回结果是字典{"username":"byz","url":"http://www.baidu.com"}
res_dic = request.json
if res_dic.get('username') and res_dic.get('url'):
username = res_dic.get('username')
url = res_dic.get('url')
#调用redis的hset方法,将username、url存入redis
opRedis.get_hashall('sites', username, url)
return jsonify({"code":20})
else:
return jsonify({"code": 204, "msg": "必填项不能为空"})
if name == 'main':
#port可以指定端口,默认端口是5000
#host默认是127.0.0.1,写成0.0.0.0的话,其他人可以访问,代表监听多块网卡上面,
server.run(debug=True, port=8899, host='0.0.0.0')
|
Copy after login
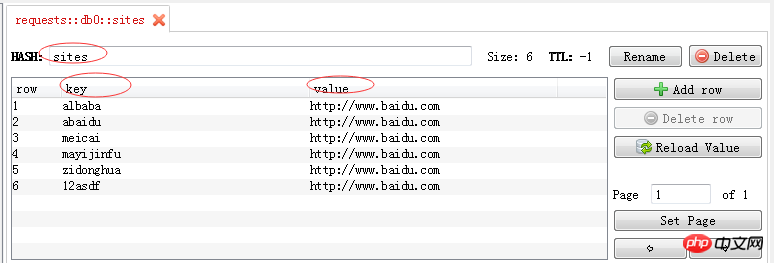
The hash type structure is as follows:
{name :{key,value}}, after the interface access is successful, the data storage structure in redis is as follows:

After redis adds the data, read the data in redis, and the interface is implemented As follows:
1 2 3 4 5 6 7 8 9 10 11 12 13 14 15 16 17 18 19 20 21 22 23 24 25 26 27 28 29 30 31 | import flask
from flask import jsonify
from conf import opRedis
from flask import request
'''
读取redis内的数据,redis数据存储类型是hash类型,格式如下
{name:{"key":"value"}}
思路: 1.通过redis的hgetall(name)方法读取redis所有数据,返回结果类型是字典
2. 循环字典内容,将元素类型转换为str,并将结果存放到字典内
'''
server = flask.Flask(name)
@server.route('/get_sties', methods =['get', 'post'])
def get_sties():
#获取redis内所有的数据信息,返回结果类型是字典,里面元素是bytes类型,name=sites
dic = opRedis.get_hashall('sites')
redisList = []
for key, value in dic.items():
redis_dic = {}
#将字典内元素的类型由bytes转换为str
k = key.decode()
v = value.decode()
#字典redis_dic内结构{"username:k, "url":v}
redis_dic['username'] = k
redis_dic['url'] = v
redisList.append(redis_dic)
return jsonify({"code": 200, "msg": redisList})
if name == 'main':
#port可以指定端口,默认端口是5000
#host默认是127.0.0.1,写成0.0.0.0的话,其他人可以访问,代表监听多块网卡上面,
server.run(debug=True, port=8899, host='0.0.0.0')
|
Copy after login
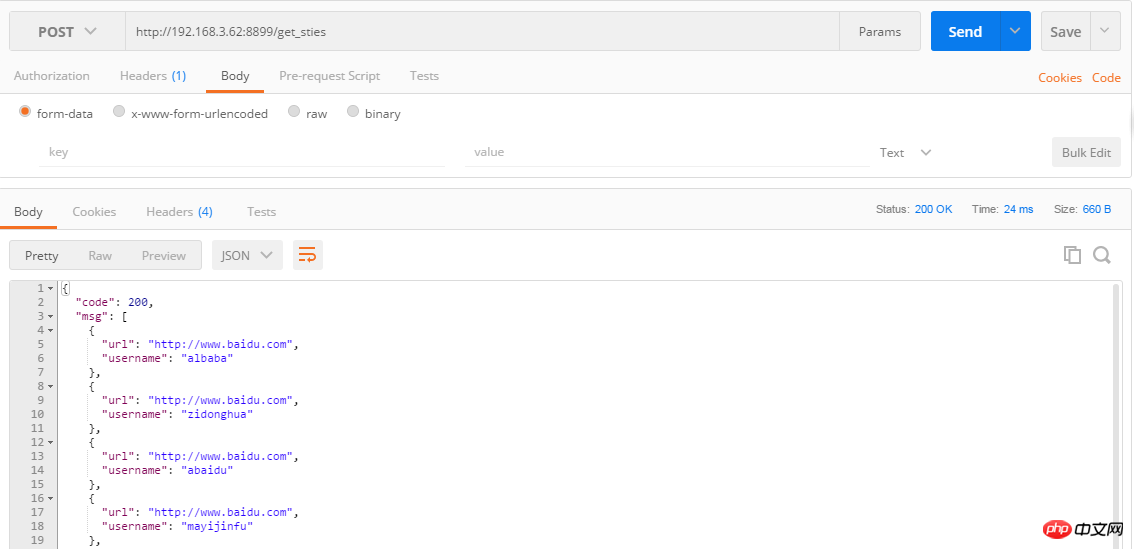
Through the postman method interface, the returned data is as follows:

To query the user, you need to pass the token value. The implementation method is as follows:
Login interface:
1 2 3 4 5 6 7 8 9 10 11 12 13 14 15 16 17 18 19 20 21 22 23 24 25 26 27 28 29 30 | import flask
from flask import jsonify
from conf import opRedis
from conf import opMysql
from conf import md5_create
from flask import request
import time
'''
登录接口,需要传用户名、密码,通过查询数据库判断用户是否登录成功,若登录成功则将用户名和token存入redis内
'''
server = flask.Flask(name)
@server.route('/login', methods=['get','post'])
def set_cookies():
name = request.values.get('username')
pwd = request.values.get('pwd')
if name and pwd:
#加密后的密码
new_pwd = md5_create.md5_test(pwd)
sql = 'select username,password from lhldemo where username="%s" and password="%s" ; ' % (name, new_pwd)
res_sql = opMysql.op_select(sql)
if res_sql:
token = name + time.strftime('%Y%m%d%H%M%S')
new_token = md5_create.md5_test(token)
#用户登录成功后,将name和token存入redis,存入数据类型是hash类型
opRedis.get_hashall('user', name, new_token)
return jsonify({"code": 200})
else:
return jsonify({"code": 204})
else:
return jsonify({"code": 304})
|
Copy after login

To query the user, you need to pass the user name and token value. Implementation method As follows:
1 2 3 4 5 6 7 8 9 10 11 12 13 14 15 16 17 18 19 20 21 22 23 24 25 26 27 28 29 30 31 32 33 34 35 | import flask
from flask import jsonify
from conf import opRedis
from conf import opMysql
from conf import md5_create
from flask import request
import time
'''
登录接口,需要传用户名、密码,通过查询数据库判断用户是否登录成功,若登录成功则将用户名和token存入redis内
'''
server = flask.Flask(name)
@server.route('/search_user', methods=['get','post'])
def set_cookies():
name = request.values.get('username')
token = request.values.get('token')
print('token',token)
if name and token:
#查看数据库,看查询的用户是否存在,若存在则返回用户id
sql = 'select id from lhldemo where username="%s" ; ' % (name)
res_sql = opMysql.op_select(sql)
if res_sql:
#从redis中获取user下的用户名对应的token值
res_token = opRedis.getRedis('user:'+name)26 if res_token == token:
return jsonify({"msg": "用户id", "id": res_sql})
else:
return jsonify({"msg": "token错误"})
else:
return jsonify({"code": "用户不存在"})
else:
return jsonify({"code": "必填项不能为空"})
if name == 'main':
#port可以指定端口,默认端口是5000
#host默认是127.0.0.1,写成0.0.0.0的话,其他人可以访问,代表监听多块网卡上面,
server.run(debug=True, port=8899, host='0.0.0.0')
|
Copy after login
The above are some interface scenarios commonly used in work. When testing payment-related interfaces or third-party interfaces, you can mock the interface to return fake data~~~ ~
The above is the detailed content of How does python implement interfaces?. For more information, please follow other related articles on the PHP Chinese website!


