The shell process will record the commands submitted by the user for execution
You can use history to view:
[root@localhost dev]# history 1  ss -tnl2  ifconfig3  vi /etc/sysconfig/network-scripts/ifcfg-ens33 4  reboot 5  systemctl stop firewalld6  systemctl disable firewalld7  ifconfig8  ifconfig9  startx   10  ping 114.114.114.114
   11  top
......  140  who -b  141  who -r  142  date
  143  w
  144  history
Customized history function
HISTSIZE: The number of command histories that the shell process can retain
[root@localhost dev]# echo $HISTSIZE1000
HISTFILE: The number of command histories that can be saved persistently file, when you log out, the command history will be written to HISTFILE
[root@localhost dev]# echo $HISTFILE/root/.bash_history
[root@localhost dev]# cat /root/.bash_history
ss -tnlifconfigvi /etc/sysconfig/network-scripts/ifcfg-ens33
reboot
systemctl stop firewalld
systemctl disable firewalldifconfigifconfigstartxping 114.114.114.114topifconfigifconfig --help
type lstype ifconfig......
bash
export nameecho $name
bash
HISTFILESIZE: The size of the command history file
[root@localhost dev]# echo $HISTFILESIZE1000
historyCommon command usage
-c: Clear command history
-d offset: Delete Specify the command history, offset is the specified number of lines
-r: Read the command history from the file into the history list
-w: Append the commands in the history list to the history file
history #: Display the latest # commands
Call the commands in the command history list
! #: Execute the #th command in the history list again
!!: Execute the previous command
again! STRING: Execute the latest command starting with STRING in the command history list again
Calling the last parameter of the previous command
Shortcut keys : Press ESC and then click .
Or use the string:!$
Control the recording method of commands
[root@localhost /]# echo $HISTCONTROL
ignoredups
ignoredups: Ignore duplicate commands;
ignorespace: Ignore commands starting with whitespace characters;
ignoreboth: The above two take effect at the same time;
Command completion
When the shell program receives the user’s request to execute a command, the leftmost string will be As a command
Command search mechanism: First search for internal commands, according to the directory set in the PATH environment variable, search the file names in the directory one by one from left to right
[root@localhost /]# echo $PATH/usr/local/sbin:/usr/local/bin:/usr/sbin:/usr/bin:/root/bin
Use the Tab key to complete
Path completion
Under the given starting path, correspond to The leading string under the path to match each file under the starting path one by one
mkdir
make directories Create directories
mkdir [OPTION]... DIRECTORY...
Common options:
-p: Automatically create parent directories on demand
[root@localhost tmp]# mkdir -p /tmp/x/y/z
[root@localhost tmp]# cd /tmp/x/y/z/[root@localhost z]#
-v: Display detailed process, verbose
[root@localhost z]# mkdir -pv /tmp/a/b/cmkdir: created directory ‘/tmp/a’mkdir: created directory ‘/tmp/a/b’mkdir: created directory ‘/tmp/a/b/c’
-m MODE: Directly give permissions
Note: Path base name For the target of the command, the path before the base name must exist
rmdir
remove empty direcories
Remove empty directories
Common options:
-p: After deleting a directory, if its parent directory is empty, delete it as well
-v: Display process
[root@localhost b]# rmdir -pv /tmp/a/b/c/rmdir: removing directory, ‘/tmp/a/b/c/’rmdir: removing directory, ‘/tmp/a/b’rmdir: removing directory, ‘/tmp/a’rmdir: removing directory, ‘/tmp’rmdir: failed to remove directory ‘/tmp’: Device or resource busy
{}: Can carry a comma-separated path, And can expand it into multiple paths
For example: /tmp/{a,b} is equivalent to /tmp/a /tmp/b
Example:
How to create /tmp/x/y1, /tmp/x/y2, /tmp/x/y1/a, /tmp/x/y1/b?
[root@localhost tmp]# mkdir -p /tmp/x/{y1/{a,b},y2}How to create a_c, a_d, b_c, b_d?
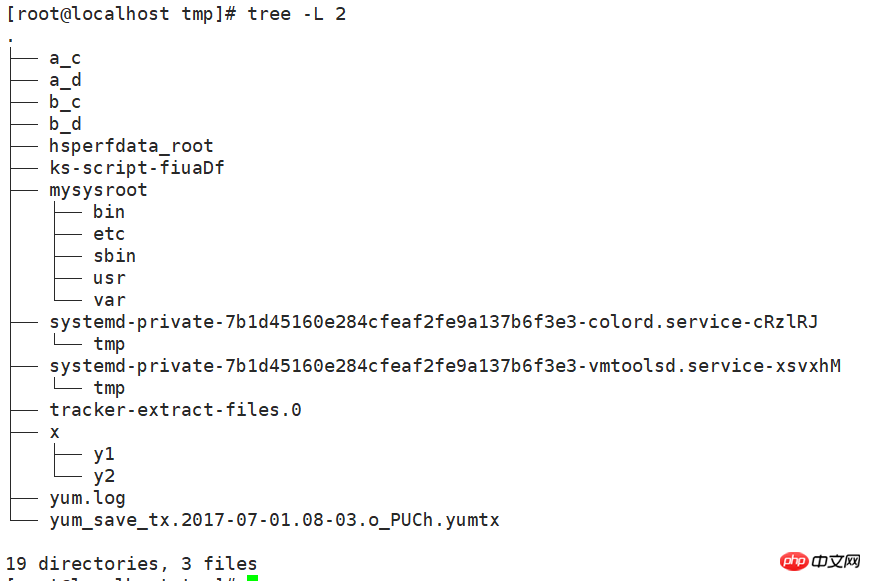
[root@localhost tmp]# mkdir -p /tmp/{a,b}_{c,d}How to create the following directory structure:
            /tmp/mysysroot/
                |-- bin|-- etc|   `-- sysconfig|       `-- network-scripts|-- sbin|-- usr|   |-- bin|   |-- lib|   |-- lib64|   |-- local|   |   |-- bin|   |   |-- etc|   |   |-- lib|   |   `-- sbin|   `-- sbin
                `-- var|-- cache|-- log
                    `-- run
mkdir -p /tmp/mysysroot/{bin,etc/sysconfig/networkscripts,sbin,usr/{bin,lib,lib64,local/{bin,etc,lib,sbin},sbin},var/{cache,log,run}}
tree
You can use tree to view the hierarchical structure of the directory

-L #, specify the level to be displayed

bash outputs this result through the status return value:
Success: 0
Failure: 1-255
After the command is executed, its status return value is stored in the special bash variable $?
[root@localhost tmp]# ls /tmp/x/y1  y2
[root@localhost tmp]# echo $?0[root@localhost tmp]# ls /tmp/yls: cannot access /tmp/y: No such file or directory
[root@localhost tmp]# echo $?2
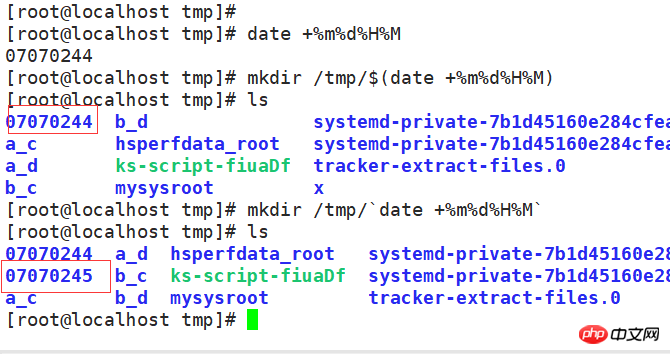
Quote the execution result of the command:
$(COMMAND) or `COMMAND`

Strong quotation, single quotation mark:
[root@localhost ~]# echo '$PATH'$PATH
Weak quotation, double quotation mark:
[root@localhost ~]# echo "$PATH"/usr/local/sbin:/usr/loca
ctrl+a:跳转至命令行行首
ctrl+e:跳转至命令行行尾
ctrl+u:删除行首至光标所在处之间的所有字符
ctrl+k:删除光标所在处至行尾的所有字符
ctrl+l:清屏,相当于clear
cat
cat [OPTION]... [FILE]...
查看文件内容,直接显示到文件底部
常用选项:
-n:可以显示行数
[root@localhost tmp]# cat /etc/passwdroot:x:0:0:root:/root:/bin/bash
bin:x:1:1:bin:/bin:/sbin/nologin
daemon:x:2:2:daemon:/sbin:/sbin/nologin
adm:x:3:4:adm:/var/adm:/sbin/nologinlp:x:4:7:lp:/var/spool/lpd:/sbin/nologin
......
gnome-initial-setup:x:989:984::/run/gnome-initial-setup/:/sbin/nologin
avahi:x:70:70:Avahi mDNS/DNS-SD Stack:/var/run/avahi-daemon:/sbin/nologin
tcpdump:x:72:72::/:/sbin/nologin
tac
tac [OPTION]... [FILE]...
反向查看文件内容
[root@localhost tmp]# tac /etc/passwdtcpdump:x:72:72::/:/sbin/nologin
avahi:x:70:70:Avahi mDNS/DNS-SD Stack:/var/run/avahi-daemon:/sbin/nologin
gnome-initial-setup:x:989:984::/run/gnome-initial-setup/:/sbin/nologin
......
adm:x:3:4:adm:/var/adm:/sbin/nologin
daemon:x:2:2:daemon:/sbin:/sbin/nologin
bin:x:1:1:bin:/bin:/sbin/nologin
root:x:0:0:root:/root:/bin/bash
more
分屏查看文件内容
head
head [OPTION]... [FILE]...
查看文件的前n行,默认为前10行
[root@localhost tmp]# head /etc/passwdroot:x:0:0:root:/root:/bin/bash
bin:x:1:1:bin:/bin:/sbin/nologin
daemon:x:2:2:daemon:/sbin:/sbin/nologin
adm:x:3:4:adm:/var/adm:/sbin/nologinlp:x:4:7:lp:/var/spool/lpd:/sbin/nologinsync:x:5:0:sync:/sbin:/bin/syncshutdown:x:6:0:shutdown:/sbin:/sbin/shutdown
halt:x:7:0:halt:/sbin:/sbin/halt
mail:x:8:12:mail:/var/spool/mail:/sbin/nologin
operator:x:11:0:operator:/root:/sbin/nologin
tail
查看文件的后n行
tail [OPTION]... [FILE]...
[root@localhost tmp]# tail /etc/passwdcolord:x:992:987:User for colord:/var/lib/colord:/sbin/nologin
qemu:x:107:107:qemu user:/:/sbin/nologin
setroubleshoot:x:991:986::/var/lib/setroubleshoot:/sbin/nologin
rpcuser:x:29:29:RPC Service User:/var/lib/nfs:/sbin/nologin
nfsnobody:x:65534:65534:Anonymous NFS User:/var/lib/nfs:/sbin/nologin
gdm:x:42:42::/var/lib/gdm:/sbin/nologin
sssd:x:990:985:User for sssd:/:/sbin/nologin
gnome-initial-setup:x:989:984::/run/gnome-initial-setup/:/sbin/nologin
avahi:x:70:70:Avahi mDNS/DNS-SD Stack:/var/run/avahi-daemon:/sbin/nologin
tcpdump:x:72:72::/:/sbin/nologin
常用选项:
tail -n #:显示最后#行或者是tail -#
-f:查看文件尾部内容,结束后不退出,跟随显示新增的行
stat
display file or file system status
文件:两类数据
元数据:metadata,文件的状态,创建时间,修改时间,大小,权限等
数据:文件里面的内容
[root@localhost tmp]# stat /etc/passwd
  File: ‘/etc/passwd’
  Size: 2235          Blocks: 8          IO Block: 4096   regular fileDevice: fd00h/64768d    Inode: 19840519    Links: 1Access: (0644/-rw-r--r--)  Uid: (    0/    root)   Gid: (    0/    root)
Context: system_u:object_r:passwd_file_t:s0
Access: 2017-07-06 09:25:43.555083116 -0400Modify: 2017-07-01 08:00:52.140151303 -0400Change: 2017-07-01 08:00:52.141154779 -0400
 Birth: -
stat显示的就是文件的元数据,包含文件路径,大小,blocks数目,IO block,文件类型,inode号,权限,uid,gid和三个时间戳等
三个时间戳:
access:最近一次访问的时间
modify:最近一次修改文件的时间
change:文件最近一次改变的时间,即改变元数据的时间
touch
change file timestamps 修改时间戳
touch [OPTION]... FILE...
文件不存在则创建文件,当直接使用命令去touch一个文件的时候,修改的是所有的时间戳
常用选项:
-c:指定的文件路径不存在时不予以创建
-a:仅修改access time
-m:仅修改modify time
-t STAMP
[[CC]YY]MMDDhhmm[.ss]
(不能修改change time,只当元数据发生变化时,才会改变)
[root@localhost tmp]# touch -t 201212121200.30  test.txt -m
[root@localhost tmp]# stat test.txt
  File: ‘test.txt’
  Size: 0             Blocks: 0          IO Block: 4096   regular empty fileDevice: fd00h/64768d    Inode: 17251556    Links: 1Access: (0644/-rw-r--r--)  Uid: (    0/    root)   Gid: (    0/    root)
Context: unconfined_u:object_r:user_tmp_t:s0
Access: 2017-07-07 03:17:12.640883844 -0400Modify: 2012-12-12 12:00:30.000000000 -0500Change: 2017-07-07 03:19:17.667997201 -0400
 Birth: -[root@localhost tmp]#
cp
复制文件或者目录
单源复制:
cp [OPTION]... [-T] SOURCE DEST
如果DEST不存在,则先创建此文件,并复制源文件的数据流至DEST文件中
如果DEST存在:
如果DEST是非目录文件,则覆盖DEST文件
如果DEST是目录文件,则在DEST目录下创建一个与源文件同名的文件,并复制其数据
多源复制:
如果DIRECTORY不存在,则报错
如果DIRECTORY存在:
如果DIRECTORY是非目录文件,则报错
如果DIRECTORY是目录文件,分别复制每个文件至目标目录中,并保持原名
常用选项:
-i:交互式复制
-f:强制覆盖目标文件
-r,-R:递归复制目录
-d:复制符号链接文件本身,而非指向的源文件
-a:-dR --preserve=all, archive,用于实现归档;
--preserv=
mode:权限
ownership:属主和属组
timestamps: 时间戳
context:安全标签
xattr:扩展属性
links:符号链接
all:上述所有属性
mv
move
移动文件,可用来重命名文件
常用选项:
-i:交互式
-f:强制覆盖文件
rm
remove
移除文件
rm [OPTION]... FILE...
常用选项:
-i:交互式移除文件
-f:强制删除文件
-r:递归删除
注意:所有不用的文件建议不要直接删除,可以移动至某个专用的目录(用来做回收站的目录)
文件名通配:是对整体文件名匹配,不是部分匹配
匹配字符:
*:匹配任意长度的任意字符
?:匹配任意单个字符
[ ]:匹配指定范围内的任意单个字符‘
[a-z],[A-Z],[0-9],[a-z0-9] 不区分大小写
特殊格式:
[[:upper:]]:所有大写字母
[[:lower:]]:所有小写字母
[[:alpha:]]:所有字母
[[:digit:]]:所有数字
[[:alnum:]]:所有的字母和数字
[[:space:]]:所有空白字符
[[:punct:]]:所有标点符号
[^]:中括号加托字符,匹配指定范围外的任意单个字符
[^0-9]:匹配数字之外的任意单个字符
[^[:upper:]]:匹配大写字母以外的任意单个字符
练习:显示/var目录下所有以l开头,以一个小写字母结尾,且中间出现一位任意字符的文件或目录;
ls -d /var/l?[[:lower:]]
练习:复制/etc目录下,所有以.conf结尾,且以m,n,r,p开头的文件或目录至/tmp/conf.d/目录下;
cp -r /etc/[mnrp]*.conf /tmp/conf.d/
IO即输入和输出设备,可用于输入的设备一般有键盘、文件系统上的常规文件、网卡等,可用于输出的设备有显示器、文件系统上的常规文件、网卡等;
程序的三种数据流:
输入的数据流:标准输入(stdin),键盘;
输出的数据流:标准输出(stdout),显示器;
错误的输出流:错误输出(stderr),显示器;
文件描述符:fd,file descriptor
标准输入:0
标准输出:1
错误输出:2
IO重定向
输出重定向:
> 覆盖输出
>> 追加输出
小特性:
set -C:禁止覆盖输出重定向至已存在的文件
set +C:开启覆盖输出重定向至已存在的文件(默认)
错误输出重定向:
2> 覆盖输出
2>> 追加输出
合并正常输出流和错误输出流
1.
&> 覆盖输出
&>> 追加输出
2.
COMMADN > /PATH/TO/somefile 2>&1 :如果命令执行成功则覆盖输出至somefile,执行不成功也覆盖输出至somefile
COMMAND >> /PATH/TO/somefile 2>&1:如果命令执行成功则追加覆盖至somefile,执行不成功也追加输出至somefile
注意:特殊设备:/dev/null 当不需要命令的执行结果,只需要知道命令的执行状态,则可以重定向至/dev/null,/dev/null相当于一个垃圾桶。
输入重定向:<
Here Document:<<,可以作为指定文件的结束符,常用于shell编程
[root@localhost tmp]# cat <<EOF> how are you> my name is Frank> EOF
how are you
my name is Frank</p>
<p> </p>
<p><span style="color: #ff0000"> tr</span></p>
<p>tr [OPTION]... SET1 [SET2]</p>
<p>把输入的数据当中的字符,凡是在SET1定义范围内出现的,通通对位转换为SET2出现的字符,不修改原文件</p>
<p>用法1: tr SET SET2 < /PATH/FROM/SOMEFILE  </p>
<p> <img src="/static/imghw/default1.png" data-src="https://img.php.cn/upload/article/000/000/001/481c5a3f155df91e35d62ca3dc88307c-3.png" class="lazy" alt=""    style="max-width:90%"  style="max-width:90%"></p>
<p>用法2:tr -d SET1  <  /PATH/FROM/SOMEFILE     删除SET1中的字符,区分大小写</p>
<p> <img src="/static/imghw/default1.png" data-src="https://img.php.cn/upload/article/000/000/001/481c5a3f155df91e35d62ca3dc88307c-4.png" class="lazy" alt=""    style="max-width:90%"  style="max-width:90%"></p>
<p><span style="color: #ff0000">管道</span></p>
<p>连接程序,实现将前面一个命令的输出直接定向后一个程序当做输出数据流</p>
<p>COMMAND1 | COMMAND2 | COMMAND3 ...</p>
<div class="cnblogs_code"><pre class="brush:php;toolbar:false">[root@localhost tmp]# echo 'abcd' | tr 'a-z' 'A-Z' | tr -d 'AD' BC
显示程序的输出并将其复制到一个或多个文件中
[root@localhost tmp]# echo 'abcd' | tee /etc/fstab | tr 'ab' 'AB' ABcd
[root@localhost tmp]# cat /etc/fstab
abcd
As in the above example, use the tee command to output to /etc/fstab, and use the standard input as the input of the subsequent tr.
The above is the detailed content of Detailed explanation of the use of basic bash features. For more information, please follow other related articles on the PHP Chinese website!


