

Getting started with webpack tutorial
The github warehouse address of this article: , which includes all the codes of this tutorial.
[If you think this article is well written, please give this warehouse a star:-D]
1. Introduction
1.1 What is webpack
webpack is a module bundler.
webpack takes modules with dependencies and generates static assets representing those modules.
A simple summary is: webpack is a module packaging tool that processes The dependencies between modules also generate static resources of the corresponding modules.
1.2 What can webpack do?

The picture clearly reflects several information:
webpack treats all static files in the project as a module
There are a series of dependencies between modules
many Static resource generation of the page (generating multiple static files after packaging, involving code splitting)
2. Webpack installation
-
Global installation (For global calls: such as
webpack --config webpack.config.js)npm install -g webpack
Copy after login Project installation
"javascript
npm install webpack
// Process calls similar to the following
import webpack from "webpack";
var webpack = require("webpack");
"
It is recommended to install Taobao's npm image, so that downloading npm packages will be much faster. The specific method is:
// 方式一npm install xx --registry=https://registry.npm.taobao.org/// 方式二:安装淘宝提供的npm工具npm install -g cnpm
cnpm install xx// 方式三// 在用户主目录下,找到.npmrc文件,加上下面这段配置registry=https://registry.npm.taobao.org/
3. Basic configuration of webpack
Creation Configuration file (webpack.config.js, when executing the webpack command, this file will be executed by default)
module.export = {entry : 'app.js',output : {path : 'assets/',filename : '[name].bundle.js'},module : {loaders : [// 使用babel-loader解析js或者jsx模块{ test : /\.js|\.jsx$/, loader : 'babel' },// 使用css-loader解析css模块{ test : /\.css$/, loader : 'style!css' },// or another way{ test : /\.css$/, loader : ['style', 'css'] }]}};Explanation 1: webpack.config. js outputs a webpack configuration file by default, which is the same as the CLI method, but is simpler.
Instruction 2: Execute the webpack command. Run configuration, prerequisites, global installationwebpack, project installation of each moduleloader
Instruction three: entrycorresponds to the entry that needs to be packagedjsFile, output corresponds to the output directory and file name, loaders in module corresponds to the loader required when parsing each module
A simple example
basic/app.js
require('./app.css');document.getElementById('container').textContent = 'APP';
basic/app. css
* {margin: 0;padding: 0;}#container {margin: 50px auto;width: 50%;height: 200px;line-height: 200px;border-radius: 5px;box-shadow: 0 0 .5em #000;text-align: center;font-size: 40px;font-weight: bold;}basic/webpack.config.js
/** * webpack打包配置文件 */module.exports = {// 如果你有多个入口js,需要打包在一个文件中,那么你可以这么写 // entry : ['./app1.js', './app2.js']entry : './app.js',output : {path : './assets/',filename : '[name].bundle.js'},module : {loaders : [{ test : /\.js$/, loader : 'babel' },{ test : /\.css$/, loader : 'style!css' }]}};basic/index.html
<!DOCTYPE html><html lang="en"><head><meta charset="UTF-8"><title>basic webpack</title></head><body><div id="container"></div><script src="./assets/main.bundle.js?1.1.11"></script></body></html>
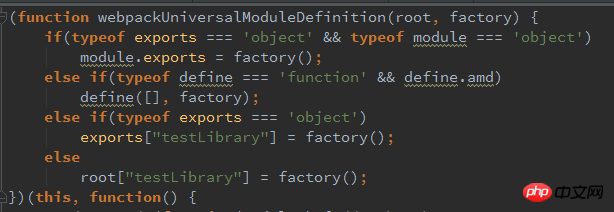
Execute webpack in the basic folder, the packaging information is as follows

Generate main.bundle.js file, chunk name is main, which is also webpack default Generated chunk name
## 4. Split points commonly used by webapck
4.1 entry related4.1 .1Multi-entry configuration of webpack
entry : {app1 : './app1.js',app2 : './app2.js'}Execute webpack in the multi-entry

It can be seen that two entry files are generated, and their corresponding chunk
4.2 output related4.2.1 output.publicPath
output: {path: "/home/proj/cdn/assets/[hash]",publicPath: "http://cdn.example.com/assets/[hash]/"}Quote from the official website:tags or reference assets like images, publicPath is used as the href or url() to the file when it's different then their location on disk (as specified by path).
The publicPath specifies the public URL address of the output files when referenced in a browser. For loaders that embed<script>or
roughly means:
specifies what address you use in the browser to reference your static file, which will include the address of your images, scripts and style loading, and is generally used for online publishing and CDN deployment.
var path = require('path');var HtmlWebpackPlugin =  require('html-webpack-plugin');module.exports = {entry : './app.js',output : {path : './assets/',filename : '[name].bundle.js',publicPath : 'http://rynxiao.com/assets/'},module : {loaders : [{ test : /\.js$/, loader : 'babel' },{ test : /\.css$/, loader : 'style!css' }]},plugins : [new HtmlWebpackPlugin({filename: './index-release.html',template: path.resolve('index.template'),inject: 'body'})
]};其中我将publicPath设置成了,其中设置到了插件的一些东西,这点下面会讲到,总之这个插件的作用是生成了上线发布时候的首页文件,其中script中引用的路径将会被替换。如下图:

4.2.2 output.chunkFilename
各个文件除了主模块以外,还可能生成许多额外附加的块,比如在模块中采用代码分割就会出现这样的情况。其中chunkFilename中包含以下的文件生成规则:
[id] 会被对应块的id替换.
[name] 会被对应块的name替换(或者被id替换,如果这个块没有name).
[hash] 会被文件hash替换.
[chunkhash] 会被块文件hash替换.
例如,我在output中如下设置:
output : {path : './assets/',filename : '[name].[hash].bundle.js',chunkFilename: "chunk/[chunkhash].chunk.js?1.1.11"}同时我修改了一下basic/app.js中的文件
require('./app.css');require.ensure('./main.js', function(require) {require('./chunk.js');});document.getElementById("container").textContent = "APP";其中对应的chunk.js就会生成带有chunkhash的chunk文件,如下图:

这在做给文件打版本号的时候特别有用,当时如何进行hash替换,下面会讲到
4.2.3 output.library
这个配置作为库发布的时候会用到,配置的名字即为库的名字,通常可以搭配libraryTarget进行使用。例如我给basic/webpack.config.js加上这样的配置:
output : {// ...library : 'testLibrary'// ...}那么实际上生成出来的main.bundle.js中会默认带上以下代码:
var testLibrary = (//....以前的打包生成的代码);// 这样在直接引入这个库的时候,就可以直接使用`testLibrary`这个变量

4.2.4 output.libraryTarget
规定了以哪一种方式输出你的库,比如:amd/cmd/或者直接变量,具体包括如下
"var" - 以直接变量输出(默认library方式) var Library = xxx (default)
"this" - 通过设置this的属性输出 this["Library"] = xxx
"commonjs" - 通过设置exports的属性输出 exports["Library"] = xxx
"commonjs2" - 通过设置module.exports的属性输出 module.exports = xxx
"amd" - 以amd方式输出
"umd" - 结合commonjs2/amd/root
例如我以umd方式输出,如图:
### 4.3 module相关
4.3.1 loader中!代表的含义
require("!style!css!less!bootstrap/less/bootstrap.less");
// => the file "bootstrap.less" in the folder "less" in the "bootstrap"
// module (that is installed from github to "node_modules") is
// transformed by the "less-loader". The result is transformed by the
// "css-loader" and then by the "style-loader".
// If configuration has some transforms bound to the file, they will not be applied.
代表加载器的流式调用,例如:
{ test : /\.css|\.less$/, loader : 'style!css!less' }就代表了先使用less加载器来解释less文件,然后使用css加载器来解析less解析后的文件,依次类推
4.3.2 loaders中的include与exclude
include表示必须要包含的文件或者目录,而exclude的表示需要排除的目录
比如我们在配置中一般要排除node_modules目录,就可以这样写
{ test : /\.js$/, loader : 'babel',exclude : nodeModuleDir
}官方建议:优先采用include,并且include最好是文件目录
4.3.3 module.noParse
使用了noParse的模块将不会被loaders解析,所以当我们使用的库如果太大,并且其中不包含require、define或者类似的关键字的时候(因为这些模块加载并不会被解析,所以就会报错),我们就可以使用这项配置来提升性能。
例如下面的例子:在basic/目录中新增no-parse.js
var cheerio = require('cheerio');module.exports = function() {console.log(cheerio);}webpack.config.js中新增如下配置:
module : {loaders : [{ test : /\.js$/, loader : 'babel' },{ test : /\.css$/, loader : 'style!css' }],noParse : /no-parse.js/}当执行打包后,在浏览器中打开index.html时,就会报错require is not defined

4.4 resolve相关
4.4.1 resolve.alias
为模块设置别名,能够让开发者指定一些模块的引用路径。对一些经常要被import或者require的库,如react,我们最好可以直接指定它们的位置,这样webpack可以省下不少搜索硬盘的时间。
例如我们修改basic/app.js中的相关内容:
var moment = require("moment");document.getElementById("container").textContent = moment().locale('zh-cn').format('LLLL');加载一个操作时间的类库,让它显示当前的时间。使用webpack --profile --colors --display-modules执行配置文件,得到如下结果:

其中会发现,打包总共生成了104个隐藏文件,其中一半的时间都在处理关于moment类库相关的事情,比如寻找moment依赖的一些类库等等。
在basic/webpack.config.js加入如下配置,然后执行配置文件
resolve : {alias : {moment : 'moment/min/moment-with-locales.min.js'}}
有没有发现打包的时间已经被大大缩短,并且也只产生了两个隐藏文件。
配合module.noParse使用
module.noParse参看上面的解释
noParse: [/moment-with-locales/]
执行打包后,效果如下:

是不是发现打包的时间进一步缩短了。
配合externals使用
externals参看下面的解释
Webpack 是如此的强大,用其打包的脚本可以运行在多种环境下,Web 环境只是其默认的一种,也是最常用的一种。考虑到 Web 上有很多的公用 CDN 服务,那么 怎么将 Webpack 和公用的 CDN 结合使用呢?方法是使用 externals 声明一个外部依赖。
externals: {moment: true}当然了 HTML 代码里需要加上一行
<script src="//apps.bdimg.com/libs/moment/2.8.3/moment-with-locales.min.js?1.1.11"></script>
执行打包后,效果如下:
4.4.2 resolve.extensions
resolve : {extensions: ["", ".webpack.js?1.1.11", ".web.js?1.1.11", ".js?1.1.11", ".less"]}这项配置的作用是自动加上文件的扩展名,比如你有如下代码:
require('style.less');var app = require('./app.js');
那么加上这项配置之后,你可以写成:
require('style');var app = require('./app');
4.5 externals
当我们想在项目中require一些其他的类库或者API,而又不想让这些类库的源码被构建到运行时文件中,这在实际开发中很有必要。此时我们就可以通过配置externals参数来解决这个问题:
//webpack.config.jsmodule.exports = {externals: { 'react': 'React'},//...}externals对象的key是给require时用的,比如require('react'),对象的value表示的是如何在global(即window)中访问到该对象,这里是window.React。
同理jquery的话就可以这样写:'jquery': 'jQuery',那么require('jquery')即可。
HTML中注意引入顺序即可:
<script src="react.min.js?1.1.11" /><script src="bundle.js?1.1.11" />
4.6 devtool
提供了一些方式来使得代码调试更加方便,因为打包之后的代码是合并以后的代码,不利于排错和定位。其中有如下几种方式,参见官网devtool
例如,我在basic/app.js中增加如下配置:
require('./app.css');// 新增hello.js,显然在文件夹中是不会存在hello.js文件的,这里会报错require('./hello.js');document.getElementById("container").textContent = "APP";执行文件,之后运行index.html,报错结果如下:

给出的提示实在main.bundle.js第48行,点进去看其中的报错如下:

从这里你完全看不出到底你程序的哪个地方出错了,并且这里的行数还算少,当一个文件出现了上千行的时候,你定位bug的时间将会更长。
增加devtool文件配置,如下:
module.exports = {devtool: 'eval-source-map',// ....};执行文件,之后运行index.html,报错结果如下:

这里发现直接定位到了app.js,并且报出了在第二行出错,点击去看其中的报错如下:

发现问题定位一目了然。
5. webpack常用技巧
### 5.1 代码块划分
5.1.1 Commonjs采用require.ensure来产生chunk块
require.ensure(dependencies, callback);//static importsimport _ from 'lodash'// dynamic importsrequire.ensure([], function(require) {
let contacts = require('./contacts')})这一点在output.chunkFileName中已经做过演示,可以去查看
5.1.2 AMD采用require来产生chunk块
require(["module-a", "module-b"], function(a, b) {// ...});5.1.3 将项目APP代码与公共库文件单独打包
我们在basic/app.js中添加如下代码
var $ = require('juqery'),_ = require('underscore');//.....
然后我们在配置文件中添加vendor,以及运用代码分离的插件对生成的vendor块重新命名
var webpack = require("webpack");module.exports = {entry: {app: "./app.js?1.1.11",vendor: ["jquery", "underscore", ...],},output: {filename: "bundle.js?1.1.11"},plugins: [new webpack.optimize.CommonsChunkPlugin(/* chunkName= */"vendor", /* filename= */"vendor.bundle.js?1.1.11")
]};运行配置文件,效果如下:

5.1.4 抽取多入口文件的公共部分
我们重新建立一个文件夹叫做common,有如下文件:
// common/app1.jsconsole.log("APP1");// common/app2.jsconsole.log("APP2");打包之后生成的app1.bundle.js、app2.bundle.js中会存在许多公共代码,我们可以将它提取出来。
// common/webpack.config.js/** * webpack打包配置文件 * 抽取公共部分js */var webpack = require('webpack');module.exports = {entry : {app1 : './app1.js',app2 : './app2.js'},output : {path : './assets/',filename : '[name].bundle.js'},module : {loaders : [{ test : /\.js$/, loader : 'babel' },{ test : /\.css$/, loader : 'style!css' }]},plugins : [new webpack.optimize.CommonsChunkPlugin("common.js?1.1.11")
]};抽取出的公共js为common.js,如图

查看app1.bundle.js,发现打包的内容基本是我们在模块中所写的代码,公共部分已经被提出到common.js中去了

5.1.5 抽取css文件,打包成css bundle
默认情况下以require('style.css')情况下导入样式文件,会直接在index.html的<head>中生成<style>标签,属于内联。如果我们想将这些css文件提取出来,可以按照下面的配置去做。
// extract-css/app1.jsrequire('./app1.css');document.getElementById("container").textContent = "APP";// extract-css/app2.jsrequire('./app2.css');document.getElementById("container").textContent = "APP1 APP2";// extract-css/app1.css* {margin: 0;padding: 0;}#container {margin: 50px auto;width: 50%;height: 200px;line-height: 200px;border-radius: 5px;box-shadow: 0 0 .5em #000;text-align: center;font-size: 40px;font-weight: bold;}// extract-css/app2.css#container {background-color: #f0f0f0;}// extract-css/webpack.config.js/** * webpack打包配置文件 * 抽取公共样式(没有chunk) */var webpack = require('webpack');var ExtractTextPlugin = require("extract-text-webpack-plugin");module.exports = {entry : {app1 : './app1.js',app2 : './app1.js'},output : {path : './assets/',filename : '[name].bundle.js'},module : {loaders : [{ test : /\.js$/, loader : 'babel' },{ test : /\.css$/, loader : ExtractTextPlugin.extract("style-loader", "css-loader") }]},plugins : [new ExtractTextPlugin("[name].css?1.1.11")
]};得到的效果如下图:

如果包含chunk文件,并且chunk文件中也因为了样式文件,那么样式文件会嵌入到js中
css合并到一个文件
// ...module.exports = {// ...plugins: [new ExtractTextPlugin("style.css?1.1.11", {allChunks: true})
]}效果如图:

如果包含chunk文件,并且chunk文件中也因为了样式文件,样式文件不会嵌入到js中,而是直接输出到style.css
配合CommonsChunkPlugin一起使用
// ...module.exports = {// ...plugins: [new webpack.optimize.CommonsChunkPlugin("commons", "commons.js?1.1.11"),new ExtractTextPlugin("[name].css?1.1.11")
]}效果图如下:

5.2 如何给文件打版本
线上发布时为了防止浏览器缓存静态资源而改变文件版本,这里提供两种做法:
5.2.1 使用HtmlWebpackPlugin插件
// version/webpack.config.js/** * webpack打包配置文件 * 文件打版本,线上发布 */var path = require('path');var HtmlWebpackPlugin =  require('html-webpack-plugin');module.exports = {entry : './app.js',output : {path : './assets/',filename : '[name].[hash].bundle.js',publicPath : 'http://rynxiao.com/assets/'},module : {loaders : [{ test : /\.js$/, loader : 'babel' },{ test : /\.css$/, loader : 'style!css' }]},plugins : [new HtmlWebpackPlugin({filename: './index-release.html',template: path.resolve('index.template'),inject: 'body'})
]};生成的效果如下:

每次打包之后都会生成文件hash,这样就做到了版本控制
5.2.2 自定义插件给文件添加版本
// version/webpack.config.version.js/** * webpack打包配置文件 * 文件打版本,线上发布,自定义插件方式 */var path = require('path');var fs = require('fs');var cheerio = require('cheerio');module.exports = {entry : './app.js',output : {path : './assets/',filename : '[name].[hash].bundle.js',publicPath : 'http://rynxiao.com/assets/'},module : {loaders : [{ test : /\.js$/, loader : 'babel' },{ test : /\.css$/, loader : 'style!css' }]},plugins : [function() {this.plugin("done", function(stats) {fs.writeFileSync(path.join(__dirname, "stats.json"),JSON.stringify(stats.toJson())
);fs.readFile('./index.html', function(err, data) {var $ = cheerio.load(data.toString()); $('script[src*=assets]').attr('src','http://rynxiao.com/assets/main.' + stats.hash +'.bundle.js');fs.writeFile('./index.html', $.html(), function(err) {!err && console.log('Set has success: '+ stats.hash)})})});}]};效果如图:

可以达到同样的效果,但是stats暂时只能拿到hash值,因为我们只能考虑在hash上做版本控制,比如我们可以建hash目录等等
5.3 shim
比如有如下场景:我们用到 Pen 这个模块, 这个模块对依赖一个 window.jQuery, 可我手头的 jQuery 是 CommonJS 语法的,而 Pen 对象又是生成好了绑在全局的, 可是我又需要通过 require('pen') 获取变量。 最终的写法就是做 Shim 处理直接提供支持:
做法一:
{test: require.resolve('jquery'), loader: 'expose?jQuery'}, // 输出jQuery到全局{test: require.resolve('pen'), loader: 'exports?window.Pen'} // 将Pen作为一个模块引入做法二:
new webpack.ProvidePlugin({$: "jquery",jQuery: "jquery","window.jQuery": "jquery"})This plugin makes a module available as variable in every module.
The module is required only if you use the variable.
Example: Make $ and jQuery available in every module without writing require("jquery").
5.4 怎样写一个loader
Loader 是支持链式执行的,如处理 sass 文件的 loader,可以由 sass-loader、css-loader、style-loader 组成,由 compiler 对其由右向左执行,第一个 Loader 将会拿到需处理的原内容,上一个 Loader 处理后的结果回传给下一个接着处理,最后的 Loader 将处理后的结果以 String 或 Buffer 的形式返回给 compiler。固然也是希望每个 loader 只做该做的事,纯粹的事,而不希望一箩筐的功能都集成到一个 Loader 中。
官网给出了两种写法:
// Identity loadermodule.exports = function(source) {
return source;};// Identity loader with SourceMap supportmodule.exports = function(source, map) {
this.callback(null, source, map);};第一种为基础的写法,采用return返回, 是因为是同步类的 Loader 且返回的内容唯一。如果你写loader有依赖的话,同样的你也可以在头部进行引用,比如:
// Module dependencies.var fs = require("fs");module.exports = function(source) {
return source;};而第二种则是希望多个loader之间链式调用,将上一个loader返回的结果传递给下一个loader。
案例
比如我想开发一个es6-loader,专门用来做以.es6文件名结尾的文件处理,那么我们可以这么写
// loader/es6-loader.js// 当然如果我这里不想将这个loader所返回的东西传递给下一个laoder,那么我// 可以在最后直接返回return source// 这里改变之后,我直接可以扔给babel-loader进行处理module.exports = function(source, map) {// 接收es6结尾文件,进行source改变source = "console.log('I changed in loader');"// 打印传递进来的参数console.log("param", this.query);// ... 我们还可以做一些其他的逻辑处理this.callback(null, source, map);};// loader/loader1.es6let a = 1;console.log(a);// loader/app.js// 向loader中传递参数require('./es6-loader?param1=p1!./loader1.es6');document.getElementById("container").textContent = "APP";执行webpack打包命令,在控制台会打印出param的值,如图:

在执行完成之后,打开index.html,在控制台打印出“I changed in loader”,而不是1

进阶
可以去阅读以下这篇文章 如何开发一个 Webpack loader
5.4 怎样写一个plugin
插件基本的结构
插件是可以实例化的对象,在它的prototype上必须绑定一个apply方法。这个方法会在插件安装的时候被Webpack compiler进行调用。
function HelloWorldPlugin(options) {// Setup the plugin instance with options...}HelloWorldPlugin.prototype.apply = function(compiler) {compiler.plugin('done', function() {console.log('Hello World!'); });};module.exports = HelloWorldPlugin;安装一个插件,将其添加到配置中的plugins数组中。
var HelloWorldPlugin = require('hello-world');var webpackConfig = {// ... config settings here ...plugins: [new HelloWorldPlugin({options: true})
]};执行效果如图:

这里只作简单的引入,平常一般都不需要自己写插件,如果想进一步了解,可以去看官网例子
5.5 布置一个本地服务器
// 1.全局安装webpack-dev-servercnpm install -g webpack-dev-server// 2. 设置一个文件启动目录,运行webpack-dev-server --content-base basic/// 3. 在浏览器输入localhost:8080
5.6 热替换
// auto-refresh/app.jsdocument.getElementById("container").textContent = "APP APP HOT ";console.log("OK");// auto-refresh/server.jsvar webpack = require('webpack');var config = require('./webpack.config.js');var WebpackDevServer = require("webpack-dev-server");var compiler = webpack(config);new WebpackDevServer(webpack(config), {publicPath: config.output.publicPath,hot: true,noInfo: false,historyApiFallback: true}).listen(8080, 'localhost', function (err, result) {if (err) {console.log(err);}console.log('Listening at localhost:3000');});// auto-refresh/webpack.config.js/** * webpack打包配置文件 */var webpack = require('webpack');module.exports = {entry : ['webpack-dev-server/client?http://127.0.0.1:8080', // WebpackDevServer host and port'webpack/hot/only-dev-server','./app.js'],output : {path : './assets/',filename : '[name].bundle.js',publicPath : './assets/'},module : {loaders : [{ test : /\.js$/, loader : 'react-hot!babel' },{ test : /\.css$/, loader : 'style!css' }]},plugins : [new webpack.HotModuleReplacementPlugin(),new webpack.NoErrorsPlugin(),new webpack.DefinePlugin({'process.env.NODE_ENV': '"development"'}),]};// auto-refresh/index.html<!DOCTYPE html><html lang="en"><head><meta charset="UTF-8"><title>basic webpack</title></head><body><div id="container"></div> <script src="./assets/main.bundle.js?1.1.11"></script></body></html>// 运行node server.js// 浏览器输入:localhost:80805.7 让wepack.config.js支持es6写法
// 1. 安装babel-core、babel-preset-es2015以及babel-loader// 2. 项目根目录下配置.babelrc文件{
"presets": ["es2015"]}// 3. 将webpack.config.js重新命名为webpack.config.babel.js// 4.运行webpack --config webpack.config.babel.js// 说明node 版本5.0以上,babel-core版本6以上需要如此配置这是一个 Webpack 支持,但文档里完全没有提到的特性 (应该马上就会加上)。只要你把配置文件命名成 webpack.config.[loader].js ,Webpack 就会用相应的 loader 去转换一遍配置文件。所以要使用这个方法,你需要安装 babel-loader 和 babel-core 两个包。记住你不需要完整的 babel 包。
其他办法(未成功)
1.在上述的方案中,其实不需要重新命名就可以直接运行webpack,但是今天试了一直不成功2.{ test : /\.js|jsx$/, loader : 'babel',query: { //添加两个presents 使用这两种presets处理js或者jsx文件 presets: ['es2015', 'react']} }6.相关链接
webpack官方网站
用 ES6 编写 Webpack 的配置文件
一小时包教会 —— webpack 入门指南
Webpack傻瓜式指南(一)
前端模块化工具-webpack
如何开发一个 Webpack Loader ( 一 )
关于externals解释
webpack使用优化
http://webpack.github.io/docs/installation.html
The above is the detailed content of Getting started with webpack tutorial. For more information, please follow other related articles on the PHP Chinese website!

Hot AI Tools

Undresser.AI Undress
AI-powered app for creating realistic nude photos

AI Clothes Remover
Online AI tool for removing clothes from photos.

Undress AI Tool
Undress images for free

Clothoff.io
AI clothes remover

AI Hentai Generator
Generate AI Hentai for free.

Hot Article
Hot Tools

Notepad++7.3.1
Easy-to-use and free code editor

SublimeText3 Chinese version
Chinese version, very easy to use

Zend Studio 13.0.1
Powerful PHP integrated development environment

Dreamweaver CS6
Visual web development tools

SublimeText3 Mac version
God-level code editing software (SublimeText3)
Hot Topics
 1377
1377
 52
52

 PHP implementation framework: CakePHP introductory tutorial
Jun 18, 2023 am 09:04 AM
PHP implementation framework: CakePHP introductory tutorial
Jun 18, 2023 am 09:04 AM
With the continuous development of Internet technology, Web development technology is also constantly updated and iterated. As an open source programming language, PHP is widely used in web development. As one of the commonly used tools in PHP development, the PHP framework can improve development efficiency and code quality. This article will introduce you to a PHP framework - CakePHP, and provide some simple tutorials to get started. 1. What is CakePHP? CakePHP is a model based on MVC (Model-View-Control
 Beginner's Guide: Start from scratch and learn MyBatis step by step
Feb 19, 2024 am 11:05 AM
Beginner's Guide: Start from scratch and learn MyBatis step by step
Feb 19, 2024 am 11:05 AM
Concise and easy-to-understand MyBatis introductory tutorial: write your first program step by step MyBatis is a popular Java persistence layer framework that simplifies the process of interacting with databases. This tutorial will show you how to use MyBatis to create and perform simple database operations. Step 1: Environment setup First, make sure your Java development environment has been installed. Then, download the latest version of MyBatis and add it to your Java project. You can download it from the official website of MyBatis
 How to use Nginx web server caddy
May 30, 2023 pm 12:19 PM
How to use Nginx web server caddy
May 30, 2023 pm 12:19 PM
Introduction to Caddy Caddy is a powerful and highly scalable web server that currently has 38K+ stars on Github. Caddy is written in Go language and can be used for static resource hosting and reverse proxy. Caddy has the following main features: Compared with the complex configuration of Nginx, its original Caddyfile configuration is very simple; it can dynamically modify the configuration through the AdminAPI it provides; it supports automated HTTPS configuration by default, and can automatically apply for HTTPS certificates and configure it; it can be expanded to data Tens of thousands of sites; can be executed anywhere with no additional dependencies; written in Go language, memory safety is more guaranteed. First of all, we install it directly in CentO
 Using Jetty7 for Web server processing in Java API development
Jun 18, 2023 am 10:42 AM
Using Jetty7 for Web server processing in Java API development
Jun 18, 2023 am 10:42 AM
Using Jetty7 for Web Server Processing in JavaAPI Development With the development of the Internet, the Web server has become the core part of application development and is also the focus of many enterprises. In order to meet the growing business needs, many developers choose to use Jetty for web server development, and its flexibility and scalability are widely recognized. This article will introduce how to use Jetty7 in JavaAPI development for We
 Real-time protection against face-blocking barrages on the web (based on machine learning)
Jun 10, 2023 pm 01:03 PM
Real-time protection against face-blocking barrages on the web (based on machine learning)
Jun 10, 2023 pm 01:03 PM
Face-blocking barrage means that a large number of barrages float by without blocking the person in the video, making it look like they are floating from behind the person. Machine learning has been popular for several years, but many people don’t know that these capabilities can also be run in browsers. This article introduces the practical optimization process in video barrages. At the end of the article, it lists some applicable scenarios for this solution, hoping to open it up. Some ideas. mediapipeDemo (https://google.github.io/mediapipe/) demonstrates the mainstream implementation principle of face-blocking barrage on-demand up upload. The server background calculation extracts the portrait area in the video screen, and converts it into svg storage while the client plays the video. Download svg from the server and combine it with barrage, portrait
 How to configure nginx to ensure that the frps server and web share port 80
Jun 03, 2023 am 08:19 AM
How to configure nginx to ensure that the frps server and web share port 80
Jun 03, 2023 am 08:19 AM
First of all, you will have a doubt, what is frp? Simply put, frp is an intranet penetration tool. After configuring the client, you can access the intranet through the server. Now my server has used nginx as the website, and there is only one port 80. So what should I do if the FRP server also wants to use port 80? After querying, this can be achieved by using nginx's reverse proxy. To add: frps is the server, frpc is the client. Step 1: Modify the nginx.conf configuration file in the server and add the following parameters to http{} in nginx.conf, server{listen80
 How to implement form validation for web applications using Golang
Jun 24, 2023 am 09:08 AM
How to implement form validation for web applications using Golang
Jun 24, 2023 am 09:08 AM
Form validation is a very important link in web application development. It can check the validity of the data before submitting the form data to avoid security vulnerabilities and data errors in the application. Form validation for web applications can be easily implemented using Golang. This article will introduce how to use Golang to implement form validation for web applications. 1. Basic elements of form validation Before introducing how to implement form validation, we need to know what the basic elements of form validation are. Form elements: form elements are
 PHP implementation framework: Lumen framework introductory tutorial
Jun 18, 2023 am 08:39 AM
PHP implementation framework: Lumen framework introductory tutorial
Jun 18, 2023 am 08:39 AM
Lumen is a PHP-based microframework developed by Laravel framework developers. It was originally designed to quickly build small API applications and microservices, while retaining some components and features of the Laravel framework. The Lumen framework is lightweight, fast, and easy to use, so it has received widespread attention and use. In this article, we will quickly get started with the Lumen framework and learn how to use the Lumen framework to build simple API applications. Framework preparation Before learning the Lumen framework, we need to
