

How to get the coordinates of an element in JavaScript
Introduction
Recently, I suddenly saw the problem of lazy loading of pictures. The general meaning is that in the initial state, the page only loads pictures in the visible area of the browser, and the remaining pictures are in Loading starts when the browser's viewable area is scrolled to its position. It seems that many large websites now implement lazy loading, so I thought about this issue. First of all, the first problem is that the browser does not have the relevant API method to detect whether an element is in the visible area, so we can only calculate it manually, so this involves the knowledge of the element length, width, and scroll bar position. The knowledge involved in this article includes the difference between element length and width clientWidth/offsetWidth/scrollWidth, and the difference between clientTop/offsetTop/scrollTop, and the source code for obtaining element coordinates is given.
1. The difference between clientWidth, offsetWidth and scrollWidth
Usually when everyone gets the length and width of an element, they use some frame-encapsulated methods. , such as jQuery.prototype.width(), these frameworks are convenient and quick to use, but they still involve a lot of knowledge. There are many ways to obtain the length and width of elements, and their actual meanings are also different.
Simply put, you can use the following formula:
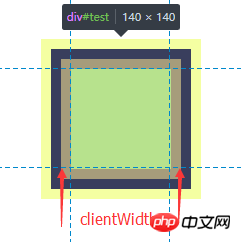
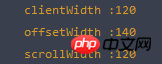
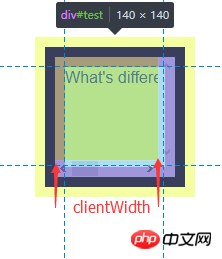
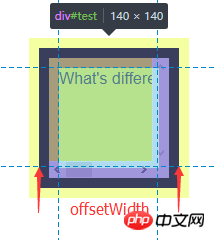
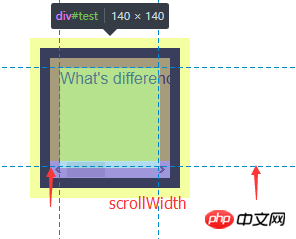
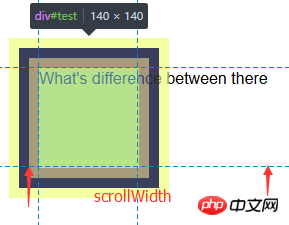
clientWidth = width (visual area) + padding
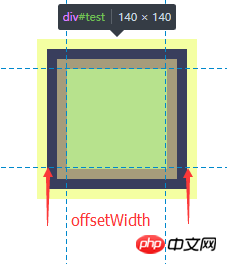
offsetWidth = width (visual area) + padding + border
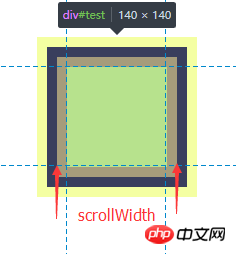
ScrollWidth = width(content area)
Suppose we have the following element:
1 #test {2 width: 100px;3 height: 100px;4 margin: 10px;5 border: 10px solid #293482;6 padding: 10px;7 background-color: yellow;8 overflow: auto;9 }| clientWidth | ##offsetWidth | scrollWidth |
|  |  |
 | ||
| ##offsetWidth | scrollWidth | ||||||||||||||||||||
|
 This is actually equivalent to the width of the content This is actually equivalent to the width of the content |
|
|||||||||||||||||||
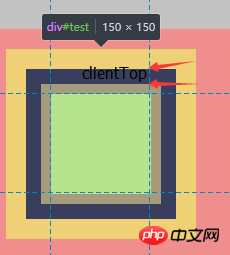
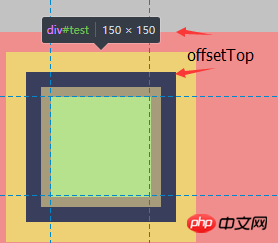
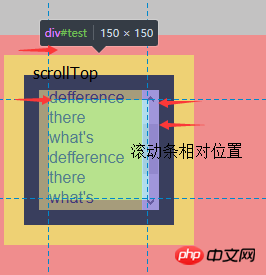
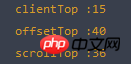
二、clientTop、offsetTop、scrollTop 的区别我们使用以下公式: clientTop = border offsetTop = 元素边框外围至父元素边框内围 scrollTop = 元素可视区域顶部至实际内容区域的顶部 给定以下两个元素 container 和 test 1 #container { 2 background-color: #F08D8D; 3 padding: 10px; 4 } 5 #test { 6 position: relative; 7 top: 10px; 8 width: 100px; 9 height: 100px;10 margin: 20px;11 border: 15px solid #293482;12 padding: 10px;13 background-color: yellow;14 }Copy after login
三、获取页面元素绝对定位坐标有了以上知识基础之后,我们现在需要考虑的问题是,如何获取页面元素的绝对位置,也就是在文档流内容区的位置。我们知道,元素的 offsetTop 属性可以获取当前元素边框外围至父元素边框内围的的距离,clientTop 可以获取元素边框的宽度。那么现在用一个递归的公式就可以求得当前元素在页面中的绝对位置: Element.absoluteTop = Element.parent.absoluteTop + Element.offsetTop + Element.clientTop; 同理,我们用参照元素的长宽减去 left 和 top 和定位,即可得到 right 和 bottom 的定位; 所以我们可以编写以下工具来获取元素的绝对位置,也就是在内容区的定位(参照元素必须是目标元素的祖先元素): 1 var Position = {}; 2 (function () { 3 Position.getAbsolute = function (reference, target) { 4 //因为我们会将目标元素的边框纳入递归公式中,这里先减去对应的值 5 var result = { 6 left: -target.clientLeft, 7 top: -target.clientTop 8 } 9 var node = target;10 while(node != reference && node != document){11 result.left = result.left + node.offsetLeft + node.clientLeft;12 result.top = result.top + node.offsetTop + node.clientTop;13 node = node.parentNode;14 }15 if(isNaN(reference.scrollLeft)){16 result.right = document.documentElement.scrollWidth - result.left;17 result.bottom = document.documentElement.scrollHeight - result.top;18 }else {19 result.right = reference.scrollWidth - result.left;20 result.bottom = reference.scrollHeight - result.top;21 }22 return result;23 }24 })();Copy after login 此方法可以获取一个元素相对于一个父元素的定位,如果要获取元素在整张页面,直接传入 document 即可: 1 Position.getAbsolute(document, targetNode); //{left: left, right: right, top: top, bottom: bottom}Copy after login 四、获取元素的可视区定位坐标在上一小节中,我们封装了一个函数,这个函数可以用来获取一个元素的相对于一个祖先元素的绝对定位坐标,在这一小节中,我们来获取元素相对于浏览器窗口可视区域的定位坐标。在上一个函数中,我们可以获取一个元素在 document 当中的定位,还记得我们在第二小节中的 scrollTop 属性吗?该属性可以获取滚动窗口可视区域顶端距离内容区顶端的距离,我们用元素的绝对定位坐标减去 document 的滚动定位就是我们想要的浏览器窗口定位啦(相对于浏览器左上角): ViewportTop = Element.absoluteTop - document.body.scrollTop; 这里需要注意一个兼容性的问题,在 Chrome 中可以用 document.body.scrollTop 和 window.pageYOffset,IE 7/8 只能通过 document.documentElement.scrollTop 获取, FireFox 和 IE9+ 可以用 document.documentElement.scrollTop 和 window.pageYOffset 获取,Safari 需要 window.pageYOffset 获取。所以这里我们需要做一下浏览器兼容: scrollTop = window.pageYOffset || document.documentElement.scrollTop || document.body.scrollTop; 注意这里的顺序,在 IE7/8 中 window.pageYOffset 是 undefined ,document.body.scrollTop 在任何浏览器中都有,只是不支持的值为 0,如果表达式返回 undefined ,会影响后面的计算操作。而 || 运算符是一个短路取真运算符,所以我们要所有浏览器都有的 document.body.scrollTop 方法放在最后,关于 || 运算符的问题,可以参考 《探寻 JavaScript 逻辑运算符(与、或)的真谛》。 我们在刚才的工具上添加一个方法: 1 var Position = {}; 2 (function () { 3 Position.getAbsolute = function (reference, target) { 4 var result = { 5 left: -target.clientLeft, 6 top: -target.clientTop 7 } 8 var node = target; 9 while(node != reference && node != document){10 result.left = result.left + node.offsetLeft + node.clientLeft;11 result.top = result.top + node.offsetTop + node.clientTop;12 node = node.parentNode;13 }14 if(isNaN(reference.scrollLeft)){15 result.right = document.documentElement.scrollWidth - result.left;16 result.bottom = document.documentElement.scrollHeight - result.top;17 }else {18 result.right = reference.scrollWidth - result.left;19 result.bottom = reference.scrollHeight - result.top;20 }21 return result;22 }23 Position.getViewport = function (target) {24 var scrollTop = window.pageYOffset || document.documentElement.scrollTop || document.body.scrollTop;25 var scrollLeft = window.pageXOffset || document.documentElement.scrollLeft || document.body.scrollLeft;26 var absolutePosi = this.getAbsolute(document, target);27 var Viewport = {28 left: absolutePosi.left - scrollLeft,29 top: absolutePosi.top - scrollTop,30 }31 return Viewport;32 }33 })();Copy after login 通过 Position.getViewport 方法可以获取元素相对于浏览器窗口的定位: 1 Postion.getViewport(targetNode); //{left: left, top: top}Copy after login 五、判断可视区域在上面的几个方法中,我们可以获取元素的文档流定位和视窗定位,不过这还是不能判断一个元素是否在可视区域内,因为视窗定位可以是非常大的数字,这样元素就在视窗的后面。这里我们需要使用浏览器视窗高度 window.innerHeight 属性,在 IE8 以下需要用 document.documentElement.clientHeight 来获取。 windowHeight = window.innerHeight || document.documentElement.clientHeight; 现在,我们用窗口的高度,减去相对于浏览器窗口的定位,即可获取相对于浏览器窗口右下角的定位; 1 var Position = {}; 2 (function () { 3 Position.getAbsolute = function (reference, target) { 4 var result = { 5 left: -target.clientLeft, 6 top: -target.clientTop 7 } 8 var node = target; 9 while(node != reference && node != document){10 result.left = result.left + node.offsetLeft + node.clientLeft;11 result.top = result.top + node.offsetTop + node.clientTop;12 node = node.parentNode;13 }14 if(isNaN(reference.scrollLeft)){15 result.right = document.documentElement.scrollWidth - result.left;16 result.bottom = document.documentElement.scrollHeight - result.top;17 }else {18 result.right = reference.scrollWidth - result.left;19 result.bottom = reference.scrollHeight - result.top;20 }21 return result;22 }23 Position.getViewport = function (target) {24 var scrollTop = window.pageYOffset || document.documentElement.scrollTop || document.body.scrollTop;25 var scrollLeft = window.pageXOffset || document.documentElement.scrollLeft || document.body.scrollLeft;26 var windowHeight = window.innerHeight || document.documentElement.offsetHeight;27 var windowWidth = window.innerWidth || document.documentElement.offsetWidth;28 var absolutePosi = this.getAbsolute(document, target);29 var Viewport = {30 left: absolutePosi.left - scrollLeft,31 top: absolutePosi.top - scrollTop,32 right: windowWidth - (absolutePosi.left - scrollLeft),33 bottom: windowHeight - (absolutePosi.top - scrollTop)34 }35 return Viewport;36 }37 })();Copy after login 现在我们使用 Position.getViewport(targetNode) 方法可以获取元素左上角相对于窗口4个方向的定位: 1 Position.getViewport(targetNode); //{left: left, top: top, right: right, bottom: bottom}Copy after login 有了这个方法,现在就可以真正的判断元素是否在可视区域内了: 1 var Position = {}; 2 (function () { 3 Position.getAbsolute = function (reference, target) { 4 //因为我们会将目标元素的边框纳入递归公式中,这里先减去对应的值 5 var result = { 6 left: -target.clientLeft, 7 top: -target.clientTop 8 } 9 var node = target;10 while(node != reference && node != document){11 result.left = result.left + node.offsetLeft + node.clientLeft;12 result.top = result.top + node.offsetTop + node.clientTop;13 node = node.parentNode;14 }15 if(isNaN(reference.scrollLeft)){16 result.right = document.documentElement.scrollWidth - result.left;17 result.bottom = document.documentElement.scrollHeight - result.top;18 }else {19 result.right = reference.scrollWidth - result.left;20 result.bottom = reference.scrollHeight - result.top;21 }22 return result;23 }24 Position.getViewport = function (target) {25 var scrollTop = window.pageYOffset || document.documentElement.scrollTop || document.body.scrollTop;26 var scrollLeft = window.pageXOffset || document.documentElement.scrollLeft || document.body.scrollLeft;27 var windowHeight = window.innerHeight || document.documentElement.offsetHeight;28 var windowWidth = window.innerWidth || document.documentElement.offsetWidth;29 var absolutePosi = this.getAbsolute(document, target);30 var Viewport = {31 left: absolutePosi.left - scrollLeft,32 top: absolutePosi.top - scrollTop,33 right: windowWidth - (absolutePosi.left - scrollLeft),34 bottom: windowHeight - (absolutePosi.top - scrollTop)35 }36 return Viewport;37 }38 Position.isViewport = function (target) {39 var position = this.getViewport(target);40 //这里需要加上元素自身的宽高,因为定位点是元素的左上角41 if(position.left + target.offsetWidth < 0 || position.top + target.offsetHeight < 0){42 return false;43 }44 if(position.bottom < 0 || position.right < 0){45 return false;46 }47 return true;48 }49 })();Copy after login 判断理由很简单,如果有一边的定位是负值,那么元素就不在视窗内。 1 Position.getAbsolute(document, targetNode); //获取元素在文档流中的绝对坐标2 Position.getViewport(targetNode); //获取元素相对于浏览器视窗的坐标3 Position.isViewport(targetNode); //判断元素是否在浏览器视窗内 Copy after login
浏览器兼容性:
IE7 也可以使用,不过结果可能会有一点差异。 扩展:图片懒加载在文章的开始,我们提到过图片懒加载的问题,那么具体需要怎么实现呢?这里只是给出一个思路: 初始状态下不设置 img 的 src,将图片的真实 url 缓存在 Img 标签上,我们可以设置为 data-src ,这样图片就不会加载了,随后给鼠标添加 mousescroll 事情,每次鼠标滚动的时候将进入可视区域的图片的 src 还原,这样也就实现了图片懒加载效果。不过初始状态下需要将页面可视区域的图片先加载出来。 参考文献: 阮一峰 — 用 JavaScript 获取元素页面元素位置 张媛媛 — js实现一个图片懒加载插件 | |||||||||||||||||||||
The above is the detailed content of How to get the coordinates of an element in JavaScript. For more information, please follow other related articles on the PHP Chinese website!

Hot AI Tools

Undresser.AI Undress
AI-powered app for creating realistic nude photos

AI Clothes Remover
Online AI tool for removing clothes from photos.

Undress AI Tool
Undress images for free

Clothoff.io
AI clothes remover

Video Face Swap
Swap faces in any video effortlessly with our completely free AI face swap tool!

Hot Article
Hot Tools

Notepad++7.3.1
Easy-to-use and free code editor

SublimeText3 Chinese version
Chinese version, very easy to use

Zend Studio 13.0.1
Powerful PHP integrated development environment

Dreamweaver CS6
Visual web development tools

SublimeText3 Mac version
God-level code editing software (SublimeText3)
Hot Topics
 1393
1393
 52
37
110
52
37
110

 Recommended: Excellent JS open source face detection and recognition project
Apr 03, 2024 am 11:55 AM
Recommended: Excellent JS open source face detection and recognition project
Apr 03, 2024 am 11:55 AM
Face detection and recognition technology is already a relatively mature and widely used technology. Currently, the most widely used Internet application language is JS. Implementing face detection and recognition on the Web front-end has advantages and disadvantages compared to back-end face recognition. Advantages include reducing network interaction and real-time recognition, which greatly shortens user waiting time and improves user experience; disadvantages include: being limited by model size, the accuracy is also limited. How to use js to implement face detection on the web? In order to implement face recognition on the Web, you need to be familiar with related programming languages and technologies, such as JavaScript, HTML, CSS, WebRTC, etc. At the same time, you also need to master relevant computer vision and artificial intelligence technologies. It is worth noting that due to the design of the Web side
 Simple JavaScript Tutorial: How to Get HTTP Status Code
Jan 05, 2024 pm 06:08 PM
Simple JavaScript Tutorial: How to Get HTTP Status Code
Jan 05, 2024 pm 06:08 PM
JavaScript tutorial: How to get HTTP status code, specific code examples are required. Preface: In web development, data interaction with the server is often involved. When communicating with the server, we often need to obtain the returned HTTP status code to determine whether the operation is successful, and perform corresponding processing based on different status codes. This article will teach you how to use JavaScript to obtain HTTP status codes and provide some practical code examples. Using XMLHttpRequest
 PHP and JS Development Tips: Master the Method of Drawing Stock Candle Charts
Dec 18, 2023 pm 03:39 PM
PHP and JS Development Tips: Master the Method of Drawing Stock Candle Charts
Dec 18, 2023 pm 03:39 PM
With the rapid development of Internet finance, stock investment has become the choice of more and more people. In stock trading, candle charts are a commonly used technical analysis method. It can show the changing trend of stock prices and help investors make more accurate decisions. This article will introduce the development skills of PHP and JS, lead readers to understand how to draw stock candle charts, and provide specific code examples. 1. Understanding Stock Candle Charts Before introducing how to draw stock candle charts, we first need to understand what a candle chart is. Candlestick charts were developed by the Japanese
 The relationship between js and vue
Mar 11, 2024 pm 05:21 PM
The relationship between js and vue
Mar 11, 2024 pm 05:21 PM
The relationship between js and vue: 1. JS as the cornerstone of Web development; 2. The rise of Vue.js as a front-end framework; 3. The complementary relationship between JS and Vue; 4. The practical application of JS and Vue.
 How to get HTTP status code in JavaScript the easy way
Jan 05, 2024 pm 01:37 PM
How to get HTTP status code in JavaScript the easy way
Jan 05, 2024 pm 01:37 PM
Introduction to the method of obtaining HTTP status code in JavaScript: In front-end development, we often need to deal with the interaction with the back-end interface, and HTTP status code is a very important part of it. Understanding and obtaining HTTP status codes helps us better handle the data returned by the interface. This article will introduce how to use JavaScript to obtain HTTP status codes and provide specific code examples. 1. What is HTTP status code? HTTP status code means that when the browser initiates a request to the server, the service
 js method to refresh current page
Jan 24, 2024 pm 03:58 PM
js method to refresh current page
Jan 24, 2024 pm 03:58 PM
js methods to refresh the current page: 1. location.reload(); 2. location.href; 3. location.assign(); 4. window.location. Detailed introduction: 1. location.reload(), use the location.reload() method to reload the current page; 2. location.href, you can refresh the current page by setting the location.href attribute, etc.
 The difference between __proto__ and prototype in JS
Feb 19, 2024 pm 01:38 PM
The difference between __proto__ and prototype in JS
Feb 19, 2024 pm 01:38 PM
__proto__ and prototype are two attributes related to prototypes in JS. They have slightly different functions. This article will introduce and compare the differences between the two in detail, and provide corresponding code examples. First, let’s understand what they mean and what they are used for. proto__proto__ is a built-in property of an object that points to the prototype of the object. Every object has a __proto__ attribute, including custom objects, built-in objects, and function objects. By __proto__ genus
 The AI era of JS is here!
Apr 08, 2024 am 09:10 AM
The AI era of JS is here!
Apr 08, 2024 am 09:10 AM
Introduction to JS-Torch JS-Torch is a deep learning JavaScript library whose syntax is very similar to PyTorch. It contains a fully functional tensor object (can be used with tracked gradients), deep learning layers and functions, and an automatic differentiation engine. JS-Torch is suitable for deep learning research in JavaScript and provides many convenient tools and functions to accelerate deep learning development. Image PyTorch is an open source deep learning framework developed and maintained by Meta's research team. It provides a rich set of tools and libraries for building and training neural network models. PyTorch is designed to be simple, flexible and easy to use, and its dynamic computation graph features make
