Before we access the MySQL database, we need to connect to the database server first. To connect to the server, we use the mysqli_connect() function.
Before using this function, let’s first take a look at the syntax of this function:
mysqli_connect(host,username,password,dbname,port,socket);
Parameter description

Return value
If the connection is successful Returns an object representing a connection to the MySQL server.
Here, I am using the wamp integrated mysql database. We use the above method to connect to our database. (The default user name is root, and the password is empty);
$conn=mysqli_connect("localhost","root","");
if(!$conn){
die("Connection failed: " . mysqli_connect_error());//如果连接失败输出一条消息,并退出当前脚本}In php, execute the mysql statement, The mysqli_query() method must be used. So before creating a database, let's first take a look at the usage of mysqli_query():
mysqli_query(connection,query,resultmode);
Parameter description

Return value
For successful SELECT, SHOW, DESCRIBE or EXPLAIN query, a mysqli_result object will be returned. For other successful queries, TRUE will be returned. On failure, returns FALSE.
Create a database using the CREATE DATABASE statement, and this statement needs to be executed through the mysqli_query() method to take effect. (Note: In PHP, all mysql statements need to be executed through this method to take effect, so they will not be explained again below)
Next we will do this in our local database, Create a database named test01
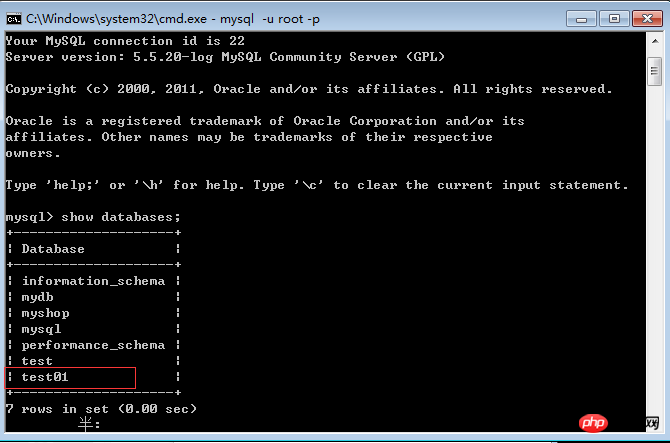
= ('localhost','root','' = "CREATE DATABASE test01"(,After executing the above statement, we can use the show databases statement to check whether the database has been created successfully. ()
Open cmd, enter mysql -u username -p and press Enter to enter the password according to the prompts. At this time, you can enter the console of the mysql database. If after typing, it prompts that mysql is not an internal or external command, then we only need to find the installation directory (bin directory) of mysql and copy it, and then use this path as a variable value to configure the environment variable. You can
Enter the show databases statement. At this time, you can see that the test01 database we just created already exists, as shown below

After the database is created, we will start to create the data table. Before creating the table, we must first select the method to create the table. Database, we use the mysqli_select_db() method to select the database. Similarly, before using this method, let’s first take a look at the usage of this method:
mysqli_select_db(connection,dbname);
Parameter description:

Returns TRUE if successful and FALSE if failed. Now let's use this method and select the table we just created.
mysqli_select_db($conn,'test01');//选择数据库
Create a table using the CREATE TABLE table name statement. Next we use this statement to create an admin table
$sql="CREATE TABLE admin (
    id INT(6) UNSIGNED AUTO_INCREMENT PRIMARY KEY,
    username VARCHAR(20) NOT NULL,
    password CHAR(6) NOT NULL,
    email VARCHAR(50) NOT NULL
)";mysqli_query($conn,$sql); //创建数据库
NOT NULL - Each row must contain a value (cannot be empty), null values are not allowed.
UNSIGNED - Use unsigned numeric types, 0 and positive numbers
AUTO INCREMENT - Set the value of the MySQL field every time when adding a record Automatically increase by 1
PRIMARY KEY - Set the unique identifier of each record in the data table. Usually the PRIMARY KEY of the column is set to the ID value, used with AUTO_INCREMENT.
After creating the database and table, we can add data to the table.
INSERT INTO statement is usually used to add new records to the MySQL table:
INSERT INTO table_name (column1, column2, column3,...) VALUES (value1, value2, value3,...)
Example:
$sql="INSERT INTO admin(username,password,email) VALUES('admin','123456','123456789@qq.com')";mysqli_query($conn,$sql);Complete execution After that, we can check whether the newly created piece of data exists in the database. As you can see from the picture on the right, this piece of data has been successfully created in our table.

Use the DELETE FROM statement to delete records from the database table.
DELETE FROM table_name WHERE some_column = some_value
$sql="DELETE FROM admin WHERE username='admin'";mysqli_query($conn,$sql);
The UPDATE statement is used to update existing records in the database table.
UPDATE table_name SET column1=value, column2=value2,... WHERE some_column=some_value
实例:
$sql="UPDATE admin SET email='309123793@qq.com'"; mysqli_query($conn,$sql);
SELECT 语句用于从数据表中读取数据:
SELECT column_name(s) FROM table_name
实例:
$sql = "SELECT id, username, email FROM admin"; mysqli_query($conn,$sql);
SELECT column_name(s) FROM table_name ORDER BY column_name(s) ASC|DESC
说明:默认为升序排列,如果需要降序排列,请使用 DESC 关键字。
$sql="SELECT * FROM admin ORDER BY username";
mysqli_query($conn,$sql);
The above is the detailed content of PHP operates MySQL database. For more information, please follow other related articles on the PHP Chinese website!


