
 Operation and Maintenance
Linux Operation and Maintenance
Change the network card name ens33 to eth0 under rhel and centos7
Operation and Maintenance
Linux Operation and Maintenance
Change the network card name ens33 to eth0 under rhel and centos7
Change the network card name ens33 to eth0 under rhel and centos7

Tips for using Linux
Complete some common problems encountered in Linux.
Modify the network card ens33 to eth0
When using RHEL and Centos7, I found that the network card name has changed to EnoX, which is quite strange. Now change it back to the old name eth0 which looks pleasing to the eye.
- Back up the /etc/sysconfig/Change the network card name ens33 to eth0 under rhel and centos7 file
cp /etc/sysconfig/Change the network card name ens33 to eth0 under rhel and centos7 /etc/sysconfig/Change the network card name ens33 to eth0 under rhel and centos7.bak
- Edit /etc/sysconfig/Change the network card name ens33 to eth0 under rhel and centos7 file
vim /etc/sysconfig/Change the network card name ens33 to eth0 under rhel and centos7
Addnet.ifnames=0 biosdevname=0
within the double quotes after GRUB_CMDLINE_LINUX As shown in the figure after adding, the order within the quotation marks has no effect
Pay attention to the spaces between each parameter.
- Rebuild the GRUB configuration file
Change the network card name ens33 to eth0 under rhel and centos72-mkconfig -o /boot/Change the network card name ens33 to eth0 under rhel and centos72/Change the network card name ens33 to eth0 under rhel and centos7.cfg
- Back up the network card configuration file and change the network card file to eth0
cp /etc/sysconfifg/network-scripts/ifcfg-ens33 /etc/sysconfifg/network-scripts/ifcfg-ens33.bakmv /etc/sysconfifg/network-scripts/ifcfg-ens33 /etc/sysconfifg/network-scripts/ifcfg-eth0
ens33 may be different from yours. To be specific, check your own ensx with ifconfig first.
- Edit the /etc/sysconfig/network-scripts/ifcfg-eth0 file
vim /etc/sysconfig/network-scripts/ifcfg-eth0
Just change the NAME and DEVICE from the original ens33 to eth0.
- Just restart the system.

The above is the detailed content of Change the network card name ens33 to eth0 under rhel and centos7. For more information, please follow other related articles on the PHP Chinese website!

Hot AI Tools

Undresser.AI Undress
AI-powered app for creating realistic nude photos

AI Clothes Remover
Online AI tool for removing clothes from photos.

Undress AI Tool
Undress images for free

Clothoff.io
AI clothes remover

Video Face Swap
Swap faces in any video effortlessly with our completely free AI face swap tool!

Hot Article
Hot Tools

Notepad++7.3.1
Easy-to-use and free code editor

SublimeText3 Chinese version
Chinese version, very easy to use

Zend Studio 13.0.1
Powerful PHP integrated development environment

Dreamweaver CS6
Visual web development tools

SublimeText3 Mac version
God-level code editing software (SublimeText3)
Hot Topics
 1386
1386
 52
52

 3 tips to easily customize your Mac computer name, host name and Bonjour name
Mar 06, 2024 pm 12:20 PM
3 tips to easily customize your Mac computer name, host name and Bonjour name
Mar 06, 2024 pm 12:20 PM
Many Mac users tend to keep the default name of their device and may never consider changing it. Many people choose to stick with the name from the initial setup, such as "Johnny's MacBook Air" or simply "iMac." Learning how to change the name of your Mac is a very useful skill, especially when you have multiple devices, as it can help you quickly distinguish and manage them. Next, we will teach you step by step how to change the computer name, host name and Bonjour name (local host name) in macOS system. Why should you change your Mac name? Changing the name of your Mac can not only show your personality, but also help improve the user experience: Personalize your Mac: The default name may not be to your taste, change it to a name you like.
 CentOS7 various version image download addresses and version descriptions (including Everything version)
Feb 29, 2024 am 09:20 AM
CentOS7 various version image download addresses and version descriptions (including Everything version)
Feb 29, 2024 am 09:20 AM
When loading CentOS-7.0-1406, there are many optional versions. For ordinary users, they don’t know which one to choose. Here is a brief introduction: (1) CentOS-xxxx-LiveCD.ios and CentOS-xxxx- What is the difference between bin-DVD.iso? The former only has 700M, and the latter has 3.8G. The difference is not only in size, but the more essential difference is that CentOS-xxxx-LiveCD.ios can only be loaded into the memory and run, and cannot be installed. Only CentOS-xxx-bin-DVD1.iso can be installed on the hard disk. (2) CentOS-xxx-bin-DVD1.iso, Ce
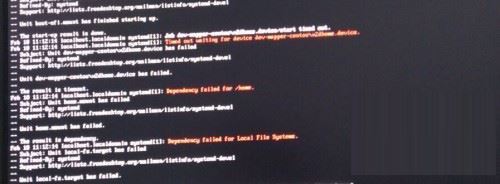 Steps to enter CentOS 7 emergency repair mode
Jan 13, 2024 am 09:36 AM
Steps to enter CentOS 7 emergency repair mode
Jan 13, 2024 am 09:36 AM
Open the centos7 page and appear: welcome to emergency mode! afterloggingin, type "journalctl -xb" to viewsystemlogs, "systemctlreboot" toreboot, "systemctldefault" to tryagaintobootintodefaultmode. giverootpasswordformaintenance(??Control-D???): Solution: execute r
 How to add/remove kernel boot parameters/parameters and GRUB boot script on Fedora/RHEL/AlmaLinux/Rocky Linux/CentOS streams
Mar 20, 2024 pm 05:36 PM
How to add/remove kernel boot parameters/parameters and GRUB boot script on Fedora/RHEL/AlmaLinux/Rocky Linux/CentOS streams
Mar 20, 2024 pm 05:36 PM
On Fedora39+, RHEL9, AlmaLinux9, RockyLinux9 and CentOSStream9Linux distributions, you can use the grubby program to manage GRUB boot entries. In this article, we will show you how to use GRUBY to add/remove kernel boot parameters from the GRUB boot entry on Fedora, RHEL, AlmaLinux, RockyLinux, and CentOSStream. We will also show you how to add/remove custom GR using GRUBY on Fedora, RHEL, AlmaLinux, RockyLinux and CentOSStream
 How to access and clean junk files in /tmp directory in CentOS 7?
Dec 27, 2023 pm 09:10 PM
How to access and clean junk files in /tmp directory in CentOS 7?
Dec 27, 2023 pm 09:10 PM
There is a lot of garbage in the tmp directory in the centos7 system. If you want to clear the garbage, how should you do it? Let’s take a look at the detailed tutorial below. To view the list of files in the tmp file directory, execute the command cdtmp/ to switch to the current file directory of tmp, and execute the ll command to view the list of files in the current directory. As shown below. Use the rm command to delete files. It should be noted that the rm command deletes files from the system forever. Therefore, it is recommended that when using the rm command, it is best to give a prompt before deleting the file. Use the command rm-i file name, wait for the user to confirm deletion (y) or skip deletion (n), and the system will perform corresponding operations. As shown below.
 How to set password rules in centos7? How to set password rules in centos7
Jan 07, 2024 pm 01:17 PM
How to set password rules in centos7? How to set password rules in centos7
Jan 07, 2024 pm 01:17 PM
Set password rules for security reasons Set the number of days after which passwords expire. User must change password within days. This setting only affects created users, not existing users. If setting to an existing user, run the command "chage -M (days) (user)". PASS_MAX_DAYS60#Password expiration time PASS_MIN_DAYS3#Initial password change time PASS_MIN_LEN8#Minimum password length PASS_WARN_AGE7#Password expiration prompt time Repeat password restriction use [root@linuxprobe~]#vi/etc/pam.d/system-auth#nearline15:
 How to install Mysql in CentOS7 and set it to start automatically at boot
Jun 02, 2023 pm 08:36 PM
How to install Mysql in CentOS7 and set it to start automatically at boot
Jun 02, 2023 pm 08:36 PM
Centos7 does not have a mysql database. The default database is mariadb (a branch of mysql). You can install the mysql database manually by following the steps below. 1. Download the rpm installation file wgethttp://repo.mysql.com/mysql-community-release-el7.rpm 2. Execute rpm to install rpm-ivhmysql-community-release-el7.rpm. After the dependency resolution is completed, the following options appear: dependenciesresolved =================================
 How to install mbstring extension under CENTOS7?
Jan 06, 2024 pm 09:59 PM
How to install mbstring extension under CENTOS7?
Jan 06, 2024 pm 09:59 PM
1.UncaughtError:Calltoundefinedfunctionmb_strlen(); When the above error occurs, it means that we have not installed the mbstring extension; 2. Enter the PHP installation directory cd/temp001/php-7.1.0/ext/mbstring 3. Start phpize(/usr/local/bin /phpize or /usr/local/php7-abel001/bin/phpize) command to install php extension 4../configure--with-php-config=/usr/local/php7-abel
