 Operation and Maintenance
 Linux Operation and Maintenance
 Teach you how to configure a static IP address for a virtual machine
Teach you how to configure a static IP address for a virtual machine
Use VMware to configure the static IP address of the virtual machine
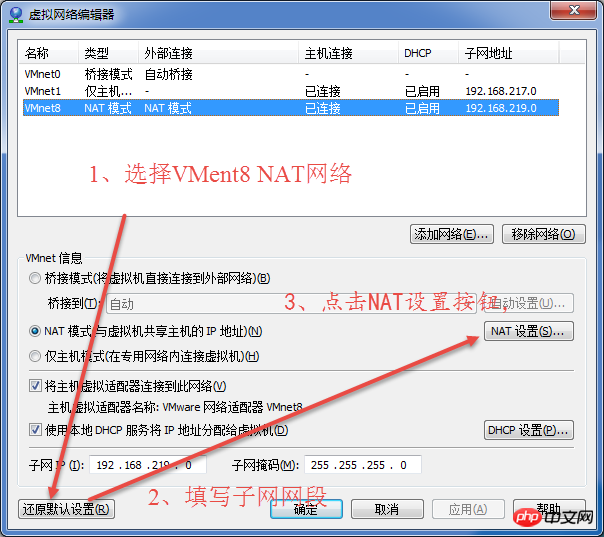
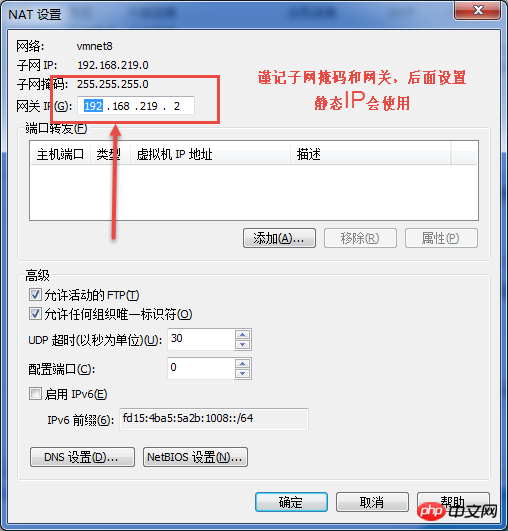
1. After installing the virtual machine, click on the menu bar Select Edit→Virtual Network Editor, open the Virtual Network Editor dialog box, select the Vmnet8 Net network connection method, set the subnet IP as desired, click the NAT setting page to view the subnet mask and gateway , will be used later to modify the static IP.

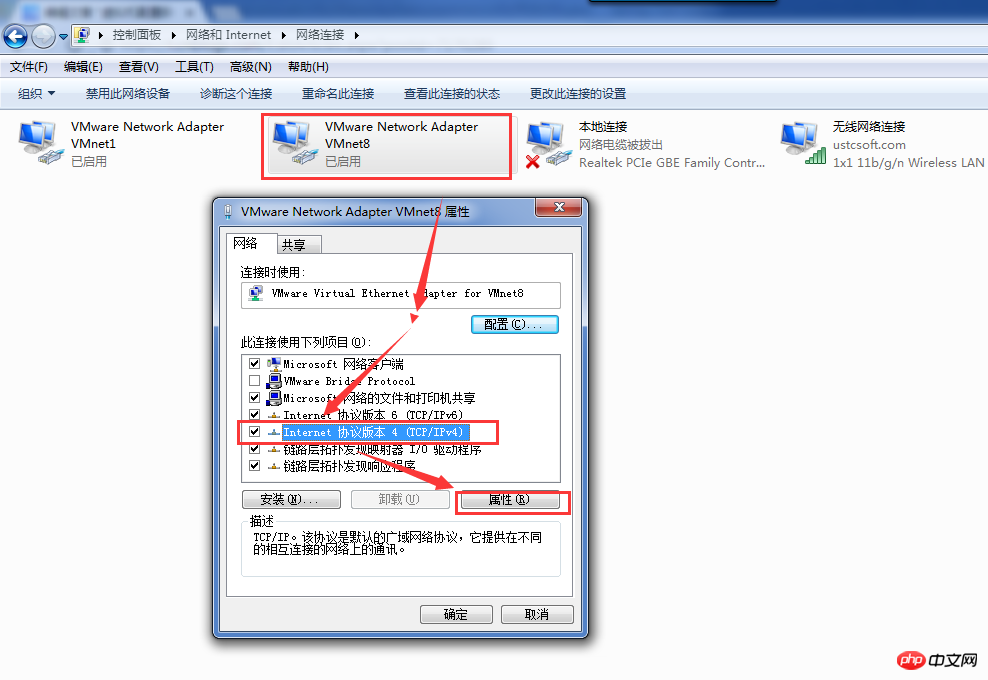
2. Check the host VM8 network card settings and open the network and Sharing Center → Change Adapter Settings →, right-click on VMware Network Adapter VMnet8 and select the Properties button to open the Properties dialog box.
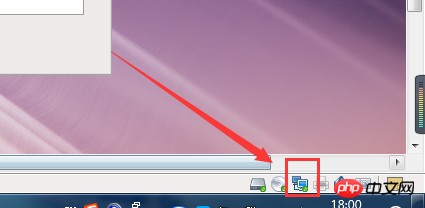
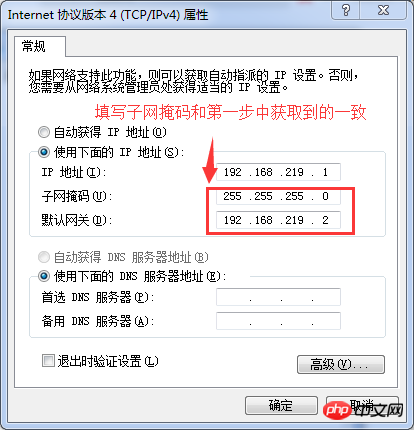 3. In the lower right corner of the virtual machine, click the network adapter button, right-click and select Disconnect, and then reconnect to ensure that you just settings take effect. Then start the virtual machine and enter ifcfg to view the currently assigned IP.
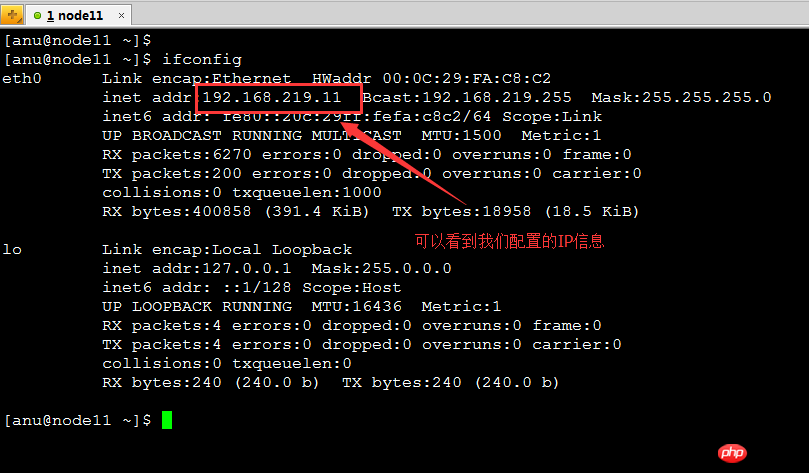 4. Modify the network configuration file, turn off the host firewall (/etc/init.d/iptables stop), and then check the firewall Please check the status (chkconfig iptables status), and then ping the host IP (192.168.223.11), host VM8 IP (192.168.219.1), and the gateway IP (192.168.219.2) between the host and the virtual machine. This can generally indicate that the fixed IP of the virtual machine is successfully set.
vi /etc/sysconfig/network-scripts/ifcfg-eth0 is:
(Tip: Press a key to enter insert mode, press esc, press ":wq" to save and exit)
DEVICE=eth0
HWADDR=00:0C:29:FA:C8:C2 (physical address cannot be copied)TYPE=Ethernet
UUID=b1aff802-155b-445e-b9cc-485d30aa6e4e (The unique ID cannot be copied)ONBOOT=yes
NM_CONTROLLED=yes
BOOTPROTO=static
IPADDR=192.168.219.11
GATEWAY=192.168.219.2


#5. Restart the virtual machine (reboot) to verify the IP Whether it is fixed or not. 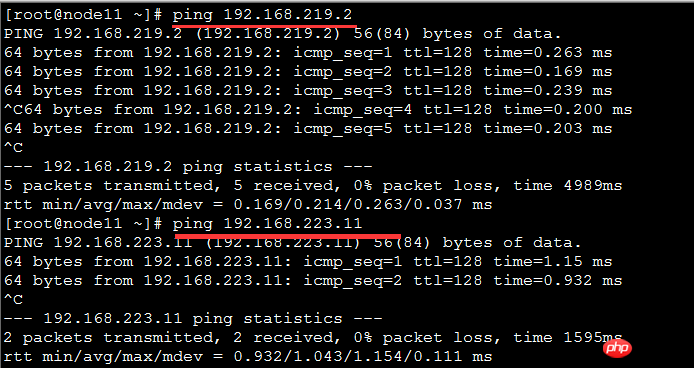
The above is the detailed content of Teach you how to configure a static IP address for a virtual machine. For more information, please follow other related articles on the PHP Chinese website!

Hot AI Tools

Undresser.AI Undress
AI-powered app for creating realistic nude photos

AI Clothes Remover
Online AI tool for removing clothes from photos.

Undress AI Tool
Undress images for free

Clothoff.io
AI clothes remover

AI Hentai Generator
Generate AI Hentai for free.

Hot Article

Hot Tools

Notepad++7.3.1
Easy-to-use and free code editor

SublimeText3 Chinese version
Chinese version, very easy to use

Zend Studio 13.0.1
Powerful PHP integrated development environment

Dreamweaver CS6
Visual web development tools

SublimeText3 Mac version
God-level code editing software (SublimeText3)

Hot Topics
 The working principle and configuration method of GDM in Linux system
Mar 01, 2024 pm 06:36 PM
Title: The working principle and configuration method of GDM in Linux systems In Linux operating systems, GDM (GNOMEDisplayManager) is a common display manager used to control graphical user interface (GUI) login and user session management. This article will introduce the working principle and configuration method of GDM, as well as provide specific code examples. 1. Working principle of GDM GDM is the display manager in the GNOME desktop environment. It is responsible for starting the X server and providing the login interface. The user enters
 Understand Linux Bashrc: functions, configuration and usage
Mar 20, 2024 pm 03:30 PM
Understanding Linux Bashrc: Function, Configuration and Usage In Linux systems, Bashrc (BourneAgainShellruncommands) is a very important configuration file, which contains various commands and settings that are automatically run when the system starts. The Bashrc file is usually located in the user's home directory and is a hidden file. Its function is to customize the Bashshell environment for the user. 1. Bashrc function setting environment
 Where can I change my Meituan address? Meituan address modification tutorial!
Mar 15, 2024 pm 04:07 PM
1. Where can I change my Meituan address? Meituan address modification tutorial! Method (1) 1. Enter Meituan My Page and click Settings. 2. Select personal information. 3. Click the shipping address again. 4. Finally, select the address you want to modify, click the pen icon on the right side of the address, and modify it. Method (2) 1. On the homepage of the Meituan app, click Takeout, then click More Functions after entering. 2. In the More interface, click Manage Address. 3. In the My Shipping Address interface, select Edit. 4. Modify them one by one according to your needs, and finally click to save the address.
 MyBatis Generator configuration parameter interpretation and best practices
Feb 23, 2024 am 09:51 AM
MyBatisGenerator is a code generation tool officially provided by MyBatis, which can help developers quickly generate JavaBeans, Mapper interfaces and XML mapping files that conform to the database table structure. In the process of using MyBatisGenerator for code generation, the setting of configuration parameters is crucial. This article will start from the perspective of configuration parameters and deeply explore the functions of MyBatisGenerator.
 How to configure workgroup in win11 system
Feb 22, 2024 pm 09:50 PM
How to configure a workgroup in Win11 A workgroup is a way to connect multiple computers in a local area network, which allows files, printers, and other resources to be shared between computers. In Win11 system, configuring a workgroup is very simple, just follow the steps below. Step 1: Open the "Settings" application. First, click the "Start" button of the Win11 system, and then select the "Settings" application in the pop-up menu. You can also use the shortcut "Win+I" to open "Settings". Step 2: Select "System" In the Settings app, you will see multiple options. Please click the "System" option to enter the system settings page. Step 3: Select "About" In the "System" settings page, you will see multiple sub-options. Please click
 How to configure and install FTPS in Linux system
Mar 20, 2024 pm 02:03 PM
Title: How to configure and install FTPS in Linux system, specific code examples are required. In Linux system, FTPS is a secure file transfer protocol. Compared with FTP, FTPS encrypts the transmitted data through TLS/SSL protocol, which improves Security of data transmission. In this article, we will introduce how to configure and install FTPS in a Linux system and provide specific code examples. Step 1: Install vsftpd Open the terminal and enter the following command to install vsftpd: sudo
 Guide you to set up a Maven local repository to speed up project construction
Feb 24, 2024 pm 02:12 PM
Teach you step by step how to configure Maven local warehouse: improve project construction speed Maven is a powerful project management tool that is widely used in Java development. It can help us manage project dependencies, build projects, and publish projects, etc. However, during the actual development process, we sometimes encounter the problem of slow project construction. One solution is to configure a local repository to improve project build speed. This article will teach you step by step how to configure the Maven local warehouse to make your project construction more efficient. Why do you need to configure a local warehouse?
 Where can I check the configuration of my win11 computer? How to find the configuration information of win11 computer
Mar 06, 2024 am 10:10 AM
When we use win11 system, we sometimes need to check the configuration of our computer, but many users are also asking where to check the configuration of win11 computer? In fact, the method is very simple. Users can directly open the system information under settings, and then view the computer configuration information. Let this site carefully introduce to users how to find win11 computer configuration information. How to find win11 computer configuration information. Method 1: 1. Click Start and open Computer Settings. 3. You can view computer configuration information on this page. 2. In the command prompt window, enter systeminfo and press Enter to view the computer configuration.


