
 Operation and Maintenance
Linux Operation and Maintenance
Two methods to explain how to configure local yum source for Redhat HAT in VMware
Operation and Maintenance
Linux Operation and Maintenance
Two methods to explain how to configure local yum source for Redhat HAT in VMware
Two methods to explain how to configure local yum source for Redhat HAT in VMware
Configuring the local yum source for Redhat HAT in VMware
Today I am going to use CM to install the big data environment. I need several machines to use the same set of yum source, so I thought of mirroring Redhat The file is copied to the virtual machine, used in suspension, and finally shared with other virtual machines through http. Thinking about it later, this is really stupid. First of all, I have already suspended the image once when installing the virtual machine, so I only need to suspend it again in each virtual machine and directly configure the yum source. There is no need to copy the iso to the virtual machine to reduce disk usage. So now let’s talk about how to do it:
1. Check before installation. First, you need to make sure that your virtual machine has loaded the local image, as shown in the figure below:

Note: Use the ISO image file when selecting your installation system Use the location of the file. Note here that the status check indicates that you have imported the disc. To check whether you have successfully imported the file, you can check whether there is a RHEL_6.4 x86_64 Disc 1 file in the /media/ directory (Redhat is used here). If there is, it means the import is successful.
If there is nothing under the /media/ directory, it may be that the ISO is not suspended. You can use the following command to manually suspend it:
mount /dev/sr0 /media/cdrom
或
mount /dev/sr1 /media/cdrom
2. Configure yum source
1. Log in to the system as the root user and create the cdrom folder in any directory. The name can be customized. I created the cdrom folder under the /mnt folder. .
# mkdir /mnt/cdrom
2. Execute the following command in any directory:
# mount -o loop /dev/cdrom /mnt/cdrom/
It should be noted that /dev/cdrom was created when I installed the system before and was used to hang the image file. Now it is also hung in /mnt/cdrom. above. If the above command is executed successfully, you will see that the files in the /mnt/cdrom/ directory are exactly the same as the files in the /media/RHEL_6.4 x86_64 Disc 1/ directory, proving that the loading is successful.
3. Modify the yum source configuration file. It is recommended to delete all the files in the /etc/yum.repos.d/ directory and create a new one with .repo as the suffix. file, the command is as follows:
# cd /etc/yum.repos.d/# rm -rf *# touch yum.repo# vim yum.repo
Then copy the following content to the yum.repo file
[rhel]
name =Red Hat enterprise Linux 6baseurl=file:///mnt/cdrom
enable=1gpgkey=1gpgkey=file:///mnt/cdrom/RPM-GPG-KEY-redhat-release
Explain the meaning of configuration a little bit:
name =Red Hat enterprise Linux 6 #The name can be chosen casually
baseurl=file:///mnt/yumsrc / #Specify the file where the yum source is located, the file where the software package is located
enable=1 #Must be 1, indicating enablement
gpgkey=1 #Indicates the version Checking the version number
gpgkey=file:///mnt/cdrom/RPM-GPG-KEY-redhat-release #Indicates the checking path of the version number
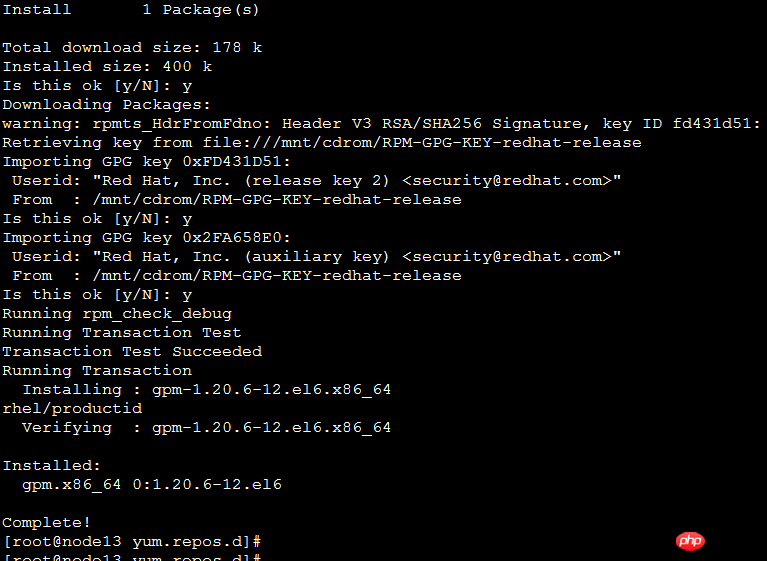
4. After the above configuration is completed, the yum source has been configured. Next, you can test the command: yum install gpm. After pressing Enter all the way, you will see Complete!, which means it has been used. The yum source successfully installed gpm, proving that the installation was successful.
Another method is introduced:
First create the dvd directory in the /mnt directory (actually this step According to personal preference, the directory name is up to you, just remember to synchronize it later)
[root@localhost ~]# mkdir /mnt/dvd
Then mount the image to the created directory (To find the cdrom file in /dev, the image must be loaded into the virtual machine. Usually after installation, if we do not make changes, it is usually loaded)
[root@localhost mnt]# mount / dev/cdrom /mnt/dvd
Then delete all existing configuration files in /etc/yum.repos.d (of course, you'd better back up first), and then use the following command, create a new file, the suffix must be .repo, the file name can be arbitrary
[root@localhost my]# vim /etc/yum.repos.d/local.repo
in Write the following content in the configuration file
[RHEL6] //Warehouse name, optional
name=all rhel6 packages //Name, optional
baseurl=file:///mnt/dvd //Source The path is very important. Fill it in according to your actual situation. This path should be filled in according to the location of the rpm package. Some are in the Server directory
enable=1 //Enable this yum source
Finally, import the public key and you’re done
The above is the detailed content of Two methods to explain how to configure local yum source for Redhat HAT in VMware. For more information, please follow other related articles on the PHP Chinese website!

Hot AI Tools

Undresser.AI Undress
AI-powered app for creating realistic nude photos

AI Clothes Remover
Online AI tool for removing clothes from photos.

Undress AI Tool
Undress images for free

Clothoff.io
AI clothes remover

Video Face Swap
Swap faces in any video effortlessly with our completely free AI face swap tool!

Hot Article
Hot Tools

Notepad++7.3.1
Easy-to-use and free code editor

SublimeText3 Chinese version
Chinese version, very easy to use

Zend Studio 13.0.1
Powerful PHP integrated development environment

Dreamweaver CS6
Visual web development tools

SublimeText3 Mac version
God-level code editing software (SublimeText3)
Hot Topics
 1386
1386
 52
52

 How to enable copy and paste for VMware virtual machines
Feb 21, 2024 am 10:09 AM
How to enable copy and paste for VMware virtual machines
Feb 21, 2024 am 10:09 AM
You can easily copy and paste text and files between VMware virtual machines (VMs) and physical systems. This capability allows you to easily transfer images, formatted and unformatted text, and even email attachments between virtual machines and host systems. This article will show you how to enable this feature and demonstrate methods for copying data, files, and folders. How to Enable Copy/Paste in VMware VMware provides three different ways to copy data, files or folders from a virtual machine to a physical computer and vice versa, as explained below: Copy and Paste Elements Drag and Drop Feature Folder Sharing 1 ] Enable copy-paste using VMware Tools You can use the keyboard if your VMWare installation and guest operating system meet the requirements
 Solution to crash and freeze of Win11 running VMware virtual machine
Feb 14, 2024 pm 02:36 PM
Solution to crash and freeze of Win11 running VMware virtual machine
Feb 14, 2024 pm 02:36 PM
Many users need to install virtual machines on their computers due to certain needs or hobbies, but recently some Win11 friends found that their computers crashed and crashed as soon as they ran the VMware virtual machine. What should they do? In fact, this problem is not difficult to solve. The editor below brings you four solutions, hoping to help you. Method 1: Hyper-V solution 1. Open Control Panel-Programs-Enable or turn off Windows functions. You may find that there is no Hyper-V on your computer, and even the vm cannot be used (if you have it open, check it as shown below) , just restart the computer). There is no Hyper-V that needs to be installed. You can go to step 1.2 below to install it. 2. Install Hyper-V on the system and create a new note
 How to share files between Win11 and VMware virtual machines?
Jan 29, 2024 pm 09:39 PM
How to share files between Win11 and VMware virtual machines?
Jan 29, 2024 pm 09:39 PM
VMware virtual machines allow users to run two or more Windows, DOS, and LINUX systems simultaneously on one machine. So how to share files between VMware virtual machines and hosts? Today, the editor will take Win11 as an example to share with you a tutorial on setting up file sharing between VMware virtual machines and hosts. Virtual machine file sharing? 1. Set the network of the installed VMware virtual machine to bridge mode. In a VMware virtual machine, you can configure shared folders through the following steps: Click Virtual Machine->Virtual Machine Settings->Options, enable shared folders, and click the Add button to set the folder path. Note: Opening shared folders needs to be done when shutting down the virtual machine. 4. To share files
![VMware Horizon Client cannot be opened [Fix]](https://img.php.cn/upload/article/000/887/227/170835607042441.jpg?x-oss-process=image/resize,m_fill,h_207,w_330) VMware Horizon Client cannot be opened [Fix]
Feb 19, 2024 pm 11:21 PM
VMware Horizon Client cannot be opened [Fix]
Feb 19, 2024 pm 11:21 PM
VMware Horizon Client helps you access virtual desktops conveniently. However, sometimes the virtual desktop infrastructure may experience startup issues. This article discusses the solutions you can take when the VMware Horizon client fails to start successfully. Why won't my VMware Horizon client open? When configuring VDI, if the VMWareHorizon client is not open, an error may occur. Please confirm that your IT administrator has provided the correct URL and credentials. If everything is fine, follow the solutions mentioned in this guide to resolve the issue. Fix VMWareHorizon Client Not Opening If VMW is not opening on your Windows computer
 Convert VMware to VirtualBox and vice versa
Feb 19, 2024 pm 05:57 PM
Convert VMware to VirtualBox and vice versa
Feb 19, 2024 pm 05:57 PM
Virtual machines are an affordable way to experience and use multiple operating systems on a single computer. VMWare and VirtualBox are the two major brands in the virtual machine industry. You can easily convert a VMware virtual machine to a VirtualBox virtual machine and vice versa, giving you the flexibility to switch machines between them without having to recreate them. Migrating a virtual machine from VMWare to VirtualBox or vice versa is not complicated. Just follow the instructions below and it's easy to do. How to convert VMware to VirtualBoxVMwareVM is stored in .vmx format and then converted to .ovf, this is VirtualBox and VMWare
![VMware Horizon client freezes or stalls while connecting [Fix]](https://img.php.cn/upload/article/000/887/227/170942987315391.jpg?x-oss-process=image/resize,m_fill,h_207,w_330) VMware Horizon client freezes or stalls while connecting [Fix]
Mar 03, 2024 am 09:37 AM
VMware Horizon client freezes or stalls while connecting [Fix]
Mar 03, 2024 am 09:37 AM
When connecting to a VDI using the VMWareHorizon client, we may encounter situations where the application freezes during authentication or the connection blocks. This article will explore this issue and provide ways to resolve this situation. When the VMWareHorizon client experiences freezing or connection issues, there are a few things you can do to resolve the issue. Fix VMWareHorizon client freezes or gets stuck while connecting If VMWareHorizon client freezes or fails to connect on Windows 11/10, do the below mentioned solutions: Check network connection Restart Horizon client Check Horizon server status Clear client cache Fix Ho
 Is redhat linux free?
Mar 25, 2023 am 10:43 AM
Is redhat linux free?
Mar 25, 2023 am 10:43 AM
redhat linux is free, and users can use Redhat for free, but Redhat services require charges; that is to say, users can use Redhat for free, but users need to pay a certain fee to obtain Redhat company's services.
 How to add local music to soda music
Feb 23, 2024 pm 07:13 PM
How to add local music to soda music
Feb 23, 2024 pm 07:13 PM
How to add local music to Soda Music? You can add your favorite local music to Soda Music APP, but most friends don’t know how to add local music. Next is the graphic tutorial on how to add local music to Soda Music brought by the editor. , interested users come and take a look! Tutorial on using soda music. How to add local music to soda music. 1. First open the soda music APP and click on the [Music] function area at the bottom of the main page; 2. Then enter the play page and click the [three dots] icon in the lower right corner; 3. Finally Expand the function bar below and select the [Download] button to add it to local music.
