 Operation and Maintenance
 Linux Operation and Maintenance
 Detailed explanation of relevant knowledge points about setting up Red Hat 6.5 Samba server
Detailed explanation of relevant knowledge points about setting up Red Hat 6.5 Samba server
The purpose of building a Samba server is to realize that after the Linux shared directory can be directly accessed from Windows, the shared directory can be accessed directly.
Now we will introduce how to set up Samba service in Red Hat 6.5 system.
Before building the Samba service, the yum source must be configured, both local and network sources are acceptable.
1. Close the selinux service
This service must be closed, otherwise Windows will not have access rights.
Temporary shutdown
It is only effective for the current time. After the computer is restarted, the service will be restarted, so it is generally selected to be permanently shut down.
setenforce 0
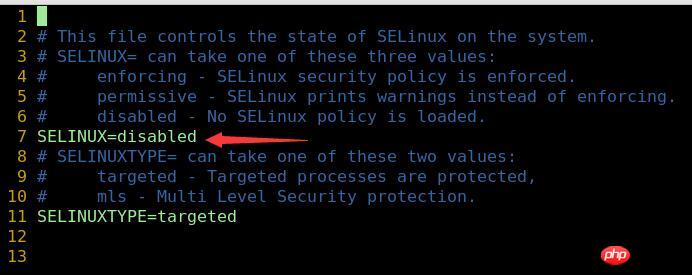
Permanent shutdown
Open selinux configuration file
vim /etc/sysconfig/selinux
Change SELINUX to disabled

Restart the computer
reboot
2. Install Samba software
yum install samba* -y
3. Modify the Samba configuration file
Open /etc/samba/smb.confvim /etc/samba/smb.conf
100
101     security = user102     passdb backend = tdbsam
<span style="color: #000000">#共享时显示的文件夹名字,要顶格写<br>[need]        <br>  #对该共享目录的描述,任意写                  <br>  comment =<span style="color: #000000"> need share    <br>  #指定<span style="color: #000000">共享的目录路径
  path = /<span style="color: #000000">share<br><span style="color: #000000">  #是否让所有可以登入的使用者看到
  public =<span style="color: #000000"> yes              <br><span style="color: #000000">  #表示可写,能够上传删除等操作,该共享目录的其他用户也必须具备同样的权限
  writable =<span style="color: #000000"> yes              <span style="color: #000000"><br>  #<span style="color: #000000">该共享目录是否可见
  browseable = yes   <br>  #不能匿名访问,需要登录       <span style="color: #000000">  guest ok = no              </span></span></span></span></span></span></span></span></span></span></span>
4. Close the firewall
Temporarily close/etc/init.d/iptables stop
chkconfig iptables off
5. Restart the Samba service
/etc/init.d/smb restart
chkconfig --level 35 smb on
6. Add a user for the Samba server
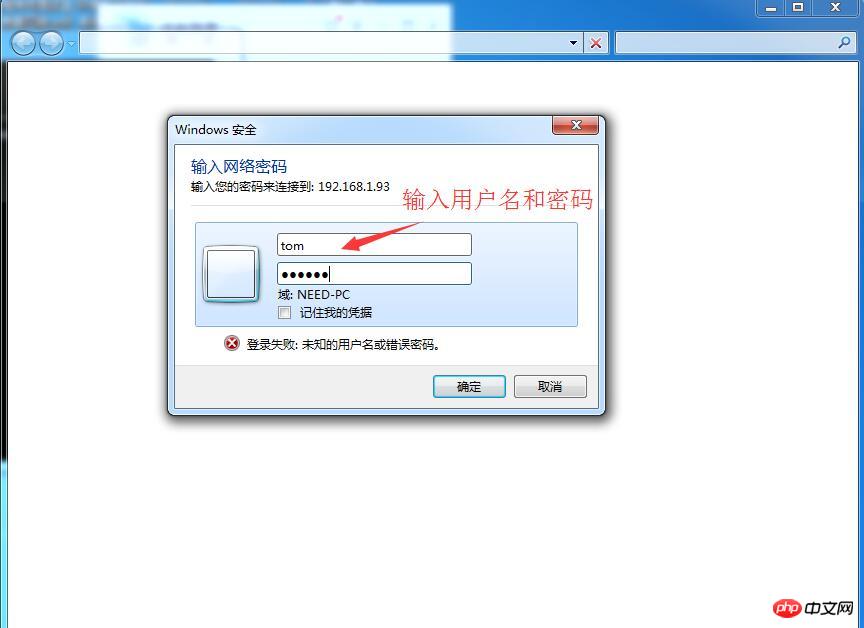
First create a normal useradduser tompasswd tom
smbpasswd tom
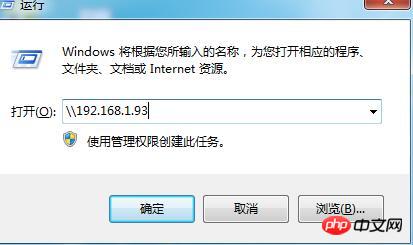
7. Windows access


The above is the detailed content of Detailed explanation of relevant knowledge points about setting up Red Hat 6.5 Samba server. For more information, please follow other related articles on the PHP Chinese website!

Hot AI Tools

Undresser.AI Undress
AI-powered app for creating realistic nude photos

AI Clothes Remover
Online AI tool for removing clothes from photos.

Undress AI Tool
Undress images for free

Clothoff.io
AI clothes remover

AI Hentai Generator
Generate AI Hentai for free.

Hot Article

Hot Tools

Notepad++7.3.1
Easy-to-use and free code editor

SublimeText3 Chinese version
Chinese version, very easy to use

Zend Studio 13.0.1
Powerful PHP integrated development environment

Dreamweaver CS6
Visual web development tools

SublimeText3 Mac version
God-level code editing software (SublimeText3)

Hot Topics
 How to solve the problem that eMule search cannot connect to the server
Jan 25, 2024 pm 02:45 PM
Solution: 1. Check the eMule settings to make sure you have entered the correct server address and port number; 2. Check the network connection, make sure the computer is connected to the Internet, and reset the router; 3. Check whether the server is online. If your settings are If there is no problem with the network connection, you need to check whether the server is online; 4. Update the eMule version, visit the eMule official website, and download the latest version of the eMule software; 5. Seek help.
 Detailed explanation of CentOS installation fuse and CentOS installation server
Feb 13, 2024 pm 08:40 PM
As a LINUX user, we often need to install various software and servers on CentOS. This article will introduce in detail how to install fuse and set up a server on CentOS to help you complete the related operations smoothly. CentOS installation fuseFuse is a user space file system framework that allows unprivileged users to access and operate the file system through a customized file system. Installing fuse on CentOS is very simple, just follow the following steps: 1. Open the terminal and Log in as root user. 2. Use the following command to install the fuse package: ```yuminstallfuse3. Confirm the prompts during the installation process and enter `y` to continue. 4. Installation completed
 Solution to the inability to connect to the RPC server and the inability to enter the desktop
Feb 18, 2024 am 10:34 AM
What should I do if the RPC server is unavailable and cannot be accessed on the desktop? In recent years, computers and the Internet have penetrated into every corner of our lives. As a technology for centralized computing and resource sharing, Remote Procedure Call (RPC) plays a vital role in network communication. However, sometimes we may encounter a situation where the RPC server is unavailable, resulting in the inability to enter the desktop. This article will describe some of the possible causes of this problem and provide solutions. First, we need to understand why the RPC server is unavailable. RPC server is a
 How to configure Dnsmasq as a DHCP relay server
Mar 21, 2024 am 08:50 AM
The role of a DHCP relay is to forward received DHCP packets to another DHCP server on the network, even if the two servers are on different subnets. By using a DHCP relay, you can deploy a centralized DHCP server in the network center and use it to dynamically assign IP addresses to all network subnets/VLANs. Dnsmasq is a commonly used DNS and DHCP protocol server that can be configured as a DHCP relay server to help manage dynamic host configurations in the network. In this article, we will show you how to configure dnsmasq as a DHCP relay server. Content Topics: Network Topology Configuring Static IP Addresses on a DHCP Relay D on a Centralized DHCP Server
 Best Practice Guide for Building IP Proxy Servers with PHP
Mar 11, 2024 am 08:36 AM
In network data transmission, IP proxy servers play an important role, helping users hide their real IP addresses, protect privacy, and improve access speeds. In this article, we will introduce the best practice guide on how to build an IP proxy server with PHP and provide specific code examples. What is an IP proxy server? An IP proxy server is an intermediate server located between the user and the target server. It acts as a transfer station between the user and the target server, forwarding the user's requests and responses. By using an IP proxy server
 How to install and configure Samba file sharing service in Debian
Mar 28, 2024 am 11:16 AM
Installing and configuring the Samba file sharing service in Debian can be completed by the following steps: 1. Install Samba: First, install Samba using the apt package manager: sudoaptupdate sudoaptinstallsamba 2. Configure Samba: Edit Samba’s main configuration file /etc/samba/smb .conf: sudonano/etc/samba/smb.conf In the file, you can define the configuration of the shared directory and shared user. The following is an example configuration: [share] comment=SharedFolder
 What should I do if I can't enter the game when the epic server is offline? Solution to why Epic cannot enter the game offline
Mar 13, 2024 pm 04:40 PM
What should I do if I can’t enter the game when the epic server is offline? This problem must have been encountered by many friends. When this prompt appears, the genuine game cannot be started. This problem is usually caused by interference from the network and security software. So how should it be solved? The editor of this issue will explain I would like to share the solution with you, I hope today’s software tutorial can help you solve the problem. What to do if the epic server cannot enter the game when it is offline: 1. It may be interfered by security software. Close the game platform and security software and then restart. 2. The second is that the network fluctuates too much. Try restarting the router to see if it works. If the conditions are OK, you can try to use the 5g mobile network to operate. 3. Then there may be more
 How to solve the problem of inaccessibility after Tomcat deploys war package
Jan 13, 2024 pm 12:07 PM
How to solve the problem that Tomcat cannot successfully access the war package after deploying it requires specific code examples. As a widely used Java Web server, Tomcat allows developers to package their own developed Web applications into war files for deployment. However, sometimes we may encounter the problem of being unable to successfully access the war package after deploying it. This may be caused by incorrect configuration or other reasons. In this article, we'll provide some concrete code examples that address this dilemma. 1. Check Tomcat service


