 Web Front-end
 JS Tutorial
 Express implements front-end and back-end communication to upload pictures to the storage database (mysql) fool-proof tutorial (1)_javascript skills
Express implements front-end and back-end communication to upload pictures to the storage database (mysql) fool-proof tutorial (1)_javascript skills
I have been struggling in the front-end pit for more than a year, and I finally made up my mind to write my first blog (although the content is mostly original, it is an integrated content). The reason I started using Express is because I wanted to The test receives and returns images uploaded by the front end to realize image upload. Everyone on the back end is quite busy, so I have no choice but to do it myself (hey, they were all forced out).
This tutorial is suitable for web front-end development who have not been exposed to node and can quickly build their own framework, based on express4.x.
First install express, http://www.expressjs.com.cn/starter/installing.html, and press Enter until the end during the installation process.
After the installation is complete, continue to install the express application skeleton and generate the default project
$ npm install express-generator -g
(-g means global installation, you can use it directly next time without installing again)
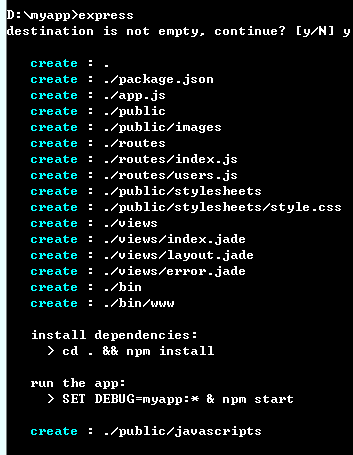
Then run express directly in the myapp folder, and the project directory will be generated directly

Then install all dependent packages:
$ npm install
Launch this app (MacOS or Linux):
$ DEBUG=myapp npm start
Use the following command on Windows platform:
> set DEBUG=myapp & npm start

When you see this page, you have completed the basic project construction, and you can continue to add your own code. (After arriving at this section, you can modify the folder in the public directory to your favorite format, such as: js, css, it is just a path)
Next, you can add your own pages to the project, but so far I have only found that express can load jade templates and ejs. You don’t have to worry about learning jade all over again. Here http://www.html2jade.org/, you can directly use tools to convert html into jade templates, and you can directly add existing projects to it. How to load jade template in express: http://www.expressjs.com.cn/guide/using-template-engines.html. In fact, the writing method of Jade is really simple. You can basically get started by looking at the API. Click here for the learning address. (jade has been integrated into the project, no need to install it again)
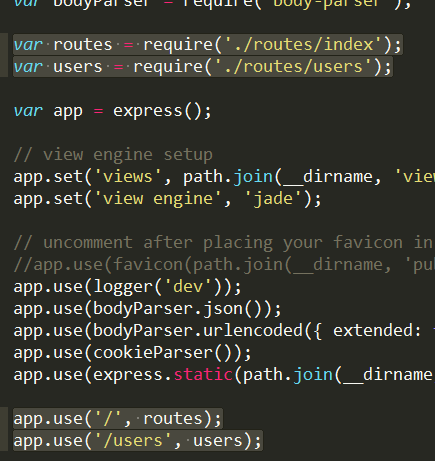
Now everyone opens the core app.js

These lines define express routing. You can briefly understand the role of routing. http://www.expressjs.com.cn/guide/routing.html This is very important. , must be understood, it is not difficult, you should be able to understand it quickly.
For example, if you open the http://localhost:3000/users page now, you can understand the code in user.js at a glance. (A get request occurred when opening this page)
Next, let’s not rush to upload pictures, but first test the post and get requests sent by the front end.
Taking post request as an example, we modify layout.jade to look like below
doctype html
html
 head
 title= title
 link(rel='stylesheet', href='/css/style.css')
 script(type="text/javascript", src="/js/jquery.js")
 script(type="text/javascript", src="/js/index.js")
 body
 block content
Create a new index.js under public/js and load jquery (just for the abbreviation of ajax). Some people may ask why there is no public path, because Express’s built-in express.static can easily host static files, such as pictures, CSS, JavaScript files, etc. Click here for details. The corresponding content of app.js is app.use(express.static(path.join(__dirname, 'public')));
Only in this way can the file be read.
Let’s start modifying the js code. Just write the most basic ajax request in public/js/index.js. The path to send the request here is "/", which is to send the request to the homepage (routing must be understood, routing You must understand, you must understand routing! )
$(document).ready(function()
{
$.post('/',
 {num: '12345678'
},
 function(data)
{
 console.log(data)
 });
}) Then modify
in routes/index.js
var express = require('express');
var router = express.Router();
/* GET home page. */
router.get('/', function(req, res, next) {
 res.render('index', { title: 'Express' });
});
router.post('/', function(req, res) {
 res.send(req.body.num);
});
module.exports = router; 在此监听首页的post请求,req.body.num表示发送过来的数据,大家可以直接打印下req,看看里面包含了什么内容,加深理解(修改完文件后记得重启express)。

这时候在控制台中就可以看到返回的数据了。
现在大家已经可以使用node接收前端发送的请求了(是不是灰长开心!!),下面进行我们的重头戏,上传图片。
因为是测试接口,公司的项目要兼容低版本浏览器,所有plupload.js就上场了(不是我不想用h5的方法)。官网,下载后如图,就够用了。(记得在layout.jade里面加载)

把index.js修改成下面的样子,这是个标准的官网上传事例,不理解的在官网看下api,很好理解(其实看变量名字也都能理解~)
$(document).ready(function() {
 var uploader = new plupload.Uploader({
 runtimes: 'html5,flash,silverlight,html4',
 browse_button: 'pickfiles', // you can pass an id...
 container: document.getElementById('container'), // ... or DOM Element itself
 url: '/',
 flash_swf_url: '../js/Moxie.swf',
 silverlight_xap_url: '../js/Moxie.xap',
 filters: {
 max_file_size: '10mb',
 mime_types: [{
 title: "Image files",
 extensions: "jpg,gif,png"
 }, {
 title: "Zip files",
 extensions: "zip"
 }]
 },
 init: {
 PostInit: function() {
 document.getElementById('filelist').innerHTML = '';
 document.getElementById('uploadfiles').onclick = function() {
 uploader.start();
 return false;
 };
 },
 FilesAdded: function(up, files) {
 plupload.each(files, function(file) {
 document.getElementById('filelist').innerHTML += '<div id="' + file.id + '">' + file.name + ' (' + plupload.formatSize(file.size) + ') <b></b></div>';
 });
 },
 UploadProgress: function(up, file) {
 document.getElementById(file.id).getElementsByTagName('b')[0].innerHTML = '<span>' + file.percent + "%</span>";
 },
 Error: function(up, err) {
 document.getElementById('console').appendChild(document.createTextNode("\nError #" + err.code + ": " + err.message));
 },
 FileUploaded: function(up, file, info) { // Called when file has finished uploading
 $("body").append($(info.response))
 },
 UploadComplete: function(up, file) {
 }
 }
 });
 uploader.init();
}) index.jade修改成下面的样子,主要是添加上传点击的元素,添加了两个按钮而已(不要嫌弃它确实是比较丑--)
extends layout
block content
 h1= title
 p Welcome to #{title}
 #filelist
 #container
 a#pickfiles select files
a#uploadfiles upload files 这里我们要用到的外部模块是Felix Geisendörfer开发的node-formidable模块。它对解析上传的文件数据做了很好的抽象。 其实说白了,处理文件上传“就是”处理POST数据 —— 但是,麻烦的是在具体的处理细节,所以,这里采用现成的方案更合适点。
安装formidable模块。
npm install formidable
修改routes/index.js
var express = require('express');
var router = express.Router();
var fs = require('fs');
var formidable = require("formidable");
/* GET home page. */
router.get('/', function(req, res) {
 res.render('index', {
 title: '孟星魂'
 });
});
router.post('/', function(req, res) {
 var form = new formidable.IncomingForm();
 form.uploadDir = "./public/upload/temp/"; //改变临时目录
 form.parse(req, function(error, fields, files) {
 for (var key in files) {
 var file = files[key];
 var fName = (new Date()).getTime();
 switch (file.type) {
 case "image/jpeg":
 fName = fName + ".jpg";
 break;
 case "image/png":
 fName = fName + ".png";
 break;
 default:
 fName = fName + ".png";
 break;
 }
 console.log(file, file.size);
 var uploadDir = "./public/upload/" + fName;
 fs.rename(file.path, uploadDir, function(err) {
 if (err) {
 res.write(err + "\n");
 res.end();
 }
 //res.write("upload image:<br/>");
 res.write("<img src='/upload/" + fName + "' />");
 res.end();
 })
 }
 });
});module.exports = router;
此时需要在public下手动新建文件夹upload以及下面的temp文件夹。
先把文件上传到临时文件夹,再通过fs重命名移动到指定的目录即可。
fs.rename即重命名,但是fs.rename不能夸磁盘移动文件,所以我们需要指定上传的临时目录要和最终目录在同一磁盘下。
res.write就是往前端返回的数据,这里我直接返回一个img标签,并添加上传文件的路径,前端只要把标签append到页面中就ok了。
完成前端图片上传功能!!
今天进行到这里,明天进行讲解node连接数据库的操作。

Hot AI Tools

Undresser.AI Undress
AI-powered app for creating realistic nude photos

AI Clothes Remover
Online AI tool for removing clothes from photos.

Undress AI Tool
Undress images for free

Clothoff.io
AI clothes remover

Video Face Swap
Swap faces in any video effortlessly with our completely free AI face swap tool!

Hot Article

Hot Tools

Notepad++7.3.1
Easy-to-use and free code editor

SublimeText3 Chinese version
Chinese version, very easy to use

Zend Studio 13.0.1
Powerful PHP integrated development environment

Dreamweaver CS6
Visual web development tools

SublimeText3 Mac version
God-level code editing software (SublimeText3)

Hot Topics
 1389
1389
 52
52
 What should I do if I encounter garbled code printing for front-end thermal paper receipts?
Apr 04, 2025 pm 02:42 PM
Frequently Asked Questions and Solutions for Front-end Thermal Paper Ticket Printing In Front-end Development, Ticket Printing is a common requirement. However, many developers are implementing...
 Who gets paid more Python or JavaScript?
Apr 04, 2025 am 12:09 AM
There is no absolute salary for Python and JavaScript developers, depending on skills and industry needs. 1. Python may be paid more in data science and machine learning. 2. JavaScript has great demand in front-end and full-stack development, and its salary is also considerable. 3. Influencing factors include experience, geographical location, company size and specific skills.
 Demystifying JavaScript: What It Does and Why It Matters
Apr 09, 2025 am 12:07 AM
JavaScript is the cornerstone of modern web development, and its main functions include event-driven programming, dynamic content generation and asynchronous programming. 1) Event-driven programming allows web pages to change dynamically according to user operations. 2) Dynamic content generation allows page content to be adjusted according to conditions. 3) Asynchronous programming ensures that the user interface is not blocked. JavaScript is widely used in web interaction, single-page application and server-side development, greatly improving the flexibility of user experience and cross-platform development.
 How to merge array elements with the same ID into one object using JavaScript?
Apr 04, 2025 pm 05:09 PM
How to merge array elements with the same ID into one object in JavaScript? When processing data, we often encounter the need to have the same ID...
 How to achieve parallax scrolling and element animation effects, like Shiseido's official website?
or:
How can we achieve the animation effect accompanied by page scrolling like Shiseido's official website?
Apr 04, 2025 pm 05:36 PM
Discussion on the realization of parallax scrolling and element animation effects in this article will explore how to achieve similar to Shiseido official website (https://www.shiseido.co.jp/sb/wonderland/)...
 The difference in console.log output result: Why are the two calls different?
Apr 04, 2025 pm 05:12 PM
In-depth discussion of the root causes of the difference in console.log output. This article will analyze the differences in the output results of console.log function in a piece of code and explain the reasons behind it. �...
 Is JavaScript hard to learn?
Apr 03, 2025 am 12:20 AM
Learning JavaScript is not difficult, but it is challenging. 1) Understand basic concepts such as variables, data types, functions, etc. 2) Master asynchronous programming and implement it through event loops. 3) Use DOM operations and Promise to handle asynchronous requests. 4) Avoid common mistakes and use debugging techniques. 5) Optimize performance and follow best practices.
 How to implement panel drag and drop adjustment function similar to VSCode in front-end development?
Apr 04, 2025 pm 02:06 PM
Explore the implementation of panel drag and drop adjustment function similar to VSCode in the front-end. In front-end development, how to implement VSCode similar to VSCode...


