 Backend Development
 C#.Net Tutorial
 Detailed explanation of graphic code of INI configuration file in C#
Detailed explanation of graphic code of INI configuration file in C#
这篇文章主要为大家详细介绍了C#操作INI配置文件示例,具有一定的参考价值,感兴趣的小伙伴们可以参考一下
本文实例为大家分享了C#操作INI配置文件示例的具体代码,供大家参考,具体内容如下
源文件地址:C#操作INI配置文件示例
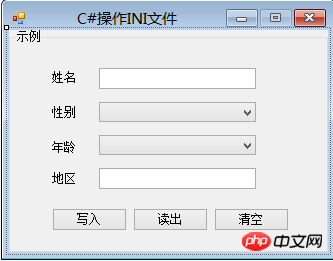
创建如图所示的控件:

源代码:
using System;
using System.Collections.Generic;
using System.ComponentModel;
using System.Data;
using System.Drawing;
using System.Linq;
using System.Text;
using System.Windows.Forms;
using System.Runtime.InteropServices;

namespace WindowsFormsApplication3

{

  public partial class Form1 : Form

  {

    public Form1()

    {

      InitializeComponent();

    }


    [DllImport("kernel32.dll")]

    private static extern long WritePrivateProfileString(string section, string key, string value, string filepath);


    [DllImport("kernel32.dll")]

    private static extern int GetPrivateProfileString(string section,string key,string def,StringBuilder returnvalue,intbuffersize,string filepath);


    private string IniFilePath;
    private void Form1_Load(object sender, EventArgs e)

    {

      comboBox1.Text = "男";

      for (int i = 1; i <= 100; i++)

      {

        comboBox2.Items.Add(i.ToString());

      }

      comboBox2.Text = "18";

      IniFilePath = Application.StartupPath + "\\Config.ini";

    }


    private void button1_Click(object sender, EventArgs e)
    {
      if ((textBox1.Text.Trim() != "") && (textBox2.Text.Trim() != ""))
      {
        string Section = "Information";
        try

        {

          WritePrivateProfileString(Section, "Name", textBox1.Text.Trim(), IniFilePath);
          WritePrivateProfileString(Section, "Gender", comboBox1.Text, IniFilePath);
          WritePrivateProfileString(Section, "Age", comboBox2.Text, IniFilePath);
          WritePrivateProfileString(Section, "Region", textBox2.Text.Trim(), IniFilePath);

        }
        catch (Exception ee)

        {

          MessageBox.Show(ee.Message);

        }
      }

      else

      {

        MessageBox.Show("姓名或地区不能为空!", "错误", MessageBoxButtons.OK, MessageBoxIcon.Warning);

      }
    }


    private void button2_Click(object sender, EventArgs e)
    {
      string outString;
      try

      {
        GetValue("Information", "Name", out outString);
        textBox1.Text = outString;
        GetValue("Information", "Gender", out outString);
        comboBox1.Text = outString;
        GetValue("Information", "Age", out outString);
        comboBox2.Text = outString;
        GetValue("Information", "Region", out outString);
        textBox2.Text = outString;

      }

      catch (Exception ee)

      {

        MessageBox.Show(ee.Message);

      }


    }


    private void GetValue(string section,string key, out string value)
    {

      StringBuilder stringBuilder = new StringBuilder();
      GetPrivateProfileString(section, key, "", stringBuilder, 1024, IniFilePath);
      value = stringBuilder.ToString();

    }


    private void button3_Click(object sender, EventArgs e)

    {
      textBox1.Text = "";
      comboBox1.Text = "男";
      comboBox2.Text = "18";
      textBox2.Text = "";
    }

  }

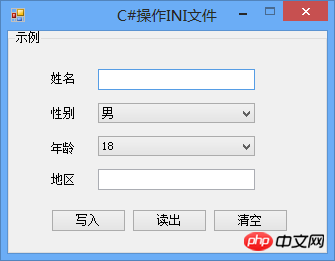
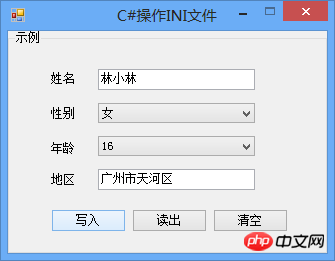
}运行结果:


The above is the detailed content of Detailed explanation of graphic code of INI configuration file in C#. For more information, please follow other related articles on the PHP Chinese website!

Hot AI Tools

Undresser.AI Undress
AI-powered app for creating realistic nude photos

AI Clothes Remover
Online AI tool for removing clothes from photos.

Undress AI Tool
Undress images for free

Clothoff.io
AI clothes remover

AI Hentai Generator
Generate AI Hentai for free.

Hot Article

Hot Tools

Notepad++7.3.1
Easy-to-use and free code editor

SublimeText3 Chinese version
Chinese version, very easy to use

Zend Studio 13.0.1
Powerful PHP integrated development environment

Dreamweaver CS6
Visual web development tools

SublimeText3 Mac version
God-level code editing software (SublimeText3)

Hot Topics
 Super complete! Common ways to write configuration files in Python
Apr 11, 2023 pm 10:22 PM
Why should we write the fixed file of the configuration file? We can directly write it as a .py file, such as settings.py or config.py. The advantage of this is that we can directly import parts of it through import in the same project; but if we need to use it in other When sharing configuration files on non-Python platforms, writing a single .py is not a good choice. At this time we should choose a common configuration file type to store these fixed parts. Currently, the commonly used and popular configuration file format types mainly include ini, json, toml, yaml, xml, etc. We can access these types of configuration files through standard libraries or third-party libraries.
 How to enable or disable eSIM on Windows 11
Sep 20, 2023 pm 05:17 PM
If you bought your laptop from a mobile operator, you most likely had the option to activate an eSIM and use your cellular network to connect your computer to the Internet. With eSIM, you don't need to insert another physical SIM card into your laptop because it's already built-in. It is very useful when your device cannot connect to the network. How to check if my Windows 11 device is eSIM compatible? Click the Start button and go to Network & Internet > Cellular > Settings. If you don't see the "Cellular" option, your device doesn't have eSIM capabilities and you should check another option, such as using your mobile device to connect your laptop to a hotspot. In order to activate and
 How to change network type to private or public in Windows 11
Aug 24, 2023 pm 12:37 PM
Setting up a wireless network is common, but choosing or changing the network type can be confusing, especially if you don't know the consequences. If you're looking for advice on how to change the network type from public to private or vice versa in Windows 11, read on for some helpful information. What are the different network profiles in Windows 11? Windows 11 comes with a number of network profiles, which are essentially sets of settings that can be used to configure various network connections. This is useful if you have multiple connections at home or office so you don't have to set it all up every time you connect to a new network. Private and public network profiles are two common types in Windows 11, but generally
 What are the employment prospects of C#?
Oct 19, 2023 am 11:02 AM
Whether you are a beginner or an experienced professional, mastering C# will pave the way for your career.
 Share several .NET open source AI and LLM related project frameworks
May 06, 2024 pm 04:43 PM
The development of artificial intelligence (AI) technologies is in full swing today, and they have shown great potential and influence in various fields. Today Dayao will share with you 4 .NET open source AI model LLM related project frameworks, hoping to provide you with some reference. https://github.com/YSGStudyHards/DotNetGuide/blob/main/docs/DotNet/DotNetProjectPicks.mdSemanticKernelSemanticKernel is an open source software development kit (SDK) designed to integrate large language models (LLM) such as OpenAI, Azure
 Install Helm on Ubuntu
Mar 20, 2024 pm 06:41 PM
Helm is an important component of Kubernetes that simplifies the deployment of Kubernetes applications by bundling configuration files into a package called HelmChart. This approach makes updating a single configuration file more convenient than modifying multiple files. With Helm, users can easily deploy Kubernetes applications, simplifying the entire deployment process and improving efficiency. In this guide, I'll cover different ways to implement Helm on Ubuntu. Please note: The commands in the following guide apply to Ubuntu 22.04 as well as all Ubuntu versions and Debian-based distributions. These commands are tested and should work correctly on your system. in U
 Where is the win10 user profile? How to set the user profile in Win10
Jun 25, 2024 pm 05:55 PM
Recently, many Win10 system users want to change the user profile, but they don’t know how to do it. This article will show you how to set the user profile in Win10 system! How to set up user profile in Win10 1. First, press the "Win+I" keys to open the settings interface, and click to enter the "System" settings. 2. Then, in the opened interface, click "About" on the left, then find and click "Advanced System Settings". 3. Then, in the pop-up window, switch to the "" option bar and click "User Configuration" below.
 Super complete! Common ways to write configuration files in Python
Apr 13, 2023 am 08:31 AM
Why write configuration files? During the development process, we often use some fixed parameters or constants. For these more fixed and commonly used parts, they are often written into a fixed file to avoid repetition in different module codes and keep the core code clean. We can directly write this fixed file into a .py file, such as settings.py or config.py. The advantage of this is that we can directly import parts of it through import in the same project; but if we need to do it on other non-Python platforms When configuring file sharing, writing a single .py is not a good choice. At this time we should choose a common configuration file type


