Home > Java > javaTutorial > body text

Tutorial on how to create a simple drawing board using Java

巴扎黑
Release: 2017-07-18 14:54:39
Original
2612 people have browsed it
I believe many people have used the Windows drawing board. This time we will talk about the implementation of the Java version of the simple drawing board.
The basic idea is this: the drawing board implementation is roughly divided into three parts: The first is the implementation of the drawing board interface, and the second is the monitoring and drawing of the drawing board Realization, the third is the redrawing of the drawing board. (The article is long, but the code is progressive. You can separate it into three parts. After implementing the current part, go to the next part.) The first is the interface implementation of the drawing board, because I did not find the specific icon. , all the components on the interface are Swing's own components, so the interface is a bit crude, but if you want to optimize it, it's easy, just change all the components on the interface to custom icons. After the interface is implemented, you can consider adding monitoring to the components of the interface. Different graphics can add different monitoring methods according to the specific situation. Then write an event processing class to write specific drawing algorithms based on different graphics. A simple version of the drawing board is almost there. I won’t mention redrawing here until later.
Let’s first look at the implementation of the drawing interface:
# #The API classes needed to implement the drawing interface mainly include: FlowLayout, GridLayout, Color, Dimension, JButton, JFrame, and JPanel.
#Define the Draw class and let the Draw class inherit JFrame. Set its size, title, visibility, etc. It should be noted that if there are many buttons to be added here, it is recommended to use an array to complete the addition of buttons, because if you add buttons one by one directly, it will not only increase the amount of code, but also be detrimental to search, addition, and code maintenance. In order to make the interface not so simple, several Jpanels and different layout managers are used here. The main form uses a fluid layout manager, and then uses three panels to host graphic buttons, color buttons and canvas respectively. Panels that hold graphic buttons and color buttons use table layout. Then the implementation of the interface is basically completed.
##
package Cbs;import java.awt.Color;import java.awt.Dimension;import java.awt.FlowLayout;import java.awt.GridLayout;import javax.swing.JButton;import javax.swing.JFrame;import javax.swing.JPanel;/**
 * Draw类,用于界面的初始化
 * @author CBS */@SuppressWarnings("serial")public class Draw extends JFrame {// 界面初始化方法public void showUI() {
        setTitle("画图");//窗体名称setSize(1200, 900);//窗体大小setDefaultCloseOperation(3);
        setLocationRelativeTo(null);//窗体居中//流式布局左对齐FlowLayout layout = new FlowLayout(FlowLayout.LEFT);
        setLayout(layout);//窗体使用流式布局管理器this.setResizable(false);//窗体大小不变        //使用数组保存按钮名String buttonName[] = { "画直线", "画椭圆", "画曲线", "多边形", 
                  "橡皮擦", "拖动线","三角形", "画球形", "笔刷", "喷枪", 
                  "色子", "立体矩形", "立体圆", "立体三角","迭代分形",                   "现代分形", "枫叶", "画树", "mandelbrot集", "L-System",                  "迭代画线","迭代三角形", "谢尔宾斯基地毯", "画字符", "清空",                  "吸管" ,"矩形","五角星","多线","字符"};//用于保存图形按钮,使用网格布局JPanel jp1=new JPanel(new GridLayout(15, 2,10,10));
        jp1.setPreferredSize(new Dimension(200, 800));        //循环为按钮面板添加按钮for (int i = 0; i 
Copy after login
View Code
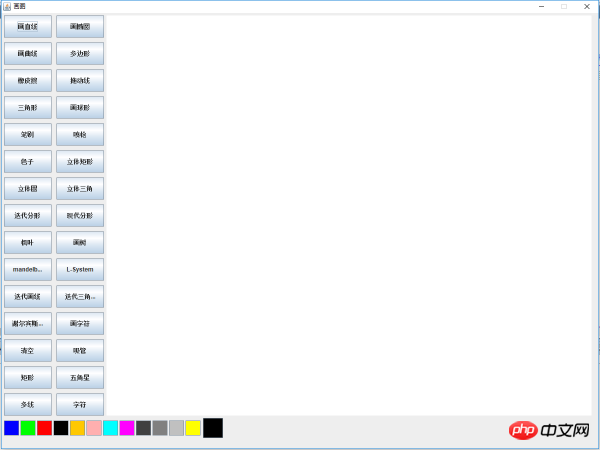
One more thing to note here is that the order in which Jpanel panels are added should not be changed. This is the panel size calculated based on the flow layout. Readers can change and debug by themselves. Another thing is that the setSize method of the form is only valid for the form itself. If you want to change the size of other components, use the setPreferredSize method. In this way, the basic interface of the drawing board is implemented. The buttons and panels of the interface can be changed according to your needs.
This is what the interface looks like:

Tutorial on how to create a simple drawing board using Java
Monitoring implementation:
当然我们空有个界面并没有什么用,我们需要的是点击不同的按钮能够实现不同的功能。这里就需要用到事件的监听机制了。实现监听的主要API类有: ActionListener,MouseListener,MouseMotionListener。添加事件监听的方法根以前的步骤是一样的:确定事件源对象,编写事件处理类,添加监听方法。画图板中的事件源对象有两种,一种是按钮,另一种就是画布的面板,按钮使用的是ActionListener,而画布面板因为负责的是绘图,所以使用的是MouseListener和MouseMotionListener。为了实现事件的监听,我们需要定义一个事件处理类DrawListener,该类实现了以上的三个事件接口。之后在重写的方法中实现不同图形的绘制。图形的绘制都可以通过Graphics对象的方法来实现。但是这里有一个问题,如何分辨在Draw类中按下的是哪个按钮呢?在定义Draw类的时候,我们使用了图形按钮和颜色按钮,图形类的按钮在实例化对象的时候是使用了带参数的构造方法的,也就是图形按钮都是有文字的,而颜色按钮则没有。依据这一点就可以很容易的区分不同的按钮了。
DrawListener类:
package Cbs;import java.awt.Color;import java.awt.Graphics;import java.awt.event.ActionEvent;import java.awt.event.ActionListener;import java.awt.event.MouseEvent;import java.awt.event.MouseListener;import java.awt.event.MouseMotionListener;import javax.swing.JButton;public class DrawListener implements ActionListener, MouseListener,
        MouseMotionListener {private Color color;//颜色属性private Graphics g;//画笔属性private String str;//保存按钮上的字符串,区分不同的按钮private int x1,y1,x2,y2;//(x1,y1),(x2,y2)分别为鼠标的按下和释放时的坐标private JButton nowColor;//当前颜色按钮    //获取Draw类的画笔对象public void setG(Graphics g) {this.g = g;
    }//获取当前颜色按钮public void setNowColor(JButton nowColor) {this.nowColor = nowColor;
    }


    @Override//鼠标拖动的方法public void mouseDragged(MouseEvent e) {//画曲线的方法if ("画曲线".equals(str)) {int x, y;
            x = e.getX();
            y = e.getY();
            g.drawLine(x, y, x1, y1);
            x1 = x;
            y1 = y;
        }
    }

    @Override//鼠标移动方法public void mouseMoved(MouseEvent e) {

    }

    @Override//鼠标单击方法public void mouseClicked(MouseEvent e) {

    }

    @Override//鼠标按下方法public void mousePressed(MouseEvent e) {
        
        g.setColor(color);//改变画笔的颜色        
        x1=e.getX();//获取按下时鼠标的x坐标y1=e.getY();//获取按下时鼠标的y坐标    }

    @Override//鼠标释放方法public void mouseReleased(MouseEvent e) {
        x2=e.getX();//获取释放时鼠标的x坐标y2=e.getY();//获取释放时鼠标的y坐标//画直线的方法if ("画直线".equals(str)) {
            g.drawLine(x1, y1, x2, y2);
        }
    }

    @Override//鼠标进入方法public void mouseEntered(MouseEvent e) {

    }

    @Override//鼠标退出方法public void mouseExited(MouseEvent e) {

    }

    @Override//处理按钮上的鼠标点击动作public void actionPerformed(ActionEvent e) {//判断是颜色按钮还是图形按钮if ("".equals(e.getActionCommand())) {
            JButton jb = (JButton) e.getSource();
            color = jb.getBackground();
            nowColor.setBackground(color);//处理当前颜色} else {
            str = e.getActionCommand();
        }
    }

}
Copy after login
View Code

Draw类也要做一些修改,为按钮和面板添加监听:

 1 package Cbs; 2  3 import java.awt.Color; 4 import java.awt.Dimension; 5 import java.awt.FlowLayout; 6 import java.awt.Graphics; 7 import java.awt.GridLayout; 8  9 import javax.swing.JButton;10 import javax.swing.JFrame;11 import javax.swing.JPanel;12 13 /**14  * Draw类,用于界面的初始化15  * @author CBS16  */17 @SuppressWarnings("serial")18 public class Draw extends JFrame {19     private DrawListener dl;20     private Graphics g;21     // 界面初始化方法22     public void showUI() {23         setTitle("画图");//窗体名称24         setSize(1200, 900);//窗体大小25         setDefaultCloseOperation(3);26         setLocationRelativeTo(null);//窗体居中27                 //流式布局左对齐28         FlowLayout layout = new FlowLayout(FlowLayout.LEFT);29         setLayout(layout);//窗体使用流式布局管理器30         this.setResizable(false);//窗体大小不变31         32         //使用数组保存按钮名33         String buttonName[] = { "画直线", "画椭圆", "画曲线", "多边形",34                       "橡皮擦", "拖动线","三角形", "画球形", "笔刷", "喷枪", 
35                       "色子", "立体矩形", "立体圆", "立体三角","迭代分形",36                        "现代分形", "枫叶", "画树", "mandelbrot集", "L-System", 
37                        "迭代画线","迭代三角形", "谢尔宾斯基地毯", "画字符", "清空",38                       "吸管" ,"矩形","五角星","多线","字符"};39                 //用于保存图形按钮,使用网格布局40         JPanel jp1=new JPanel(new GridLayout(15, 2,10,10));41         jp1.setPreferredSize(new Dimension(200, 800));42         43         //实例化DrawListener对象44         dl=new DrawListener();45         //循环为按钮面板添加按钮46         for (int i = 0; i 
Copy after login
View Code
drawDrawListener里面只写了画直线和曲线的方法,读者可以根据自己的需求添加,思路和方式都是一样的。Draw类里面有些需要注意的地方在这里提一下:一个是画笔g的获取一定要在窗体的可见之后采取获取,不然获取的画笔对象返回值会是null。二是要为图形按钮添加监听,DrawListener的实例化需要在setVisible方法之前,所以不建议使用构造方法直接传入g画笔参数,我使用的是set方法。最后是注意一下使用哪个添加方法,按钮使用的是addActionListener方法,画板面板使用的是addMouseListener和addMouseMotionListener方法。使用画板面板来获取画笔并给画面面板添加监听是为了让绘图的时候图形不会跑出面板外,这里的画笔和监听都由主窗体获得也是可以的,不过绘制时会出现线画出面板的问题。
画板的重绘:
到这里画板的制作已经基本实现了,我们已经可以在上面绘制各种各样的图形了。但是细心的人可能会发现一个问题,那就是如果把窗体最小化之后再次打开,画板上原本已经画好的东西会全部都消失了。这样子肯定是不行的,辛辛苦苦画的“大作”怎么能说说没就没了呢。那么为什么会出现这样的问题呢?要回答这个问题我们就需要先了解Java的绘图机制。做画图板我们使用的是Swing组件,这套组件是基于原先的AWT组件开发,在绘制的时候会调用系统的画图函数,这就是为什么我们可以从面板或者是窗体中获取画笔对象的原因。这也就是说Java中你所能够看到窗体,按钮或者其它的所有组件其实都是画出来。所以当我们点击窗体使它最小化或者改变大小的时候,原来的画的窗体就不能适应需要了,这时系统会调用JFrame的paint方法实现窗体的重绘,也就是再次画了一个新的窗体,而JFrame的paint方法只对窗体已经添加的组件有效,我们自己绘制的东西并没有写在paint方法里面,所以窗体重绘之后,我们原先绘制的图形也就消失了。要解决这个问题我们需要重写父类的paint方法。但是这样的话问题又来了,画图是在DrawListener类里面实现的,要怎么把它们弄到paint方法里面去呢?
当然方法可能有很多,这里我只介绍我所知道的:要把画出来的图形在paint方法中再次画出来,就需要有东西来保存画过的图形。保存可以使用数组或者集合,这里推荐使用集合,可以很方便的实现添加,而不需要去考虑大小的问题。数组的实现也大同小异,这里就不多做介绍。确定了使用集合,那么集合内保存什么类型的数据呢?毫无疑问应该保存的是图形的数据,但是集合使用泛型的话也只能保存同一种类型的数据,我们却有那么多种图形?这里就可以使用接口或者抽象类,我们只需要创建不同得图形类,让它继承抽象类或者是实现接口。然后每画一个图形就实例化一个图形的对象,存入集合中,最后在paint方法中遍历集合,重新绘制图形即可。
下面直接贴最终代码(仍然只写了直线和曲线),只是添加了几行代码,注意与前面比较。
//图形接口package Cbs;//图形集合public interface NetJavaShape {public abstract void draw();
}//直线类package Cbs;import java.awt.Color;import java.awt.Graphics;import Cbs.NetJavaShape;public class ImpLine implements NetJavaShape{
    Graphics g;int x1, y1,x2, y2;
    Color c;public ImpLine(Graphics g,int x1,int y1,int x2,int y2,Color c){this.g=g;this.c=c;this.x1=x1;this.y1=y1;this.x2=x2;this.y2=y2;
    }public void draw() {
        g.setColor(c);
        g.drawLine(x1, y1, x2, y2);
    }

}//DrawListener类package Cbs;import java.awt.Color;import java.awt.Graphics;import java.util.List;import java.awt.event.ActionEvent;import java.awt.event.ActionListener;import java.awt.event.MouseEvent;import java.awt.event.MouseListener;import java.awt.event.MouseMotionListener;import java.util.ArrayList;import Cbs.NetJavaShape;import javax.swing.JButton;public class DrawListener implements ActionListener, MouseListener,
        MouseMotionListener {private Color color=Color.BLACK;//颜色属性,初始值为黑色private Graphics g;//画笔属性private String str;//保存按钮上的字符串,区分不同的按钮private int x1,y1,x2,y2;//(x1,y1),(x2,y2)分别为鼠标的按下和释放时的坐标private JButton nowColor;//当前颜色按钮//保存图形对象的集合private List<netjavashape> shapesArray = new ArrayList<netjavashape>();//图形private NetJavaShape shape;//在draw类中获取集合public List<netjavashape> getShapesArray() {return shapesArray;
    }//获取Draw类的画笔对象public void setG(Graphics g) {this.g = g;
    }//获取当前颜色按钮public void setNowColor(JButton nowColor) {this.nowColor = nowColor;
    }


    @Override//鼠标拖动的方法public void mouseDragged(MouseEvent e) {//画曲线的方法if ("画曲线".equals(str)) {int x, y;
            x = e.getX();
            y = e.getY();//实例化对象,曲线也是直线画的所以不同新建一个曲线类了shape=new ImpLine(g,x,y,x1,y1,color);//调用画图方法            shape.draw();//将图形存入集合中            shapesArray.add(shape);//            g.drawLine(x, y, x1, y1);x1 = x;
            y1 = y;
        }
    }

    @Override//鼠标移动方法public void mouseMoved(MouseEvent e) {

    }

    @Override//鼠标单击方法public void mouseClicked(MouseEvent e) {

    }

    @Override//鼠标按下方法public void mousePressed(MouseEvent e) {
        
        g.setColor(color);//改变画笔的颜色        
        x1=e.getX();//获取按下时鼠标的x坐标y1=e.getY();//获取按下时鼠标的y坐标    }

    @Override//鼠标释放方法public void mouseReleased(MouseEvent e) {
        x2=e.getX();//获取释放时鼠标的x坐标y2=e.getY();//获取释放时鼠标的y坐标//画直线的方法if ("画直线".equals(str)) {//实例化对象,shape=new ImpLine(g,x1,y1,x2,y2,color);//调用画图方法            shape.draw();//将图形存入集合中            shapesArray.add(shape);//            g.drawLine(x1, y1, x2, y2);        }
    }

    @Override//鼠标进入方法public void mouseEntered(MouseEvent e) {

    }

    @Override//鼠标退出方法public void mouseExited(MouseEvent e) {

    }

    @Override//处理按钮上的鼠标点击动作public void actionPerformed(ActionEvent e) {        if ("".equals(e.getActionCommand())) {
            JButton jb = (JButton) e.getSource();
            color = jb.getBackground();
            nowColor.setBackground(color);//处理当前颜色} else {
            str = e.getActionCommand();
        }
    }

}//draw类package Cbs;import java.awt.Color;import java.awt.Dimension;import java.awt.FlowLayout;import java.awt.Graphics;import java.awt.GridLayout;import java.util.ArrayList;import java.util.List;import javax.swing.JButton;import javax.swing.JFrame;import javax.swing.JPanel;/**
 * Draw类,用于界面的初始化
 * @author CBS */@SuppressWarnings("serial")public class Draw extends JFrame {private DrawListener dl;private Graphics g;//保存图形对象的集合private List<netjavashape> shapesArray = new ArrayList<netjavashape>();// 界面初始化方法public void showUI() {
        setTitle("画图");//窗体名称setSize(1200, 900);//窗体大小setDefaultCloseOperation(3);
        setLocationRelativeTo(null);//窗体居中FlowLayout layout = new FlowLayout(FlowLayout.LEFT);//流式布局左对齐setLayout(layout);//窗体使用流式布局管理器this.setResizable(false);//窗体大小不变        //使用数组保存按钮名String buttonName[] = { "画直线", "画椭圆", "画曲线", "多边形",     "橡皮擦", "拖动线","三角形", "画球形", "笔刷", "喷枪", "色子", "立体矩形", "立体圆", "立体三角","迭代分形", "现代分形", "枫叶", "画树", "mandelbrot集", "L-System", "迭代画线","迭代三角形", "谢尔宾斯基地毯", "画字符", "清空","吸管" ,"矩形","五角星","多线","字符"};
        JPanel jp1=new JPanel(new GridLayout(15, 2,10,10));//用于保存图形按钮,使用网格布局jp1.setPreferredSize(new Dimension(200, 800));        //实例化DrawListener对象dl=new DrawListener();//循环为按钮面板添加按钮for (int i = 0; i </netjavashape></netjavashape></netjavashape></netjavashape></netjavashape>
Copy after login
View Code
这里使用集合添加图形实现画板的重绘时,我是每实现一个图形就会新建一个类来保存图形的信息,这样图形类就会有很多。如果不想创建那么多的图形类可以把它们都放到一个类里面,设置一个type的参数,赋上按钮的名称。然后在draw方法中依据这个值判断是什么图形实现不同的画图方法。这样画板的所有功能基本就实现了,画板的项目也就到这里。
总结:

The production of drawing board mainly uses Swing components, event listening mechanism, Graphics drawing and drawing board redrawing and the use of collections. Abstract classes or interfaces serve as standard graphics classes.


##Listener class


package com.baidu;

import java.awt.*;

import java.awt.event.MouseEvent;
import java.awt.event. MouseListener;

public class MyMouseListener implements MouseListener{

//Color
Panel p;
//Canvas
Graphics g;
//Action command
private SimpleDraw draw;
//Give the coordinates
private int x1,y1,x2,y2;
//Construction method


public MyMouseListener(SimpleDraw draw){
this .g=draw.getGraphics();//Assign the passed object value to the attribute g
this.draw=draw;

}


//The mouse enters Called when the component is on
@Override
public void mouseClicked(MouseEvent e) {
}
//Called when the mouse leaves the component
@Override
public void mouseEntered(MouseEvent e) {
}
@Override
public void mouseExited(MouseEvent e) {
}
@Override
public void mousePressed(MouseEvent e) {
x1=e.getX() ;
y1=e.getY();
}
@Override
public void mouseReleased(MouseEvent e) {
x2=e.getX();
y2=e. getY();
String command = draw.getCommand();
g.setColor(Color.blue);


if(command.equals("straight line")){
g.drawLine(x1, y1, x2, y2);

}else if(command.equals("rectangle")){
g.drawRect(x1, y1, x2-x1, y2-y1);

}else if(command.equals("ellipse")){
g.drawOval(x1, y1, x2-x1, y2-y1);
}
}
}


#

The above is the detailed content of Tutorial on how to create a simple drawing board using Java. For more information, please follow other related articles on the PHP Chinese website!

Related labels:
source:php.cn
Statement of this Website
The content of this article is voluntarily contributed by netizens, and the copyright belongs to the original author. This site does not assume corresponding legal responsibility. If you find any content suspected of plagiarism or infringement, please contact admin@php.cn
Popular Tutorials
More>
Latest Downloads
More>
Web Effects
Website Source Code
Website Materials
Front End Template