

First of all, these concepts are very easy to confuse, but they are also involved in NIO, so let’s summarize [1].
Synchronization: When the API call returns, the caller will know the result of the operation (how many bytes were actually read/written).
Asynchronous: Compared with synchronization, the caller does not know the result of the operation when the API call returns, and the result will be notified later by a callback.
Blocking: When no data can be read, or all data cannot be written, the current thread is suspended and waits.
Non-blocking: When reading, read as much data as you can and then return. When writing, write as much data as you can and then return.
For I/O operations, according to the documentation on Oracle's official website, the classification standard for synchronous and asynchronous is "whether the caller needs to wait for the I/O operation to complete". This "wait for the I/O operation" "Complete" does not mean that the data must be read or that all the data is written, but it refers to the actual I/O operation, such as the period when data is transferred between the TCP/IP protocol stack buffer and the JVM buffer. Time, whether the caller wants to wait.
So, our commonly used read() and write() methods are synchronous I/O. Synchronous I/O is divided into blocking and non-blocking modes. If it is non-blocking mode, no data is detected. When it is readable, it is returned directly without actually performing I/O operations.
The summary is that there are actually only three mechanisms in Java: synchronous blocking I/O, synchronous non-blocking I/O and asynchronous I/O. What we will talk about below are the first two, which were introduced in JDK 1.7 Asynchronous I/O is called NIO.2.
We know that the emergence of a new technology is always accompanied by improvements and improvements, and the same is true for the emergence of Java NIO.
Traditional I/O is blocking I/O, and the main problem is the waste of system resources. For example, in order to read the data of a TCP connection, we call the read() method of InputStream. This will cause the current thread to be suspended until data arrives. Then the thread will occupy memory during the period when the data arrives. The resource (storage thread stack) does nothing, which is as the saying goes, occupying the pit and not taking a shit. In order to read the data of other connections, we have to start another thread. This may not be a problem when the number of concurrent connections is small. However, when the number of connections reaches a certain scale, memory resources will be consumed by a large number of threads. On the other hand, thread switching requires changing the status of the processor, such as program counter and register values, so switching between a large number of threads very frequently is also a waste of resources.
With the development of technology, modern operating systems provide new I/O mechanisms to avoid this waste of resources. Based on this, Java NIO was born. The representative feature of NIO is non-blocking I/O. Then we discovered that simply using non-blocking I/O does not solve the problem, because in non-blocking mode, the read() method will return immediately when no data is read. We don’t know when the data will arrive. You can only keep calling the read() method to retry, which is obviously a waste of CPU resources. As you can see below, the Selector component was born to solve this problem.
All I/O operations in Java NIO are based on Channel objects, just like stream operations They are all based on the same Stream object, so it is necessary to first understand what Channel is. The following content is taken from the documentation of JDK 1.8
A channel represents an open connection to an entity such as a hardware device, a file, a network socket, or a program component that is capable of performing one or more distinct I/ O operations, for example reading or writing.
As can be seen from the above content, a Channel represents a connection to a certain entity, which can be a file, network socket, etc. In other words, the channel is a bridge provided by Java NIO for our program to interact with the underlying I/O services of the operating system.
Channel is a very basic and abstract description. It interacts with different I/O services, performs different I/O operations, and has different implementations, so the specific ones include FileChannel, SocketChannel, etc.
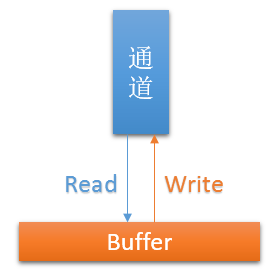
The channel is similar to the Stream. You can read data into the Buffer and write the data in the Buffer to the channel.
Of course, there are differences, which are mainly reflected in the following two points:
A channel can be both read and written, while A Stream is one-way (so it is divided into InputStream and OutputStream)
The channel has non-blocking I/O mode
The most commonly used channel implementations in Java NIO are as follows. It can be seen that they correspond to the traditional I/O operation classes one-to-one.
FileChannel: read and write files
DatagramChannel: UDP protocol network communication
SocketChannel: TCP Protocol network communication
ServerSocketChannel: Listening to TCP connections
The buffer used in NIO is not a simple byte array, but an encapsulated Buffer class. Through the API it provides, we can flexibly Manipulating data will be discussed in detail below.
Corresponding to the basic types of Java, NIO provides a variety of Buffer types, such as ByteBuffer, CharBuffer, IntBuffer, etc. The difference is that the unit length when reading and writing buffers is different (in units of variables of the corresponding type) reading and writing).
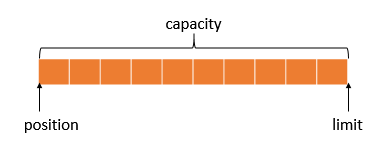
There are three very important variables in Buffer. They are the key to understanding the working mechanism of Buffer. They are
capacity (total capacity)
position (current position of the pointer)
limit (read/write boundary position)
Buffer works like C Character arrays in the language are very similar. By analogy, capacity is the total length of the array, position is the subscript variable for us to read/write characters, and limit is the position of the end character. The initial situation of the three variables in the Buffer is as shown below
During the process of reading/writing the Buffer, the position will move backward, and the limit is the boundary of the position movement. It is not difficult to imagine that when writing to the Buffer, the limit should be set to the size of the capacity, and when reading the Buffer, the limit should be set to the actual end position of the data. (Note: Writing Buffer data to the channel is a Buffer read operation, and reading data from the channel to the Buffer is a Buffer write Operation)
Before reading/writing the Buffer, we can call some auxiliary methods provided by the Buffer class to correctly set the values of position and limit. The main ones are as follows
flip(): Set limit to the value of position, and then set position to 0. Called before reading the Buffer.
rewind(): Just set position to 0. It is generally called before re-reading the Buffer data. For example, it is used when reading the same Buffer data and writing it to multiple channels.
clear(): Return to the initial state, that is, limit is equal to capacity and position is set to 0. Called before writing to the Buffer again.
compact(): Move the unread data (data between position and limit) to the beginning of the buffer, and set position to the next one at the end of this data Location. In fact, it is equivalent to writing such a piece of data to the buffer again.
Then, look at an example of using FileChannel to read and write text files. Use this example to verify the readable and writable characteristics of the channel and the basic usage of Buffer (note that FileChannel cannot be set to non-blocking mode ).
    FileChannel channel = new RandomAccessFile("test.txt", "rw").getChannel();
    channel.position(channel.size());  // 移动文件指针到末尾(追加写入)

    ByteBuffer byteBuffer = ByteBuffer.allocate(20);

    // 数据写入Buffer
    byteBuffer.put("你好,世界!\n".getBytes(StandardCharsets.UTF_8));

    // Buffer -> Channel
    byteBuffer.flip();
    while (byteBuffer.hasRemaining()) {
        channel.write(byteBuffer);
    }

    channel.position(0); // 移动文件指针到开头(从头读取)
    CharBuffer charBuffer = CharBuffer.allocate(10);
    CharsetDecoder decoder = StandardCharsets.UTF_8.newDecoder();

    // 读出所有数据
    byteBuffer.clear();
    while (channel.read(byteBuffer) != -1 || byteBuffer.position() > 0) {
        byteBuffer.flip();

        // 使用UTF-8解码器解码
        charBuffer.clear();
        decoder.decode(byteBuffer, charBuffer, false);
        System.out.print(charBuffer.flip().toString());

        byteBuffer.compact(); // 数据可能有剩余
    }

channel.close();This example uses two Buffers, of which byteBuffer is used as the data buffer for channel reading and writing, and charBuffer is used to store decoded characters. The usage of clear() and flip() is as mentioned above. What needs to be noted is the last compact() method. Even if the size of charBuffer is completely enough to accommodate the decoded data of byteBuffer, this compact() is essential. This is Because the UTF-8 encoding of commonly used Chinese characters occupies 3 bytes, there is a high probability of truncation in the middle. Please see the picture below:
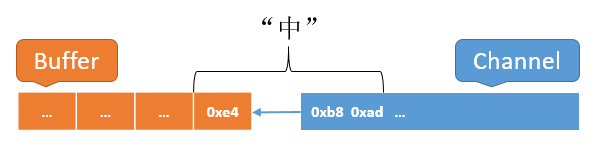
When the Decoder reads When 0xe4 at the end of the buffer is obtained, it cannot be mapped to a Unicode. The function of the third parameter false of the decode() method is to let the Decoder regard the unmapped bytes and the subsequent data as additional data, so decode () method will stop here, and position will fall back to the position of 0xe4. As a result, the first byte of the "medium" character encoding is left in the buffer, which must be compacted to the front to be spliced with the correct and subsequent data. (For character encoding, please refer to my previous article: http://www.cnblogs.com/coderjun/p/5117590.html)
BTW, the CharsetDecoder in the example is also a new feature of Java NIO Features, so you should have discovered that NIO operations are buffer-oriented (traditional I/O is stream-oriented).
So far, we understand the basic usage of Channel and Buffer. The next thing to talk about is the important component of letting one thread manage multiple Channels.
Selector (selector) is a special component used to collect the status (or event) of each channel. We first register the channel to the selector and set the events we care about, and then we can quietly wait for the event to occur by calling the select() method.
The channel has the following 4 events for us to monitor:
Accept: There is an acceptable connection
Connect: Connection successful
Read: There is data to read
Write: Data can be written
前文说了,如果用阻塞I/O,需要多线程(浪费内存),如果用非阻塞I/O,需要不断重试(耗费CPU)。Selector的出现解决了这尴尬的问题,非阻塞模式下,通过Selector,我们的线程只为已就绪的通道工作,不用盲目的重试了。比如,当所有通道都没有数据到达时,也就没有Read事件发生,我们的线程会在select()方法处被挂起,从而让出了CPU资源。
如下所示,创建一个Selector,并注册一个Channel。
注意:要将 Channel 注册到 Selector,首先需要将 Channel 设置为非阻塞模式,否则会抛异常。
Selector selector = Selector.open();
channel.configureBlocking(false);
SelectionKey key = channel.register(selector, SelectionKey.OP_READ);
register()方法的第二个参数名叫“interest set”,也就是你所关心的事件集合。如果你关心多个事件,用一个“按位或运算符”分隔,比如
SelectionKey.OP_READ | SelectionKey.OP_WRITE
这种写法一点都不陌生,支持位运算的编程语言里都这么玩,用一个整型变量可以标识多种状态,它是怎么做到的呢,其实很简单,举个例子,首先预定义一些常量,它们的值(二进制)如下
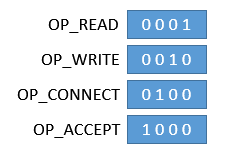
可以发现,它们值为1的位都是错开的,因此对它们进行按位或运算之后得出的值就没有二义性,可以反推出是由哪些变量运算而来。怎么判断呢,没错,就是“按位与”运算。比如,现在有一个状态集合变量值为 0011,我们只需要判断 “0011 & OP_READ” 的值是 1 还是 0 就能确定集合是否包含 OP_READ 状态。
然后,注意 register() 方法返回了一个SelectionKey的对象,这个对象包含了本次注册的信息,我们也可以通过它修改注册信息。从下面完整的例子中可以看到,select()之后,我们也是通过获取一个 SelectionKey 的集合来获取到那些状态就绪了的通道。
概念和理论的东西阐述完了(其实写到这里,我发现没写出多少东西,好尴尬(⊙ˍ⊙)),看一个完整的例子吧。
这个例子使用Java NIO实现了一个单线程的服务端,功能很简单,监听客户端连接,当连接建立后,读取客户端的消息,并向客户端响应一条消息。
需要注意的是,我用字符 ‘\0′(一个值为0的字节) 来标识消息结束。
public class NioServer {

    public static void main(String[] args) throws IOException {
        // 创建一个selector
        Selector selector = Selector.open();

        // 初始化TCP连接监听通道
        ServerSocketChannel listenChannel = ServerSocketChannel.open();
        listenChannel.bind(new InetSocketAddress(9999));
        listenChannel.configureBlocking(false);
        // 注册到selector(监听其ACCEPT事件)
        listenChannel.register(selector, SelectionKey.OP_ACCEPT);

        // 创建一个缓冲区
        ByteBuffer buffer = ByteBuffer.allocate(100);

        while (true) {
            selector.select(); //阻塞,直到有监听的事件发生
            Iterator<SelectionKey> keyIter = selector.selectedKeys().iterator();

            // 通过迭代器依次访问select出来的Channel事件
            while (keyIter.hasNext()) {
                SelectionKey key = keyIter.next();

                if (key.isAcceptable()) { // 有连接可以接受
                    SocketChannel channel = ((ServerSocketChannel) key.channel()).accept();
                    channel.configureBlocking(false);
                    channel.register(selector, SelectionKey.OP_READ);

                    System.out.println("与【" + channel.getRemoteAddress() + "】建立了连接!");

                } else if (key.isReadable()) { // 有数据可以读取
                    buffer.clear();

                    // 读取到流末尾说明TCP连接已断开,
                    // 因此需要关闭通道或者取消监听READ事件
                    // 否则会无限循环
                    if (((SocketChannel) key.channel()).read(buffer) == -1) {
                        key.channel().close();
                        continue;
                    }

                    // 按字节遍历数据
                    buffer.flip();
                    while (buffer.hasRemaining()) {
                        byte b = buffer.get();

                        if (b == 0) { // 客户端消息末尾的\0
                            System.out.println();

                            // 响应客户端
                            buffer.clear();
                            buffer.put("Hello, Client!\0".getBytes());
                            buffer.flip();
                            while (buffer.hasRemaining()) {
                                ((SocketChannel) key.channel()).write(buffer);
                            }
                        } else {
                            System.out.print((char) b);
                        }
                    }
                }

                // 已经处理的事件一定要手动移除
                keyIter.remove();
            }
        }
    }
}这个客户端纯粹测试用,为了看起来不那么费劲,就用传统的写法了,代码很简短。
要严谨一点测试的话,应该并发运行大量Client,统计服务端的响应时间,而且连接建立后不要立刻发送数据,这样才能发挥出服务端非阻塞I/O的优势。
public class Client {

    public static void main(String[] args) throws Exception {
        Socket socket = new Socket("localhost", 9999);
        InputStream is = socket.getInputStream();
        OutputStream os = socket.getOutputStream();

        // 先向服务端发送数据
        os.write("Hello, Server!\0".getBytes());

        // 读取服务端发来的数据
        int b;
        while ((b = is.read()) != 0) {
            System.out.print((char) b);
        }
        System.out.println();

        socket.close();
    }
}The above is the detailed content of Detailed introduction to NIO core components in Java. For more information, please follow other related articles on the PHP Chinese website!


![[Web front-end] Node.js quick start](https://img.php.cn/upload/course/000/000/067/662b5d34ba7c0227.png)


