
 Web Front-end
CSS Tutorial
Detailed explanation of the usage of WebKit-specific properties of some hidden advanced properties in css3
Web Front-end
CSS Tutorial
Detailed explanation of the usage of WebKit-specific properties of some hidden advanced properties in css3
Detailed explanation of the usage of WebKit-specific properties of some hidden advanced properties in css3

Although modern browsers already support many CSS3 properties, most designers and developers still seem to focus on some very "mainstream" properties, such as border-radius, box-shadow or transform. They're well documented, well tested, and used the most, so if you're designing a website these days, it's hard to live without them.
But hidden within the browser’s vast treasure trove are some advanced, grossly underrated properties that don’t get much attention. Perhaps some of them should be like this (ignored), but other attributes should get more recognition. The greatest treasures lie beneath Webkit, and in the age of iPhones, iPads, and Android apps, it's useful to start understanding them. Even the Gecko engine used by Firefox and others provides some unique properties. In this article, we’ll take a look at lesser-known CSS 2.1 and CSS3 properties and their support in modern browsers.
Note: For each attribute, we stipulate here: "WebKit" refers to browsers that use the Webkit kernel (Safari, Chrome, iPhone, iPad, Android, etc.), "Gecko" refers to the Gecko kernel browser (Firefox, etc.). Then there are properties that are part of the official CSS 2.1 specification, which means more browsers and even some older browsers will support them. Finally, a CSS3 tag identifies properties that comply with the standard and are supported by the latest browser versions—such as Firefox 4, Chrome 10, Safari 5, Opera 11.10, and IE9.
-webkit-mask
This attribute is quite powerful, so a detailed introduction is beyond the scope of this article. It is worth studying in depth, because it can save you in practical applications. A lot of time.
-webkit-mask makes it possible to add a mask to an element, so that you can create patterns of arbitrary shapes. The mask can be a CSS3 gradient or a translucent PNG image. When the alpha value of the mask element is 0, it will cover the underlying elements, and when it is 1, it will completely display the underlying content. Relevant attributes include -webkit-mask-clip, -webkit-mask-position and -webkit-mask-repeat, etc., which rely heavily on the syntax in background. For more information check out the webkit blog and the link below.
Example
Image Mask:
.element{
background: url(img/image.jpg) repeat;
-webkit-mask:
url(img/mask.png);
}Example
Gradient Mask:
.element2 {
background: url(img/image.jpg) repeat;
-webkit-mask: -webkit-gradient(linear, left top, left bottom, from(rgba(0,0,0,1)), to(rgba(0,0,0,0)));
}-webkit-text-stroke
One shortcoming of CSS borders is that only rectangular elements can be used. -webkit-text-stroke can add borders to text. It can not only set the width of the text border, but also set its color. Moreover, using the color: transparent attribute, you can also create hollow fonts!
Example
Set a 2px wide blue border for all
titles:h1 {-webkit-text-stroke: 2px blue}Copy after login
h1 {-webkit-text-stroke: 2px blue}Another feature is to set a 1px transparent border , can make the text smooth:
h2 {-webkit-text-stroke: 1px transparent}Create a red hollow font:
h3 {
color: transparent;
-webkit-text-stroke: 4px red;
}-webkit-nbsp-mode
Line breaks are sometimes tricky: sometimes you want the text to break at the appropriate place (rather than wrap), and sometimes you don't. One property that controls this is -webkit-nbsp-mode, which allows you to change the behavior of whitespace, forcing text to break where it is used. This can be achieved by setting the value to space.
-webkit-tap-highlight-color
This property is only used on iOS (iPhone and iPad). When you click on a link or clickable element defined through Javascript, it will appear with a semi-transparent gray background. To reset this behavior, you can set -webkit-tap-highlight-color to any color.
To disable this highlighting, set the color’s alpha value to 0.
Example
Set the highlight color to 50% transparent red:
-webkit-tap-highlight-color: rgba(255,0,0,0.5);
Browser support: iOS (iPhone and iPad only).
Extended reading : Safari Developer Library
zoom: reset
Generally speaking, zoom is an IE-specific property. But webkit has also begun to support it, and using the value reset, webkit can achieve good results (interestingly, IE does not support this value). It allows you to reset the normal zoom behavior in the browser - if an element is declared with zoom:reset, other elements on the page will zoom in when the user zooms in the page.
Note: In fact, we often use -webkit-text-size-adjust:none; when disabling chrome's forced font size; it can also achieve a similar effect. The difference is that the element that sets this attribute The text within will not be enlarged/shrunk, but other elements on the page will change - Shenfei
-webkit-margin-collapse
这个属性属于限制级的,但是它还是非常值得关注。通常,两个相邻的元素的margin会折叠起来(collapse)。这意味着第一个元素的底部的边距和第二个元素的头部边距会被合并到一起。
最常见的例子就是两个相邻的
元素会共享他们的margin值。想要控制这个表现,我们可以使用-webkit-margin-collapse及其分拆后的-webkit-margin-top-collapse、-webkit-margin-bottom-collapse等属性。默认值是collapse,值separate则停止共享margin值,也就是说,第一个元素的底部边距和第二个元素的头部边距会正常叠加。
-webkit-box-reflect
你还记得几乎每个网站都把他们的网站logo或者头部的文字做成倒影的那个年代吗?谢天谢地,那个年代已经过去了,但是如果你要在一些按钮、导航、或者其他UI元素上更好的使用这个技术,-webkit-box-reflect是更好的选择。
这个属性接受above、below、left和right四个关键词,它们设置倒影的方向,它们和一个设置元素和它的倒影建的距离的数字一起使用。同时,蒙板图片也是同样支持的(看上面的-webkit-mask部分,不要搞混了哈)。倒影会自动生成并对布局没有影响。下面的元素只用了CSS,第二个按钮用了-webkit-box-reflect属性。
示例
这个倒影会出现在它的父元素的下面并有5px的间距:
-webkit-box-reflect: below 5px;
这个倒影会投射到元素的右边,没有间距。然后,一个蒙板将会被应用(url(mask.png)):
-webkit-box-reflect: right 0 url(mask.png);
-webkit-marquee
另一个属性让我们回到美好的从前:那个遍地marquee(跑马灯)的年代。有趣的是这个已经被遗弃的标签反而在现在变的很有用,比如我们在比较小的手机屏幕上切换内容,如果不断行的话文字将不能完全显示。
ozPDA创建的这个天气的应用很好的使用了它。 (如果你木有看到变换的文字,可以尝试换一个城市来体验。需要使用WebKit内核浏览器)
示例
.marquee {
white-space: nowrap;
overflow:-webkit-marquee;
width: 70px;
-webkit-marquee-direction: forwards;
-webkit-marquee-speed: slow;
-webkit-marquee-style: alternate;
}要让marquee工作需要一些前提条件。首先,white-space必须设置为nowrap,这样才能让文字不自动换行,其次,overflow必须设置为-webkit-marquee,宽度也要设置为比文字实际长度小的数值。
剩下的属性确保文字从左边滚动到右边(-webkit-marquee-direction)、来回移动(-webkit-marquee-style)以及以比较低的速度移动(-webkit-marquee-speed)。其它的属性有-webkit-marquee-repetition,用来定义marquee重复的次数,-webkit-marquee-increment, 定义每次递增的速度变化。
The above is the detailed content of Detailed explanation of the usage of WebKit-specific properties of some hidden advanced properties in css3. For more information, please follow other related articles on the PHP Chinese website!

Hot AI Tools

Undresser.AI Undress
AI-powered app for creating realistic nude photos

AI Clothes Remover
Online AI tool for removing clothes from photos.

Undress AI Tool
Undress images for free

Clothoff.io
AI clothes remover

AI Hentai Generator
Generate AI Hentai for free.

Hot Article
Hot Tools

Notepad++7.3.1
Easy-to-use and free code editor

SublimeText3 Chinese version
Chinese version, very easy to use

Zend Studio 13.0.1
Powerful PHP integrated development environment

Dreamweaver CS6
Visual web development tools

SublimeText3 Mac version
God-level code editing software (SublimeText3)
Hot Topics
 1359
1359
 52
52

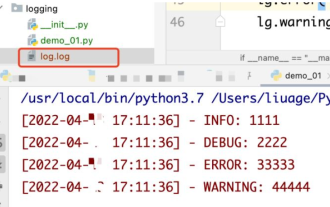 How to use python+Flask to realize real-time update and display of logs on web pages
May 17, 2023 am 11:07 AM
How to use python+Flask to realize real-time update and display of logs on web pages
May 17, 2023 am 11:07 AM
1. Log output to file using module: logging can generate a custom level log, and can output the log to a specified path. Log level: debug (debug log) = 5) {clearTimeout (time) // If all results obtained 10 consecutive times are empty Log clearing scheduled task}return}if(data.log_type==2){//If a new log is obtained for(i=0;i
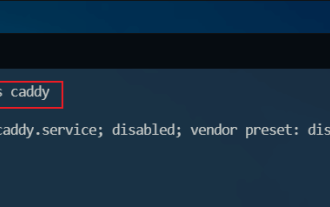 How to use Nginx web server caddy
May 30, 2023 pm 12:19 PM
How to use Nginx web server caddy
May 30, 2023 pm 12:19 PM
Introduction to Caddy Caddy is a powerful and highly scalable web server that currently has 38K+ stars on Github. Caddy is written in Go language and can be used for static resource hosting and reverse proxy. Caddy has the following main features: Compared with the complex configuration of Nginx, its original Caddyfile configuration is very simple; it can dynamically modify the configuration through the AdminAPI it provides; it supports automated HTTPS configuration by default, and can automatically apply for HTTPS certificates and configure it; it can be expanded to data Tens of thousands of sites; can be executed anywhere with no additional dependencies; written in Go language, memory safety is more guaranteed. First of all, we install it directly in CentO
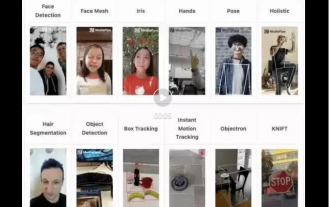 Real-time protection against face-blocking barrages on the web (based on machine learning)
Jun 10, 2023 pm 01:03 PM
Real-time protection against face-blocking barrages on the web (based on machine learning)
Jun 10, 2023 pm 01:03 PM
Face-blocking barrage means that a large number of barrages float by without blocking the person in the video, making it look like they are floating from behind the person. Machine learning has been popular for several years, but many people don’t know that these capabilities can also be run in browsers. This article introduces the practical optimization process in video barrages. At the end of the article, it lists some applicable scenarios for this solution, hoping to open it up. Some ideas. mediapipeDemo (https://google.github.io/mediapipe/) demonstrates the mainstream implementation principle of face-blocking barrage on-demand up upload. The server background calculation extracts the portrait area in the video screen, and converts it into svg storage while the client plays the video. Download svg from the server and combine it with barrage, portrait
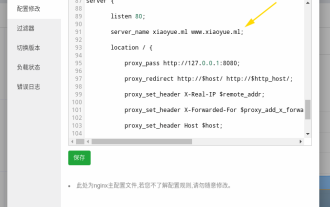 How to configure nginx to ensure that the frps server and web share port 80
Jun 03, 2023 am 08:19 AM
How to configure nginx to ensure that the frps server and web share port 80
Jun 03, 2023 am 08:19 AM
First of all, you will have a doubt, what is frp? Simply put, frp is an intranet penetration tool. After configuring the client, you can access the intranet through the server. Now my server has used nginx as the website, and there is only one port 80. So what should I do if the FRP server also wants to use port 80? After querying, this can be achieved by using nginx's reverse proxy. To add: frps is the server, frpc is the client. Step 1: Modify the nginx.conf configuration file in the server and add the following parameters to http{} in nginx.conf, server{listen80
 How to implement form validation for web applications using Golang
Jun 24, 2023 am 09:08 AM
How to implement form validation for web applications using Golang
Jun 24, 2023 am 09:08 AM
Form validation is a very important link in web application development. It can check the validity of the data before submitting the form data to avoid security vulnerabilities and data errors in the application. Form validation for web applications can be easily implemented using Golang. This article will introduce how to use Golang to implement form validation for web applications. 1. Basic elements of form validation Before introducing how to implement form validation, we need to know what the basic elements of form validation are. Form elements: form elements are
 Using Jetty7 for Web server processing in Java API development
Jun 18, 2023 am 10:42 AM
Using Jetty7 for Web server processing in Java API development
Jun 18, 2023 am 10:42 AM
Using Jetty7 for Web Server Processing in JavaAPI Development With the development of the Internet, the Web server has become the core part of application development and is also the focus of many enterprises. In order to meet the growing business needs, many developers choose to use Jetty for web server development, and its flexibility and scalability are widely recognized. This article will introduce how to use Jetty7 in JavaAPI development for We
 Is PHP front-end or back-end in web development?
Mar 24, 2024 pm 02:18 PM
Is PHP front-end or back-end in web development?
Mar 24, 2024 pm 02:18 PM
PHP belongs to the backend in web development. PHP is a server-side scripting language, mainly used to process server-side logic and generate dynamic web content. Compared with front-end technology, PHP is more used for back-end operations such as interacting with databases, processing user requests, and generating page content. Next, specific code examples will be used to illustrate the application of PHP in back-end development. First, let's look at a simple PHP code example for connecting to a database and querying data:
 How to enable administrative access from the cockpit web UI
Mar 20, 2024 pm 06:56 PM
How to enable administrative access from the cockpit web UI
Mar 20, 2024 pm 06:56 PM
Cockpit is a web-based graphical interface for Linux servers. It is mainly intended to make managing Linux servers easier for new/expert users. In this article, we will discuss Cockpit access modes and how to switch administrative access to Cockpit from CockpitWebUI. Content Topics: Cockpit Entry Modes Finding the Current Cockpit Access Mode Enable Administrative Access for Cockpit from CockpitWebUI Disabling Administrative Access for Cockpit from CockpitWebUI Conclusion Cockpit Entry Modes The cockpit has two access modes: Restricted Access: This is the default for the cockpit access mode. In this access mode you cannot access the web user from the cockpit
