
 Backend Development
Python Tutorial
Getting Started with Python: Detailed Introduction to Blockchain (Picture)
Backend Development
Python Tutorial
Getting Started with Python: Detailed Introduction to Blockchain (Picture)
Getting Started with Python: Detailed Introduction to Blockchain (Picture)

The basic concept of blockchain is simple: a distributed database that stores an ever-lengthening list containing many ordered records. The following article mainly introduces you to the relevant information about blockchain for learning Python. The article introduces it in detail through sample code. Friends who need it can take a look below.
Preface
This article will give you a brief introduction to the relevant knowledge about blockchain (BlockChain), and use Python to make a simple implementation. Not much to say below, let’s take a look at the detailed introduction:
What is blockchain
In short, blockchain It is a permanent and irreversibly modified record generated by superimposing (chaining) encrypted data (blocks) in chronological order. Specifically, the blockchain is composed of a series of data blocks generated using cryptographic methods. Each block contains the hash value of the previous block, starting from the genesis block. Start connecting to the current block to form a block chain. Each block is guaranteed to be generated after the previous block in chronological order, otherwise the hash value of the previous block is unknown. It is an important concept in Bitcoin.
Features
The blockchain has the following characteristics:
Decentralization: The blockchain does not rely on a central node, but on distributed nodes.
No trust system required: The blockchain is based on cryptographic algorithms, and data requires approval by other users within the network, so there is no need for a third-party intermediary structure or endorsement by a trust organization.
Untamperable and encrypted security: The blockchain adopts a one-way hash algorithm, and each newly generated block is strictly advanced in linear order according to time. The irreversibility of time causes any Attempts to intrude and tamper with data information in the blockchain can be easily traced, leading to rejection by other nodes, which can limit related illegal activities.
#The above characteristics enable blockchain to have more and more applications in many fields such as banking, securities markets, and finance.
How blockchain works
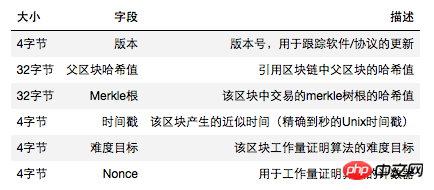
Blockchain is a series of encrypted data blocks. These blocks consist of a block header containing metadata, followed by a long list of transactions that make up the body of the block. The block structure in Bitcoin is as follows:

Block header
The block header contains information related to other areas in the blockchain The connection information, timestamp, nonce and other information in the block are as follows:
Block identifier
The block has Two identifiers, one is the hash value of the block header, and the other is the block height. The hash value of the block header is a number obtained by performing a secondary hash calculation on the block header using the SHA256 algorithm. The block hash value uniquely and unambiguously identifies a block, and any node can independently obtain the block hash value by simply hashing the block header. Block height refers to the position of the block in the blockchain. Block height is not a unique identifier. While a single block will always have a clear, fixed block height, the converse is not true and a block height does not always identify a single block. Two or more blocks may have the same block height and compete for the same position in the blockchain.
After understanding the above basics, let’s start using Python to implement a simple blockchain.
Python implementation of blockchain
1. Define the block structure
In [ 16]:
# block.py
import hashlib
import uuid
class Block(object):
def __init__(self, data=None, previous_hash=None):
self.identifier = uuid.uuid4().hex # 产生唯一标示
self.nonce = None # nonce值
self.data = data # 区块内容
self.previous_hash = previous_hash # 父节点哈希值
def hash(self, nonce=None):
'''
计算区块的哈希值
'''
message = hashlib.sha256()
message.update(self.identifier.encode('utf-8'))
message.update(str(nonce).encode('utf-8'))
message.update(str(self.data).encode('utf-8'))
message.update(str(self.previous_hash).encode('utf-8'))
return message.hexdigest()
def hash_is_valid(self, the_hash):
'''
校验区块哈希值有否有效
'''
return the_hash.startswith('0000')
def __repr__(self):
return 'Block<Hash: {}, Nonce: {}>'.format(self.hash(), self.nonce)The above is a block structure. What is implemented here is a simplified version, which does not fully correspond to the blocks in Bitcoin. The block here contains a unique identifier, the hash value of the parent node, the nonce value and the content field of the block. You can see that the hash value of a block must meet certain conditions to be valid, such as starting with 0000. Next, initialize this block structure.
In [37]:
# 创建一个内容为hello world的内容块

block = Block('Hello World')
block
Out[37]:
Block<Hash: 238a65a101c8829d7fc406eb78a71cfc19ad702b437e2c1be8d9061ddb81e900, Nonce: None>
Although the above block has been created, its hash value is not valid.
In [38]:
block.hash_is_valid(block.hash())
Out[38]:
False
Change the value of nonce to get a new hash value.
In [39]:
block.hash(1)
Out[39]:
'a6431938ba10270dfcfdf7a2371312446914fedadf79632c2c0adb3b463f4838'
The hash value was updated, but is not yet a valid hash value. In order to obtain a valid hash value, it is a process of constantly updating the nonce value, or a mining process. Add a mine function below to get a suitable nonce value.
In [78]:
# block.py
import hashlib
import uuid
class Block(object):
def __init__(self, data=None, previous_hash=None):
self.identifier = uuid.uuid4().hex # 产生唯一标示
self.nonce = None # nonce值
self.data = data # 区块内容
self.previous_hash = previous_hash # 父节点哈希值
def hash(self, nonce=None):
'''
计算区块的哈希值
'''
message = hashlib.sha256()
message.update(self.identifier.encode('utf-8'))
message.update(str(nonce).encode('utf-8'))
message.update(str(self.data).encode('utf-8'))
message.update(str(self.previous_hash).encode('utf-8'))
return message.hexdigest()
def hash_is_valid(self, the_hash):
'''
校验区块哈希值有否有效
'''
return the_hash.startswith('0000')
def __repr__(self):
return 'Block<Hash: {}, Nonce: {}>'.format(self.hash(self.nonce), self.nonce)
'''
新增挖矿函数
'''
def mine(self):
# 初始化nonce为0
cur_nonce = self.nonce or 0
# 循环直到生成一个有效的哈希值
while True:
the_hash = self.hash(nonce=cur_nonce)
if self.hash_is_valid(the_hash): # 如果生成的哈希值有效
self.nonce = cur_nonce # 保持当前nonce值
break # 并退出
else:
cur_nonce += 1 # 若当前哈希值无效,更新nonce值,进行加1操作In [75]:
block = Block('Hello World')

# 挖矿,循环直至找到合适的nonce
block.mine()

# 打印
block
Out[75]:
Block<Hash: 000087359d5264153d624556f0a0c6f25cba06e453975c1c02587862e823911b, Nonce: 64751>
至此,第一个有效的区块生成完成,下面开始定义区块链。
二、定义区块链结构
In [81]:
class BlockChain(object):
def __init__(self):
self.head = None # 指向最新的一个区块
self.blocks = {} # 包含所有区块的一个字典
'''
添加区块函数
'''
def add_block(self, new_block):
previous_hash = self.head.hash() if self.head else None
new_block.previous_hash = previous_hash
self.blocks[new_block.identifier] = {
'block': new_block,
'previous_hash': previous_hash,
'previous': self.head,
}
self.head = new_block
def __repr__(self):
num_existing_blocks = len(self.blocks)
return 'Blockchain<{} Blocks, Head: {}>'.format(
num_existing_blocks,
self.head.identifier if self.head else None
)定义好区块链结构后,下面就开始初始化一条区块链。
In [82]:
# 初始化
chain = BlockChain()

# 打印
chain
Out[82]:
Blockchain<0 Blocks, Head: None>
In [83]:
# 添加区块
chain.add_block(block)

# 打印
chain
Out[83]:
Blockchain<1 Blocks, Head: 364c0cf963384ca28a2763499a140405>
In [84]:
# 添加更多的区块

for i in range(6):
 new_block = Block(i)
 new_block.mine()
 chain.add_block(new_block)

# 打印
chain
Out[84]:
Blockchain<7 Blocks, Head: e7cb24ec7acd42a4aaebe7faee9e0713>
以上就是一个简单区块链,后面还会涉及到区块链的有效性。当区块链中一个区块被改变后,这个区块的哈希就会改变,从而影响到这块区块之后的区块,致使这个区块链不再有效。这些将在后续继续深入。
总结
The above is the detailed content of Getting Started with Python: Detailed Introduction to Blockchain (Picture). For more information, please follow other related articles on the PHP Chinese website!

Hot AI Tools

Undresser.AI Undress
AI-powered app for creating realistic nude photos

AI Clothes Remover
Online AI tool for removing clothes from photos.

Undress AI Tool
Undress images for free

Clothoff.io
AI clothes remover

Video Face Swap
Swap faces in any video effortlessly with our completely free AI face swap tool!

Hot Article
Hot Tools

Notepad++7.3.1
Easy-to-use and free code editor

SublimeText3 Chinese version
Chinese version, very easy to use

Zend Studio 13.0.1
Powerful PHP integrated development environment

Dreamweaver CS6
Visual web development tools

SublimeText3 Mac version
God-level code editing software (SublimeText3)
Hot Topics


 PHP and Python: Different Paradigms Explained
Apr 18, 2025 am 12:26 AM
PHP and Python: Different Paradigms Explained
Apr 18, 2025 am 12:26 AM
PHP is mainly procedural programming, but also supports object-oriented programming (OOP); Python supports a variety of paradigms, including OOP, functional and procedural programming. PHP is suitable for web development, and Python is suitable for a variety of applications such as data analysis and machine learning.
 Choosing Between PHP and Python: A Guide
Apr 18, 2025 am 12:24 AM
Choosing Between PHP and Python: A Guide
Apr 18, 2025 am 12:24 AM
PHP is suitable for web development and rapid prototyping, and Python is suitable for data science and machine learning. 1.PHP is used for dynamic web development, with simple syntax and suitable for rapid development. 2. Python has concise syntax, is suitable for multiple fields, and has a strong library ecosystem.
 Python vs. JavaScript: The Learning Curve and Ease of Use
Apr 16, 2025 am 12:12 AM
Python vs. JavaScript: The Learning Curve and Ease of Use
Apr 16, 2025 am 12:12 AM
Python is more suitable for beginners, with a smooth learning curve and concise syntax; JavaScript is suitable for front-end development, with a steep learning curve and flexible syntax. 1. Python syntax is intuitive and suitable for data science and back-end development. 2. JavaScript is flexible and widely used in front-end and server-side programming.
 Can visual studio code be used in python
Apr 15, 2025 pm 08:18 PM
Can visual studio code be used in python
Apr 15, 2025 pm 08:18 PM
VS Code can be used to write Python and provides many features that make it an ideal tool for developing Python applications. It allows users to: install Python extensions to get functions such as code completion, syntax highlighting, and debugging. Use the debugger to track code step by step, find and fix errors. Integrate Git for version control. Use code formatting tools to maintain code consistency. Use the Linting tool to spot potential problems ahead of time.
 Can vs code run in Windows 8
Apr 15, 2025 pm 07:24 PM
Can vs code run in Windows 8
Apr 15, 2025 pm 07:24 PM
VS Code can run on Windows 8, but the experience may not be great. First make sure the system has been updated to the latest patch, then download the VS Code installation package that matches the system architecture and install it as prompted. After installation, be aware that some extensions may be incompatible with Windows 8 and need to look for alternative extensions or use newer Windows systems in a virtual machine. Install the necessary extensions to check whether they work properly. Although VS Code is feasible on Windows 8, it is recommended to upgrade to a newer Windows system for a better development experience and security.
 PHP and Python: A Deep Dive into Their History
Apr 18, 2025 am 12:25 AM
PHP and Python: A Deep Dive into Their History
Apr 18, 2025 am 12:25 AM
PHP originated in 1994 and was developed by RasmusLerdorf. It was originally used to track website visitors and gradually evolved into a server-side scripting language and was widely used in web development. Python was developed by Guidovan Rossum in the late 1980s and was first released in 1991. It emphasizes code readability and simplicity, and is suitable for scientific computing, data analysis and other fields.
 How to run programs in terminal vscode
Apr 15, 2025 pm 06:42 PM
How to run programs in terminal vscode
Apr 15, 2025 pm 06:42 PM
In VS Code, you can run the program in the terminal through the following steps: Prepare the code and open the integrated terminal to ensure that the code directory is consistent with the terminal working directory. Select the run command according to the programming language (such as Python's python your_file_name.py) to check whether it runs successfully and resolve errors. Use the debugger to improve debugging efficiency.
 Is the vscode extension malicious?
Apr 15, 2025 pm 07:57 PM
Is the vscode extension malicious?
Apr 15, 2025 pm 07:57 PM
VS Code extensions pose malicious risks, such as hiding malicious code, exploiting vulnerabilities, and masturbating as legitimate extensions. Methods to identify malicious extensions include: checking publishers, reading comments, checking code, and installing with caution. Security measures also include: security awareness, good habits, regular updates and antivirus software.
