 Java
Java
 javaTutorial
 Detailed graphic and text explanation of tomcat related configuration and eclipse integration in Java
Detailed graphic and text explanation of tomcat related configuration and eclipse integration in Java
This article mainly introduces tomcat related configuration and eclipse integration_related information compiled by Power Node Java Academy. Friends in need can refer to
tomcat related configuration and eclipse integration
tomcat It is a popular open source and free web application server. First of all, it must be clear that Tomcat is closely related to Java. Therefore, before installation and use, you must first install JDK and set the JDK environment variables. Since the JDK has been installed on the machine, you must also set it. Okay, JDK environment variables, so I won’t describe them too much here, just explain the environment variables I set:
JAVA_HOME: F:\JDK_Kit
CLASSPATH: .;%JAVA_HOME%\lib \dt.jar;%JAVA_HOME%\lib\tools.jar; (with a dot at the front)
Add at the front of the path:;%JAVA_HOME%\bin; (with a semicolon before and after )
Enter java-version in the cmd window to check whether the environment variable is set successfully:

My JDK version is 1.8.0_45.
Okay, now you have configured the JDK environment variables. Let's start operating Tomcat.
First search Tomcat on Baidu and download it from Apache’s official website. The latest version of Tomcat8 is selected here
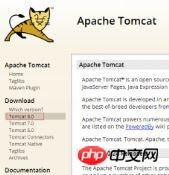
After clicking in, the zip format is selected. It is an installation-free version. Since my machine is 64-bit Windows, I chose the following:
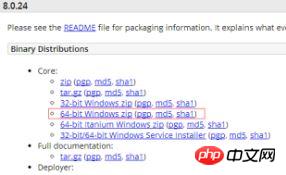
After downloading, extract it to my customized TomCat_8.0.24 under the F drive. In the folder:
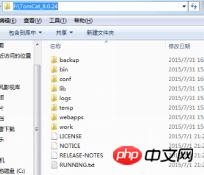
After decompression, you need to start configuring Tomcat’s environment variables and some settings:
Create a new TOMCAT_HOME in the environment variable with a value of The directory where Tomcat is located, which is F:\TomCat_8.0.24

In addition, create CATALINA_HOME and CATALINA_BASE, where CATALINA_HOME is the installation directory of Tomcat, and CATALINA_BASE is the working directory of Tomcat,
I don’t differentiate for the time being, so I set its value to %TOMCAT_HOME%
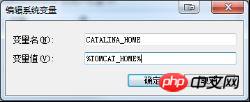
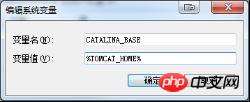
After configuring Tomcat’s environment variables, we need to configure Tomcat Configure some files in:
Open the bin folder in the Tomcat installation directory. We need to supplement startup.bat and shutdown.bat.
Edit these two files. Add the following two lines to the first line at the beginning of the file, that is, before @echooff:
SETJAVA_HOME=JDK directory
SETCATALINA_HOME=Decompressed Tomcat directory
For mine For the system, it is configured as:
SETJAVA_HOME=F:\JDK_Kit
SETCATALINA_HOME=F:\TomCat_8.0.24
After completing this step, you can click startup.bat in the future Start the server and click shutdown.bat to shut down the server. Of course, this is only one of the ways.
We will introduce several ways to start and shut down Tomcat later.
Next, Tomcat should be added to the service.
For the zip version downloaded from the Internet, Tomcat needs to be added to the service. Otherwise, Tomcat cannot be configured and the bin folder cannot be opened. tomcat8w.exe this program.
As you can see from the task manager, click the star button on the tomcat8w.exe program to start tomcat8.exe.
The way to add tomcat to the service is to locate the directory where the bin folder is located in cmd, enter service.batinstall

and you will see a series of The environment variables just configured, and the prompt that Tomcat has been installed:
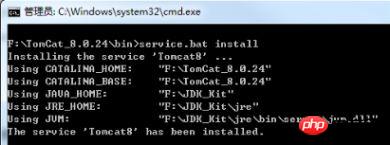
#Note: Each line here must clearly show the value of each environment variable setting, if any Which parameter has no value and only double quotes are displayed, it is an error.
In this case, although tomcat8w.exe can be opened, clicking the start button will not start the service (that is, it cannot switch to the stop button) can be pressed).
You can also type services.msc through cmd to call out the service to see if there is Apache Tomcat8 (the default is manual startup, if it is changed to automatic startup, Tomcat will start in the background when you turn on the machine)


At this point, the basic configuration has been completed. There may be some small configurations, such as setting the user name and password of Tomcat, which will be discussed later.
Startup of Tomcat
After configuring Tomcat, we are concerned about whether these configurations are successful, so we need to start Tomcat to verify how many times Tomcat has. First startup method:
The first one: (not recommended)
This method can only be enabled on your own computer (suitable for testing web applications on your own computer), Other people's computers cannot connect to the tomcat server of my own computer. This has been verified many times.
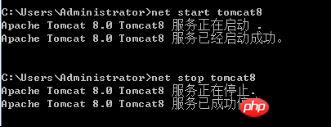
Start in the command console cmd. Enter the following statement in cmd to open or close the Tomcat server:
netstart service name
netstop service name
The service names of Tomcat are all Tomcat+version numbers, such as Tomcat6, Tomcat7. . . Because my Tomcat version is Tomcat8, the service name here is Tomcat8
. The startup display in the task manager in this way is:

The latter two methods are also displayed as:

Therefore, the abnormality of this method is also reflected from the side door, so it is not recommended! Not recommended! Not recommended!
Second type: Use the startup.bat batch file to open the Tomcat server, and use the shutdown.bat batch file to close the Tomcat server. For this method, join as mentioned above
Two sentences SETJAVA_HOME=JDK directory and SETCALINA_HOME=decompressed Tomcat directory
Third method:Enter the bin folder of the Tomcat directory and open Tomcat7w. exe program, select the star button in the open window to open the server, and select the stop button to close the server.
Verification of Tomcat
After understanding the various ways to open Tomcat, we can verify whether Tomcat can work. Choose any way to start Tomcat, such as typing netstartTomcat8 in cmd

It prompts that the Tomcat server has started successfully. Then open the browser and enter localhost:8080

If Tomcat can work , then you can open the Tomcat website, then make sure Tomcat can work normally:
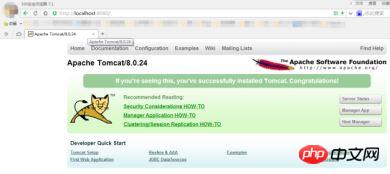
After the test, don’t forget to shut down the server and close it according to the way you choose to open it:
Finally some small things:
1. Tomcat can set the user name and password. In the conf directory in the Tomcat directory, there is a tomcat-users. xml file, click in to edit the user name and password
Add a line above /tomcat-users in the last line:
userusername="admin"password="123456" roles="manager-gui "/
You can set the username and password to admin and 123456

There is another little knowledge point here. The role of role determines whether you are Tomcat administrator, if you are an administrator, you can manage tomcat, such as deploying web references.
2. Tomcat’s default port number is 8080. You can open server.xml in the conf directory in the Tomcat directory and find this line:

You can see that the port number is 8080. You can change this port number to any port number.
The above is all the processes of Tomcat from downloading to configuration, final startup and verification. If you want to use Eclipse to develop with Tomcat, you also need to configure Tomcat in Eclipse.
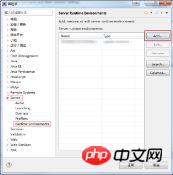
Start Eclipse first. Click [Window], select the last item [Preferences], open the preference window, click [Server], select the last item [RuntimeEnviroments] among its sub-items,
At this time click [ Add] button to add a server:
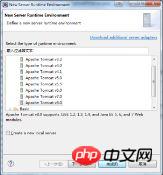
Set the directory where Tomcat is located and the JRE used:
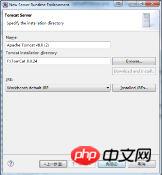
The association between Eclipse and Tomcat is completed, but the Tomcat server has not yet been created.
To create a Tomcat server, you can click the [Servers] tab on the toolbar of the console under Eclipse, and the following prompt will appear:

Then We click according to the prompts, and the following window will pop up:
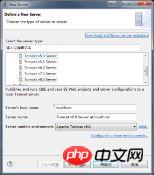
Eclipse automatically selected the [Tomcatv8.0Server] option for us. Since we do not have the resources yet, we click directly [Complete], you can see the [Servers] label at this time:

After completing the creation of the Tomcat server, you still need to configure the Tomcat server, double-click the [Servers] label The [Overview] window of the server will pop up, find the [ServerLocations] configuration option, and select the [UseTomcatinstallation] option, so that the [Serverpath] below will be automatically set to the installation directory of the Tomcat server, and then manually set the [Deploypath] 】Set to webapps, thus completing all configurations of the Tomcat server in Eclipse:
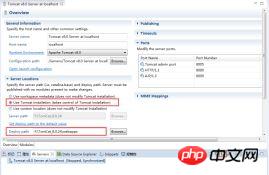
We can click the green button, which is to start the server, we will Seeing that the server status under the [Servers] tab has changed to start, and the end button is also activated:

At the same time click the [Console] tab, we also You can see some information:

It means that Tomcat has been started successfully in Eclipse, then open the browser and enter localhost:8080:

At this time, you can see that the Tomcat server is indeed working:
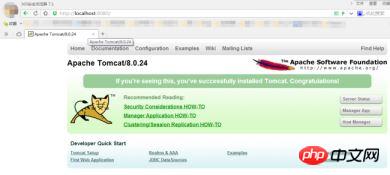
This means that Tomcat has been successfully configured in Eclipse and can work normally.
Postscript
Some problems that may arise:
After double-clicking the server to open the [Overview] window, you can see that some ports can be set in the right part of the interface. Tomcat port, HTTP port and AJP port
1. Sometimes it will prompt that the (8005, 8080, 8009) port is occupied, it may be because other software occupies one of these three ports (this is The most likely reason is that the Javaw process is occupied),
Then just force it to close.
The above is the detailed content of Detailed graphic and text explanation of tomcat related configuration and eclipse integration in Java. For more information, please follow other related articles on the PHP Chinese website!

Hot AI Tools

Undresser.AI Undress
AI-powered app for creating realistic nude photos

AI Clothes Remover
Online AI tool for removing clothes from photos.

Undress AI Tool
Undress images for free

Clothoff.io
AI clothes remover

AI Hentai Generator
Generate AI Hentai for free.

Hot Article

Hot Tools

Notepad++7.3.1
Easy-to-use and free code editor

SublimeText3 Chinese version
Chinese version, very easy to use

Zend Studio 13.0.1
Powerful PHP integrated development environment

Dreamweaver CS6
Visual web development tools

SublimeText3 Mac version
God-level code editing software (SublimeText3)

Hot Topics
 Square Root in Java
Aug 30, 2024 pm 04:26 PM
Guide to Square Root in Java. Here we discuss how Square Root works in Java with example and its code implementation respectively.
 Perfect Number in Java
Aug 30, 2024 pm 04:28 PM
Guide to Perfect Number in Java. Here we discuss the Definition, How to check Perfect number in Java?, examples with code implementation.
 Random Number Generator in Java
Aug 30, 2024 pm 04:27 PM
Guide to Random Number Generator in Java. Here we discuss Functions in Java with examples and two different Generators with ther examples.
 Weka in Java
Aug 30, 2024 pm 04:28 PM
Guide to Weka in Java. Here we discuss the Introduction, how to use weka java, the type of platform, and advantages with examples.
 Armstrong Number in Java
Aug 30, 2024 pm 04:26 PM
Guide to the Armstrong Number in Java. Here we discuss an introduction to Armstrong's number in java along with some of the code.
 Smith Number in Java
Aug 30, 2024 pm 04:28 PM
Guide to Smith Number in Java. Here we discuss the Definition, How to check smith number in Java? example with code implementation.
 Java Spring Interview Questions
Aug 30, 2024 pm 04:29 PM
In this article, we have kept the most asked Java Spring Interview Questions with their detailed answers. So that you can crack the interview.
 Break or return from Java 8 stream forEach?
Feb 07, 2025 pm 12:09 PM
Java 8 introduces the Stream API, providing a powerful and expressive way to process data collections. However, a common question when using Stream is: How to break or return from a forEach operation? Traditional loops allow for early interruption or return, but Stream's forEach method does not directly support this method. This article will explain the reasons and explore alternative methods for implementing premature termination in Stream processing systems. Further reading: Java Stream API improvements Understand Stream forEach The forEach method is a terminal operation that performs one operation on each element in the Stream. Its design intention is


