
 Web Front-end
CSS Tutorial
Detailed explanation of examples of implementing pull-up prompt pointer animation in css3
Web Front-end
CSS Tutorial
Detailed explanation of examples of implementing pull-up prompt pointer animation in css3
Detailed explanation of examples of implementing pull-up prompt pointer animation in css3

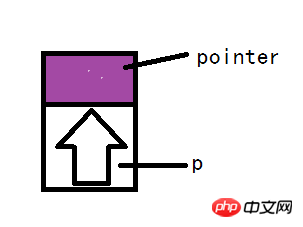
The content to be implemented today is as shown in the figure below:

With the animation properties of CSS3, it is very simple to implement.
html layout:
<p class="pointer">
   <p></p>
</p>
Let the p of .pointer be placed where you want it to be displayed. The p is placed on the pointer arrow diagram, and the p of .pointer is Box, because the box wrapping this arrow needs to move upward, so the height of p is 10px higher than the height of the arrow.
css style:
.pointer{
    position: absolute;
    height: 3.8rem;
    bottom: 3rem;
    width: 100%;
}
.pointer p{
    animation: anima-pointer 2s infinite;
    position: absolute;
    bottom: 0;
    left: 50%;
    margin-left: -1.4rem;
    height: 2.8rem;
    width: 2.8rem;
    background: url("../images/css-sprites.png") -63px 0;
}

/*animation*/
@keyframes anima-pointer
{
    0%   {opacity:0;bottom:0}
    100%  {opacity:1;bottom:10px;}
}
Among them. This is the code in my project. Because I still need to position the p of .pointer, I used position:absolute. You can use other attributes besides static to allow the arrow p to be positioned absolutely relative to the parent element.
Focus on animation:
To use css animation, you must first use @keyframes to declare the animation. Here it is declared as anima-pointer. At 0%, let it stay in place and not display, and then transition to 100%. The transparency is set to 1 and the position is increased by 10px relative to the original position.
Use animation when using animation for the style of arrow p: just follow the animation just declared and some animation properties. For specific animation properties, please refer to the w3c official document. The properties declared here are that the animation lasts for two seconds and the animation is executed in an infinite loop.
The above is the detailed content of Detailed explanation of examples of implementing pull-up prompt pointer animation in css3. For more information, please follow other related articles on the PHP Chinese website!

Hot AI Tools

Undresser.AI Undress
AI-powered app for creating realistic nude photos

AI Clothes Remover
Online AI tool for removing clothes from photos.

Undress AI Tool
Undress images for free

Clothoff.io
AI clothes remover

AI Hentai Generator
Generate AI Hentai for free.

Hot Article
Hot Tools

Notepad++7.3.1
Easy-to-use and free code editor

SublimeText3 Chinese version
Chinese version, very easy to use

Zend Studio 13.0.1
Powerful PHP integrated development environment

Dreamweaver CS6
Visual web development tools

SublimeText3 Mac version
God-level code editing software (SublimeText3)
Hot Topics


 How to make progress bar with h5
Apr 06, 2025 pm 12:09 PM
How to make progress bar with h5
Apr 06, 2025 pm 12:09 PM
Create a progress bar using HTML5 or CSS: Create a progress bar container. Set the progress bar width. Create internal elements of the progress bar. Sets the internal element width of the progress bar. Use JavaScript, CSS, or progress bar library to display progress.
 How to set h5 table border
Apr 06, 2025 pm 12:18 PM
How to set h5 table border
Apr 06, 2025 pm 12:18 PM
In HTML, set H5 table borders through CSS: Introduce a CSS style sheet, style the border using border attributes (including border-width, border-style, and border-color sub-properties), and apply the style to the table elements. In addition, specific border styles can be set, such as border-top, border-right, border-bottom, and border-left.
 How to make h5 click icon
Apr 06, 2025 pm 12:15 PM
How to make h5 click icon
Apr 06, 2025 pm 12:15 PM
The steps to create an H5 click icon include: preparing a square source image in the image editing software. Add interactivity in the H5 editor and set the click event. Create a hotspot that covers the entire icon. Set the action of click events, such as jumping to the page or triggering animation. Export H5 documents as HTML, CSS, and JavaScript files. Deploy the exported files to a website or other platform.
 How to run the h5 project
Apr 06, 2025 pm 12:21 PM
How to run the h5 project
Apr 06, 2025 pm 12:21 PM
Running the H5 project requires the following steps: installing necessary tools such as web server, Node.js, development tools, etc. Build a development environment, create project folders, initialize projects, and write code. Start the development server and run the command using the command line. Preview the project in your browser and enter the development server URL. Publish projects, optimize code, deploy projects, and set up web server configuration.
 How to make pop-up windows with h5
Apr 06, 2025 pm 12:12 PM
How to make pop-up windows with h5
Apr 06, 2025 pm 12:12 PM
H5 pop-up window creation steps: 1. Determine the triggering method (click, time, exit, scroll); 2. Design content (title, text, action button); 3. Set style (size, color, font, background); 4. Implement code (HTML, CSS, JavaScript); 5. Test and deployment.
 How to solve the h5 compatibility problem
Apr 06, 2025 pm 12:36 PM
How to solve the h5 compatibility problem
Apr 06, 2025 pm 12:36 PM
Solutions to H5 compatibility issues include: using responsive design that allows web pages to adjust layouts according to screen size. Use cross-browser testing tools to test compatibility before release. Use Polyfill to provide support for new APIs for older browsers. Follow web standards and use effective code and best practices. Use CSS preprocessors to simplify CSS code and improve readability. Optimize images, reduce web page size and speed up loading. Enable HTTPS to ensure the security of the website.
 How to make the h5 drop-down menu
Apr 06, 2025 pm 12:24 PM
How to make the h5 drop-down menu
Apr 06, 2025 pm 12:24 PM
The Create H5 drop-down menu includes the following steps: Create a drop-down list, apply a CSS style, add toggle effects, and handle user selections. The specific steps are as follows: Use HTML to create a drop-down list. Use CSS to adjust the appearance of the drop-down menu. Use JavaScript or CSS to achieve the switching effect. Listen to change events to handle user selections.
 How to do the h5 progress bar
Apr 06, 2025 am 11:54 AM
How to do the h5 progress bar
Apr 06, 2025 am 11:54 AM
There are two ways to make an H5 progress bar: using HTML progress bar elements and using JavaScript to create a progress bar. The HTML progress bar element method involves creating a progress bar element and setting its maximum and current value, while the JavaScript method includes creating a progress bar container and a function that updates the progress bar.
