

Introduction to Python Basics--Blockchain
The basic concept of blockchain is simple: a distributed database that stores an ever-lengthening list containing many ordered records. The following article mainly introduces you to the relevant information about blockchain for learning Python. The article introduces it in detail through sample code. Friends who need it can take a look below.
Preface
This article will give you a brief introduction to the relevant knowledge about blockchain (BlockChain), and use Python to make a simple implementation. Not much to say below, let’s take a look at the detailed introduction:
What is blockchain
In short, blockchain It is a permanent and irreversibly modified record generated by superimposing (chaining) encrypted data (blocks) in chronological order. Specifically, the blockchain is composed of a series of data blocks generated using cryptographic methods. Each block contains the hash value of the previous block, starting from the genesis block. Start connecting to the current block to form a block chain. Each block is guaranteed to be generated after the previous block in chronological order, otherwise the hash value of the previous block is unknown. It is an important concept in Bitcoin.
Features
The blockchain has the following characteristics:
Decentralization: The blockchain does not rely on a central node, but on distributed nodes.
No trust system required: The blockchain is based on cryptographic algorithms, and data requires approval by other users within the network, so there is no need for a third-party intermediary structure or endorsement by a trust organization.
Untamperable and encrypted security: The blockchain adopts a one-way hash algorithm, and each newly generated block is strictly advanced in linear order according to time. The irreversibility of time causes any Attempts to intrude and tamper with data information in the blockchain can be easily traced, leading to rejection by other nodes, which can limit related illegal activities.
#The above characteristics enable blockchain to have more and more applications in many fields such as banking, securities markets, and finance.
How blockchain works
Blockchain is a series of encrypted data blocks. These blocks consist of a block header containing metadata, followed by a long list of transactions that make up the body of the block. The block structure in Bitcoin is as follows:
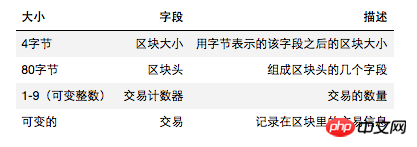
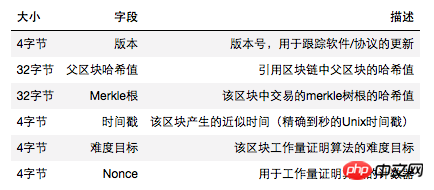
Block header
The block header contains information related to other areas in the blockchain The connection information, timestamp, nonce and other information in the block are as follows:
Block identifier
The block has Two identifiers, one is the hash value of the block header, and the other is the block height. The hash value of the block header is a number obtained by performing a secondary hash calculation on the block header using the SHA256 algorithm. The block hash value uniquely and unambiguously identifies a block, and any node can independently obtain the block hash value by simply hashing the block header. Block height refers to the position of the block in the blockchain. Block height is not a unique identifier. While a single block will always have a clear, fixed block height, the converse is not true and a block height does not always identify a single block. Two or more blocks may have the same block height and compete for the same position in the blockchain.
After understanding the above basics, let’s start using Python to implement a simple blockchain.
Python implementation of blockchain
1. Define the block structure
In [ 16]:
# block.py
import hashlib
import uuid
class Block(object):
def __init__(self, data=None, previous_hash=None):
self.identifier = uuid.uuid4().hex # 产生唯一标示
self.nonce = None # nonce值
self.data = data # 区块内容
self.previous_hash = previous_hash # 父节点哈希值
def hash(self, nonce=None):
'''
计算区块的哈希值
'''
message = hashlib.sha256()
message.update(self.identifier.encode('utf-8'))
message.update(str(nonce).encode('utf-8'))
message.update(str(self.data).encode('utf-8'))
message.update(str(self.previous_hash).encode('utf-8'))
return message.hexdigest()
def hash_is_valid(self, the_hash):
'''
校验区块哈希值有否有效
'''
return the_hash.startswith('0000')
def __repr__(self):
return 'Block<Hash: {}, Nonce: {}>'.format(self.hash(), self.nonce)The above is a block structure. What is implemented here is a simplified version, which does not fully correspond to the blocks in Bitcoin. The block here contains a unique identifier, the hash value of the parent node, the nonce value and the content field of the block. You can see that the hash value of a block must meet certain conditions to be valid, such as starting with 0000. Next, initialize this block structure.
In [37]:
# 创建一个内容为hello world的内容块

block = Block('Hello World')
block
Out[37]:
Block<Hash: 238a65a101c8829d7fc406eb78a71cfc19ad702b437e2c1be8d9061ddb81e900, Nonce: None>
Although the above block has been created, its hash value is not valid.
In [38]:
block.hash_is_valid(block.hash())
Out[38]:
False
Change the value of nonce to get a new hash value.
In [39]:
block.hash(1)
Out[39]:
'a6431938ba10270dfcfdf7a2371312446914fedadf79632c2c0adb3b463f4838'
The hash value was updated, but is not yet a valid hash value. In order to obtain a valid hash value, it is a process of constantly updating the nonce value, or a mining process. Add a mine function below to get a suitable nonce value.
In [78]:
# block.py
import hashlib
import uuid
class Block(object):
def __init__(self, data=None, previous_hash=None):
self.identifier = uuid.uuid4().hex # 产生唯一标示
self.nonce = None # nonce值
self.data = data # 区块内容
self.previous_hash = previous_hash # 父节点哈希值
def hash(self, nonce=None):
'''
计算区块的哈希值
'''
message = hashlib.sha256()
message.update(self.identifier.encode('utf-8'))
message.update(str(nonce).encode('utf-8'))
message.update(str(self.data).encode('utf-8'))
message.update(str(self.previous_hash).encode('utf-8'))
return message.hexdigest()
def hash_is_valid(self, the_hash):
'''
校验区块哈希值有否有效
'''
return the_hash.startswith('0000')
def __repr__(self):
return 'Block<Hash: {}, Nonce: {}>'.format(self.hash(self.nonce), self.nonce)
'''
新增挖矿函数
'''
def mine(self):
# 初始化nonce为0
cur_nonce = self.nonce or 0
# 循环直到生成一个有效的哈希值
while True:
the_hash = self.hash(nonce=cur_nonce)
if self.hash_is_valid(the_hash): # 如果生成的哈希值有效
self.nonce = cur_nonce # 保持当前nonce值
break # 并退出
else:
cur_nonce += 1 # 若当前哈希值无效,更新nonce值,进行加1操作In [75]:
block = Block('Hello World')

# 挖矿,循环直至找到合适的nonce
block.mine()

# 打印
block
Out[75]:
Block<Hash: 000087359d5264153d624556f0a0c6f25cba06e453975c1c02587862e823911b, Nonce: 64751>
至此,第一个有效的区块生成完成,下面开始定义区块链。
二、定义区块链结构
In [81]:
class BlockChain(object):
def __init__(self):
self.head = None # 指向最新的一个区块
self.blocks = {} # 包含所有区块的一个字典
'''
添加区块函数
'''
def add_block(self, new_block):
previous_hash = self.head.hash() if self.head else None
new_block.previous_hash = previous_hash
self.blocks[new_block.identifier] = {
'block': new_block,
'previous_hash': previous_hash,
'previous': self.head,
}
self.head = new_block
def __repr__(self):
num_existing_blocks = len(self.blocks)
return 'Blockchain<{} Blocks, Head: {}>'.format(
num_existing_blocks,
self.head.identifier if self.head else None
)定义好区块链结构后,下面就开始初始化一条区块链。
In [82]:
# 初始化
chain = BlockChain()

# 打印
chain
Out[82]:
Blockchain<0 Blocks, Head: None>
In [83]:
# 添加区块
chain.add_block(block)

# 打印
chain
Out[83]:
Blockchain<1 Blocks, Head: 364c0cf963384ca28a2763499a140405>
In [84]:
# 添加更多的区块

for i in range(6):
 new_block = Block(i)
 new_block.mine()
 chain.add_block(new_block)

# 打印
chain
Out[84]:
Blockchain<7 Blocks, Head: e7cb24ec7acd42a4aaebe7faee9e0713>
以上就是一个简单区块链,后面还会涉及到区块链的有效性。当区块链中一个区块被改变后,这个区块的哈希就会改变,从而影响到这块区块之后的区块,致使这个区块链不再有效。这些将在后续继续深入。
The above is the detailed content of Introduction to Python Basics--Blockchain. For more information, please follow other related articles on the PHP Chinese website!

Hot AI Tools

Undresser.AI Undress
AI-powered app for creating realistic nude photos

AI Clothes Remover
Online AI tool for removing clothes from photos.

Undress AI Tool
Undress images for free

Clothoff.io
AI clothes remover

AI Hentai Generator
Generate AI Hentai for free.

Hot Article
Hot Tools

Notepad++7.3.1
Easy-to-use and free code editor

SublimeText3 Chinese version
Chinese version, very easy to use

Zend Studio 13.0.1
Powerful PHP integrated development environment

Dreamweaver CS6
Visual web development tools

SublimeText3 Mac version
God-level code editing software (SublimeText3)
Hot Topics
 1376
1376
 52
52

 Do mysql need to pay
Apr 08, 2025 pm 05:36 PM
Do mysql need to pay
Apr 08, 2025 pm 05:36 PM
MySQL has a free community version and a paid enterprise version. The community version can be used and modified for free, but the support is limited and is suitable for applications with low stability requirements and strong technical capabilities. The Enterprise Edition provides comprehensive commercial support for applications that require a stable, reliable, high-performance database and willing to pay for support. Factors considered when choosing a version include application criticality, budgeting, and technical skills. There is no perfect option, only the most suitable option, and you need to choose carefully according to the specific situation.
 How to use mysql after installation
Apr 08, 2025 am 11:48 AM
How to use mysql after installation
Apr 08, 2025 am 11:48 AM
The article introduces the operation of MySQL database. First, you need to install a MySQL client, such as MySQLWorkbench or command line client. 1. Use the mysql-uroot-p command to connect to the server and log in with the root account password; 2. Use CREATEDATABASE to create a database, and USE select a database; 3. Use CREATETABLE to create a table, define fields and data types; 4. Use INSERTINTO to insert data, query data, update data by UPDATE, and delete data by DELETE. Only by mastering these steps, learning to deal with common problems and optimizing database performance can you use MySQL efficiently.
 MySQL download file is damaged and cannot be installed. Repair solution
Apr 08, 2025 am 11:21 AM
MySQL download file is damaged and cannot be installed. Repair solution
Apr 08, 2025 am 11:21 AM
MySQL download file is corrupt, what should I do? Alas, if you download MySQL, you can encounter file corruption. It’s really not easy these days! This article will talk about how to solve this problem so that everyone can avoid detours. After reading it, you can not only repair the damaged MySQL installation package, but also have a deeper understanding of the download and installation process to avoid getting stuck in the future. Let’s first talk about why downloading files is damaged. There are many reasons for this. Network problems are the culprit. Interruption in the download process and instability in the network may lead to file corruption. There is also the problem with the download source itself. The server file itself is broken, and of course it is also broken when you download it. In addition, excessive "passionate" scanning of some antivirus software may also cause file corruption. Diagnostic problem: Determine if the file is really corrupt
 MySQL can't be installed after downloading
Apr 08, 2025 am 11:24 AM
MySQL can't be installed after downloading
Apr 08, 2025 am 11:24 AM
The main reasons for MySQL installation failure are: 1. Permission issues, you need to run as an administrator or use the sudo command; 2. Dependencies are missing, and you need to install relevant development packages; 3. Port conflicts, you need to close the program that occupies port 3306 or modify the configuration file; 4. The installation package is corrupt, you need to download and verify the integrity; 5. The environment variable is incorrectly configured, and the environment variables must be correctly configured according to the operating system. Solve these problems and carefully check each step to successfully install MySQL.
 Solutions to the service that cannot be started after MySQL installation
Apr 08, 2025 am 11:18 AM
Solutions to the service that cannot be started after MySQL installation
Apr 08, 2025 am 11:18 AM
MySQL refused to start? Don’t panic, let’s check it out! Many friends found that the service could not be started after installing MySQL, and they were so anxious! Don’t worry, this article will take you to deal with it calmly and find out the mastermind behind it! After reading it, you can not only solve this problem, but also improve your understanding of MySQL services and your ideas for troubleshooting problems, and become a more powerful database administrator! The MySQL service failed to start, and there are many reasons, ranging from simple configuration errors to complex system problems. Let’s start with the most common aspects. Basic knowledge: A brief description of the service startup process MySQL service startup. Simply put, the operating system loads MySQL-related files and then starts the MySQL daemon. This involves configuration
 How to optimize MySQL performance for high-load applications?
Apr 08, 2025 pm 06:03 PM
How to optimize MySQL performance for high-load applications?
Apr 08, 2025 pm 06:03 PM
MySQL database performance optimization guide In resource-intensive applications, MySQL database plays a crucial role and is responsible for managing massive transactions. However, as the scale of application expands, database performance bottlenecks often become a constraint. This article will explore a series of effective MySQL performance optimization strategies to ensure that your application remains efficient and responsive under high loads. We will combine actual cases to explain in-depth key technologies such as indexing, query optimization, database design and caching. 1. Database architecture design and optimized database architecture is the cornerstone of MySQL performance optimization. Here are some core principles: Selecting the right data type and selecting the smallest data type that meets the needs can not only save storage space, but also improve data processing speed.
 How to optimize database performance after mysql installation
Apr 08, 2025 am 11:36 AM
How to optimize database performance after mysql installation
Apr 08, 2025 am 11:36 AM
MySQL performance optimization needs to start from three aspects: installation configuration, indexing and query optimization, monitoring and tuning. 1. After installation, you need to adjust the my.cnf file according to the server configuration, such as the innodb_buffer_pool_size parameter, and close query_cache_size; 2. Create a suitable index to avoid excessive indexes, and optimize query statements, such as using the EXPLAIN command to analyze the execution plan; 3. Use MySQL's own monitoring tool (SHOWPROCESSLIST, SHOWSTATUS) to monitor the database health, and regularly back up and organize the database. Only by continuously optimizing these steps can the performance of MySQL database be improved.
 Does mysql need the internet
Apr 08, 2025 pm 02:18 PM
Does mysql need the internet
Apr 08, 2025 pm 02:18 PM
MySQL can run without network connections for basic data storage and management. However, network connection is required for interaction with other systems, remote access, or using advanced features such as replication and clustering. Additionally, security measures (such as firewalls), performance optimization (choose the right network connection), and data backup are critical to connecting to the Internet.
